When vegetable crops enter the phase of vigorous growth, there is a risk of the stem falling off or breaking under the weight of leaves or fruits. To understand how to tie up tomatoes in a greenhouse, expert advice on choosing fixtures for fixing and support methods will help to fully harvest even the richest crop.
Do I need to tie up the tomatoes?
In attaching tomato stems to a stable support, the need does not always arise. There are varieties whose agricultural technology and hybrid characteristics do not require the installation of supporting rails. For example, garter tomatoes in a greenhouse, if they are limited growth varieties, are useless. Such tomatoes grow up to 40-50 cm in height and have a strong stem that does not fall down. Reasons why tomatoes need to be tied up include:
- Stalk leg rot. Ampel varieties tend to creep, which is why the leaves and flowers are constantly in contact with moist soil. To stop the process of decay and infection of the stalks, the stem is attached to a vertical rail or a stretched cord.
- Low yield. No matter how much you would like to save time, tying up tomatoes in a greenhouse is worth at least for the sake of abundant fruiting. Otherwise, active vegetation of lateral sprouts will begin, stealing vitality from tomato fruits.
- Indeterminacy. Unlimited growth energy cannot be controlled in any other way. The garter is carried out so that varieties with a growth of 2-2.5 m do not reach 3-4 m.

When should you tie up your tomatoes?
The optimal time for giving direction to the growth of tomatoes is determined based on the growth of the cultivated variety. The correct garter of a tomato in a greenhouse assumes that at least 8-10 true leaves have already appeared on the plant, and the thickness of the lower part of the stem will reach at least 1 cm. The following terms for this manipulation are distinguished:
- 35-40 days for early maturing varieties;
- 50-60 days for mid-season varieties;
- 70-80 days for late maturing species.
Tomato garter options
Attachment to the garter is performed according to one of several existing techniques. You can choose a specific one, taking into account factors such as the area of \u200b\u200bthe garden, the number of plants on each ridge and the width of the bushes. The best ways to tie a tomato are on the list:


Garter of tall tomatoes in a greenhouse
The main stem is so strong that the root system that feeds it needs a lot of space and frequent top dressing. fruit longer when watered at the root, so the fasteners of the garter should not get in the way underfoot, otherwise the rods or rope loops will begin to rot when in contact with water. The procedure, revealing how to properly tie tomatoes, includes several steps:
- Loosening the soil to saturate it with oxygen and facilitate compaction of yards or twigs.
- Installation along the edges of the beds of stakes 2.5-3 m in height.
- Attaching cords to stakes and tying tomato stalks to them.
- Adding new cords as the tomato shoots develop.
A garter of medium height tomatoes in a greenhouse
Varieties with fast and high growth are unpretentious, unlike medium-sized ones with a height of the main stem up to 1 m. Tomatoes of medium height require careful care, formation and garter of the bush. The decision on how to tie tomatoes should take into account these features of tomato cultivation. The only optimal scheme in this case is horizontally stretched cords that discipline the side shoots of the plant.
Tomato garter tool
The design for fixing tomato stems, as a rule, is made independently. In garden supply stores you can find its component parts made of high-strength threads, wood, light metal. A device for tying tomatoes in a greenhouse may consist of the following elements:
- twine;
- polyester rope;
- clothespins made of wood or plastic;
- rings for fixing vertical trellises;
- metal rods.
Garter twine tomato
Twine is used to attach vines of ampelous or indeterminate tomatoes to a vertical trellis or wire mesh. In order not to have to decide 2-3 times a year how to tie tomatoes in a greenhouse with twine, if it crumbles or breaks, you need to choose hemp or cotton ropes. Polypropylene twine breaks into pieces, and linen rope soaks in the rain, causing a tomato bush to fall to the ground. The garter is made on one knot and with the condition of free fit of the stem, so as not to disturb the movement of juices to the leaves and ripening tomatoes.

Tomato garter loop
With a free loop, tomatoes are also tied to a vertical trellis or horizontal rails under the ceiling of the greenhouse. Other ways to tie a tomato can damage the stem, while in a soft loop the main stem of the plant lies loose. The loop tying mechanism involves the following steps:
- Cutting twine into pieces of 70-100 cm.
- Two tomato stalks standing side by side are captured with one loop, with the expectation that the length of the ends of the ropes differ significantly at different ends.
- The short end of the twine is brought under the base of the loop.
- The edge of the twine is wound into a loop, tightening the knot.
Clothespins for garter tomatoes
Pintucks on springs or a ring mechanism are called the ideal option for beginners. All other tomato garter methods require at least some experience and gardening tools. With the help of clothespins, tomato stems can be attached to almost any surface:
- side wall of the greenhouse;
- twine hanging from the ceiling;
- horizontal rails;
- neighboring, more resistant plants.

Tomato garter rods
Out of inexperience, gardeners are trying to install wood twigs to support the stems. Their disadvantage is lightness, due to which they are unstable, unable to bear the weight of the plant and gusts of wind. Recently, an opinion has been increasingly expressed about how to properly tie up tomatoes in a greenhouse to increase the reliability of the structure, denying the very possibility of using even wooden stakes for this because of their ability to damage tomato roots. Metal rods for installation in the garden require certain rules to be observed:
- Cutting bars and deburring the edges, especially if a cone-shaped fixture is made from blanks.
- Preparation of the base for the installation of rods. If the soil is too loose, it needs to be compacted by hand or mixed with heavy loam.
- The choice of the depth of immersion of the garter structure in the ground. No matter how much you would like to tie up the tomatoes in the greenhouse as soon as possible, you need to bury at least 30-40 cm of the rod underground.
Many beginner gardeners are interested in why and how they tie up tomatoes. Tomato is a rather capricious and demanding crop that requires increased attention in the process of growing. There are several simple ways to get a good crop of tomatoes.
Carefully tied beds make it easy to care for plants. No matter how strong the stems of plants are, in the process of fruit ripening, they begin to bend to the ground, becoming a delicacy for slugs and worms, and sometimes they can break. This is especially true for tall tomatoes that can reach two meters in height.

A simple procedure for tying tomatoes will bring great benefits to the future harvest and save them from typical problems. Why is a tomato garter useful for a beginner gardener?
- It is important to water tomato bushes under the root, without affecting the tops and fruits, so as not to provoke the appearance of burns on them under the influence of sunlight. Seedlings lying on the ground cannot be watered in this way.
- Tomato fruits will not be available to caterpillars, slugs, mice and other pests, as they will be located above ground level.
- The stem, leaves and fruits will be protected from excessive moisture and decay.
- The stem will not bend or break under the weight of the crop.
- Securely tied tomatoes will not die from heavy rains that can harm the plant with powerful blows, causing damage to the bushes.
- Garter tomato in the open field allows you to make tomato bushes as open as possible to the sun's rays, which will give them the opportunity to fully develop.
- Garter tomatoes will allow you to effectively carry out the spraying procedure to prevent all kinds of diseases.
- Growing tomatoes is impossible without carrying out procedures such as pinching, mulching. Tying tomatoes will make these processes easier.

How to tie tomatoes
With the development of vegetable growing, several options have been developed and taken root, how, with the help of tying, success in growing tomatoes can be achieved. Here are the main ways to garter tomatoes:
- pegs;
- cells;
- tapestries;
- caps;
- hooks.
With the help of pegs
Many beginner gardeners are interested in the question - how to tie tomatoes to pegs? Using pegs is the most common way. It is important to use it on time. How to use it for a garter for a tomato? It is necessary to choose the appropriate height of each peg, corresponding to the dimensions of the bush. Tall seedlings will need pegs 2-2.5 meters high, medium-sized - much lower. To properly tie tomatoes, you need to use stakes, the height of which is 30 cm more than the height of the tomato bushes.
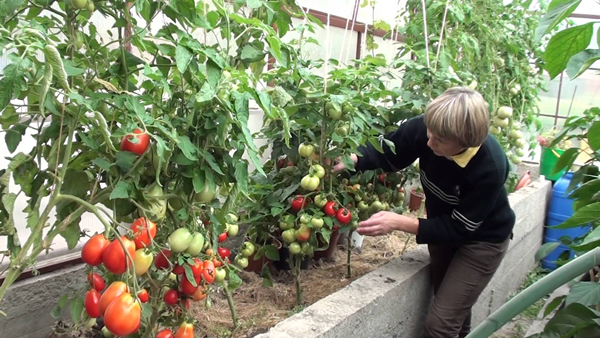
Each peg must be firmly fixed in the ground, deepening it by 30 cm. It should be located at a distance of 10 cm from the tomato stem so as not to damage the roots (photo 1). The tomato should be tied loosely enough. First you need to tie the twine to the support, then wrap the stem without effort and tie it. As the plants grow, the tomato garter is repeated several times.
It is worth noting that it is important to pre-burn wooden pegs and slats in a furnace or on a fire before installation. A garter on supports with charred ends can be used for a long time, otherwise the pegs will rot by the end of the season.

With the help of cells
When tying, you will need blanks in the form of circles made of thick wire. They need to be attached to metal supports, thus obtaining a strong cage in the form of a cylinder. The structures will be needed in large quantities - one for each bush. It is necessary to dig each cell to a depth of 15-20 cm and tie a seedling to it (photo 2).
Instead of wire and rebar cages, you can make wooden ones by driving one support near individual tomato bushes to get a square cage. It will be much stronger than pegs.
Such designs will last more than one year, although it will take a little effort to make them. As the tomatoes grow in the open field, the tying must be repeated several times.

On trellises
Successful cultivation of tomatoes is also possible thanks to tying bushes on trellises. The method consists in the fact that wooden supports about 3 m high are driven into the soil at opposite ends of the beds. If the beds are too long, several supports can be driven into one row at a distance of 2-4 m from each other. To their upper part as tightly as possible with the help of nails, you need to nail the slats to get a frame. We stretch the wire horizontally on the supports, the lower one should be located at a height of 25 cm from the ground.
On the resulting frame, you need to make garters for a tomato in the form of a grid using soft wire or nylon rope. The trellis will serve as a solid support for growing bushes, especially if you install it on both sides of the beds. Such a wicker structure is not afraid of any wind (photo 3).

Growing tomatoes on trellises allows you to tie individual bunches with pouring fruits so that they do not bend under their weight.
Supports in the form of caps
You can tie tomatoes in the open field on supports in the form of caps (pyramids). Seedling holes must be prepared by forming a triangle with sides of 35-40 cm. A column about 3 m high is driven in the center of the triangle, from the top of which 3 equal pieces of wire are pulled. They become a support for 3 plants at the same time.
Such "wigwams" can be made from any improvised means - ropes, twine, vines. To cover 4 bushes, you can use a larger number of guy rods with transverse weaving in the form of a cage (photo 4).

Crocheting tomatoes
As a garter for tomatoes, it is convenient to use hooks that will effectively perform their function all summer long. With the help of hooks, the strongest supports for growing giant plants are obtained. This method seems rather complicated for tying tomatoes in the open field, but it is the one that is optimal for tying up tall tomato bushes.
Along the entire length of the beds, you need to stretch the wire or rope, attaching it to the supports installed in the same way as for tying with trellises. From a used bicycle tube or old socks, tights, rings should be cut, and hooks should be made from dense, strong wire. Near each bush, you need to stretch the fishing line, place loops on it at a distance of 20-25 cm from each other, thread hooks into them, and the design is ready. It remains to bring the rings under the desired branches, bend them in half and thread hooks into them. As the bush grows, the garter is repeated, only the ring is put on the hook located above.
Plants tied in this way are not damaged, because the soft material does not cut into them, and the clusters do not break under the weight of the pouring fruits.
How to tie up tomatoes (video)
Related posts:
No related entries found.
Indeterminate tomato varieties are more suitable for planting in a greenhouse - those in which growth is not limited. Therefore, it is so important to tie up the bushes for normal development and fruiting. The microclimate in the greenhouse itself contributes to the rapid growth of tomatoes. Culture loves high temperature and humidity. Tall varieties of tomatoes cannot be grown without the use of a support. If this technique is not used, the stem may break off under the weight of the fruit, or the plant begins to creep along the ground.
The garter facilitates plant care and improves breathability, thereby significantly reducing the risk of fungal diseases. The fruits begin to receive more light, which contributes to their accelerated ripening. A tied stem will not break off, even if many fruits form on it, and harvesting will be much faster.
The optimal time for tying a tomato in a greenhouse depends on their age and growth. According to the rules, this must be done when 8-10 true leaves are formed on the bushes, and the trunk in the lower part will have a thickness of 1 cm or more. This procedure also depends on the timing of ripening tomatoes. The garter is carried out:
- 35-40 days for early maturing varieties;
- 50-60 days for mid-season varieties;
- at 70-80 days for late-ripening species.
A feature of tall varieties is a powerful central stem and a highly developed root system, which requires frequent watering and top dressing at the root, so they should be tied up in such a way that there is no contact of the garter with water. Stakes 2.5-3 m high are installed along the edges of the beds, to which cords are attached, and then tomatoes are tied to them. As the stems grow, new garter cords are added.
If varieties of medium height tomatoes are grown in a greenhouse, they require more thorough care than tall species. The optimal garter scheme in this case is horizontally stretched cords, on which side shoots are fixed to give them the correct direction of growth.

The garter procedure requires compliance with a certain technology. You will need to follow the following procedure:
- pre-pasynkovanie bushes;
- choose an individual support for a specific type of tomato;
- prepare materials for work;
- to make a garter;
- water each plant.
It is better not to use synthetics or plastic as garters. The choice should be stopped on natural fabrics, but you need to remember that they are only suitable for one-time use. For a classic tomato garter, you will need:
- metal rods or wooden stakes;
- wire or twine;
- cut strips 3-4 cm wide of cotton fabric.
Attention! Fishing line or thin rope is not suitable for tying tomatoes. As the bushes grow, such material will dig into the stems and interfere with their normal nutrition. An incorrectly produced garter can easily ruin the entire crop.
Stakes are driven in from the north side of each bush and then the tops of the stems are tied to them with strips of fabric, making 2-3 turns around the peg. As the bush grows, it is necessary to move the garter higher, or use a new one.
How to tie up tomatoes in a greenhouse: video

On sale now you can find plastic lattice supports, specially designed for tying tall bushes. The fixtures are reusable and do not require any additional materials other than strips of cloth.
On a note! By the way, many summer residents successfully use old nylon tights for tying up tomatoes, which can be washed and used repeatedly.
The linear method is also quite convenient. In this case, strips of fabric are tied to horizontally stretched cords or wire opposite each bush, with which the tomato stalks are then fixed. In this case, re-tying the bush is not required, since during growth the shoots themselves will wrap around the rope.

The method using tapestries is considered reliable, but it is also the most technically complex. Each of the tapestries is a frame made of wood or metal with horizontal metal rods, or dense twine, stretched in the form of strings horizontally in increments of 30-35 cm.
As they grow, the shoots are simply woven between the stretched rows of twine, multiple brushes can be hung with plastic hooks from the same strings. With this method of tying, you can leave a few additional stepchildren, since the trellis is quite capable of holding even a powerful bush, and in this case the crop will be larger.
Useful tips when building a garter:
- It is impossible to tie the stem to the support with the "eight", in this case there is a risk of squeezing the stem and preventing it from developing normally.
- When forming fruits, also tie up brushes, this will make it possible to guarantee the preservation of the crop.
- For tall varieties, the trellis method of tying is more suitable. And for medium-sized ones - a garter using individual rods or stakes.
- Tie up tomatoes in a timely manner to prevent lodging of the stems and their contact with the soil - this way you will reduce the risk of late blight.
- Carry out the garter at the moment when the stem is just beginning to slope, do not allow it to be severely deformed.
- Always leave a gap of 1-2 cm between the shoot and the support, this margin will help the stem thicken unhindered.
If you have a large greenhouse, it makes sense to purchase a special device - a garter. The principle of its operation is the same as that of a stapler. The binder fixes the stem near the support with a special tape, which speeds up the procedure and eliminates the need for consumables.
Tomato garter in the greenhouse: video
The seedling is transferred to the greenhouse when it is strong enough, 8-10 leaves have formed on each bush, and the growth of the bushes is about 30 cm. For normal growth in a new place, it needs to provide suitable conditions.
Observe the temperature regime: during the day 25-28 degrees, at night not lower than 17-18 degrees.
Humidity should be at around 75%, this is facilitated by timely ventilation. Excess dampness inside the greenhouse can give rise to a lot of diseases in tomatoes. It is better to water the bushes in a basal way. If possible, install a drip irrigation system.
- Water should soak the soil to a depth of 15-20 cm. In this case, good contact of the roots with the soil will allow the plants to take root faster in a new place.
- Manual watering is carried out after drying the topsoil.
- Immediately after moistening, the ground around the tomatoes should be slightly loosened to provide oxygen to the roots.
- At the beginning of flowering, the watering rate is reduced to 1-2 liters per bush to curb the growth of green mass and actively form ovaries.
- When pouring fruits, watering should again become plentiful. The soil is watered every 2-3 days, soaking it to a depth of 20-30 cm. In the heat, watering should be daily.
The garter of the bushes is carried out on average 7-10 days after transplanting the seedlings into the greenhouse, using an individual or trellis method. If you do not remove the stepchildren, they weaken the bush and this negatively affects the amount of the crop.

Tall varieties need to be formed into one stem with the removal of all side shoots. And after the formation of the 7th fetal brush, the top of the main stem is also pinched. It is better to break out stepchildren with your hands - this way the plant is less injured. Medium-sized varieties are usually formed in 2-3 stems.
During flowering, it is necessary to help high-quality pollination of flowers. To do this, in windy weather, windows are opened in the greenhouse, creating a draft that mixes the pollen. Some summer residents lure pollinating insects into the greenhouse by planting honey plants there. You can pollinate plants artificially by shaking brushes or by pollinating them with a toothbrush yourself.
Contains potassium and phosphorus. Fertilizer is better to give on the leaf, in this case, the nutrients are absorbed by the plants faster. You can use superphosphate, potassium monophosphate and industrial complex fertilizers (Master Agro). Feed every 7-10 days. During the fruiting period, the bushes are fertilized under the root with slurry, chicken manure and superphosphate, alternating organic and mineral top dressing.
Helpful advice! From folk remedies, you can use yeast top dressing, a milk solution with iodine, an infusion of nettle and wood ash.
Treat the bushes with copper sulphate, foundationazole, phytosporin, using them according to the instructions. From folk remedies, you can use an infusion of garlic as a prophylaxis (1 kg of peeled garlic cloves in a bucket of water, leave for 7 days, strain and spray tomatoes).
Formation and care of tomatoes in greenhouses: video

When growing tomatoes in a polycarbonate greenhouse, there are some subtleties that directly affect the quality of the crop:
- Before each planting in the greenhouse, fresh soil should be added to the soil or replaced completely.
- Planting bushes in a checkerboard pattern can significantly save space by reducing the distance between rows to 40 cm.
- After watering, the greenhouse windows must be opened - this will prevent condensation on the walls and reduce the humidity level to normal values.
- in the morning or evening hours. The water temperature should be equal to the soil temperature.
- The introduction of root dressings should be carried out only after watering.
- Pasynkovanie bushes are best done in the morning, at this time the shoots are more fragile. In addition, until the evening, the wounds will have time to heal.
- To stimulate the formation of ovaries, the bushes are sprayed with a special preparation "Ovary" or a solution of boric acid (1 tsp per 10 liters of water).
- If the bushes look powerful and strong, but the formation of ovaries does not occur, then the plants have accumulated an excess amount of minerals. In this case, you should stop watering and increase the temperature to 25 degrees.
- During the ripening of the fruit, the soil should not be allowed to dry out, otherwise the tomatoes will crack, which will reduce their shelf life. The vents during this period should always be open so that oxygen enters.
- In order for the fruits to ripen faster, the bushes should be slightly pulled out of the soil before harvesting. For the same purpose, cut off all the leaves next to the fruit brush.
Growing tomatoes in a polycarbonate greenhouse is a painstaking and troublesome business. But if you follow all the rules of planting and care, any summer resident can grow an excellent crop.
Tomatoes are a traditional crop grown in gardens and cottages. Despite the fact that the choice of these ripe fruits in the store is quite wide, many people prefer homemade tomatoes. Among the varieties of this culture, there are tall, short, medium-sized plants, but most often summer residents opt for the former.
But when growing such tomatoes, you need to know how to tie tomatoes. Tall tomatoes are cultivated both in greenhouses and in open ground. Despite the fact that these plants are more capricious and require careful care, they are loved for their large and tasty fruits. One of the important stages of growing tomatoes is the garter. Therefore, in order for tomatoes to grow better, it is important to know how to properly tie up tomatoes.
Garter Rules
Abroad, in open ground, tomatoes are often grown without a garter, the stems lie on the ground. This method of growing tomatoes is favored by the hot southern climate. In our latitudes, untied lying bushes in the open field will quickly begin to rot and hurt, and summer residents who use this method risk being left without a crop. Therefore, it is better to tie them up. Garter tall tomatoes in the open field has a lot of advantages.
- Firstly, it greatly facilitates watering and fertilizing, since tomatoes do not tolerate water on the tops, and even more so that the solution intended for the roots gets on it.
- Secondly, tied plants are well ventilated and dried after rains, so they are less likely to get late blight and other diseases. Humid warm environment is favorable for the development of diseases.
- Thirdly, the fruits on the tied bushes are illuminated more evenly, which means they will ripen faster. But in order not to damage tall tomatoes in the open field when tying, you must follow simple rules. In general, they relate to the choice of materials. For tying, do not use wire, fishing line, thin rope and other similar materials. They will cut into the stem and damage it. Thus, the plant will begin to hurt, and bacteria and various pathogens will quickly penetrate the wound.
Garter material is best used synthetic, such as nylon stockings or tights. You can also use a thick nylon cord, rope or twine. Such materials will not rot. Plants should not be tied tightly, the rope should hold the stem, but not dig into it. Do not use last year's garter material, as pathogens or bacteria may remain in it. It is necessary to tie up tall tomatoes only in proven ways.
Ways to tie a tomato
Proper tying should provide soft but firm support, and should not damage tall outdoor plants. To do this, you need to use the proposed methods.
Garter for pegs
This is a long-tried and proven method that provides reliable support for weak stems of tomatoes. To tie tomatoes on pegs, you need to choose several stakes of a size corresponding to the declared height of the plants. Then the garter material is cut from the rope or cords.
Near each bush, one peg is driven into the ground; it can be wooden or metal. The garter material is pre-disinfected by boiling in water. The stem of the tomato is tied up near the top. The rope must be loosely wrapped several times and tied into a knot. In the process of growing a bush, the rope can be moved up or another garter can be made, and the old one removed.

tie for trellis
Tying to a trellis will securely fix tall tomatoes in open ground and will prevent them from falling. A simple trellis is easy to make with your own hands. To do this, you need wooden supports, nails, wire and slats. As a support, you can use a wooden or metal column in the amount of 3 pieces.
The height of the column should be approximately 3.5 meters. So that after installation, the height above the ground is 3 meters. Supports are installed in one row with an interval of 4 meters. In the upper part of the supports, slats are installed, pinned with nails. Then, along the supports, the wire is pulled in three rows with an interval of 1 meter. Thus, a horizontal fence of three wires should be obtained.
The lowest wire is installed 20 cm from the ground. After installing the frame from a nylon rope, you need to weave a mesh with cells. To do this, a rope is wound on the wire every 20 cm. You need to make a trellis before planting tomatoes. Then they are planted to the trellis and, as they grow, they are directed upwards.
Linear way
This is another version of the trellis garter, but simpler. In the same way as in the previous version, supports are installed, and the wire is pulled in one row. Above each plant, a rope is tied to the wire to secure the tomato stems. The other end of the rope is wrapped around the stem and tied. It is not necessary to tie up such tomatoes, as the stem grows, it is necessary to wrap it around the rope and it will be securely fastened.
Using cages for tomatoes
To fix tall bushes in the open field in this way, you need to make an individual cage for each of them. It is made of hard wire and metal arcs. The arcs are bent and installed on planted bushes, then they are connected with wire. The planted plant is tied with a rope to the cage frame.
Another option is landing in pyramidal caps, which are made from 4 rods. This cap is designed for 4 plants. It is dug in when planting tomato seedlings, and the tops of the rods are connected with wire.
Hook garter
This method is somewhat similar to a garter to a trellis. High stakes are dug along the edges of the tomato beds. A wire is pulled between them, every 30 cm a fishing line with rings and hooks is tied on it.
Hooks are used to attach tomato stems. This method is quite effective, but time-consuming and inconvenient to use, so it is not often used.
By tying your tomatoes in any of the proposed ways, you can be sure that they will be securely fastened and will not fall.
As soon as the first spring sun warms up, it becomes lively in summer cottages - someone is loosening the ground, someone is digging. Everyone wants to harvest a rich harvest in the fall. Summer residents are doing their best to grow tomatoes. Everyone does it differently - some people collect tomatoes in large quantities and do not know what to do with them, and some people have only a few fruits on a bush.
Why is this happening? The opinion of many people is based on the fact that tomatoes "love" or not the place and the person who cares for them. Actually it is not. To grow this unpretentious garden crop, it is important not only to prepare the soil, it is also necessary to feed the plants, water them often, because tomatoes are 80% water, and also stepchild and tie them up in time. It is on how much this part of the work will be done correctly that the future harvest depends.
Why you need to tie up tomatoes
Most gardeners theoretically know and even adhere to some rules for growing tomatoes. Most manage to get a good harvest, but you can make an effort, take a little time and pay more attention to growing tomatoes. If everything is done correctly, then, starting from the beginning of August and ending in late autumn, you can harvest a good tomato crop.
If we have already familiarized ourselves with how to properly grow seedlings and stepson tomatoes, then not everyone knows how to properly tie up tomatoes.
Why you need to tie up tomatoes:
- it is important that the fruits do not fall to the ground and do not touch it;
- you need to tie up not only tall, but also undersized varieties of tomatoes;
- when tying a plant, it is undesirable to use a thin rope, fishing line or wire, as they can damage the delicate stems of tomatoes. It is better to use nylon tights or cut an old sheet into strips;
- you can not leave garter material from last year to tie tomatoes next year - this way you can infect plants.
Why else do you need to tie up tomatoes? According to experienced summer residents, even if you have an undersized tomato variety and low bushes, when you tie them up correctly, you can enhance the growth of the root system. This means that she will become stronger, receive more nutrition, which she will then transfer to the fruits.
An important rule that it is advisable not to miss even at the first stage - planting tomato seedlings. As soon as you plant the seedlings, prepare the pegs in advance. They need to be installed at a distance of 10 cm from the future bush, and then immediately perform a garter in the form of the number "8". In addition, when tying, you can use tapestries, then there is a chance to save on the consumption of garter material (rope or fabric strips).
And yet, properly tied tomatoes will bear fruit well, the bushes will become stronger, but at the same time they will not break. Those plants that mature and rest on pegs will be protected from slugs. In addition, if the summer turned out to be rainy, then the tomatoes can be saved from decay. The garter is also very important to ensure normal ventilation of the plants - they will be well ventilated and warmed up evenly, and in order to spray them in order to protect against phytophthora, much effort is not needed.
How to tie up tomatoes correctly can be seen in the photo:


Tomato garter material
A wooden peg, an ordinary strong stick or a trellis can serve as a support for a garter of plants. You can also use metal reinforcement as a support.
Most often, summer residents prefer tying tomatoes on a trellis. This is a support specially designed for tying climbing horticultural and horticultural crops. The design may differ - it may be vertical supports made of metal or wood, between which a plastic mesh is stretched. By the way, the mesh can be different, metal or woven independently from a strong rope. The grid can also be replaced with wooden pegs that are driven into the ground. But the best option is still a ready-made design for growing tomatoes on a trellis.

By the way, you can adapt and grow tomatoes right next to buildings, for example, plant tomatoes near a greenhouse, and use one wall as a support. To do this, you need to stretch a trellis plastic mesh on the wall of the greenhouse on one side, and on the other hand, if you planted tomatoes in several rows, install support pegs and also stretch the mesh.
As a "dressing" for plants, you can adapt old linen, sheets, or use nylon tights. This material will withstand 1 season, and maybe several. If you plan to use the same material for tying tomatoes in the new season, then it must be processed. To do this, the tapes are washed in hot water with laundry soap or simply boiled for several minutes. This is necessary in order to prevent pests from infecting young tomato bushes, as they multiply very quickly and the larvae can remain on the tape for a long time.
How to make a simple trellis design yourself
There is nothing complicated about gartering tomatoes. The main thing is desire and some free time.
What materials will be needed:
- wooden supports;
- slats;
- nails;
- wire.
First you need to prepare 3 supports, it can be a wooden post or a metal one. The height of the support above the ground is 3 m. The columns are installed in 1 row at a distance of 4 m from each other. If you have a large tomato plantation, then you need to prepare more columns.
We will also need wooden slats to connect the top of the supports and nails. We nail the rails to the supports as tightly as possible.

We fix the end of the wire on the extreme supports. We do this work further, in increments of 1 m. If we took 3 pieces of supports, then we should get 3 wires, in the lower part it will pass at a distance of 20 cm from the ground.
That's all, we have prepared a frame for the trellis. Now the next stage is the installation of the frame. We need soft wire, rope or nylon thread. The material must be cut into equal segments, 4.5 m long. Now let's get to work - you need to fix the free end of the rope on the support and twist it on the wire 1 time so that the rope does not move. Every 20 cm we wind the next rope on the transverse wire to the very bottom. Our task is to “weave” a grid that will have the same cells. In total, we need about 6 such woven "panels".
This part of the work can be done in the fall, when the harvest is harvested and the soil is to be prepared for the new season. Just at this time, you can dig a small trench (approximately 60 cm wide), the depth of the trench is half a meter. Do not throw the soil that we dig far, we will need it.
Now our actions are as follows: we take 6 identical parts of manure (preferably horse) and mullein, 3 parts of pure wood (without impurities) ash and goat droppings and 1 part chicken. All this is combined, mixed and laid in a prepared trench to the brim. And now we just have to cover our natural fertilizer with soil. Just during the winter, the trench will sit down a bit and in the spring you can start work.
What we do in the spring: prepare a groove for planting tomato seedlings. The depth of the groove is approximately 15 cm. We plant tall varieties of tomatoes directly through the trellis.
Caring for plants is simple - as they grow, they are directed upwards so that they curl around a rope or wire. In order not to spud the ground, the beds can be covered with leaves or dry chopped straw.
As a result of such a garter of tomatoes, you can collect a bucket or a little more tomatoes from 1 bush. As a result of growing vegetables on a trellis, you can get rid of many diseases, the bushes will be well ventilated. In addition, harvesting is a pleasure.

Advantages of the trellis method of tying tomatoes:
- you can walk between the rows to care for the aisles and harvest;
- tomatoes will be well ventilated, which means the leaves (especially the lower ones) will not “sweat” and rot;
- mold spores (late blight) will not multiply, as there are no favorable conditions for the reproduction of bacteria;
- tomatoes are visible and visible, and harvesting will be much easier, since there is no need to turn and tilt the branches.
How to tie tomatoes on support stakes
Metal fittings, a plastic pipe or a wooden stick are suitable as support pegs. The height of the support depends on the variety of tomatoes. For tall plants, 2 m in length is enough (sometimes 3), and for undersized plants, 1 m will be enough.
The pegs must be driven into the ground so that they hold firmly and do not loosen, because as the plant grows, the load on the support will increase. Therefore, we dig in pegs to a depth of 20 cm. The distance between plants is 5 or 10 cm. Pegs must be driven in simultaneously with planting seedlings.

Further, after the supports are installed, you immediately need to tie a clothesline (fabric) to the support or make ribbons of the right size from an old sheet. We wind the rope around the support and the tomato bush crosswise, and then we fix it on the support so that it does not come undone.
Garter of tomatoes on linear trellises
Mark the place of the future beds. Install supports on both sides (these can be stakes, tubes or thick wooden sticks). The height of the support is 2 or 3 m. Between the supports you need to install a crossbar or pull a rope (but not thin so that it does not damage the stems of the plant). We tie a rope to the crossbar so that each plant has its own support, along which the tomatoes will curl as they are pulled out. The lower end of the rope must be tied to the stalk of tomatoes.

How to tie tomatoes in a greenhouse
You need to tie up tomatoes in a greenhouse a little differently. For example, you can install metal rods from each edge of the garden once for many years in a row. Then connect them together with wire or other durable material.
Next, a dressing is tied to each bush on one side and to the wire so that the bush is vertical. When the tomatoes are gradually pulled out, the rope is pulled up. The task of adjusting the rope is to align the bush so that it is vertical.

Rigid and thin garters should not be used, as well as wire, as this material can damage thin, still fragile stems and young shoots. Dressing material is better to take soft and thick. An old sheet, any thin knitwear (t-shirts, T-shirts, underwear) is just right.
You can not stretch the time so as not to miss the moment of tying, otherwise the bushes will grow crooked and then it is impossible to straighten them.
There is another way of gartering, when a small peg is placed next to the bush, and seedlings are immediately tied to it. Next, from the peg, you need to stretch a ribbon or rope to tie the plant. If the fit is thick, then the loop should be loose when tying. Tie up individual tomato branches in a trellis. It is strictly forbidden to pull shoots together with each other. Tomatoes should grow freely, and so that they do not break or collapse, a garter is just what is needed.
If you have chosen the trellis method of tying tomatoes, then when growing a tomato in a greenhouse, you need to remove the lower leaves. Humidity in the greenhouse is high and plants can become infected with late blight.
In an adult tomato, the lower part (30 cm from the ground) should remain free.
If, nevertheless, the plant has become infected with late blight, then the leaves must be removed from the lower part completely, up to the brush. If everything is in order, then the leaves must be removed sequentially, every 3 days, 1-2 leaves.
It is important that the dressing is free both when growing tomatoes in the greenhouse and in the open field. Crash into the stem and literally cut it, the material should not. So don't skimp on string or old sheets. And if you have no time to do this, go to a specialized store, where you can buy accessories for tying tomatoes - clothespins, rings or a coarse plastic mesh. Such material will serve you for many years.
You can learn how to tie up tomatoes from this video: