All the high-voltage generators discussed above had a capacitor as an energy storage device. Of no less interest are devices that use inductance as such an element.
The vast majority of designs of this kind of converters in the early years contained a mechanical inductance switch. The disadvantages of such a circuit solution are obvious: increased wear of contact pairs, the need for their periodic cleaning and adjustment, and a high level of interference.
With the advent of modern electronic switches, the designs of voltage converters with switched inductive energy storage have become noticeably simplified and become competitive.
The basis of one of the simplest high-voltage generators (Fig. 12.1) is an inductive energy storage device.
Rice. 12.1. Electrical circuit of a high-voltage generator based on an inductive energy storage
The rectangular pulse generator is assembled on a 555 chip (KR1006VI1). The pulse parameters are regulated by potentiometers R2 and R3. The frequency of control pulses also depends on the capacitance of timing capacitor 01. Pulses from the output of the generator are supplied through resistor R5 to the base of the key (switching) element - powerful transistor VT1.
This transistor, in accordance with the duration and repetition rate of the control pulses, switches the primary winding of transformer T1.
As a result, high voltage pulses are formed at the output of the converter. To protect transistor VT1 (2N3055 - KT819GM) from breakdown, it is advisable to connect a diode, for example, type KD226 (cathode to collector) parallel to the emitter-collector transition.
The high-voltage generator (Fig. 12.2), developed in Bulgaria, also contains a master square-wave generator on a 555 chip (K1006VI1). The pulse frequency is smoothly controlled by resistor R2 from 85 to 100 Hz. These pulses are sent through RC circuits to the switching elements on transistors VT1 and VT2. Zener diodes VD3 and VD4 protect transistors from damage when operating an inductive load.

Rice. 12.2. Circuit of a high voltage generator based on an inductive energy storage device
The high voltage generator (Fig. 12.2) can be used either independently - to obtain high voltage (usually up to 1...2 kV), or as an intermediate stage of “pumping” other converters.
Transistors BD139 can be replaced with KT943V.
Powerful bipolar transistors have been used for many years as key elements of converters with inductive energy storage. Their disadvantages are obvious: the residual voltages on the open switch are quite high, resulting in energy losses and overheating of the transistors.
As field-effect transistors improved, the latter began to push aside bipolar transistors in power supply circuits and voltage converters.
For modern high-power field-effect transistors, the open switch resistance can reach ten...hundredths of an Ohm, and the operating voltage can reach 1...2 kV.
In Fig. Figure 12.3 shows the electrical circuit of a voltage converter, the output stage of which is made using a MOSFET field-effect transistor. To match the generator with the field-effect transistor, a bipolar transistor with a high transmission coefficient is included.

Electrical circuit of a high-voltage pulse generator with a key field-effect transistor
The master oscillator is assembled on the /SMO/7-chip CD4049 according to a standard circuit. Both the output stages themselves and the control signal generation stages shown in Fig. 12.1 - 12.3 et seq. are interchangeable and can be used in any combination.
The output stage of the high voltage generator of the electronic ignition system designed by P. Bryantsev (Fig. 12.4) is made on a modern domestic element base.
When control pulses are applied to the input of the circuit, transistors VT1 and VT2 open briefly. As a result, the inductor is briefly connected to the source

Rice. 12.4. Diagram of the output stage of P. Bryantsev’s high voltage generator using a composite transistor

Rice. 12.5. Electrical circuit of a high voltage generator with a master oscillator based on Schmitt triggers
nutrition. Capacitor C2 smoothes out the peak of the voltage pulse. The resistive divider (R3 and R5) limits and stabilizes the maximum voltage at the collector of transistor VT2.
The B115 ignition coil was used as transformer T1. Its main parameters: Ri=1.6 Ohm,\ The following two circuits of high-voltage voltage generators using inductive energy storage devices (Fig. 12.5, 12.6) were developed by Andres Estaban de la Plaza. The first of the devices contains a master rectangular pulse generator, an intermediate and output stage, and a high-voltage transformer. Electrical circuit of a high voltage generator with a master oscillator based on an operational amplifier The master oscillator is based on a Schmitt trigger (KMO/7-chip type 4093). Using a Schmitt trigger instead of NOT logic elements (see, for example, Fig. 12.3) allows you to obtain pulses with steeper edges, and, therefore, reduce energy losses on key elements. Coordination of KMO/7-elements with power transistor VT2 is carried out by a preamplifier on transistor VT1. Output transformer T1 is switched by power bipolar transistor VT2. This transistor is installed on the heat sink plate. The pulse frequency of the generator is changed stepwise by switch SA1. The ratio between the pulse duration and pause and the pulse repetition rate are smoothly adjusted by potentiometers R1 and R2. Switch SA2 turns on/off resistor R6 connected in series with the primary winding of the step-up transformer. Thus, the output power of the converter is adjusted stepwise. The operating frequency of the generator in its five subranges is adjustable within 0.6...8.5 kHz; 1.5…20 kHz; 5.3…66 kHz; A3…MO kHz; 43…>200 kHz. The primary winding of transformer T1, wound on a core from a horizontal scan transformer, has 40 turns with a diameter of 1.0 mm. The output voltage of the converter at frequencies below 5 kHz is 20 kV, in the frequency range 50...70 kHz the output voltage decreases to 5... 10 /sv. The output power of the high-frequency signal of the device can reach up to 30 W. In this regard, when using this design, for example, for gas-discharge photography, it is necessary to take special measures to limit the output current. Vuovolt generator, fig. 12.6, has a more complex design. Its master oscillator is based on the operational amplifier DA1 (CA3140). To power the master oscillator and buffer stage (DDI chip type 4049), a 12 S voltage stabilizer is used on the DA2 type 7812 integrated circuit. The pre-terminal cascade on complementary transistors VT1 and VT2 ensures the operation of the final cascade on the powerful transistor VT3. The duration/pause ratio is adjusted with potentiometer R7, and the pulse frequency with potentiometer R4. The generation frequency can be changed stepwise by switching the capacitance of capacitor C1. The initial generation frequency is close to 20 kHz. The primary winding of the modified horizontal scan transformer has 5 ... 10 turns, its inductance is approximately 0.5 mH. The output transistor is protected from overvoltage by turning on the varistor R9 in parallel with this winding. Transistor 2N2222 can be replaced with KT3117A, KT645; 2N3055 - on KT819GM; BD135 - on KT943A, BD136 - on KT626A, diodes 1N4148 - on KD521, KD503, etc. The DA2 microcircuit can be replaced with a domestic analogue - KR142EN8B(D); DDI - K561TL1. The next type of high-voltage voltage generators are self-oscillating voltage converters with inductive feedback. A self-excited pulse converter produces packets of high-frequency high-voltage oscillations (Fig. 12.7). Rice. 12.7. Electrical circuit of a self-excited pulse voltage converter The autogenerator of high voltage pulses on transistor VT1 receives a feedback signal from transformer T1 and has an ignition coil T2 as a load. The generation frequency is about 150 Hz. Capacitors C*, C2 and resistor R4 determine the operating mode of the generator. Transformer T1 is made on a magnetic core Ш 14×18. Winding I consists of 18 turns of PEV-2 0.85 mm wire, wound in two wires, and Winding II consists of 72 turns of PELSHO 0.3 mm wire. The VD2 zener diode is mounted in the center of a duralumin radiator with dimensions of 40x40x4 mm. This zener diode can be replaced with a chain of powerful zener diodes with a total stabilization voltage of 150 V. Transistor VT1 is also installed on a radiator with dimensions of 50x50x4 mm. A self-excited resonant voltage converter is described in the work of E. V. Krylov (Fig. 12.8). It is made on a high-frequency powerful transistor VT1 type KT909A. The converter transformer is made on a fluoroplastic frame with a diameter of 12 mm using a 150HF ferrite rod measuring 10x120 mm. Coil L1 contains 50 turns, L2 - 35 turns of LESHO wire 7×0.07 mm. The coils of the low-voltage half of the device have one turn of wire per Rice. 12.8. Circuit of a resonant high-voltage generator with transformer feedback fluoroplastic (polytetrafluoroethylene) insulation. They are wound on top of coil L2. The output voltage of the converter is 1.5 kV (maximum - 2.5 kV). Conversion frequency - 2.5 MHz. Power consumption - 5 W. The output voltage of the device varies from 50 to 100% as the supply voltage increases from 8 to 24 V. Using a variable capacitor 04, the transformer is tuned to the resonant frequency. Resistor R2 sets the operating point of the transistor, regulates the level of positive feedback and the shape of the generated signals. The converter is safe to operate - at low-resistance loads, high-frequency generation breaks down. The following diagram of a high-voltage pulse voltage source with two-stage conversion is shown in Fig. 12.9. The electrical circuit of its first stage is quite traditional and practically does not differ from the previously discussed designs. The difference between the device (Fig. 12.9) is the use of a second voltage-increasing stage on the transformer. This significantly increases the reliability of the device, simplifies the design of transformers and provides effective isolation between the input and output of the device. Transformer T1 is made on a W-shaped core made of transformer steel. The core cross-section is Rice. 12.9. Circuit of a high-voltage converter with transformer feedback and double transformer voltage conversion 16x16 mm. The collector windings I have 2×60 turns of wire with a diameter of 1.0 mm. Feedback coils II contain 2x14 turns of wire with a diameter of 0.7 mm. The step-up winding III of transformer T1, wound through several layers of interlayer insulation, has 20 ... 130 turns of wire with a diameter of 1.0 mm. A 12 or 6 V car ignition coil is used as an output (voltage) transformer. High-voltage generators with inductive energy storage devices include the devices discussed below. To obtain high-voltage nanosecond pulses, V. S. Belkin and G. I. Shulzhenko developed a driver circuit based on drift diodes and saturable inductance with a single-ended converter synchronized with the driver, and also showed the possibility of combining the functions of the driver switch and the converter. The circuit of the converter synchronized with the driver is shown in Fig. 12.10; A version of the driver circuit with separate key elements is shown in Fig. 12.11, and timing diagrams characterizing the operation of individual components of the driver circuit are in Fig. 12.12. The master generator of rectangular pulses (Fig. 12.10) generates pulses that unlock the transistor switch VT1 Rice. 12.10. Circuit of a high-voltage pulse shaper with a common key for the converter and the shaper Rice. 12.11. Fragment of a high-voltage pulse former circuit with separate switches Rice. 12.12. Timing diagram of the converter operation for a time 1n and locking for a time \^ (Fig. 12.12). Their sum determines the pulse repetition period. Over time, current I„ flows through inductor L1. After the transistor is turned off, the current through the diode VD1 charges the storage capacitance of the driver C1 to voltage u^, the diode VD1 closes and cuts off the capacitor C1 from the power source. Table 12.1 provides data on the possible use of semiconductor devices in a high-voltage pulse shaper. The amplitude of the generated pulses is given for a low-resistance load of 50 Ohms. Table 12.1. Selection of elements for high-voltage pulse shapers Pulse duration, NS Generated pulse amplitude, V KD204, KD226 (KT858, KT862) DL112-25(KT847) DL122-40 (KP953) KD213 (KT847) DL132-80 (KP953) Bipolar pulse shapers based on serial diodes have an amplitude of each half-wave of 0.2...1 kV for a matched load of 50...75 Ohms with a full pulse duration of 4...30 NS and a repetition frequency of up to 20 kHz. Pulse generators are devices that are capable of creating waves of a certain shape. The clock frequency in this case depends on many factors. The main purpose of generators is considered to be the synchronization of processes in electrical appliances. Thus, the user has the opportunity to configure various digital equipment. Examples include clocks and timers. The main element of devices of this type is considered to be an adapter. Additionally, capacitors and resistors along with diodes are installed in the generators. The main parameters of devices include the indicator of excitation of oscillations and negative resistance. You can make a pulse generator with your own hands using inverters at home. To do this, you will need a capacitorless adapter. It is best to use field resistors. Their impulse transmission parameter is at a fairly high level. Capacitors for the device must be selected based on the power of the adapter. If its output voltage is 2 V, then the minimum should be at 4 pF. Additionally, it is important to monitor the negative resistance parameter. On average, it must fluctuate around 8 ohms. Today, a rectangular pulse generator with regulators is quite common. In order for the user to be able to adjust the maximum frequency of the device, it is necessary to use a modulator. Manufacturers present them on the market in rotary and push-button types. In this case, it is best to go with the first option. All this will allow you to fine-tune the settings and not be afraid of a failure in the system. The modulator is installed in the square pulse generator directly on the adapter. In this case, soldering must be done very carefully. First of all, you should thoroughly clean all contacts. If we consider capacitorless adapters, their outputs are on the top side. Additionally, there are analog adapters, which are often available with a protective cover. In this situation, it must be removed. In order for the device to have high throughput, resistors must be installed in pairs. The oscillation excitation parameter in this case must be at the level. As the main problem, the rectangular pulse generator (the diagram is shown below) has a sharp increase in operating temperature. In this case, you should check the negative resistance of the capacitorless adapter. To make a pulse generator with your own hands, it is best to use an analog adapter. In this case, it is not necessary to use regulators. This is due to the fact that the level of negative resistance can exceed 5 ohms. As a result, the resistors are subject to quite a large load. Capacitors for the device are selected with a capacity of at least 4 ohms. In turn, the adapter is connected to them only by output contacts. The main problem with the pulse generator is the asymmetry of oscillations, which occurs due to overloading of the resistors. It is possible to make a simple pulse generator of this type only using inverters. In such a situation, it is best to select an adapter of the analog type. It costs much less on the market than the capacitorless modification. Additionally, it is important to pay attention to the type of resistors. Many experts advise choosing quartz models for the generator. However, their throughput is quite low. As a result, the oscillation excitation parameter will never exceed 4 ms. Plus, there is the risk of the adapter overheating. Considering all of the above, it is more advisable to use field-effect resistors. in this case it will depend on their location on the board. If you choose the option when they are installed in front of the adapter, in this case the excitation rate of oscillations can reach up to 5 ms. In the opposite situation, you can’t count on good results. You can check the operation of the pulse generator by simply connecting a 20 V power supply. As a result, the level of negative resistance should be around 3 ohms. To keep the risk of overheating to a minimum, it is additionally important to use only capacitive capacitors. The regulator can be installed in such a device. If we consider rotary modifications, then the modulator of the PPR2 series is suitable as an option. According to its characteristics, it is quite reliable today. A trigger is a device that is responsible for transmitting a signal. Today they are sold unidirectional or bidirectional. For the generator, only the first option is suitable. The above element is installed near the adapter. In this case, soldering should be done only after thoroughly cleaning all contacts. You can even choose an analog adapter directly. The load in this case will be small, and the level of negative resistance with successful assembly will not exceed 5 Ohms. The parameter for excitation of oscillations with a trigger is on average 5 ms. The main problem the pulse generator has is this: increased sensitivity. As a result, these devices are not capable of operating with a power supply higher than 20 V. Let's pay attention to the microcircuits. Pulse generators of this type involve the use of a powerful inductor. Additionally, only an analog adapter should be selected. In this case, it is necessary to achieve high system throughput. For this purpose, capacitors are used only of the capacitive type. At a minimum, they must be able to withstand a negative resistance of 5 ohms. A wide variety of resistors are suitable for the device. If you choose them of a closed type, then it is necessary to provide for them a separate contact. If you decide to use field-effect resistors, the phase change in this case will take quite a long time. Thyristors are practically useless for such devices. The pulse generator circuit of this type provides for the use of only a capacitorless adapter. All this is necessary to ensure that the excitation rate of oscillations is at least at the level of 4 ms. All this will also reduce thermal losses. Capacitors for the device are selected based on the level of negative resistance. Additionally, the type of power supply must be taken into account. If we consider pulsed models, their output current level is on average around 30 V. All this can ultimately lead to overheating of the capacitors. To avoid such problems, many experts advise installing zener diodes. They are soldered directly onto the adapter. To do this, you need to clean all contacts and check the cathode voltage. Auxiliary adapters for such generators are also used. In this situation they play the role of a dial-up transceiver. As a result, the oscillation excitation parameter increases to 6 ms. Setting up a high-voltage pulse generator with capacitors of this type is quite simple. Finding elements for such devices on the market is not a problem. However, it is important to choose a high-quality microcircuit. Many people purchase multi-channel modifications for this purpose. However, they are quite expensive in the store compared to regular types. Transistors for generators are most suitable unijunction ones. In this case, the negative resistance parameter should not exceed 7 Ohms. In such a situation, one can hope for the stability of the system. To increase the sensitivity of the device, many advise using zener diodes. However, triggers are used extremely rarely. This is due to the fact that the throughput of the model is significantly reduced. The main problem with capacitors is considered to be amplification of the limiting frequency. As a result, the phase change occurs with a large margin. To set up the process properly, you must first configure the adapter. If the negative resistance level is at 5 ohms, then the maximum frequency of the device should be approximately 40 Hz. As a result, the load on the resistors is removed. A high-voltage pulse generator with the specified capacitors can be found quite often. Moreover, it can be used even with 15 V power supplies. Its throughput depends on the type of adapter. In this case, it is important to decide on resistors. If you select field models, then it is more advisable to install the adapter of the capacitorless type. In this case, the negative resistance parameter will be around 3 ohms. Zener diodes are used quite often in this case. This is due to a sharp decrease in the level of the limiting frequency. In order to level it, zener diodes are ideal. They are usually installed near the output port. In turn, it is best to solder resistors near the adapter. The indicator of oscillatory excitation depends on the capacitance of the capacitors. Considering 3 pF models, note that the above parameter will never exceed 6 ms. The main problem with devices with PP5 capacitors is considered to be increased sensitivity. At the same time, thermal indicators are also at a low level. Due to this, there is often a need to use a trigger. However, in this case it is still necessary to measure the output voltage. If it exceeds 15 V with a block of 20 V, then the trigger can significantly improve the operation of the system. The pulse generator circuit with this regulator includes only closed-type resistors. In this case, microcircuits can even be used in the PPR1 series. In this case, only two capacitors are required. The level of negative resistance directly depends on the conductivity of the elements. If the capacitor capacitance is less than 4 pF, then the negative resistance can even increase to 5 ohms. To solve this problem, it is necessary to use zener diodes. In this case, the regulator is installed on the pulse generator near the analog adapter. The output contacts must be thoroughly cleaned. You should also check the threshold voltage of the cathode itself. If it exceeds 5 V, then an adjustable pulse generator can be connected to two contacts. Rectangular pulse generators are used in many amateur radio devices: electronic meters, slot machines, and they are most widely used when setting up digital equipment. We bring to your attention a selection of circuits and designs of rectangular pulse generators The main and widespread type of relaxation generator is a symmetrical multivibrator with two transistors, the circuit of which is shown in the figure below. In it, two standard amplifier stages on transistors VT1 and VT2 are connected in a series chain, that is, the output of one stage is connected to the input of the other through separating capacitors C1 and C2. They also determine the frequency of the generated oscillations F, or more precisely, their period T. Let me remind you that the period and frequency are related by the simple relation If the circuit is symmetrical and the ratings of the parts in both stages are the same, then the output voltage has a meander shape. The generator works like this: immediately after switching on, while capacitors C1 and C2 are not charged, the transistors find themselves in a “linear” amplification mode, when some small base current is set by resistors R1 and R2, it determines the collector current Vst times greater, and the voltage on the collectors is somewhat less than the power supply voltage due to the voltage drop across the load resistors R3 and R4. In this case, the slightest changes in the collector voltage (at least due to thermal fluctuations) of one transistor are transmitted through capacitors C1 and C2 to the base circuit of the other. Let's assume that the collector voltage VT1 has dropped slightly. This change is transmitted through capacitor C2 to the base circuit VT2 and slightly blocks it. The collector voltage VT2 increases, and this change is transmitted by capacitor C1 to the base VT1, it is unlocked, its collector current increases, and the collector voltage decreases even more. The process occurs like an avalanche and very quickly. As a result, transistor VT1 is completely open, its collector voltage will be no more than 0.05...0.1 V, and VT2 is completely locked, and its collector voltage is equal to the supply voltage. Now we need to wait until capacitors C1 and C2 are recharged and transistor VT2 is slightly opened by the current flowing through bias resistor R2. The avalanche-like process will go in the opposite direction and will lead to the complete opening of transistor VT2 and the complete closing of VT1. Now you need to wait another half-period needed to recharge the capacitors. The recharging time is determined by the supply voltage, the current through resistors Rl, R2 and the capacitance of capacitors Cl, C2. In this case, they talk about the “time constant” of the chains Rl, C1 and R2, C2, approximately corresponding to the period of oscillations. Indeed, the product of resistance in ohms and capacitance in farads gives the time in seconds. For the values indicated in the diagram of Figure 1 (360 kOhm and 4700 pF), the time constant is about 1.7 milliseconds, which indicates that the multivibrator frequency will lie in the audio range of the order of hundreds of hertz. The frequency increases with increasing supply voltage and decreasing the ratings of Rl, C1 and R2, C2. The described generator is very unpretentious: you can use almost any transistors in it and change the values of the elements within a wide range. You can connect high-impedance telephones to its outputs to hear sound vibrations, or even a loudspeaker - a dynamic head with a step-down transformer, for example, a subscriber broadcast loudspeaker. This way you can organize, for example, a sound generator for learning Morse code. The telegraph key is placed in the power circuit, in series with the battery. Since two antiphase outputs of a multivibrator are rarely needed in amateur radio practice, the author set out to design a simpler and more economical generator containing fewer elements. What happened is shown in the following figure. Here two transistors with different types of conductivity are used - p-p-p and p-n-p. They open simultaneously, the collector current of the first transistor serves as the base current of the second. Together, the transistors also form a two-stage amplifier, covered by the PIC through the chain R2, C1. When the transistors are turned off, the voltage at the collector VT2 (output 1 V) drops to zero, this drop is transmitted through the PIC chain to the base of VT1 and completely turns it off. When capacitor C1 is charged to approximately 0.5 V on the left plate, transistor VT1 will open slightly, current will flow through it, causing even more current to transistor VT2; The output voltage will begin to rise. This increase is transmitted to the base of VT1, causing it to open even more. The above-described avalanche-like process occurs, completely unlocking both transistors. After some time required to recharge C1, transistor VT1 will close, since the current through the high-value resistor R1 is insufficient to fully open it, and the avalanche-like process will develop in the opposite direction. The duty cycle of the generated pulses, that is, the ratio of pulse durations and pauses, is regulated by the selection of resistors R1 and R2, and the oscillation frequency by the selection of capacitance C1. Stable generation at the selected supply voltage is achieved by selecting resistor R5. It can also regulate the output voltage within certain limits. So, for example, with the ratings indicated in the diagram and a supply voltage of 2.5 V (two alkaline disk batteries), the generation frequency was 1 kHz, and the output voltage was exactly 1 V. The current consumed from the battery was about 0.2 mA, which indicates very high efficiency of the generator. The load of the generator R3, R4 is made in the form of a divider by 10, so that a lower signal voltage can be removed, in this case 0.1 V. An even lower voltage (adjustable) is removed from the variable resistor R4 motor. This adjustment can be useful if you need to determine or compare the sensitivity of phones, test a highly sensitive ULF by applying a small signal to its input, and so on. If such tasks are not set, resistor R4 can be replaced with a constant one or another divider link (0.01 V) can be made by adding another 27 Ohm resistor at the bottom. A rectangular signal with steep edges contains a wide range of frequencies - in addition to the fundamental frequency F, also its odd harmonics 3F, 5F, 7F and so on, up to the radio frequency range. Therefore, the generator can be used to test not only audio equipment, but also radio receivers. Of course, the amplitude of harmonics decreases as their frequency increases, but a sufficiently sensitive receiver allows you to listen to them in the entire range of long and medium waves. It is a ring of two inverters. The functions of the first of them are performed by transistor VT2, at the input of which an emitter follower on transistor VT1 is connected. This is done to increase the input resistance of the first inverter, making it possible to generate low frequencies with a relatively small capacitance of capacitor C7. At the output of the generator, element DD1.2 is included, which acts as a buffer element that improves the matching of the generator output with the circuit under test. In series with the timing capacitor (the required capacitance value is selected by switch SA1), resistor R1 is connected, by changing the resistance of which the output frequency of the generator is regulated. To adjust the duty cycle of the output signal (the ratio of the pulse period to its duration), resistor R2 is introduced into the circuit. The device generates pulses of positive polarity with a frequency of 0.1 Hz...1 MHz and a duty cycle of 2...500. The frequency range of the generator is divided into 7 subranges: 0.1...1, 1.10, 10...100, 100 ...1000 Hz and 1...10, 10...100, 100...1000 kHz, which are set by switch SA1. The circuit can use silicon low-power transistors with a gain of at least 50 (for example, KT312, KT342, etc.), integrated circuits K155LNZ, K155LN5. The rectangular pulse generator on the microcontroller in this circuit will be an excellent addition to your home measurement laboratory. A feature of this oscillator circuit is a fixed number of frequencies, 31 to be exact. And it can be used in various digital circuit solutions where it is necessary to change the oscillator frequencies automatically or using five switches. The choice of one frequency or another is carried out by sending a five-bit binary code at the input of the microcontroller. The circuit is assembled on one of the most common microcontrollers, Attiny2313. A frequency divider with an adjustable division ratio is built in software, using the frequency of a quartz oscillator as a reference. Pulse current generator A pulse current generator is a device that generates high-power current pulses. Pulse current generators are used when testing high-voltage equipment and when studying electrical discharges. Also, when connecting a pulse current generator with a pulse voltage generator, a device is obtained that can create artificial lightning. The pulse current generator includes parallel-connected capacitors, a rectifier and a spark charger. First, the capacitors are slowly charged to a voltage the value of which does not exceed the breakdown voltage of the spark gap. After this, a voltage pulse is applied to the igniting electrode of the spark gap, resulting in breakdown of the spark gap. The capacitors are then discharged onto the test object. To increase the current value, you need to reduce the inductance and increase the capacitance; for this you need to bring the capacitors as close as possible to the device under test. Appendix 5 Curves of maximum current ratios of current transformers 10 kV and 35 kV In Fig. A5.1, a shows the curves of the maximum current multiplicities of CTs of type TPL-10 with a permissible error of 10%: 1 - for CTs with transformation ratios from 5/5 to 300/5 class P; 2 - for TT with coefficients Direct current generator A direct current generator is a machine capable of converting mechanical rotational energy into direct current electrical energy. History of the creation of direct current generators In 1831, Michael Faraday discovered the law of magnetic induction, Pulse voltage generator A pulse voltage generator is a device whose task is to create high-voltage electrical pulses and generate them with an amplitude of up to 10,000,000 V. The pulse voltage generator includes a group Pulse modulator A pulse modulator is a special device of any pulse station, the task of which is to control the operation of a high-frequency oscillation generator. A pulse modulator consists of a high-voltage rectifier, a coil Pulse transformer A pulse transformer is a high-frequency transformer. Used to transmit low power signals over a wide frequency range without distorting the pulse shape, to create high voltage pulses, to change polarity Current sources Current sources are special devices capable of creating an electric field in a conductor, as well as an electrical network. In 1786, the Italian scientist L. Galvano published a book in which he examined the effect of electric current on living organisms. Book Pulse rocket engine A pulse rocket engine is a rocket engine that imparts an impulse to the vehicle due to the short-term creation of significant thrust. The operating mode of such an engine consists of numerous short-term pulses, It seems that in our enlightened times the transistor has been studied so much that it is no longer possible to learn anything new about it. 


Generators with inverters
Rectangular pulse model with regulator

Overlapping pulse generator

Symmetrical pulse device
Generator with trigger

increased load?

Models with quartz stabilization

Generators with capacitors PP2
Models with PP5 capacitors

Main generator problems
Devices on MKM25 regulators
 The amplitude of the generated signal in such generators is very stable and close to the supply voltage. But the shape of the oscillations is very far from sinusoidal - the signal is pulsed, and the duration of the pulses and pauses between them is easily adjustable. Pulses can easily be given the appearance of a meander when the duration of the pulse is equal to the duration of the pause between them.


Unusual operating mode of the transistor.
However, I recently discovered an oscillator circuit that is very stable and has good load capacity, although it doesn't seem to be supposed to do that at all.
.gif)
Fig.1. Generator circuit.
To start the generator, it is necessary to briefly short-circuit the collector and emitter of the transistor through a low-resistance resistance or apply a short trigger pulse to the transistor input.
A model of a generator with a triggering pulse is shown in Figure 2.
.gif)
Fig.2. Generator model diagram.
Timing diagrams of the generator operation are shown in Figure 3.

Blue - current in the base of the transistor.
Red - voltage at the base.
The generator is started by a single voltage pulse from generator V2. It follows from the diagrams that generation begins after the end of the triggering current pulse in the base of the transistor.
During the passage of the triggering current pulse, the transistor opened, current began to flow in inductance L1, and energy accumulated in the form of a magnetic field. After turning off the transistor, as described in many textbooks, the magnetic field energy is converted into electric field energy, which accumulates in capacitor C1. The voltage across the capacitor increases to a certain value, after which the reverse process begins. The voltage across the capacitor begins to drop, and the current in the coil increases, changing its direction to the opposite.
When the voltage across the capacitor drops to zero, the current in the coil has a maximum value, from this moment the voltage across the capacitor must change its sign and increase in the other polarity. But this does not happen, since the voltage at the transistor’s collector becomes negative and its collector junction opens, biased in the forward direction. Through this junction, the current accumulated in the inductor begins to flow into the base of the transistor. From the diagrams it can be seen that the voltage at the base also becomes negative, the emitter junction closes and begins to play the role of a collector - the transistor operates completely in inverse mode, with a low current gain, but still in transistor mode. Part of the current is branched into the emitter and returned to the power source. The rest of the current also ultimately returns to the power source, having done work to overcome the emf of source V3 and losses in other circuit elements.
After the voltage at the coil terminal connected to the collector of the transistor becomes zero, the transistor switches from inverse mode to normal operation. All this time it remains open, as a result of which the voltage of the power source is applied to the coil for a time sufficient for it to accumulate the energy necessary for the next period of oscillation.
For a better understanding of the processes (if anyone suddenly wants), Figure 4 shows diagrams of the currents in the transistor.
Rice. 4. Timing diagrams of currents in the transistor.
The directions of the currents are given to the current in the base.
Blue - current in the base of the transistor.
Red - current in the collector.
Black - current in the emitter
From the current diagrams it is clear that the emitter current is almost always equal to the collector current, with the exception of the initial stage of the process.
If it seems to someone that such a generator has no practical application, this is not so. In circuit design for alternative energy, such a solution is often found. Attempts to understand what happens in such circuits led to the appearance of this article.
I will make my contribution by proposing a scheme for driving a Tesla transformer using this generator. It differs from the well-known power supply circuit in that both terminals of the Tesla coil remain free. It differs from other power supply circuits, in which both ends of the Tesla coil are free, because there is no feedback coil.
A model of such a circuit is shown in Figure 5.

Fig.5. Scheme of the kacher model.
In the diagram, L2 is an inductor, L3 is a Tesla coil.
Figure 6 shows diagrams of the voltage at the collector of the transistor and the voltage at the Tesla coil.

Rice. 6. Voltage timing diagrams.
Green - voltage at the collector.
And finally, a diagram that can be found on the Internet. It differs from the diagram in Figure 5 by the presence of a feedback coil. Such a circuit does not need a triggering pulse, but starts itself. It differs from the pump circuit with a feedback coil in that the frequency of the pump pulses is set not by the resonant frequency of the Tesla coil, but by the frequency of the oscillating circuit formed by inductance L1 and capacitance C1.
A model of a self-starting circuit is shown in Figure 7.
.gif)
Fig.7. Diagram of a car driver model with auto start.
A timing diagram illustrating the startup process is shown in Figure 8.

Rice. 8. Voltage timing diagrams in a circuit with autostart.
Green - voltage at the collector.
Brown - voltage on the Tesla coil.
Above, only the general principles of generator operation are discussed. In a real circuit, much depends on the value of the reference voltage and the resistor in the base circuit. By changing these parameters, you can change the amount of reverse current in the collector of the transistor and obtain the shape of the signals on the collector from pulses to sine waves. In a circuit with auto-start, the waveforms are also affected by the inductances of coils L2 and L4. For example, a transistor in a forced-start circuit can operate without any bias in the base circuit.
A model of such a circuit is shown in Figure 9.

Fig.9. Diagram of a model with no bias in the base circuit.
Figure 10 shows a time diagram of the voltage rise on the Tesla coil.

Fig. 10. Timing diagram of voltage on a Tesla coil.
If the circuit is started by short-circuiting the collector and emitter with a resistor, then the transistor can be represented as a two-terminal network.
A model of such a circuit is presented in Figure 11.

Fig. 11. Model diagram representing a transistor in the form of a two-terminal network.
Figure 12 shows the timing diagrams of the triggering current pulse and voltage on the Tesla coil.

Rice. 12. Timing diagrams.
Blue - current in resistor R1/.
Brown - voltage on the Tesla coil.
Interestingly, the model also works with shorted emitter and base terminals, and even works with a simple rectifier diode. However, only if the model includes a diode recovery time greater than its opening time. This may serve as a key to understanding the pumping mechanism of the oscillatory circuit. That is, during the recovery time of the transition, more energy enters the circuit than is consumed when it opens. If real diodes have this property, then constructing a generator is quite possible if the ratios of the circuit parameters are observed, allowing the generation mode. Moreover, such circuits may be interesting from the point of view that restoration of the closed state of diodes can occur almost instantly, which in practice is used to generate nanosecond pulses. But I haven’t tested this in hardware, and I won’t publish it here yet. This is a topic for another article.
All the circuits described here have one useful feature - despite the large currents flowing in their circuits, the current consumption from the power supply can be negligible, because most of it is returned back to the power source.
* * *
Generator of short voltage pulses on a diode.
The circuit corresponding to the model presented in Figure 11 in the previous article can be launched in practice, and it continues to work even when the emitter and base terminals of the transistor are short-circuited, and the currents in the transistor increase. But with a rectifier diode instead of a transistor it is not possible to start. This, by the way, indicates that a transistor with shorted emitter and base terminals is not the same as a simple diode.
It is likely that the internal resistance of the base plays some role in the process. When the voltage at the collector junction is inverted, it opens and current flows into the base, since the emitter junction turns on in the opposite direction and takes over the functions of the collector junction. Due to the presence of resistance in the base circuit, some voltage drops across it, the transistor turns on in inverse mode and most of the current begins to flow through the emitter junction, determined by the current gain of the transistor in inverse mode. The emitter junction is probably entering saturation. And, when the voltage polarity on the transistor is restored, some additional time is required for the charges to dissolve in the saturated junction. That is, the condition necessary for the operation of such a circuit - the recovery time is greater than the opening time - is fulfilled.
But this is only an unverified attempt to explain the disparity of a transistor with short-circuited emitter and base terminals to a conventional diode.
The topic of this article is to isolate from the circuits discussed in the previous article the recovery moment of a diode with an inductance included in its circuit, with the aim of abruptly interrupting the current in the inductance.
- Why do we need this?
- Firstly, it allows you to obtain short high-voltage voltage pulses. Sometimes generators of such pulses are in demand.
- Secondly, and this is the main thing, when we turn on the Tesla coil as the inductance of the inductor, we can get closer to the main requirement formulated by Tesla himself - to interrupt the current in the inductor during its rise.
Today, interest in Tesla's work is growing, as evidenced by the many Internet forums dedicated to this topic. But practically only a few experimenters have learned to fulfill this requirement. At best, transistor switches and spark gaps can produce a sharp edge of the voltage pulse on the inductor. And they absolutely cannot provide a sharp interruption of the current in the inductor.
A simplified diagram is presented in Figure 1:

Fig.1. Simplified circuit diagram of a short voltage pulse generator.
An inductance L1 is connected to the output of the low-level pulse generator, the second end of which is connected to the cathode of the diffusion diode D1. The diode anode is connected between the terminals of voltage sources V1 and V2.
During the action of a low-level pulse, when transistor U2 is open and transistor U1 is closed, diode D1 opens, a current begins to flow through it, the rate of increase of which is determined by the voltage of the source V2, inductance L1 and resistance R3 (resistance of coil L1, transistor U2, diode D1 and we do not take into account the voltage drop across it for simplicity). If the pulse duration is long enough, the forward current of the diode will be established at a level determined by voltage V1 and resistance R3.
At the end of the pulse, transistor U2 closes and transistor U1 opens. The current in the inductance begins to decrease to zero, and then changes its direction and begins to increase. The diode begins to be restored by the inductance current L1. The rate of change of current in this case is determined by the source voltage V1 and inductance L1, and the rise time of the current and, accordingly, the amount to which it will increase is determined by the recovery time of diode D1. Upon recovery, diode D1, if it is diffusion, closes very quickly and abruptly interrupts the current in inductance L1. At the junction of the diode and inductance, a high amplitude voltage surge occurs.
Thus, by choosing the ratio and voltage values of the sources V1 and V2, we can set the open state current of the diode, and, accordingly, its turn-off current, and the rate of current increase in the coil in the diode “pumping” mode and in its recovery mode.
It is important to be able to do this when turning on a Tesla coil as an inductance. The fact is that the inductor has a strong influence on voltage fluctuations in the Tesla coil if the rate of current rise in it is equal to or higher than the rate of voltage rise in the Tesla coil oscillations, and has a weak effect if this speed is lower. To avoid uncertainty, we mean the speed at which current or voltage passes through zero, that is, the maximum. In addition, during calculations it must be normalized - divided by the amplitude of the measured signal.
For proper control, it is necessary, at the stage of “pumping” the diode, to ensure a rate of rise of current in the inductor that is less than the rate of rise of voltage in the Tesla coil, and when restoring the diode, a rate of rise equal to or greater than the rate of change of voltage in the Tesla coil.
A model of the actual circuit used in the experiments is shown in Figure 2.

Fig.2. Model of the actual circuit used in the experiments.
The signal graphs in the model are shown in Figure 3.

Rice. 3. Timing diagrams of generator signals.
Blue - voltage at the generator output.
Red - voltage on the inductor.
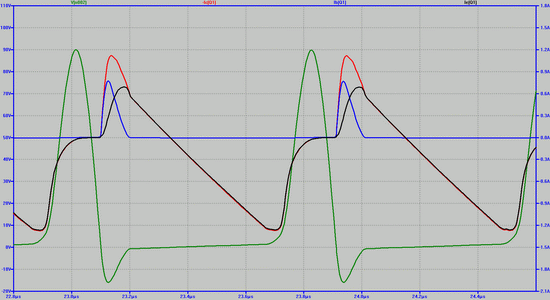
Green - current in the diode.
The diagram shows that at a low output signal level, the current in the diode and in the coil increases more slowly than at a high level, and is set at 1.8 A. After changing the output signal level, the current in the coil decreases to zero and at the same speed continues to increase to a value of 5.1 A. At this moment, the diode closes and the current in the coil abruptly stops. A voltage surge of up to 1000V is observed on the coil.
Unfortunately, it was not possible to find a good diode model, so there are some discrepancies between the model and the real object, but in general the picture is close to reality. In particular, the actually measured surges on the coil, depending on the type of diode, are up to 100 V. The maximum surge was obtained at the collector junction of the 2T908A transistor - about 250 V, while it does not break through. It should also be taken into account that the measurements were made with an S1-65 oscilloscope, which has a bandwidth of 50 MHz and a rise time of PH = 10 ns. It can be assumed that in reality the emissions are slightly higher.
Figures 4-9 show oscillograms of voltages and currents measured on the 2D230I diode and on the collector junction of the 2T908A transistor.
From the oscillograms it can be seen that the duration of the pulses at the average level in both cases is about 50 ns. In the diode, repeated pulses are grouped more closely and the first surge is more than twice as large as the subsequent ones. Other diodes behave similarly. In a transistor, the difference between the pulse amplitudes is smaller and repeated pulses occur less frequently. This means that when using an inductor as an inductor, it is preferable to use diodes, because repeated pulses of the transistor will reduce the voltage amplitude in the swinging coil. A comparison of current oscillograms shows that under the same conditions of opening the diode under test and the collector junction of the transistor, the recovery process in the transistor takes longer, which leads to a larger current at the moment of recovery in the transistor than in the diode, which results in a larger amplitude of the voltage surge.

Rice. 4. Oscillogram of voltage surge at the cathode of the 2D230I diode.
Settings: X =0.1 µs/div, Y = 20 V/div.

Rice. 5. Oscillogram of voltage surge at the cathode of the 2D230I diode.
Settings: X = 1 µs/div, Y = 20 V/div.

Rice. 6. Oscillogram of the current in the coil L 1 for diode 2D230I.

Rice. 7. Oscillogram of the voltage surge on the coil for the 2T908A transistor.
Settings: X =0.1 µs/div, Y = 50 V/div.

Rice. 8 . Oscillogram of a voltage surge at the collector of the 2T908A transistor.
Settings: X = 1 µs/div, Y = 50 V/div.

Rice. 9 . Oscillogram of the current in the coil for the 2T908A transistor.
Settings: X = 1 µs/div, Y = 1 A/div.
The given oscillograms show that the model fairly well reflects the processes occurring in real elements, at least at a qualitative level. Quantitative differences arise due to the lack of accurate models of the tested elements.
Let us now consider the model shown in Figure 10, in which a Tesla coil inductor is used as inductance.

Fig. 10. Model of a circuit with an inductor and a Tesla coil.
The timing diagrams of the current in the inductor L1 and the voltage on the Tesla coil L2 are shown in Figure 11.

Rice. 11. Model timing diagrams
On Figure 12 shows a fragment the same diagram, in which it is clearly seen that changing the current in the inductor at a rate two times less than the rate of change in voltage on the Tesla coil has practically no effect on the oscillations in the Tesla coil. Changing the current at a rate equal to the rate of change in voltage across the Tesla coil has a strong effect on the amplitude of the oscillations.

Rice. 12. Fragment of the previous time diagram.
Green - current in inductor L1.
Brown - voltage on Tesla coil L2.
To maintain and increase the amplitude of oscillations in the Tesla coil, it is necessary to increase the frequency of current pulses in the inductor, and each pulse must fall into the desired phase. In practice, this can be achieved by synchronizing the generator from a meter, the input of which is supplied by oscillations from a Tesla coil. Since our task is not to design a specific node, I simply selected the generator frequency in the model. A model of such a process is shown in Figure 13.

Fig. 13. A model of a circuit with an inductor and a Tesla coil that maintains continuous oscillations in it.
This model differs from the previous one only in the parameter that sets the oscillation frequency of the generator.
The timing diagrams of the current in the inductor L1 and the voltage on the Tesla coil L2 are shown in Figure 14.

Rice. 14. Timing diagrams of the model.
Green - current in inductor L1.
Brown - voltage on Tesla coil L2.
To increase the current in the inductor, it is necessary to increase the current in the open state of the diode. In Soviet times, diffusion diodes were produced for tens and even hundreds of amperes, so there are no restrictions on this side. The operating voltages of diffusion diodes also reach several kilovolts. It makes no sense to connect several diodes in series. The whole process will determine which diode will recover first. At least when the diode and transistor shown here are connected in series, all the diagrams are the same as for the diode. It has a shorter cooldown.
Note that the process in a Tesla coil is affected not only by the magnitude of the current at the moment of rupture, but also by the magnitude of its change, that is, the circuit also turns out to be economical in terms of energy costs. The change in current is equal to the sum of the diode current at the moment the pulse ends and the current at the moment of recovery. Losses in resistance circuits are proportional to the square of the current, and the sum of the squares is always less than the square of the sum.