In the evening, the LED interior lighting becomes an analogue of an air conditioner turned on on a hot day. Not all car owners are satisfied with the classic illumination, often there is a desire to make changes to it. The best option for solving this problem is LED car interior lighting, made by yourself.
Let's try to figure out how to make relaxing and comfortable lighting inside the car, giving the interior uniqueness and individuality. Interior lighting with LED strip, made on its own, will cope with a similar task. Modern LEDs are able to make a radical transformation of the interior appearance in a matter of minutes. Currently, manufacturers offer various options for the combination of colors, the saturation of the glow - the choice is up to the consumer.
Interior lighting
Let's start with the fact that the LED lighting in the car interior has distinctive characteristics:
- ease of installation of the backlight;
- when installing the emitters, there is no need to mount fasteners. The backlight must be mounted on a special surface with a sticky base. In order to strengthen the LED strip inside the car, it is enough to get rid of the protective strip;
- small LEDs can be easily put into standard sockets, after removing typical lamps from there;
- the LED lamp has high mechanical strength and is sealed. If the polarity is not reversed during installation, it is quite difficult to disable the lamp;
- lED lamp lights up instantly, you can use bulbs for light and music.
Specificity of neon lighting
Neon lights give a rich and bright light. Installing them is more difficult than installing LED bulbs. In addition, problems often arise during the operation of neon lighting. For example, such lighting is not designed to be switched on and off continuously. Lamps will have to be changed frequently.
How to make an original backlight in a car with your own hands?
As soon as you choose the option of lighting the car interior, proceed to the selection of tools and materials, without which you cannot realize your plan.
You will need:
Instructions
DIY LED interior lighting is performed according to a certain algorithm:
- First you need to remove the terminal from the battery.
- Next, we determine the location of the LED backlight. It can be installed above the torpedo.
Advice! In order for the lighting to be safe in operation, it is not touched by passengers, we suggest strengthening it under the seats.

Attention! Try to keep the fuse close to the battery so that you can change it at any time.
- Put a protective special tube on the electrical wire. Solder the wire, then place a protective tube on the soldering site.
- The second wire must be brought out to the body, connected to the battery. With the controller, you can change the color options of the LED backlight, on average, you can use 17 million different shades. The controller helps you choose colors, adjust the intensity of the glow. With the help of an LED strip fixed inside the cabin, it is possible to illuminate the space in five different speeds, with a change in effects and colors.
- Next, we start calculating the length of the wires. You also need to decide on the location of the switch. The location of the fuse near the battery allows you to protect the lamp from voltage surges, switching errors.
Places for mounting LED lighting
Among the convenient places where you can mount LED backlighting are:
- location under the glove compartment or dashboard;
- installation of LEDs under car seats;
- fastening the LED strip under the headrests.
Once the wires are attached to the battery, you can put a fuse for the backlight. You can pass the wire through the holes that are in the plate dividing the engine compartment and the car interior. If there is no hole, you can drill it yourself.

Attention! Do not forget to put rubber insulation on the edges of the hole, otherwise the wires will break while the machine is moving. For such purposes, a rubber ring of the required diameter is suitable.
We connect the second wire to the battery terminal by throwing it through the hole in the plate. When connecting, be sure to observe the polarity.
Advice! Make sure that there are no traces of rust, paint, dirt on the wire.
When carrying out self-installation of LED lighting in the cabin, you can significantly save your family budget.
Interior lighting connection options
Ready-to-use lights are available at many auto parts stores. On average, the basic set of interior lighting, consisting of 4 neon emitters, is 2-6 thousand rubles. After installing such lighting, the car will become "exclusive", completely transformed and updated.
We mount a multicolor backlight that will be powered by a car cigarette lighter. Professionals consider this installation option to be the simplest, since there is no need to change the electrical wiring inside the car. To work you need to use:
- rGB LED strip, designed for four contacts;
- stranded wire (4-5 m);
- controller with control panel;
- soldering iron;
- 4 terminal clamps;
- transparent silicone sealant.
Before proceeding with the installation, it is important to make high-quality measurements of the places where you plan to mount the LED strip. In addition, it is important to measure the perimeter of the passenger compartment along which the tape will be attached. The distance under the instrument panel is measured. Next, the distance between the front car seats is determined.
Advice! Add 40-50 cm of tape to the received numbers as a reserve.
After completing all measurements, you will have four pieces of LED strip and 7 pieces of wires.

Connection diagram
The tape is attached, then the wire, then the connector, the next wire, again the connector, again the wire, and a new piece of tape. An electrical wire is used to attach the individual elements of the circuit into a single whole, which runs between the upper connectors. The terminal clips for the upper pair are mounted under the dashboard, and the lower ones are attached under the front seats.
You can clearly see this in the video:
When buying an LED strip, remember that you will only be able to cut it into pieces in some places, using the line that is between the flat metal contacts. Also, keep in mind that the controller is rated for 12W, so calculate the maximum wattage of the lamps on the tape before starting installation. We clean the 1 cm sections of the wire from plastic, solder it to the LED strip, and perform the insulation using silicone glue.
You can use double-sided tape to secure the tape and wires to the place you need. Installation should start from under the glove compartment.
The wires must be passed through the terminal clamp and the controller fixed to it. Then you need to check that the wires match the color of the controllers. We complete the installation of the backlight under the car pedals.
In recent years, tuning of passenger cars has become very popular. In the process of its implementation, the body structures are first of all subjected to refinement, which immediately catch the eye and clearly emphasize the individuality of the car owner.
The same effect can be achieved through internal tuning, one of the varieties of which is the use of the illumination of the dashboard, the upper part of the cabin and in the leg area.
Quite often, the interior lighting of a car, including such a design as atmospheric interior lighting, is often done by hand. It is used as a means of increasing the efficiency of using products of the domestic auto industry, such as, for example, the popular VAZ-2110.
Combination of aesthetics and functionality
The interior lighting of a VAZ as its own tuning is usually designed by a developer to solve several problems at the same time.
The first of these tasks in relation to the VAZ-2110 is the creation of an appropriate image, which is achieved by using additional sources of different brightness and color.
As for the functional role that the car interior lighting has, its practical achievement is much more difficult. For the VAZ-2110, the presence of additional light sources means that in the dark, very comfortable conditions are provided not only for the driver, but also for passengers. Let's name just a few of them:
- tuning in the form of illumination helps to quickly find various items, including small ones, both in a purse and glove box, and on the seats;
- the so-called polite interior lighting makes landing in the VAZ-2110 much more comfortable, due to the delay in turning off the light after closing the door, and a smooth decrease in the brightness of the standard bulb at the same time;
- illumination of the lower part of the VAZ-2110 interior allows you to quickly detect objects that have fallen on the floor in the area of \u200b\u200b\\ u200b \\ u200bthe legs;
- illuminated door handles make it easier for passengers to board and disembark.
The list of advantages can be continued if desired. 
LED lighting elements
Illumination, including in the leg area, can be produced by various sources. Without big problems, all types of known options for interior lighting can be realized with your own hands.
The accumulated experience clearly shows that such tuning provides the best results when using single and strip semiconductor light sources, for illuminating the area in the leg area and other places. This is determined by the fact that:
- they do not require high voltage for their operation and are powered from the vehicle's on-board network;
- due to the low voltage, semiconductor sources are safe during operation, even in the area of \u200b\u200b\\ u200b \\ u200bthe legs;
- sources of this type are economical and do not create a serious load on the on-board network of the VAZ-2110;
- lED strips are very flexible and allow you to bypass any contour;
- today, LED strips are available in all kinds of colors.
It is also important that you can make such a backlight with your own hands and connect it to the car network without deep knowledge in the field of electrical engineering.

Some design features
When implementing LED interior lighting with your own hands, you must first of all decide what and how to highlight.
With regard to the placement of the tape in the VAZ-2110 cabin, the backlight can be done everywhere, but it will bring the greatest benefit in the glove box and in the leg area, and for the rear seat, its benefit is much greater. Illumination of door handles can also be safely attributed to this.
As an element of decor, such tuning is best done on the air duct grilles, it looks good as illumination of doors with a logo, as well as illumination of car doors around their perimeter.
Sets the type of switching on of individual lighting elements, including those in the leg area. The easiest option is to permanently connect it to the on-board electrical network. However, the most functional will be a separate, easily accessible switch, with which the decorative illumination of the door illumination with the logo, or the illumination of the foot area, will be turned on exclusively at night.
It is impossible to give general recommendations for choosing the color of the glow, except for the obvious provision that it should be in harmony with the color scheme of the illuminated components of the VAZ-2110 interior. 
Used tools and materials
When implementing with your own hands any kind of interior lighting, simple tools and consumables are used.
- Of the tools during installation, you will need pliers, a sharp knife, scissors, and a soldering iron.
- Consumables include tin and rosin for soldering, one or more terminal blocks, screw terminals, and a toggle switch or push button.
The LED strip is sold by length, so the necessary measurements should be made in advance.
During installation, the individual components of the backlight are connected to each other by a flexible (multi-wire) cable, the core area of \u200b\u200bwhich should be 1 square millimeter. Places of soldering and connection of contacts are closed with electrical tape. An ordinary multimeter is used as a means of checking the correct installation.
Features of mounting LED strip
Installation of the LED strip in the area of \u200b\u200bthe legs and in other places is carried out with glue. When forming the desired length of the tape, it is cut with scissors, the cut must be made strictly according to the round or oval marks.
Wires are soldered to the tape segments, at the ends of which the terminals are installed. All bare places of wiring must be wrapped with electrical tape. The place of installation of the tape is wiped with any degreasing liquid in order to ensure the strength of the fastening.
It is necessary to connect the tape to the car's electrical network with respect to the polarity.
Other types of backlighting
The so-called laser illumination appeared relatively recently. It is a miniature optical projector. It is installed on the lower narrow surface of the door, turns on when it is opened, and forms a logo on the ground right under the door.
Due to the relatively small dimensions of the projector, laser illumination during installation does not cause major problems. 
Neon interior lighting is realized by installing new lighting sources, it differs from other types in its high brightness. The installation of the neon lamp is carried out on the mounting angle under the dashboard, with fixing in the working position with plastic tightening clamps.
A standard connector is cut off from the wires for power supply, then these wires are connected to the door opening sensor and to the interior lighting switch. The wires are routed under the rugs and behind the sheathing to provide the required level of aesthetics and protection.
It is not so difficult to make the illumination of the feet in the car interior, moreover, it will also look quite attractive. As an example, let's take a story that I personally witnessed.
One evening an old car drove up to the stop, but almost no one paid attention to it. But that was until the moment when the driver opened the doors, after which bright lights flashed in the cabin, which aroused many interest.
Plus, the car's interior looked more attractive. That is, thanks to the light lights, the nondescript old upholstery of the car got a gorgeous look, which of course could not fail to attract the views of others.
LED lighting can transform any car, including the oldest, which is the main advantage of this innovation.
How the backlight works
The LED backlight can be customized according to your preference. For example, you can make it turn on simultaneously with the standard lighting when you open the doors, or you can control it using an electronic unit.

You can also combine the two options. That is, the illumination of the lower part of the cabin is made neon and we connect it to the door opening sensor, and the rest of the illumination is LED, but we connect it through the block - the switch.
Varieties of backlight
The lighting for the car interior can be:
1) .LED... The main advantage of this option is ease of installation. In this case, the emitters do not need a fixation device. Individual LEDs are miniature, so they can even be installed in the sockets for standard lamps. The LED strip is shockproof and sealed.
2) .Neon... The light in neon lights is bright and rich. The backlight is difficult to install, while the lamps in the installation are quite capricious. They are afraid of mechanical damage.
DIY car interior lighting
Under the feet of the driver and passenger, the lighting can be made neon, and the ceiling can be illuminated with LED lamps.
Installing neon lights ... First of all, it is necessary to install special emitters, for which you will need:
- Nylon clamps;
- Aluminum corner;
- Neon emitters;
- Self-tapping screws;
Saw off the corner according to the size of the emitter and light it with self-tapping screws under the torpedo. The light should fall down directly under your feet. After that we fix the emitter with clamps to the corner.
We do the same with the passenger seats. On the rear seats, we fasten it with the edge up, which will protect the emitter from mechanical damage.
We carefully lay all the wires under the floor and pull them out to the torpedo from the driver's side. If necessary, the wires at the connection points can be extended and insulated.

When connecting, the wires should be connected to the door opening sensor and the interior lighting switch so that when the door is opened and the lighting is turned on, our additional lighting will light up.
Installing LED backlight .Installation of LED footlights is carried out according to the standard scheme, which is practically the same for all cars.
But for work we need;
- Heat-shrink tubing;
- Wires (section 4x0.5 mm);
- LED strip and single diodes (you can take a ready-made strip of the factory-assembled type SMD 5050, but it is more expensive, so you can buy an RGB strip sold by the meter);
You can install the backlight on the dashboard, in the places for salon lamps, with standard lighting elements. All of this can be replaced with LEDs. Single LEDs have the same base as standard lamps, and therefore can be easily replaced if necessary.

Next, we determine the location of the backlight. Traditionally, it is installed in the leg area and along the roof perimeter along the uprights. First, you need to measure the required length of the tape, after which we cut it to the desired size. In this case, the mode is only in places with contacts for soldering.
The wire must be measured in such a way that it is enough to reach the ignition lock, but it is also recommended to provide some margin.
We cut off, clean the ends and solder to the tape, after which the heat-shrinkable tube is stretched and with the help of a household hairdryer or lighter we warm up until the porn is pulled together. We should do exactly the same with other pieces of tape.
Connection options:
- connect a container via an RGB block;
- connection in the same way as neon lamps.
The LED backlighting of the car's disk is an exclusively decorative tuning that will not bring any benefit to the car owner other than the aesthetic pleasure of contemplating and driving his car. Naturally, LED lighting, like any other type of car tuning, can be done in your own garage and it is not at all necessary to take the car to a tuning salon, where you will be charged quite a lot of money for such work.
What kind of lighting to make a car
Let's start with the fact that there are more than enough types of backlighting for a car. It can be a fairly simple illumination of the passenger compartment or the legs of the driver and passengers and more complex illumination of the car's disks and the space under the car. Which of these types of lighting to choose and start implementing it is entirely a matter of your taste, because there is no particular difficulty and special difference between installing the lighting on the car door and on the wheels. The main thing is to understand the basic principles and carefully go through all the stages of work, and then you can get a backlight for a car much cheaper than you could do it in a car dealership.
White illumination under the bottom of a white car and a brief instruction for its installation
We will consider the general principles of organizing the backlight for a car and the features of installing the backlight for each element of the car, if necessary. Otherwise, you can easily use the same techniques and methods that are described below to organize the illumination of absolutely any part of the car. 
What we need for work:
- The LED strips themselves
- Wire (four-core)
- LED strip controller with remote control
- Silicone glue or silicone gun
- Corrugated thin tube
- Soldering iron, solder, rosin
More about materials and tools

More and more LED strips are being sold lately. Naturally, the cost of an LED strip can be of great importance to you, but we strongly discourage you from buying cheap LED strips, as they not only often fail and burn out, but also do not give the glow intensity that is needed for high-quality car backlighting ... In the event that you still have not decided on the color of the future backlighting, we advise you to buy an RGB strip that will give you the opportunity to switch the colors of the LED backlighting when you want to change the color. This is why you need a controller with a remote control. 
There are no special requirements for the wire, since they all perform the same task, and the wire itself will most likely hide either under the upholstery of the passenger compartment if you illuminate the doors or legs, or it will hide and isolate itself in a corrugated pipe if you will do the illumination of the bottom of the car, number or its disks. In this case, you protect your electronics from water ingress and corrosion at soldering points and in those places where the factory wire braid could be damaged.

In addition, you may need connectors. These can be ordinary "crocodiles" for testing the backlight connection and permanent connectors that are screwed with a screwdriver and provide reliable contact throughout the system. They are needed not only for convenience when connecting the backlight, but also when you need to replace some part of the wiring in case of damage, or part of the LED strip for repair. If you use the connectors, you do not have to completely change the backlight wiring, you can only replace the damaged section of the circuit.

Any work to improve a car should start with a project. Naturally, at this stage we need to decide where we will install the backlight and we can say exactly how much wires, LED strip and connectors we need for this. We make an approximate plan for the location of objects inside your car and mark the places where we will conduct the wiring. This is simple enough, as most of the wiring can be hidden either under the interior trim or under the vehicle floor. However, in this case, you should definitely purchase and use a corrugated tube to insulate the wire. Let's look at the connection diagram for the backlight for the car interior and, using its example, we will figure it out in the process.

Now it is worth inspecting your car in the places where you will attach the LED strip itself. The ideal LED backlighting option is when the light source is not visible and only the bright vehicle backlight is visible. What's more, if you install the backlight in a hard-to-reach place, the tape is less likely to be damaged while driving or transporting people.
Accurate measurements and cutting of LED strip 
In the event that you have not yet armed yourself with a tape measure and have not measured the exact length of those objects to which the LED strips will be attached, it's time to do it. After that, we take the tape in our hands and cut it, but we do it very carefully. The point is that the LED strip cannot be cut anywhere. There are special places for this, located every 3 LEDs. And remember that it is better to make the tape a little shorter than necessary, since if the tape is not fixed evenly, but with sagging, the backlight intensity will be uneven, and this should not be allowed.
Soldering and testing

We arm ourselves with a soldering iron and solder the ends of a four-core wire to the cutting points of the LED strip. Try to observe the color of the wires in all connection points, so that it is easier for you to navigate during repairs or when errors are detected. We recommend that you check the glow as shown in the figure before insulating the soldering point.
If everything is in order, you can repeat this operation for the remaining sections of the LED strip. Prepare the required number of connectors in order to easily connect the resulting LED strips already at the installation site and also observe the color of the wires.
If you are sure that the sections of the LED strip work as they should and you have not made mistakes anywhere, it's time to pick up an ordinary silicone glue or a gun that melts the silicone and pour it over the soldering points. This will not only protect the LED strip from moisture or accidental shorting of contacts in the soldered areas, but also help you seal the junction.
This is enough for a secure fixation, so that the use of adhesive tape can be dispensed with. 
We glue the LED strip
Everything is ready to install and connect the interior lighting in your car. To the surface you have chosen. You can either use a few drops of silicone glue, or attach the tape with plastic ties - it doesn't really matter. Both options are quite reliable and durable.
If it is impossible to glue the backlight, as is often the case when installing the backlight on discs, you should use a hinged frame made of a thin profile, on which we will place the tape using plastic ties, but more on that later.
We connect the backlight through the connectors
Exactly observing the color of the wires and connecting the wiring according to our plan, you should pay attention to how you will hide the wires. If you have the opportunity to run them under the interior trim, try to do it as discreetly as possible so that the wire does not bristle. And in the event that you will start up the wiring under the bottom of the car, first put insulating corrugated tubes on the wires, the ends of which should either also be filled with silicone or wrapped with electrical tape. It is best to hide the connectors in the same place where the LED strip itself is located, because in this case you will have access to them at any time. 
After all the lighting elements of your car are connected and you hide the wiring, we connect the wires according to the scheme with the controller and you can proceed to the organization of the backlight power supply.
Power for car backlight
You can power the backlight in different ways. Someone uses a door panel for this, and in this case, the lighting will be not only a decorative element, but also a reminder that the door is not closed, because it will burn only when the doors are opened. However, this method is not suitable for cases of illumination of disks and the underside of a car, because there the illumination should always be on when we want it.
Which power supply method to choose
The easiest way to connect power for a car is a cigarette lighter. It just gives out 12 V, so this power is quite enough for us to connect all the lights in our car. To do this, you can simply remake the charger for a mobile phone and connect the wires to the circuit to the stabilizer, which lowers the voltage to 4 V. To do this, it is enough to disassemble the charger for the mobile phone, which works from the cigarette lighter and solder one wire to the ground, and the second - in front of the stabilizer. This will be enough to ensure the operation of the backlight, and if necessary, the charger is simply pulled out of the cigarette lighter. 
However, the most correct option would still be to connect the backlight power to the battery through fuses. In addition, this option will allow you to maintain the integrity of the vehicle's factory wiring, which is extremely important.
Checking and testing

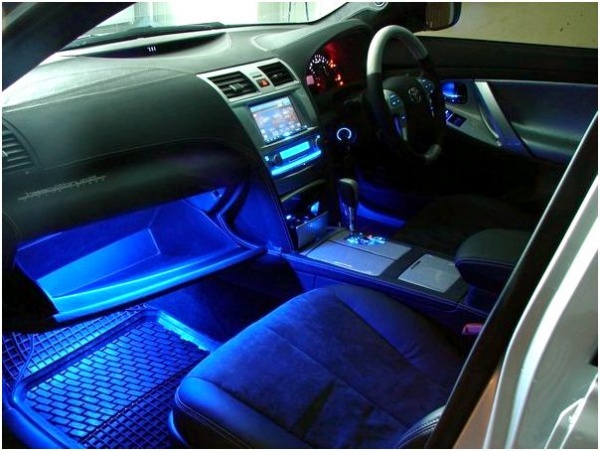
We pick up the remote control and turn on the backlight. If you did everything right, you can enjoy the ability to change color modes and even glow shades, and you can even customize programs for smooth overflows and color changes. 
Here's what you should end up with if you do it right:
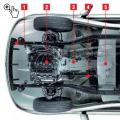
Features of installing the backlight on disks and on the bottom of the car
Please note that the car lighting is a system that must be permanently connected to a power source, otherwise it will not work. If you want to illuminate the underbody or rims of the car, the basic principles of work do not change, but an additional stage is added.
If you do the illumination of the discs, the wheel must be removed, and the discs themselves must be cleaned of dirt and rust. After that, it will be necessary to assemble a structure of the required diameter from an aluminum profile in order to place the backlight on it. This design is tightly fixed to the stationary part and is connected to the wires using a connector, which in this case will also need to be either insulated or taken out into the car.

Please note that the wires and the tape itself must be firmly glued or pulled to the structure fixed to the car rim.
In the case of illuminating the underside of a car, everything is somewhat simpler, but it may also happen that there is simply nowhere to fix the LED strip. In this case, we can also use a small metal profile, which does not need to be screwed to the car body from the inside and the LED strip must be glued onto it. The only difficulty in this process is that the LED strip for disks and for the bottom of the car must be chosen either sealed or sealed with silicone or other transparent materials, otherwise it will simply burn out if moisture gets in. 
Assembly and the first exit in a highlighted car.
If you did backlight rims, put the wheels back in place and make sure that the wires do not interfere with the rotation of the wheel, and during the rotation the LED strip remains stationary. In case you worked in the salon and did the illumination of the legs or doors of the car, tuck the wires and put the remote control in a place convenient for you. Check again if the backlight is on and you can get ready for your first trip to the city. 
Before driving for the first time in a car with the new interior lighting, many experienced drivers advise you to sit in the passenger compartment for a few minutes with the lighting on so that your eyes adapt. At first, the backlight can distract from driving, but over time you will get used to it and you will only enjoy the bright colors in the interior or on the disks of your car!
This project should appeal to most car owners. Everyone must have tried to find shoes under the seats and know that the lights in the cabin are so dim that it can be difficult to do. So why not make your own LED car interior lighting and make it stand out among others?
Necessary note: I did not want to risk the integrity of my wiring and therefore did not cut anything, but only sketched the wires from above. Well, now let's get down to business from talking.
What do we need for lighting? So:


- LED strips. I prefer to use RGB strips, which allow me to choose among a certain number of colors, rather than be content with just one color.
- RGB LED strip controller with remote control.
- Four-core wire. Usually, V + (white), R (red), G (green) and B (blue) wires come from the LED strip.
- Connectors.
- Soldering iron.
- Silicone glue.
You will also need brains and patience. Because, as soon as you make this LED interior lighting, you start begging the sun for sunset to drive your pumped car))).

As soon as the plan became clear, we proceed with the design of the wiring, taking into account the connectors. Why connectors? They play an important role in both bonding and securing the bond. Let's say several LEDs are out of order. Nobody wants to rip out all the wiring. When using connectors, you only need to remove the faulty section of the tape, repair or replace them and insert into place.

In the following image, we see four connectors in pairs at the back and front. Thus, the wire to each tape passes between them. The LED controller connects to a 12V power supply.
Now, since I don't want to cut the wiring and include additional fuses in the circuit, I will power it from the cigarette lighter or charging, which will be very easy to do. Also in this case, the lighting will go out when the ignition key is removed.

Now that everything is planned out, the next very important step awaits us - measurements. The importance of this step is to further position the elements in the right places without pulling the wires.
We make the first measurements for the section of the interior lighting located under the dashboard, determining the total length of the two front LED strips. Secondly, we take measurements for the tapes located at the back, under the chairs.
After this part of the work is done, we proceed to determine the length of the wires, bearing in mind that you need to have a margin of length to be able to fit at the place of their attachment to the tapes. To determine the length of the wires, we measure the following sections:
- from the controller to the front left connector;
- from the front left connector to the front right connector;
- from the front left connector to the rear left connector;
- from the rear left connector to the rear right connector.
When connecting the illumination circuitry under the seats, leave extra length of the wires so that the connections do not break when the seat is moved forward or backward.
After taking measurements, it is time to cut the LED strips to length.

Our project requires four pieces of LED strip. All LED strips have cut lines every three LEDs. Keep in mind that it is better to make the segment shorter than longer, as the extra "tail" of the tape will dangle, and this will give the appearance of an incomplete structure and spoil the impression.

After soldering, it is best to check its quality by lighting all the LED colors in sequence. So, in the images we see that the check of the three primary colors - red, green, blue.

If they light up without any problems, you need to ensure the safety of the joints. One way is to apply silicone glue, which will prevent the wires from coming into contact with each other and ensure the rigidity of the connection.

ready to be installed in the car. In the same way, we will make three more, which in total will give us four sections of the vehicle interior lighting.
Now is the time to go to the car and start connecting the circuit.
As you can see, first of all we attach the LED strip located under the dashboard to the glue. Then we attach the connector to it. Pay attention to the photographs - they clearly show what is being said here.


After the deed is done, let's hide our wires. It is enough to shove the wires inside the panels and stretch them to the seats, where the next section of the LED interior lighting will be installed.


Under the chairs, the pieces of LED strip should not be glued with glue or adhesive tape, but passed between the springs and strings and tied at the ends. It should be noted that I left a sufficient amount of wire to ensure that moving the chair forward or backward does not affect the integrity of the connections. When this step has been completed, we proceed to rework the charger.
There are several different ways to power our interior lighting:
- from unused fuses from the fuse box using jumpers;
- through the door panel. In this case, the backlight will shine when the doors are open, and go out when they are closed;
- from the headlights (either from the main fuse box or from the cut wiring supplying the headlights).
But we will use a charger. Why?
The reason I redesigned the charger is because I don't use the cigarette lighter in any way other than to charge my phone. So why not modify the "charging" if it is used frequently and thus make it easier to use it for two tasks at the same time.
Most phone chargers will output 4V (not enough for our LED backlight). That is, they lower the voltage of the car battery from 12V to 4V. All we need to do is run the wires past the voltage regulator.


When we open the charger, we see a fuse (protects against overloads) and a regulator circuit (which lowers the voltage). We solder our wires to the fuse and to ground bypassing the stabilizer. So we get the 12 V we need!
Thus, we will power our LED interior lighting. Once all the connections are made, let's start checking our work.
With the remote control you can:
- turn on / off the backlight;
- change colors;
- adjust the intensity;
- use fading effects.
Now it remains to wait for the sun to set, and it will be possible to roll our pumped car out of the garage!


Interior lighting testing in the morning.