The automatic transmission of modern cars is a high-tech, electronically controlled system. The structure of the transmission consists of many parts that work under severe stress. To avoid unexpected breakdowns and maintain a long service life, regular maintenance and use of a manufacturer-approved lubricant should be used.
A bit of theory: 4-Motion system
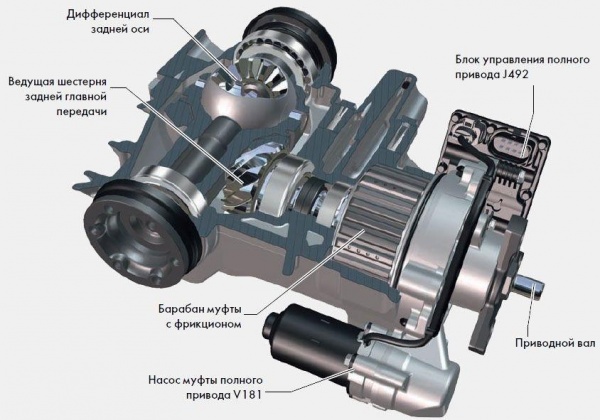
In the Volkswagen Tiguan crossover, the torque from the engine is transmitted to the automatic gearbox. Further, the transfer case provides rotation of the front and rear axles. The movement is transmitted to the front wheels through the front axle differential. At the same time, torque is supplied via the propeller shaft to the Haldex all-wheel drive clutch, which drives the final drive and the rear axle differential. Depending on the operating mode and driving conditions, the automation distributes the torque force along the axes, ensuring maximum efficiency.
Volkswagen Tiguan is equipped with a hydromechanical 6-speed automatic transmission with a planetary gear, which is characterized by simplicity of the device, compactness and low weight. The automatic transmission is equipped with an adjustable torque converter lock-up clutch, as well as electro-hydraulic gear shift drives. The box is equipped with an oil cooler to cool the lubricant while driving.
The rotation of the wheels of the rear axle is provided by a Haldex clutch located in the housing of the rear final drive. Oil pressure on the piston compresses the friction discs, and the clutch transmits torque up to 2400 N * m. An electric pump of an axial piston type, which is controlled by an electronic controller, is responsible for pumping oil. The working pressure in the hydraulic system of the Haldex coupling is about 29 atmospheres. The system is equipped with a maintenance-free oil filter with a non-return valve.
Note! If the Haldex clutch pump fails, the oil pressure in the system disappears and the transmission of torque to the rear wheels stops.
Transmission fluids for Volkswagen Tiguan
For the automatic transmission AISIN 09M, the manufacturer recommended the use of working fluid ATF ( Automatic Transmission Fluid) standard G 055 025. The grease is highly fluid and has a characteristic red color.
Those who like to save on analogs should remember that, unlike standard gear oils 70W-80, 80W-90, in automatic transmissions, the lubricating fluid must remain fluid at any temperature up to 120 degrees. Therefore, the SAE viscosity classification does not apply to ATF fluids.
The capacity of the automatic transmission at the first factory filling is 7 liters. When replacing, about 5 liters of transmission lubricant will be required, since the remaining 2 liters of oil are distributed along the lines, the cavities of the cooler and the internal volume of the gearbox and cannot be drained without completely dismantling and disassembling the unit.
The Haldex all-wheel drive clutch is filled with mineral transmission oil VAG G055 175 A2. The system volume is 720 ml.
Changing the oil in an automatic transmission
Many manuals indicate that the transmission oil in the Volkswagen Tiguan automatic transmission, filled at the factory, retains its operational characteristics throughout the entire service life of the vehicle. However, in practice, it is recommended to change the lubricant in the gearbox every 60 thousand kilometers of the distance traveled due to the difficult operating conditions of the mechanism.
To change the oil in the Tiguan automatic transmission with your own hands, you will need the following consumables:
- aTF gear lubricant of the corresponding approval;
- oil filter (code 09M 325 429);
- gearbox pallet gasket (code 09M 321 370A);
- the sealing ring of the drain plug (code 09D 321 181B);
- container for draining oil;
- rags.
Also, for work, you will need a device for pumping transmission fluid.

For a successful replacement, the oil in the Tiguan automatic transmission must be warmed up. To do this, you need to travel for at least an hour in different modes. After warming up the lubricant, the car is installed on a viewing pit, overpass or hung out on a lift.
To access the gearbox, the engine protection and the gearbox mudguard are removed. The pallet of the box and the adjacent surfaces are cleaned of dust and dirt. To drain the old transmission grease, unscrew the drain plug with a # 5 hex wrench.
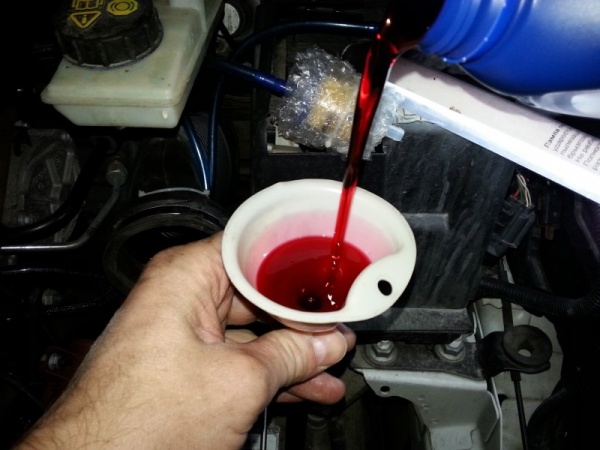
Warning! Transmission oil flows out of the gearbox bore in a spiral jet, therefore it is recommended to use a suitable funnel to collect the oil to avoid spills and contamination of clothing and work area.
After about one liter of oil has drained, you need to unscrew the overflow pipe using a hexagon to ensure further flow of grease.
When the transmission grease stops flowing (the total volume of the drained fluid will be about 4 liters), the drain plug is installed in place, and the automatic transmission pan bolts are unscrewed with a 10 key.

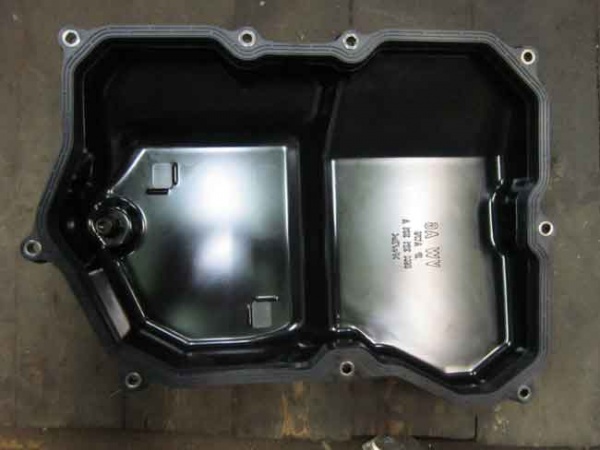
The remaining grease is drained from the dismantled pallet, the inner surface is thoroughly wiped dry with a rag, and metal particles resulting from wear of the box parts are removed from the magnets. Then the oil filter with a protective mesh is disconnected from the valve body.
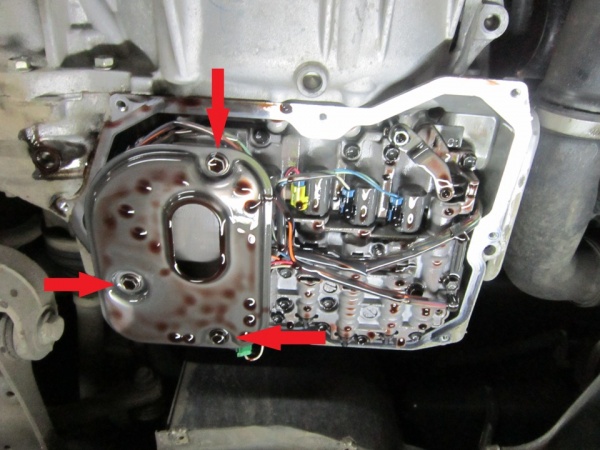
Information! In most cases, automatic transmission breakdowns are caused not by the deterioration of the properties of the transmission lubricant, but by the leaching of solid metal particles into the gearbox mechanism, which were not removed from the pallet magnets in time.
A new filter and a sump with a fresh gasket are installed in their original place. Before installation, it is recommended to pre-coat the oil filter seals and the pan gasket with transmission oil.
Development of automatic transmission Tiguan after changing the lubricant
To evenly distribute the lubricant throughout the entire volume of the box, it is necessary to ensure automatic transmission operation in all modes within a few minutes... After this procedure, check the ATF level.
The lubrication level is checked using a laptop with preinstalled software such as VCDS or VAG K.
On the device connected via the diagnostic socket, the menu is activated: "Automatic transmission" - "Measured values" - "Group 06".

Baseline conditions are set according to the manual:
- aTF transmission oil temperature is not more than 30 degrees;
- the machine is on a level horizontal surface;
- the gear selector is in the Park position.
With the car running, when the ATF temperature indicator reaches a value in the range from 35 to 45 degrees, the control plug of the automatic transmission oil level is unscrewed. With sufficient lubricant, about 300 grams of oil will drain from the bypass pipe. After that, the control hole is screwed in with a plug with a new O-ring. If the transmission grease does not flow out of the control hole, then it is necessary to add oil to the gearbox.
After completion of the operation, the surfaces of the parts are cleaned of oil residues, and the connections are checked for leaks.
You can get a visual representation of the process of changing the oil in the Volkswagen Tiguan automatic transmission from the following video:
Oil change in the Haldex all-wheel drive clutch
According to the recommendations of the VAG concern for the Haldex coupling, the oil change should be carried out in the interval of 40,000-60,000 kilometers of the distance traveled, depending on the frequency and intensity of use of the all-wheel drive. For cars with low annual mileage, it is recommended to change the lubricant in the coupling every 12 months.
4th generation Haldex
To change the transmission oil in the Volkswagen Tiguan four-wheel drive clutch yourself, you will need the following tools and materials:
- container for draining liquid;
- set of wrenches;
- pliers;
- a medical syringe for 100 cubes and a flexible tube of a suitable diameter;
- new oil for Haldex coupling;
- oil purification filter 31325173;
- rags;
- gloves and goggles.
Work is carried out on an overpass, inspection pit or on a car lift. To carry out an oil change, the machine must be installed horizontally.
To preheat the old oil to facilitate the draining process, operate the car in four-wheel drive mode.Before removing the used fluid from the clutch, unscrew the two fixing bolts, remove the fine filter cover, use pliers to pull out the plastic gasket and dismantle the filter element.
Advice! You can start and immediately stop the engine for a short time so that the oil pressure squeezes the filter with the gasket out of the seat.
Then the clutch drain plug is unscrewed, and the transmission fluid is drained by gravity into a suitable container.

After the end of the procedure, the plug is screwed back into the Haldex coupling housing, and a new filter, pre-lubricated with oil, is installed in the seat.
You also need make sure there is no damage to the O-rings, which are on the plastic pad. Failed seals are replaced with new ones in order to eliminate oil leakage. The assembled gasket is inserted into the sleeve.
New oil is poured into the Haldex coupling using a syringe. To do this, instead of a needle, a flexible tube is put on, which is inserted into the filler hole. The procedure is carried out until grease begins to flow out of the hole. After filling in a sufficient amount of gear oil, screw the filler plug and wipe the clutch housing dry with a rag.
Then a test drive is made, after which you should turn off the engine and make sure that there are no leaks from under the Haldex coupling plugs. After 10-15 minutes, unscrew the filler plug to check the lubricant level. If liquid flows out, the level is sufficient. If necessary, add gear lubricant to Haldex. After checking, the plug is installed in place, oil drips are removed with a rag. This completes the procedure.
The procedure for changing the oil in the Haldex VW Tiguan clutch can be seen in the following video:
5th generation Haldex
The sequence of work on changing the oil in the fifth generation Haldex is similar to that described above with one exception. As a result of the current trend to reduce the size and weight of automotive units, the control solenoid valve has been removed from the four-wheel drive clutch design. Respectively Haldex 5 has no oil filter fine cleaning. As a result, wear debris (metal dust and swarf) builds up in the oil circulating in the hydraulic system and is highly likely to cause serious damage. Consequently, for a greater guarantee for the new model of couplings, the interval between transmission lubricant changes should be reduced by several thousand kilometers.
Changing the oil in the clutch is not so difficult. In order to cope with this task, it is not necessary to be an auto mechanic and to have special equipment on hand. It is enough just to thoroughly study the theoretical part of the issue and skillfully apply it in practice.
Vehicles on which the Haldex coupling is installed
The clutch, as part of the AWD, regulates the transfer of torque from the front axle to the rear. Untimely oil change in Haldex is one of the most common causes of four-wheel drive problems. Timely maintenance of the clutch (oil change, elimination of bearing noise) will keep your car in excellent technical condition.
The Haldex multi-plate clutch is installed on VW vehicles with a transverse engine. But not so long ago, the couplings of the Austrian manufacturer began to be used by other well-known auto concerns, such as GM, BMW, SAAB.
Interesting! Haldex couplings appeared in 1988 and the first production models were installed on Audi and Volkswagen vehicles.
How often to change the oil
The frequency of oil changes depends on many factors. For example, Volkswagen Tiguan owners are advised to carry out the oil change procedure in the Haldex clutch through every 10-15,000 km of run.But the need for such a procedure must be judged in each individual case.
The frequency of changing the oil in the clutch will be influenced by:
- fuel quality
- mileage
- ecology
- climate (average daily temperature; seasonal features; temperature changes)

All these factors affect the condition of the vehicle in general and oil consumption in particular. But for more confidence, you can test the transparency of the oil. Before taking an oil sample, you must let the machine run for about 10 minutes. The darker the oil, the older it is, which means it's time to fill in new fluid and change the filter.
What you need to change the filter and oil in the Haldex coupling
As mentioned earlier, no special equipment or special knowledge is needed to change the oil in the clutch. Every more or less experienced motorist will cope with this task.
For this he will need:
- waste oil drain
- set of wrenches for drain plug and filter cover
- pliers
- gloves with a water-repellent effect (ordinary rubber gloves will do)
- rags
- one hundred cubic meter syringe
 First you need to prepare the workplace, make sure it is well lit. Since the bulk of the work will be carried out under the car, it is necessary to fix the car in the desired position with a jack or install it above the inspection pit. In this case, the machine must be in a horizontal position, at the same level, in order to determine the exact amount of lubricant.
 Important!Coupling maintenance does not tolerate savings. Give preference to high quality oil and filter, the service life of the Haldex coupling depends on it. ForVolkswagenTiguan will fit oil G055175A2.
Having finished with the preparatory work, we proceed to the procedure for "updating" the coupling.
Filter and Oil Change Procedure
Following a simple algorithm of actions, you can easily cope with the task.
Removing the filter and draining the oil
In order for the oil to easily drain, it must be warmed up to a temperature of 300 ° C. For personal safety, it is worth wearing safety glasses.
Before draining the oil, it is necessary to unscrew the bolts holding the filter cover, using pliers, remove the thin gasket and the filter for the Haldex coupling.
Then place a container under the clutch to drain the used oil and remove the clutch plug.
Cleaning the pump mesh
For full maintenance of the coupling, one more procedure is required - clean the pump mesh.
This can be done in five steps:
- Remove pump connector
- Unscrew the fixing bolts
- Get the pump
- Remove from it two bolts holding the mesh
- Clean the mesh from dirt
After that, the mesh is installed back and the pump returns to its "native" place.
Oil filling and filter installation
The quality of the oil will not depend on the Haldex series, whether it is a 4 or latest generation clutch. You just have to make it a habit to purchase only high-quality raw materials from trusted companies.
So, we proceed to change the oil and a new inventory is used - a stock-tube syringe. After filling it with oil and opening the filler plug, we begin to fill the coupling with a new, clean liquid.
Do not reuse the old filter by removing it - dispose of it immediately.
Begin installing the new filter by checking the seals. If the rubber rings look worn, they should also be replaced with new ones, otherwise oil will leak through them.
Remember! Before installation, the filter must be lubricated with oil, otherwise it will not “sit” well in its place.
After a thorough check, replacement of parts, we install the filter cover and fix it with bolts.
Check the tightness of the bolts at each stage of the installation work. Under-tightening the fixing bolts is as bad as over-tightening them. In both cases, there is a risk of damage to parts. When tightening the bolts, the main thing is to make a reasonable amount of effort - no more, no less.
Checking the oil level
When oil starts to flow out of the hole, it will mean that the coupling is filled to the brim. Foroil change in the Haldex clutch in VW Tiguan it will take about 650 ml of liquid. So with proper use, taking into account the filling of the coupling with oil and the lubrication of the parts, you will need about a liter of oil.
The procedure for changing the oil in the Haldex coupling is really not as complicated as it might seem at first glance, which means that you can do it too.
The Haldex Volkswagen Tiguan clutch, according to the manufacturer's assurance, the unit is eternal and does not require maintenance. We understand that there are no eternal knots and liquids, everything has its time, this is especially true for transmission units - handouts, gearboxes, gearboxes and couplings, including Haldex. Elsa, of course, knows better, we completely trust the German wizarding engineers, but the saying “Trust but check” has not been canceled yet.
Given:
- Car: Volkswagen Tiguan
- Year of issue: 2011
- Model Year: 2011
- Engine: CAWA (2.0L 1984 cc 200 HP)
- ICE features: Gasoline, 4 valves per cylinder, timing chain drive
- Transmission: JVZ (classic automatic transmission, 6 steps, modification 09G)
- DSG Preselective Gearbox: No
- Mileage: 60191 kilometers
The Haldex clutch was invented in 1988 by Swedish engineer Sigvard Johansson, who developed the idea of \u200b\u200bautomatically redistributing torque between the axles of a car in unpredictable rally conditions, since he was also a rally racer. In 1992, he sold his invention to the Swedish company Haldex, after which they began to introduce it into the design of the Quattro all-wheel drive transmission, thereby realizing the concept of an automatically connected all-wheel drive. The Haldex coupling has been used in serial machines since 1998. The first were the Audi A3 Quattro, Audi TT and VW Golf.
The Haldex Volkswagen Tiguan clutch has been modified and adapted by German engineers. Before her, a viscous coupling was used, which gave four-wheel drive, but had a number of limitations and inconveniences, the main one of which was a low response speed, which allowed the wheels to slip when the driver did not expect it. Haldex is controlled by a computer that monitors the speed of each wheel, movement in turns, how the car brakes and accelerates, takes data from the yaw rate sensor, on the basis of which it controls the clutch. All this is perfectly combined with ABS, EDS, ESR, ASR, which allows us to drive comfortably and safely.
The hub, discs, working and sliding pistons rub, press, compress each other, which means there will be wear. The Haldex Volkswagen Tiguan clutch is equipped with a filter that is installed in the rear axle gearbox housing and is activated when all-wheel drive is engaged. VAG engineers somehow missed the logical chain “If there is a filter, then there is dirt”, and therefore it must be changed. The formula for the frequency of oil change in the Tiguan gearbox has long been derived - every 50 thousand kilometers with unloaded driving. Why is that? When the rear axle is operating, wear products (metal, plastic, paper) get into the oil and, like the Chinese, who are crushing all the markets in the world, these abrasive particles depress the operation of the rear gear. The contact of the oil with the metal provokes oxidation in this unit, which eventually results in more serious malfunctions, up to the transformation of the car into a front-wheel drive one - it's like getting a snowball in the face from a small child, it seems like a trifle, but the bruise can be impressive.
Getting started: first, diagnostics of Tiguan, then we drive the car through a technical wash, raise the person in need on a lift, inspect the bottom and suspension for damage, smudges and some suspicious things. We are convinced that everything is fine and proceed directly to the replacement.
The filter is hidden behind a cover.

Removing it is not difficult, first you need to loosen the bolts on it, but do not unscrew them entirely.

The bolts are loose, the scanner is connected - Vzhuh! - turn on the four-wheel drive with one movement of your finger and the cover is gently squeezed out of the gearbox by pressure. Fast, clean, neat! Moving on.

We turn to the bolt in the drain hole. We unscrew it and get rid of the old oil with impurities we don't like. We are waiting for the end of the flow: oil will flow both from the drain plug and from the hole where the filter is located.

Now you can safely unscrew the bolts, remove the cover and pull out the filter.

This is how a filter with a load of 53,000 kilometers looks in close-up. There are indeed wear particles in the oil.


Place the new filter in its place and close it with a lid.

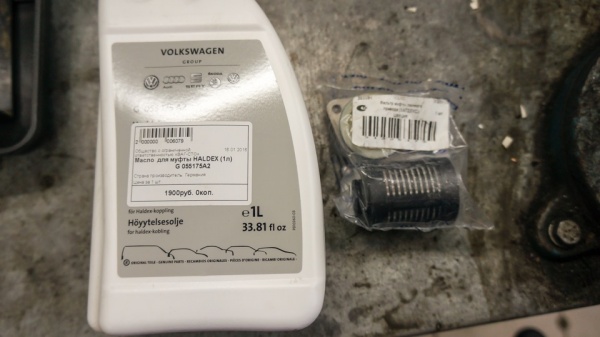
To get a guaranteed result from the procedure, we use only original oil from the manufacturer. We share the serial number of the oil, we do not mind.
Changing the oil in the Haldex coupling on Tiguan is quite simple, and even an ordinary man in the street can do it with his own hands, without any special equipment, you just have to delve into this issue a little.
Before replacing, let's understand what a Haldex coupling is, what it does and what it consists of. Haldex is used in 4Motion all-wheel drive systems, it carries out and controls the transfer of torque from the front axle of the car to the rear. Haldex is located in the rear axle differential housing.
At the moment, 4th generation Haldex couplings are installed on 4Motion all-wheel drive systems, they have a simpler design than their predecessors. Haldex fourth generation consists of a pump, control system, pressure accumulator and friction discs.
As you can see, the clutch is an important component of the car and it is necessary to change the oil in it every 50-60 thousand kilometers so that it functions normally and does not let you down at the most inopportune moment.
How to change the oil in the Haldex clutch on a VW Tiguan.
First, we buy oil. Should be purchased G055175A2. The replacement process will consume about 650 ml, so take a liter.
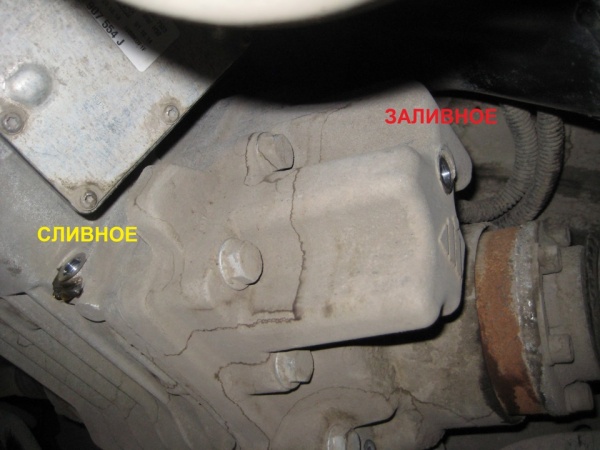
Let me remind you that there is a haldex in the rear axle differential housing. Photo for clarity: 
So let's get started.
1. During the replacement process, the main thing is not to confuse the plugs of the rear axle gearbox and the Haldex clutch, since such an error will be critical, because a completely different oil is poured into the rear axle.
2. Take a close look at the picture: 
3. The Haldex coupling plugs are shown in red, while the rear axle gearbox plugs are shown in green.
4. First, we need to drain the mining, for this we put a glass (more than 600 ml) under the lower plug and unscrew it, wait until this muddy slurry merges, then unscrew the upper plug and only after that, making sure that the remains of the mining have stopped pouring in a thin stream into the glass, twist the bottom plug and proceed with the replacement.
5. Take new oil, put it into a stock-tube syringe, if necessary, put a tube on the tip. 
6. Pour the oil until it flows through the top, then plug the hole with a stopper, wipe everything that gets dirty, and that's it, it's done, the oil is changed.
Thus, the oil change in the Haldex coupling is over, road tests can be carried out.
Video "how to change the oil in the Haldex clutch on a Volkswagen Tiguan"
Administrator
18633

1. Regulations for replacement for VW Tiguan:
1.1 For models up to 2009 - every 60,000 km., With hard operation (with a significant load on the clutch) - every 40,000 km;
1.2 For models from 2010 - once every 3 years or every 60,000/40,000 km, i.e. which comes first.
2. Required consumables:
2.1 Oil in the coupling (720 ml is needed for replacement):
- or original (new version of oil), ref .: G060175A2 - 1 pc. (0.85l.);
- or original (previous version of oil), ref .: G055175A2 - 1 pc. (1l.);
- or Volvo'vskoe, art .: 31325136 - 1 pc. (1 l.). !!! It is said to be the same oil as the original (previous version), ref .: G055175A2.
2.2 Filter:
- or VOLVO'vsky, art. 31325173 - 1 piece;
- or FORD'vsky, art .: 1673828 / 9V4N-4A319-AA / 9V4N4A319AA - 1 pc .;
- or LAND ROVER'sky, art .: LR032298 - 1pc.
The original filter kit for the Tiguan can be bought at http://www.neuspeed.com/haldex111358...ement-kit.html !!! (Although there is no need for this, since from the Volvo kit (art. 31325173) we use only a filter for replacement, and as a zip: a cover, two bolts, and an O-ring). !!!
2.3 Fill and drain bolts:
- Filler bolt, included with washer, art. N90281802 - 1 pc.
- Drain bolt, included with washer, art. N91082701 - 1 pc.
Change the bolts depending on their condition (i.e. at the first replacement - it is not necessary to change them).
2.4 Tightening torque for bolts:
- Drain bolt - 30 Nm;
- Filler bolt - 15 Nm;
- Filter cover and motor mount - 6 Nm.
3. Instruction:
From Elsa: On vehicles with a Haldex clutch, due to the fact that the clutch is located in the same housing with the final drive, drain plugs and plugs for both systems are often confused with each other. These errors, which can be avoided during maintenance and repair, can damage the clutch or final drive.

1 - screw plug of the Haldex coupling filling hole.
2 - drain plug of the Haldex coupling.
3 - screw plug of the filling hole of the main gear.
4 - drain plug of the main gear.
To clean the mesh, it is not recommended to disassemble the pump itself; it is advised to clean it (mesh) directly on it, by blowing and / or with an alcohol-based brake cleaner. And if you decide to disassemble, then do everything very carefully, because there are springs and a bearing. Be sure to write down or photograph how it was so that you do not get confused during reassembly.
When you pulled out the pump, you will see a mesh on an iron round plate with a slot under the mesh, unscrew only two bolts that hold the mesh, and in no case unscrew the third bolt. Behind the metal plate there is a hydraulic pump mechanism, which also consists of a certain number of small parts, and as practice shows, these parts will just get lost or roll up somewhere. two, (0AY 598 305 - Seal kit for the booster pump), the pump does not need to be disconnected from the power connector.


Sequence of work:
1. Thoroughly clean from dirt all joints of the motor and filter (so that dirt does not get inside). For example, use an alcohol-based brake cleaner.
2. Remove the filter:
2.1
unscrew the bolts securing the filter cover, remove the cover;
2.2
in order for the filter to slide out of the bore, you must:
· or using a diagnostic cord: connect "Vasya diagnostician", Run block 22 "All-wheel drive system" next 03 "Test of executive mechanisms". We press to run. Tests are performed sequentially. We reach the test "Pumping motor is on" and press "start".
· or having disconnected the "chip" of the pump in the place of its connection to the clutch control unit, supply it with 12V from a conventional battery.
Be careful with the pump chip, many of them, from not knowing how to remove it, break the chip retainer. To properly disconnect the connector, you can practice on the chip from the antifreeze tank - they are the same (we press the chip, trying to stick it deeper, at this moment we press on the heel of the latch (I pressed it with a small awl), it will be released, and then we pull the chip off). Next, we release the wire from the holders 3 pieces. The most dreary one turned out to be removed from the top of the clutch, it is not visible, therefore to the touch. We take out the wire.
For the correct power supply, you need to apply PLUS + to the "chip" contact located on the rectangular side of the "chip", and MINUS - to the contact located on the semicircular side of the "chip". If you confuse the polarity, then it's not scary, just the pump will start pumping in the other direction.

· or start the engine and let it run for a while until the filter is pressed out.
2.3
After performing any action specified in clause 2.2, the filter with the plug should protrude by about 5-7mm (the first O-ring will appear), while 100 grams of oil will pour out (therefore, prepare a napkin or rag in advance). Next, very carefully swing the plug with the filter by the pin, it (the filter) very quickly squeeze out to the second O-ring, and then completely remove the filter with the plug.
!!! There were cases when, when "picking out" the filter from the clutch with improvised means (an awl, a sharp slotted screwdriver, etc.), they pierced it through and through, and when installed, oil began to leak through it. Since you can buy the original filter kit only on ebay.com, as a temporary solution (or maybe permanent), we do this: cut off the damaged part from the original plug and glue a thin plug from the Volvo kit in its place. It turns out a pretty reliable design. !!!
!!! Must remember - which side was the filter !!! since it has a check valve.

It is also believed that the oil pressure relief valves in the filter plug (# 3 in the illustration below on the left) should be perpendicular to the ground. !!!
This must be taken into account when reinstalling the filter.


2.4 Unscrew the drain plug and the oil begins to drain through the drain hole (you can turn the wheels to speed up the process).
2.5 After unscrewing the two hexagon screws, remove the pump in order to clean the mesh on it. With an effort we take out the pump. It also (like the filter) has two rubber o-rings. There is a mesh on the pump, clean it with an alcohol-based brake cleaner and / or blow with air.
It is highly advisable to flush the coupling. Better with an alcohol-based brake disc cleaner until clean rinsing comes out of the clutch. The clutch can be washed indiscriminately on site. Under no circumstances should you use OBDs, carburetors, etc. - they corrode the rubber parts of the coupling.
We put a tube on the bottle with the cleaner, put it in the filler hole, and knock out all the trash under pressure with alcohol vapor. It is also possible through the pump seat and through the filter seat.
Through the recess of the place where the filter sits (coupling housing), flushing is carried out in the following order:
- First, carefully remove dirt (with a napkin or rag) from the recess of the place where the filter sits (coupling housing). !!! It is important that this dirt does not get into the central hole (where the filtered oil is already entering), since if you drive dirt into the central channel, it is possible that the clutch will fail: dirt particles can get into the inlet valves of the second circuit, as well as into the control valve - the solenoid . !!!;
- After flushing, blow through everything with compressed air to evaporate the alcohol. These are three holes: filler, filter location, pump attachment point.
2.6 Reinstall the pump: we lubricate the bore of the pump and 2 of its sealing rubber rings with oil, install the pump in place, tighten the screws and begin to tighten them one by one, if necessary, tap the pump lightly with a wooden mallet. They pushed me a little, pulled me up. It can be difficult to install the pump simply by hand (without tapping). We connect the pump "chip" to the clutch block.
2.7 Install a new filter couplings into place. To do this, install the filter element from the Volvo kit with the RIGHT side to the sealing plug, lubricate the sealing plug bore and the plug itself with 2 rubber rings with oil. And, without allowing it to skew, carefully install the assembled "structure" into the coupling until the second cut ring disappears, install the filter cover (old or new from the Volvo kit), tighten it to the coupling with screws with a torque of 6 Nm.
2.8 Screw new or old drain bolt with a torque of 30 Nm.
2.9 Fill in new oil through the filler hole. The oil to be poured should be warm - about 30-40 degrees Celsius (if the replacement is carried out in cold weather, then the oil can be put on the battery to warm up in advance). Remember that the filling volume of the coupling is 720 ml, only 600 ml immediately fits. Therefore, pouring oil along the edge of the filler hole, it (hole) must be closed with a filler bolt with a torque of 15 Nm.
Next, you need to connect the "Vasya diagnostician" cord, run the program and run the test of the rear-wheel drive actuators again, but do it to the end, let the motor run a little longer so that it drives the oil through a new filter (somewhere about a minute). After that, add oil to the clutch again - just the remainder of about 120 ml should fit.
Instead of using a lanyard (well, or after using it, if 120 ml was not added), you need to drive a car so that four-wheel drive is connected, i.e. the clutch is working, and then add the rest of the oil, tighten the bolt to a torque of 15 Nm.
PS: infa from the land rover club:
The cover of the clutch block control unit is made of aluminum. After 4 years of operation in Moscow, this cover tends to rot from road reagents. Small holes appear in it, as if someone had poked with a needle. Through these holes, moisture makes its way to the printed circuit board. As a result, the varnish on the board bursts, the board damp, the tracks rot. Then they burn. To avoid corrosion, treat the cover of the control unit with anti-corrosion protection ("Movil", etc.) in advance.
To write this document, all the material was taken from the forum http://forum.tiguans.ru/, from the topic "Oil change in the Haldex coupling", then summarized. I express my gratitude to all members of the forum who participated in the collection of information on this topic. This is a huge work and costly business!
Yours faithfully,
Insaider_777 (Ilya Gurin).