The camber-toe angles of the wheels of the car can be adjusted with your own hands, using improvised means and simple devices. In this article, we will talk about how to make wheel alignment yourself at home, and what difficulties are most often encountered when adjusting the wheel alignment angles.
Incorrect camber adjustment can cause, for example, rapid tire wear, or the fact that when driving in a straight line, the machine will steer to the left or right.
At the end of this article, you will find a video that details and shows everything you need to know about wheel alignment.
First, let's understand the theory: wheel alignment - what is it? What are the wheel alignment angles and how does the behavior of the car on the road depend on them?
Camber-convergence - what is it?
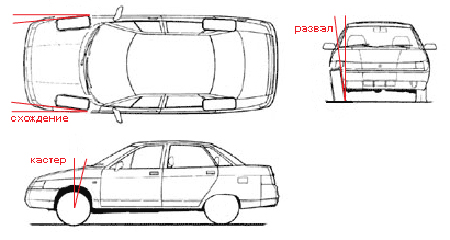
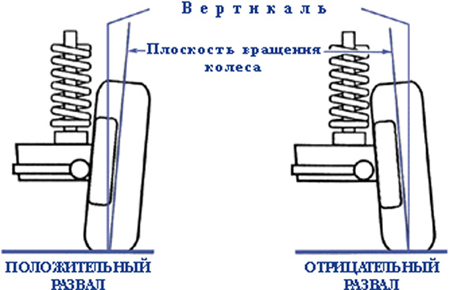
Collapse Is the angle between the vertical and the plane of the wheel. It ensures reliable contact of the tire with the road (see the picture above).
Convergence Is the angle between the direction of travel and the plane of rotation of the wheel. The stability of the car in corners and tire wear depends on it.
- Rear wheel drive vehicles should have the wheels turned slightly towards each other - this is called positive toe. In motion, they move apart and become parallel.
- For front-wheel drive vehicles, on the contrary, the toe-in should be negative (see the diagram below).
Caster Is the caster angle of the king pin. This parameter very rarely needs to be adjusted, only on the newly assembled front suspension from new parts, so we will not consider its adjustment.
Repair of the suspension or steering (replacing the same shock absorbers or steering joint) leads to a significant change in the installation angles of the wheels. The daily operation of the car also, over time, makes its own adjustments to these parameters, so periodically there is a need to adjust the camber-toe-in.
It is best to adjust wheel alignment twice a year, when changing tires seasonally. During this time, more than once you will fall into a hole or run over a curb, from which the chassis looses and the angles change. Timely camber adjustment is much cheaper than a set of new tires.
In 1955, American engineer Lee Hunter developed the first wheel alignment stand. The sensors mounted on the wheels sent out focused light beams and accurately measured the angles. Therefore, the stand was called optical. But already in 1969, it was connected to a computer, and in 1995, 3D technologies were first used to measure and adjust angles.
True, Soviet motorists coped without any stands and computers - with the help of wrenches, calipers, threads and a plumb line, they adjusted the camber and toe angles with their own hands.
Diy camber adjustment instructions
Before proceeding with the adjustment of the camber and toe angles, it is imperative to check the chassis of the car. If repair is needed, then it is pointless to do wheel alignment. The steering and suspension must be in good order.
Pay attention to three points on which the angles of the wheels on the car depend very much:
- Serviceability of the chassis (more about diagnostics of the car suspension).
Be sure to check the tire pressure before adjusting the camber-toe and make sure that you have not accidentally forgotten a couple of bags of potatoes or cement in the trunk :)
As an example, we will describe how to make wheel alignment with your own hands on a VAZ 2109 car.
To avoid unnecessary camber and toe adjustments after chassis repair, mark all disconnectable connections relative to each other before disassembling the suspension. This is best done with a chisel, punch, or paint. It is also necessary to count the number of revolutions when unscrewing the tips from the steering rods.
The camber angles are adjusted in the following order (recall that in our case the actions are described for the VAZ 2109 car):
- Machine must be parked on level ground before camber adjustment is started.
- We put two vertical marks on the rim of the wheel with chalk in diameter - one on top, the other on the bottom.
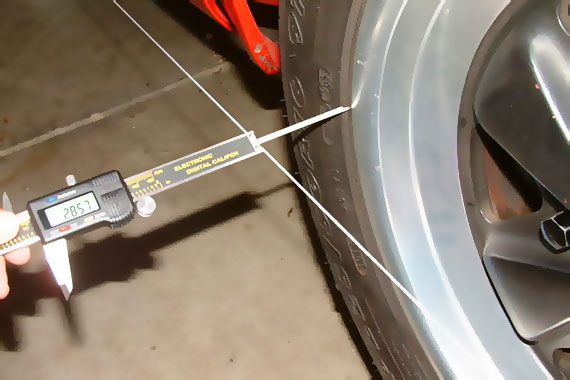
- We apply a plumb line to the wing, and along the marks with a ruler or caliper we measure the distance from the rim to the cord at the top mark, and then at the bottom. The difference should be ± 3 mm.
- The rim may not be perfect, so it is advisable to roll the car by turning the wheel 90 ° and making 2 more vertical marks. We measure again.
- Do the same on the second wheel and record the result.
- Then turn the machine 180 ° and take measurements again, write them down and compare.
- Then remove the wheel and with two 19 keys, loosen the two bolts securing the shock absorber strut bracket to the steering knuckle.
- Move the steering knuckle with a wrench by 19 due to the eccentricity of the bolt head inward or outward to the required distance, thus achieving the required camber angle.
- Tighten the bolts, put the wheel in place, lower the car and swing a few times by pushing down on the fender. Take measurements.
- Move some distance away from the car and look at the position of the front wheels, comparing them to the plane of the rear wheels.
On rear-wheel drive cars, the camber angle should be within + 1 / + 3mm, and on front-wheel drive cars, camber in the range from -1 to + 1mm is considered normal.
Wheel alignment adjustment
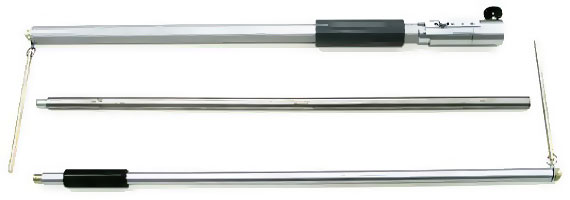
Toe-in ruler
To adjust the angle of convergence, measurements are most conveniently made with a special telescopic ruler with a scale (see the photo above). It is more convenient to work in the pit. The steering wheel must be in a straight-ahead position.
- Before adjusting the toe, on the inside of the wheels with chalk, apply one mark on the left and right tires as close as possible to the rims.
- Having created a preload in the ruler, install it, resting its ends at the designated points so that its body does not touch the body and suspension parts.
- Shake the ruler lightly, on the movable scale align “zero” with the stationary pointer. Fix the scale.
- Carefully roll the car forward so that the ruler moves back with the wheels, but does not touch the suspension and body parts.
- Check the readings.
If on a VAZ 2109 the distance between the wheels at the rear is less than in front, then the steering rods must be shortened, and if more, then lengthened.
- Using a 27 key, loosen the locknuts on the steering rods. Nuts with notches on the edges have a left-hand thread.
- Use a 24 wrench to rotate the clutch to change the length of the rod.
- Remember to keep an eye on the horizontal position of the steering wheel spoke.
- Set the movable scale on the toe-in ruler to zero and roll the car backwards.
- With readings from -1 to + 1mm, the toe angle adjustment can be completed. For extra control, drive your car forward.
Look in turn from the side of each front wheel to the gate of each rear wheel. With a horizontal steering wheel spoke, you can easily see whether or not both wheels move to the left or right. If the displacement is noticeable, then by unscrewing one rod and twisting the other by the same number of revolutions, correct the displacement.
After adjusting the camber-toe with your own hands, you should think about which wheels to choose: stamped or cast? It is believed that alloy wheels significantly reduce the load on the suspension, and stamped ones are more practical.