Hardly anyone seriously thought about the wheel alignment procedure with their own hands and also with improvised means. But just a few decades ago, adjusting the "geometry" of the chassis "in Uncle Vasya's garage" did not cause any surprise among motorists.
Wheel alignment and camber. What is it and why?
If you mentally draw one line along the vertical plane of the wheel and the second along the plane of its rotation, then we can see the camber angle, which is responsible for the position of the wheels when the car moves in a turn, for the clarity of its passage.
Camber angle
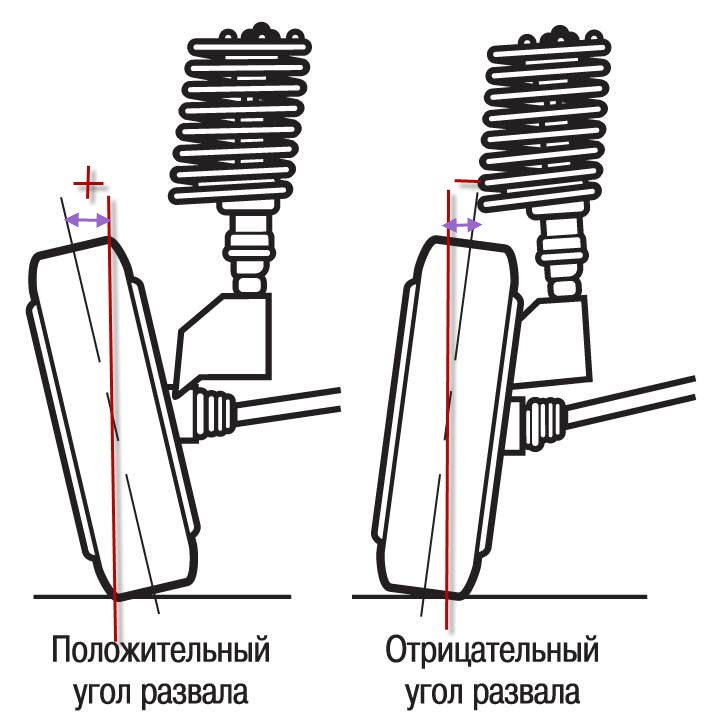
Positive and negative camber
Now let's play with our imaginations, looking at the car from above. We draw lines of the plane of rotation of the wheels and lines of the direction of its movement. Here we can observe the toe angle, which gives our car driving stability and its further predictability.
Toe angle
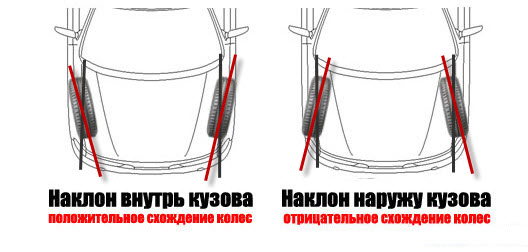
Positive and negative convergence angle
In order to realize the full importance of the process of adjusting the camber-toe-in, it is necessary to understand that its stability while driving (the tendency to overturn and drifts), directional stability (handling and maneuverability), the economic component (increased tire life and fuel economy) depend on the correct installation of the wheels of the car. ).
Signs of disturbed wheel alignment
As the "manual" of a car mechanic says: "... for the domestic vehicle fleet of early years of production, the frequency of checking the" geometry "is 10,000 ... 15,000 kilometers ...", for foreign cars, experts recommend diagnosing every 30,000 kilometers. For me, this is too vague an indicator that does not at all reflect the realities of modern operating conditions. Agree, it is difficult to bind to these recommendations an off-road lover on a tuned "Pajero", which actively "collects" all the bumps and bumps, and a grandfather on the "seven", for whom overcoming road irregularities is associated with a complete stop of the car. Therefore, to determine the state of the camber-toe angles of the front and rear wheels, the following signs can serve:
- when driving in a straight line, the car leads to the side;
- when the wheels are in a straight forward position, the steering wheel bar is shifted to the side;
- there is no directional stability (the car shows unusual behavior, "prowls" around);
- delayed reaction to turning the steering wheel;
- "Tight" steering wheel;
- when braking, the car "leaves" to the side, to turn (when the braking system is in good order);
- at maximum cornering angles, the radii differ significantly from each other (the wheels can touch the wheel arch liners);
- when exiting a turn, the steering wheel does not return;
- uncharacteristic tire noise while driving;
- uneven rubber wear.
In order not to be confused by the last item on this list of "symptoms", it is necessary to periodically check the air pressure in the tires, as, in principle, the instruction manual for the car says. Normally, tire wear should be caused by the conditions of its operation, and not by the consequences of mechanical malfunctions of the car's suspension.
![]()
Examples and causes of premature wear
In addition, there is also an unscheduled need to check and adjust the camber-toe angles. As a rule, this procedure should be carried out after:
- strong impacts leading to damage or displacement of suspension parts;
- long-term and aggressive driving on bumps;
- changes in vehicle clearance (an indirect sign of "fatigue" of struts, shock absorbers and rubber suspension elements);
- removal and installation of racks, beams with levers;
- replacement of suspension elements (ball bearings, silent blocks of levers and rods);
- replacement of elements of the steering system that affect the position of the wheels (steering rack, as well as its tips and rods);
- after autobuffers or other options for spacers were installed on the car.
Adjusting the wheel alignment on passenger cars
To begin with, the wheel alignment angles on different car brands can vary significantly. This is due both to the design features of the car's suspension and directly to its purpose. For example, drift racing cars have negative camber, which gives them a small contact patch on a straight line (reduces rolling resistance), while cornering, the contact patch has a maximum value, which allows them to corner at maximum speed. And from the camber, naturally, the values of the convergence angles also change.

This "geometry" is common for drifting.
As a result of the above, I suggest you get acquainted with the methodology for setting the camber-toe angles using the example of the VAZ 2110 car, and then, if you wish, you can successfully apply it directly on your car.
Tools and prerequisites
- A set of keys, heads;
- Construction plumb line or level;
- A coil of wire or strong twine;
- Roulette or telescopic ruler;
- Two even bars 60 centimeters long;
- Two sliding supports for adjustable wheels;
- Inspection pit with a flat platform.
Preparation
We install the car on sliding supports (pancakes), while checking that they are on the same level, since the curvature of the floor greatly affects the accuracy of measurements.
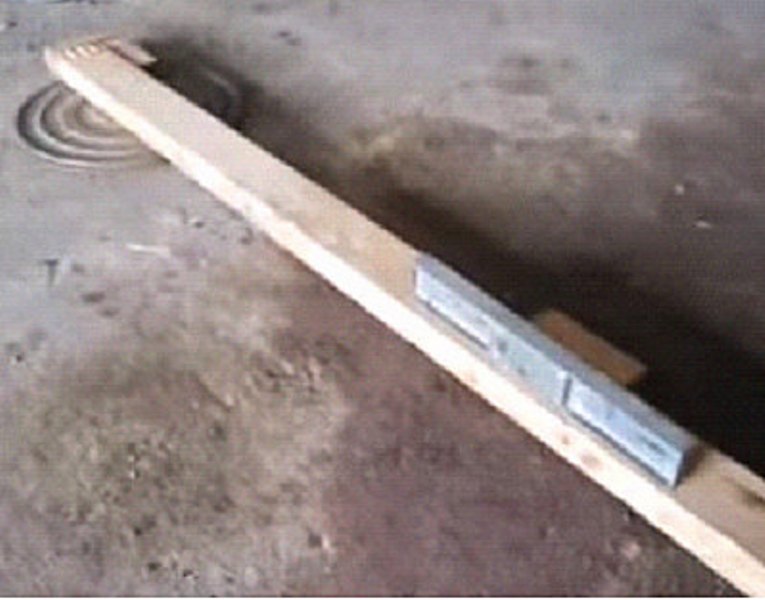
Level check
I understand your dumb question about the presence of supporting "pancakes", I propose to make them from four sheets of metal, having previously lubricated each pair for better sliding with grease.
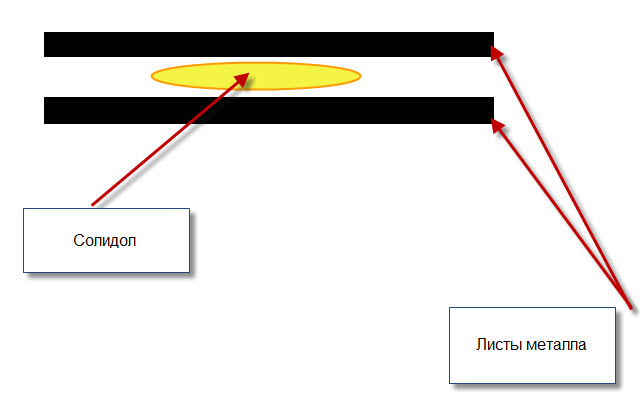
Homemade example
I draw your attention to this, since when adjusting the camber-toe angle of one of the wheels, the second must be stationary.
Diagnostics
At this stage, we have a choice in the way of removing the values of the wheel position: with a building plumb line or a building level.
- Plumb line.
In order for all measurements to be correct, we need to set the wheels strictly along the line corresponding to the rectilinear movement;
Having attached the plumb line to the wing (for example, with a magnet with a cloth placed under it), we measure the distance "A" and "B" on the left and right wheels (the reference point is the wheel rim!), And write down the result;
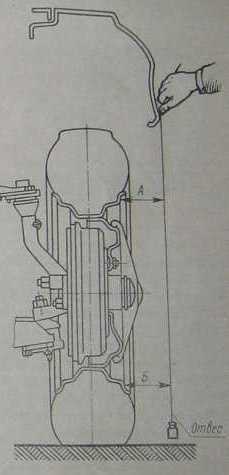
This is how a vertical plumb line is used.
We rent the car so that the measurement line turns 90 °, we take new indicators. We repeat the operation again and average the obtained values, thereby leveling the measurement error associated with the beating of the wheel disk. For front-wheel drive cars, the average values of the camber angles are considered to be 0 ± 1 mm, for rear-wheel drive, the range of +1 ± 3 mm is considered the norm (by the way, for 13 and 14 inch disks, 1 millimeter of camber is approximately 10 arc minutes).
In our case, the manufacturer recommends setting the camber angle to 0 ± 30 ′, which is approximately 2 ... 2.5 mm. What type of camber is preferable to you depends on the load of your car - the greater the gross weight, the greater the negative camber angle in dynamics ...
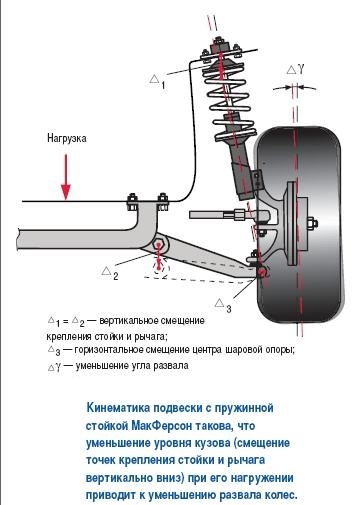
An example of weight distribution on a MacPherson type suspension
… And on the driving style - the more aggressive cornering, the more the wheel tends to positive camber.
The camber angle is very large
A little distracted, let's continue.
- Level.
On the car in question, it was decided to install a negative camber and, to facilitate the process, a plate with a thickness of 2.52 millimeters was previously attached to the level.
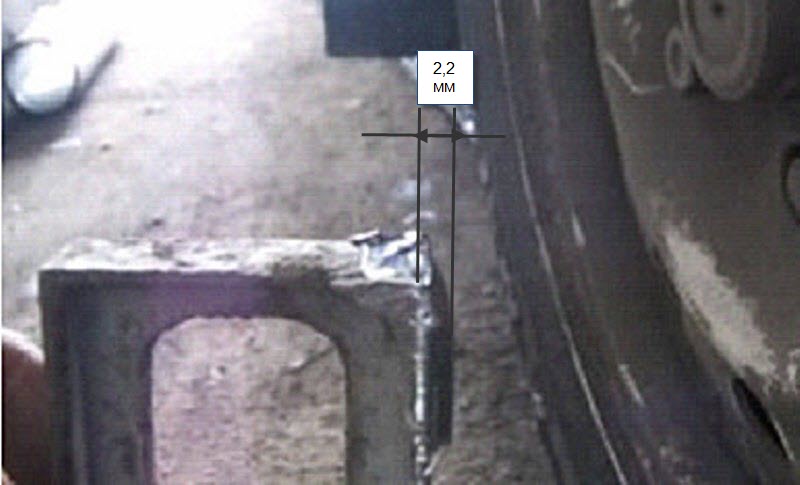
A measuring plate will help you in your work
Adjustment
After all the preparations, we just have to apply the level to the wheel rim and adjust its camber angle until the bubble takes a central position.
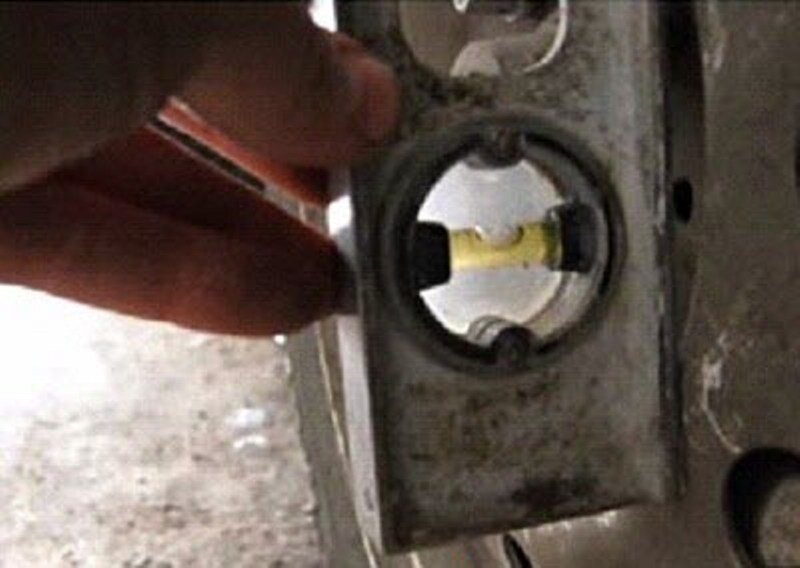
Use a building level to check
We repeat the above operation for the second wheel. The adjustment process itself is to unscrew the bolts.
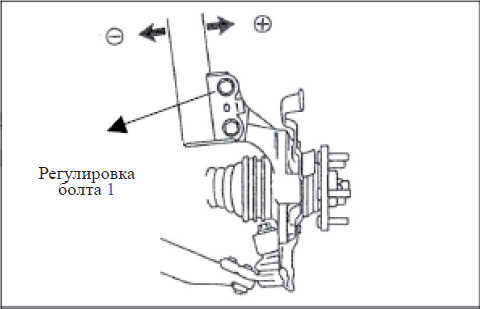
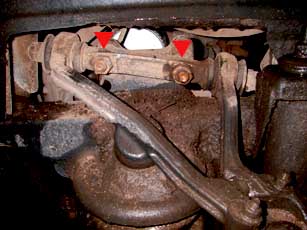
Adjusting bolt
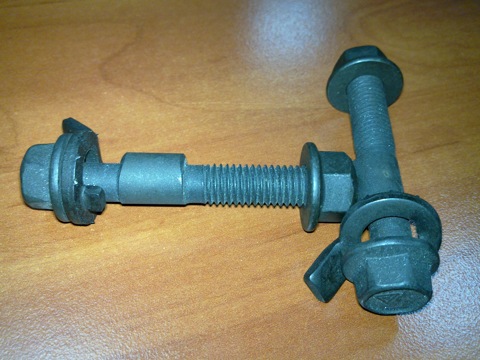
Eccentric bolt
The adjustment of this value on your model may be slightly different, but the meaning of the actions remains the same: deflect the wheel axle perpendicular to the car body. For example, on front-wheel drive vehicles with the same MacPherson strut, this parameter is also adjusted by the strut bolts. In one version, the already mentioned upper bolt can play the role of an eccentric, in the other, the rack itself has an oval-shaped adjustment hole.
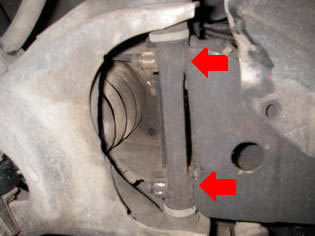
The photo shows an oval hole for adjustment
In the third case, the default camber of the manufacturer may not be adjusted at all and then, if necessary, you either have to make an oval groove on the rack mount yourself or bore / purchase the upper bolt for the adjusting size.
On rear wheel drive vehicles, the camber angle is adjusted by adding and subtracting washers of a certain thickness between the upper / lower arm and the beam.
Shims are marked in red
The methods can be different.