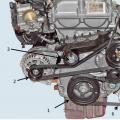
During the movement of each car, its chassis, which includes the suspension and wheels, is subjected to especially significant loads. In order to at least partially reduce the load, as well as ensure the straight-line movement of the machine, the wheels are installed at certain angles. In addition, the available wheel angles affect.
There are several angles at which the wheels are installed, one of them is the so-called wheel camber, the second is toe-in.
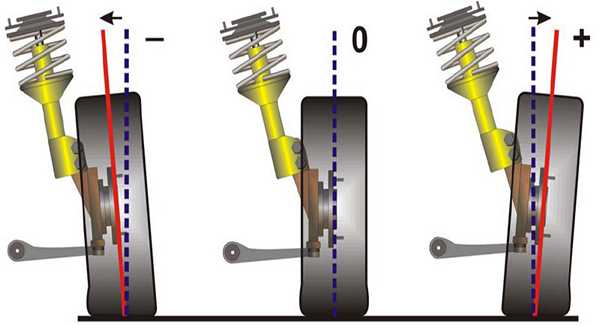
Camber is the angle of deviation of the wheel axis from the vertical position. Camber is positive when the top of the wheel is tilted outward from the center of the car, and negative when the top is directed towards the center of the car.
This angle is needed to reduce the steering gear of the oscillating movements of the wheel when driving over bumps. Also, the task of this angle is to ensure the largest possible contact patch of the slope tread with the track surface. The presence of this angle also affects the stability of the car when cornering.
Camber
On cars that do not use a MacPherson suspension, camber has a slight positive value, that is, the top of the wheels is deflected from the center of the car. Usually the blockage value is small, about 2 degrees.
In the MacPherson suspension, this angle has either a zero value, that is, the wheel axis has a strictly perpendicular position relative to the road surface, or, in some cases, the camber of the MacPherson suspension has a negative value.
Negative values of the angle of obstruction are also used on cars that participate in competitions on a circular track.
It should be said that it is difficult to achieve significant accuracy when setting this angle; it is often adjusted rather roughly. As a result, camber adjustment only leads to the fact that there is no increased tire wear. Also, camber adjustment should be carried out on both wheels at once, otherwise in the future the car will be carried away to the side where the smaller angle is set. Well, on the one hand, the tire will wear out much faster.
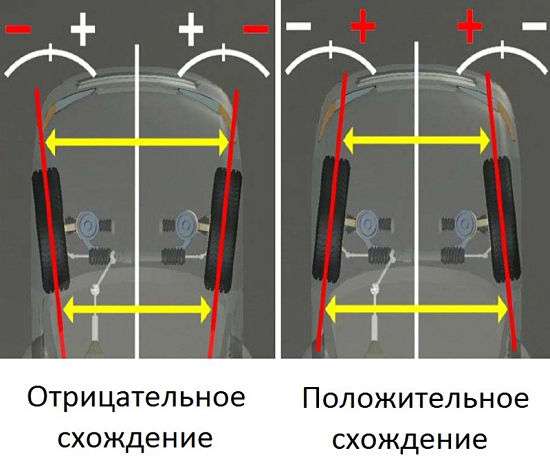
Let's move on to the wheel alignment angle, which is called "toe-in". This is the angle that is set between the plane of the wheel and the longitudinal axis of the car itself. This angle is needed to reduce car drift. Also, this angle significantly affects the tire wear rate. This angle can be measured either in degrees or in millimeters. Measuring toe in millimeters is pretty straightforward. The car is put on the site, first the distance between the inner edges of the front wheels at the rear is measured, and then at the front. Further, the value obtained when measuring the distance between the wheels in front of them is subtracted from the value obtained when measuring in the rear. This value should be either zero for MacPherson suspension or positive for other suspension types. If the value is negative, this angle is incorrectly set.
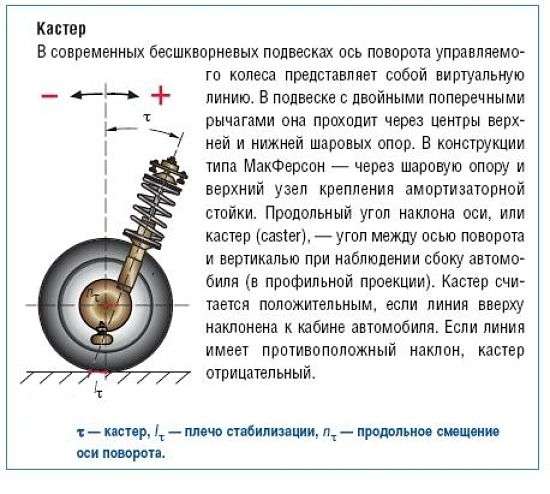
Castor is the angle of the longitudinal deflection of the suspension strut from its perpendicular position relative to the road surface. This angle provides additional stabilization of the wheels in the conditions of their rectilinear movement. It also provides self-alignment of the wheel position while driving, ensuring straightness of movement. This angle must have the same value on both racks, otherwise the difference in these angles can lead to the drift of the car to one side.
Diy camber adjustment
In most cases, wheel alignment adjustment is carried out on special stands with computer calculation of these angles. However, it is possible to adjust wheel alignment in garage conditions, but for this you need to know how to correctly adjust the adjustment, as well as have the equipment to perform this procedure. To adjust the angles, you will need:
- A set of keys;
- Special measuring ruler;
- Cord with a weight;
- Ruler (regular):
Camber adjustment
When adjusting the camber-toe with your own hands, the camber is measured first. Although this angle is measured in degrees, it can be converted to a millimeter value. The sequence of actions for calculating camber is as follows:
Video: Diy wheel alignment
- The car is placed on a flat surface. It is advisable to carry out the check in the garage with the inspection hole available in it. In this case, there must be space for moving the car, which will be needed when measuring.
- After installing the car on the site, you need to put the wheels so that they "look" exactly. After aligning the wheels, you need to put small marks on the wheel with chalk. Marks are placed at the top and bottom of the wheel.
- Next, a cord with a weight is taken. It must be attached to the wing of the car so that the cord has a strictly parallel position relative to the applied marks. For convenience, the cord can be glued to the wing with tape.
- A regular ruler with millimeter divisions measures the distance from the wheel to the cord at the top and bottom. To avoid errors, this distance is measured not from the tire, but from the wheel rim.
- After that, the car must be rolled forward so that the applied marks rotate 90 degrees. Two more marks are applied to the wheel again at the top and bottom parallel to the cord, and the distance between the cord and the rim is measured again in its upper and lower parts.
- Then the car is rolled again, but now so that the wheels rotate 180 degrees. That is, the last two placemarks should be swapped. The top will move down and the bottom will move up and the measurements are taken again.
- The difference in the three measurements should not be significantly different. Also, at a normal camber angle, the difference between the distances in the upper and lower parts of the wheel for all three measurements should be 1 mm for a car with front-wheel drive, and 1-3 mm for a rear-wheel drive model.
- If the indicators differ, adjustments need to be made. For this, the car is jacked up and the wheel is removed.
- After removing the wheel, you will need to disconnect the strut bracket from the steering knuckle. To do this, you need to use a prepared set of keys.
- By turning the eccentric bolt located on the steering knuckle, it is displaced to one side or the other, thereby adjusting. How much you need to move the steering knuckle will tell the early measurements.
- After that, the strut bracket is connected to the fist and the car wheel is put in place. After adjustment, you will need to take measurements again to make sure that the adjustment is correct.
Wheel alignment adjustment
Having finished with the camber, you can proceed to checking and adjusting the second angle - toe-in.
Video: The fastest and most accurate camber diagnostics
The sequence of checking and adjusting this angle is as follows:
- The car stands on the platform, the wheels are aligned.
- On the inside of the wheels in the front part, two marks are applied, they need to be applied closer to the rim.
- The telescopic ruler for measuring the convergence is prepared by creating a preload on it. The ends of the ruler must be resting against the existing marks. The movable ruler scale must be moved so that the "0" mark coincides with the fixed pointer.
- After installing the ruler, the car must be rolled forward so that the ruler is at the back of the wheel. When rolling, it is important to make sure that the ruler does not catch on anything.
- Next, you need to see if there is a deviation on the scale and how much. For front-wheel drive cars, the toe-in value should be "0 / + - 1". If the ruler readings are like this, then no adjustment is needed.
- If the reading is greater, then the adjustment is made. This operation is performed by changing the length of the steering rods. On the traction, you need to loosen the lock nut and, depending on whether it needs to be lengthened or shortened, the traction must either be unscrewed or screwed in a little. Then tighten the lock nut again.
- Having finished with the adjustment, you need to take measurements again.
Castor adjustment is usually not done. It is important to take into account that before you start checking and adjusting the camber / toe with your own hands, you should check the condition of the rubber suspension elements for wear, and also check the condition of the steering rod ends. If they are severely worn, the readings during measurements will differ and it will be impossible to correctly adjust the angles.
After adjustment, the correct alignment of the wheel alignment can be checked on the road. A car with correctly adjusted angles should not be pulled to the side, there should be no beating in the steering wheel.
What can a poor-quality wheel alignment adjustment lead to?
Here are a few defects that may appear after incorrect adjustment of wheel alignment and ways to eliminate them.
![]()
Rapid rubber wear due to incorrect camber-toe setting
1. The position of the steering wheel when the vehicle is moving in a straight line is deviated from the middle position.
There may be several reasons for the appearance of such a defect:
- increased steering play, which was not taken into account when adjusting the toe;
- the rear axle is slightly rotated relative to the longitudinal axis of the vehicle. This defect can be missed by the traffic controller if the work was carried out at the optical stand, as well as in the case when the mode of measuring the angle of installation of bridges is disabled on the computer stand;
- the difference in pressure in the tires of the right and left wheels, which was not eliminated before adjustment;
- the presence of other hidden defects in the suspension system, which were missed when inspecting and checking the chassis of the car before adjusting;
- there are cases when the middle position of the steering wheel changes if the wheels on the front suspension are changed among themselves.
In cases where there is a spontaneous deviation from straight-line movement (sideways deviation), the cause of the deviation should be identified and eliminated, and only then the average position of the rudder should be checked.
2. The car spontaneously deviates from the direction of travel.
There may also be several reasons:
- the difference in the quality of the manufacture of front wheel tires, expressed in the inhomogeneity of the power characteristics of their metal frame. This is not uncommon. To check, you need to change the front wheels - the pull should change its direction. To eliminate it, you should change the wheels among themselves, picking up such a pair in which spontaneous withdrawal will stop;
- defects of the rear axle, the diagnosis of which was missed before adjustment. Inspect and check the position of the rear axle;
- the presence of hidden defects in suspension systems that were not identified during their diagnostics, were not carried out in full or of poor quality;
- poorly made adjustment or not calibrated test stand.
3. One-sided drift of the machine appeared only after the adjustment was made, before this there was no deviation, but there was a characteristic uneven wear of the rubber.
The reason may be the difference in the quality of the tires, which is mentioned above, leading to the spontaneous evasion of the machine from rectilinear motion. However, before that, the withdrawal was compensated by incorrect convergence, the elimination of which led to the appearance of evasion. In this case, you should change the tires.