Having traveled around the streets of the city in rainy weather and wiped the headlights dozens of times, the motorist thinks about installing a headlight washer. The device allows you to easily and comfortably clean the glass of the lighting equipment from dirt without leaving the car. There are many devices on the market for every taste, but first you need to understand the design features of your own car.
Design
Depending on the design of the headlights, you can choose the optimal cleaning system option. There are two main types of headlight washers: brush and jet. The brush washer is difficult to install, since it is a mechanism of small wipers on the surface of the headlight glass.
The nozzles deliver a small amount of liquid and the brush removes accumulated dirt. Do not use this type on headlights with plastic optics, as over time the surface will be covered with many scratches. The jet washer cleans any type of headlamp using high pressure fluid. Installation of such a mechanism is much easier, since it excludes the brush from the design.
Essential elements
The headlight washer jet system includes:
- Rotary high pressure headlamp washer pump for supplying fluid to the injectors. The device creates a pressure in the system within 0.2 MPa.
- Connecting hoses to ensure that liquid from the reservoir enters the nozzles. Depending on the selected kit, they differ in material quality and length.
- System control unit.
- Fuse box and wiring to connect the pump to the vehicle electronics and monitor its operation.
- Fluid tank. Not available in some kits, since the pump is supposed to be located in the wiper tank.
- Injectors and bumper mounting kit.Depending on the type of placement chosen, they can be stationary or telescopic. The main difference between these types lies in the possibility of a hidden location of telescopic nozzles.

There are special washer kits for some models. They take into account the optics model and the upper bumper surface. In some cases, it is possible to connect the kit to the wiper reservoir, but often you need to choose a place for installing a separate reservoir. There are also no particular problems with the installation of a universal headlight washer.
Manufacturers
The main equipment manufacturers on the market are Sho-me and Hella. Headlight washers Sho-me will please with their price and ease of assembly. The company itself is a typical mass production from China, so it makes sense to opt for the installation of such a mechanism on a modest budget.
Hella, on the other hand, is a typical European manufacturer with strict standards and certifications, which affects the price. Therefore, Hella headlight washers are better in quality and have a longer life cycle, but the cost is much higher.
Nevertheless, the installation of a telescopic headlight washer Hella will really delight any car enthusiast with its long service life. When choosing such a simple mechanism, it is worth assessing the need to purchase better equipment and, if possible, save money.

Detailed installation instructions
Installing a headlamp washer does not require any special skills and is within the power of any motorist. If the manufacturer does not provide special holes, then you will have to drill them to secure the nozzles. To do this, you need to remove the bumper and carefully punch holes from the back.
The nozzles are located opposite the central part of the headlights, so you need to carefully measure the distance in accordance with the installation instructions. The exception is bi-xenon headlights, which cannot be used without a washer. In this case, the nozzles are located away from the center of the headlights.
The washers themselves can be repainted to match the color of the car, but for this you need to determine the paint number. We fix the nozzles in the hole made and check the quality of the fastening. Pay attention to the location of the headlight washer nozzle cover.

To install the pump, we drill a hole in the tank and fix it with a sealing rubber, if necessary, fix the device with electrical tape. After that, we mount the tank in the selected place and place a special tee valve for distributing the liquid in the system.
Important! Under no circumstances should the reservoir and hoses be located near units with high temperatures.
After installing the bumper in its usual place, we mount the hoses, the necessary valves and tees. According to the instructions, we connect the headlight washer pump to the car electronics. If the pump is located inside the wiper reservoir, then without a special headlight washer relay, it will work together with the wipers. If the pump is located in a separate tank, then it will be started by pressing a special button in the cabin. In any case, you can customize its work to your taste.

Connection and testing
The best place to install the control unit is the alarm column and the ignition unit. For this, the white wire is connected to the positive contact of the size lantern. Then the red wire is connected through a fuse to the power source. The black and red wires coming from the tie with the white are connected to the negative and positive contacts of the washer itself. The blue wire is connected to the positive terminal of the car cigarette lighter illumination or to the disconnect terminal of the dimensions.

It is worth conducting a test of the assembled system after installation before permanent operation, for this it is necessary to pour a special liquid into the tank, but distilled or boiled water is also suitable.
Important! During winter operation, water can render the pump unusable.
Maintenance and repair
Operating conditions will differ depending on the installation option and equipment chosen. If a car enthusiast connects the washer to the wipers button, then the fluid consumption will increase significantly. To create a high-pressure jet, much more glass cleaning fluid is required, so connecting to the standard wiper mechanism will entail constant refilling of the tank.

To reduce fluid consumption after installation, it helps to turn on the washer only by pressing a special button in the cabin. The headlight washer button will also allow you not to turn off the entire system in the winter, when the use of equipment is impractical and fraught with breakdowns.
In winter, the nozzles become clogged with ice and dirt, making it difficult to use them without thorough cleaning.Telescopic washers freeze to the bumper, causing damage to the headlight washer motor. Some drivers sometimes pull out the fuse responsible for the operation of the device during the cold season.
It is necessary to periodically use the mechanism you installed to avoid contamination of the nozzles. No more than once a week, run the system for a small test. In particular, this kind of prophylaxis is required when using telescopic mechanisms, since the nozzle can get stuck in the grooves.

Depending on the degree of breakdown and wear and tear of the equipment, small repairs can be done on our own. Over time, fluid from the system begins to flow from the washer housing joint. You can fix this by disassembling the case and fixing the malfunction. To do this, remove the bumper, disconnect the hose from the system and drain the fluid. Then disconnect the headlight washer from the bumper.
Then we separate the back and front parts, with the help of pliers we make several breaks around the circumference of the plastic ring. After that, the halves of the body can be pushed apart with a little effort. The device of the washer itself is quite simple: the headlight washer motor pumps pressure into the piston, after which it extends and opens the spray valve, from where the liquid is supplied to the headlight, after which the spring returns the piston to its place. Due to constant vibration, the rubber ring sealing the gap between the cylinder and the body slides into the wider part of the body and the tightness of the cylinder is broken.
To remedy the situation, you need to reverse the installation of the ring and fix it. This can be done with a thread lubricated with a sealant or with a rubber pad made by hand. After that, we assemble the body back and tighten it with a clamp.
Outcome
By purchasing a car, every motorist strives to improve comfort and convenience in his constant movements around the city. Unfortunately, manually cleaning your headlights gets in the way of a pleasant driving experience. Moreover, when there is an opportunity to automate this process without serious expenditures of finances and efforts thanks to the installation of additional equipment. Good road!
Even the most powerful lighting devices will not illuminate the road if the headlights are dirty. Consider how to install a headlight washer with your own hands to increase the level of safety when driving at night.
Washer selection
A headlight washer device is mandatory when installing xenon headlights on a vehicle. In the article, the easiest and cheapest way to equip a car with a headlight washer was indicated. But this method is well suited only in order to legalize the installation of xenon and not receive a fine for improper re-equipment of the vehicle. From the point of view of efficiency, the use of a pump used to wash the windshield is extremely inefficient. Due to the low pressure, the liquid will not effectively remove frozen or dried deposits. In order to somehow remedy the situation, you will have to turn on the washer for a longer period, which will lead to overspending of fluid and hitting your wallet in winter.
Only a special high-pressure pump for headlight washers can ensure the efficient operation of the system.
If a standard headlight washer was installed on your car in later years of production or in some trim levels, you can buy an original kit. In this case, the number of alterations will be minimal, but the cost of standard devices often cannot be called humane. That is why we recommend opting for universal headlight washer kits, which can be of two types:
- telescopic - nozzles are pushed out of the hole in the bumper by the pressure of the incoming washer fluid;
- jet - sprayers are attached to the bumper near the headlights, like those used to wash the windshield.
Inkjet or telescopic
The telescopic version is much nicer to the eye and generally looks richer. But in operation, jet nozzles are easier. Frost adheres to the decorative covers of telescopic nozzles in winter, thereby blocking their protruding; also, as it gets dirty and under the influence of frost, the mechanism may start to jam. Sometimes in cases of closure of the lid due to increased pressure in the system, the hoses break off, which leads to the leakage of fluid. Also, retractable nozzles are more difficult to install, since their installation may require the manufacture of individual brackets.
In terms of power connection, pump installation and hose routing, jet and telescopic systems do not differ from each other.
 What you need to install
The standard set of universal washers includes:

If you have one pump and two injectors, all the remaining items can be purchased from an auto parts store. Instead of a control unit, a conventional 4-pin relay will do.
Standard set of tools for installation:
- a screwdriver, a drill for a nozzle (when installing jet nozzles, the diameter of the drill should be slightly less than the narrowest point of the nozzle body entering the bumper), as well as a drill for tapping into the tank, if necessary;
- needle files, a construction knife to give the cutouts the correct shape;
- masking tape, pencil, ruler;
- pliers, keys, screwdrivers for removing the bumper.
Self-installation

Power connection
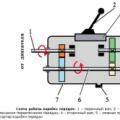
When installing the power supply unit, refer to the diagram provided by the device manufacturer. Carefully study the pinout of the connectors, the color scheme of the wires of the systems into which you will be implemented.
 In a simpler, but no less functional, version, a conventional 4-pin relay is used to connect the power. Take the power "plus" directly from the battery, placing a fuse of the required rating as close to the battery as possible). Connect the control plus from it. Screw the power minus to ground, and extend the control minus wire to the button in the passenger compartment. The button must be normally open, no latching. Connect one terminal of the button to the control minus of the relay, and the second to the ground inside the passenger compartment. When the button is pressed, the contacts will close, causing the pump to turn on.
When driving at night, especially in inclement weather, the headlights are sometimes so splattered with mud that you have to stop to clean them, otherwise the road is simply not visible. To avoid this situation, the best solution is to install a headlight washer. Although this device does not directly affect driving, it significantly improves driving safety.
The principle of operation of the headlight washer
There are several different design options for such devices installed on a car. These are the so-called:
- low pressure washers (with headlight wipers);
- high pressure washers, when cleaning the headlights with a jet of liquid.
The device of these products differs dramatically. The principle of headlight cleaning, implemented in low pressure washers, completely repeats the operation of wipers on the windshield. How similar washers look like on a car can be seen in the photo.
The principle of operation that high pressure washers use is completely different. In this case, a stream of water or other washer fluid is directed to the surface of the dirty headlights, for which a special nozzle is used, most often not one, which allows you to evenly clean the entire surface. How a headlight washer of this type works, the photo makes it clear 
At present, headlight washers are used, which use the principle of operation based on the creation of high pressure in the system.
High pressure headlight washer device
The design of such a product includes the following elements:
- high pressure pump;
- fluid tank;
- connecting hoses;
- control unit with the necessary accessories.
Below is a description of all the listed system elements.
Tank
Serves as a source of liquid used to clean the headlights. For this purpose, both the washer tank, which is part of the car, and an additional one, which must be independently fixed in a suitable place under the hood or bumper, can be used. 
Please note that the washer kit does not include a reservoir offered by various manufacturers. You will have to choose it yourself.
Pump
It serves to create pressure in the washer fluid in the system. Its principle of operation is the same as how the windscreen washer pump works. To start the washer pump, control signals are sent to it. 
Connecting hoses
In this case, no explanations are required, with their help individual nodes are connected into a single system. The only wish is to ensure the minimum length of the hoses when connecting all the elements, which will greatly facilitate the working conditions of all the components.
Headlight washer nozzles
In many ways, it is how the injector works that determines the quality of the system. It forms a jet that washes away dirt from the surface of the headlights. The accuracy and correctness of the installation of the nozzles is the key to the high-quality operation of the system, and its design features determine the fluid consumption. The nozzle can be either single or combined, when several pieces are installed in a separate block.
Any nozzle is attached to the bumper, and since it can be of any shape, it is designed for use on bumpers of various shapes:
- flat;
- spherical;
- under a high bumper (on SUVs).
The listed types of nozzles are generally referred to as stationary. As a rule, any nozzle of this type is reliable and easy to install.
However, there is one more, somewhat specific type - telescopic nozzles. What they are can be clearly seen in the photo below. 
Such a nozzle is hidden under the bumper, only the cover is visible on its surface, which practically does not affect the appearance of the car. According to the signals from the control unit, the nozzle, under the action of the hydraulic piston, moves out of the bumper and the washer fluid is sprayed, after which the nozzle is retracted under the bumper. 
This principle of operation of the system ensures the required quality of cleaning the surface of the headlights from contamination. This is achieved by creating an optimal distance to the glass and setting the desired direction of action of the jet of washer fluid. The disadvantages include the possibility of the lid freezing at low temperatures.
Control block
The headlight washer control can be organized in a variety of ways. The simplest and most effective option is to use a separate button that controls the high pressure pump through a relay. In this case, the headlight washer, if necessary, is switched on independently of the general system, which saves washer fluid.
At the same time, it is possible to connect the headlight washer system to the system already on the car, then the control will be uniform. You can program the control unit to turn on the headlight washer after a certain number of times the front window washer is activated, which is somewhat inconvenient and causes additional fluid consumption.
Other control algorithms can be implemented, including automatic turn-on or smart control.
Installation and operation of a high pressure headlamp washer
Such a system can be mounted on any vehicle. Today, car owners have the opportunity to choose various options for such devices, often they do not need to contact service centers for their installation, all the work can be done independently, following the manufacturer's instructions.
You just need to remember that you first need to find the washer tank and determine the place where it will be attached, or find the possibility of installing an additional high pressure pump in the standard tank. Well, you need to be prepared for the fact that you have to drill the bumper of the car. 
The very operation of the headlight washer is no different from the operation of the existing front glass washer. When using, you must follow simple rules:
- use only clean water or washer fluid. Dirt, debris very quickly disable the nozzles, and in this case, instead of spraying the liquid, a thin stream of water will be thrown out;
- for better cleaning of the headlights, detergents can be added to the water;
- in conditions of low temperature, only undiluted non-freezing liquid should be used;
- it is necessary to periodically use the washer, even if it is dry, this will keep it in good working order and clean the nozzles;
- periodically check the fastening of individual components of the system.
Although headlight washers do not directly affect driving, their use significantly improves driving safety by providing good lighting during inclement weather at night.
Each driver wants to get the most comfortable conditions so that his car is both beautiful and comfortable from the inside, and does not cause unnecessary trouble. One of the devices that make life easier for the driver is the headlight washer. It helps to avoid the unpleasant time of manual cleaning of automotive lighting.
[Hide]
Self-assembly instructions
Perhaps every driver knows what this is, but not everyone has heard of what components it consists of, how to install it with your own hands, and also how to operate it correctly. Correct operation of the purchased and installed device will prolong its life, and you will be saved from the need to manually wash the lighting equipment.
Tools and materials
The device includes the following components:
- Rotary pump. It is installed to supply fluid to the nozzles. Thus, it creates the required pressure within 0.2 MPa. The pump runs for exactly as many seconds as the quality of the fluid in the system suggests.
- Connecting hoses. Thanks to this device, the headlight washer nozzle is enriched with liquid from the tank. The connecting hoses can be different and differ from each other in terms of material and length.
- Control block.
- Liquid tank. In some cars, the device may be located in the wiper tank, as their designs are somewhat similar.
- A set of nozzles and attachments to the bumper of the car. They can be of two types: stationary and telescopic.

The unit also contains a fuse box and wiring. It is designed to connect the pump to the machine system and to monitor its operation. For some cars, the equipment of the device may differ from the standard set. It depends on the optics of the car and the distinctive features of the bumper. In any case, you can choose a suitable option for yourself without spending much effort and money.

Processes
- A small hole with a diameter of 15 mm must be drilled in the tank. It is being prepared for the pump.
- A sealing rubber must be installed on the prepared hole. Then the pump can be installed.
- If the body of the device is worse than the material from which the tank is installed, then the pump must be attached with high-quality electrical tape. Some drivers do it anyway.
- Next, a tank is installed, next to which the headlight washer valve is installed.
- Then you can install the nozzles. They are installed to the side of the center of the headlamp if xenon is installed on the dipped beam switch. The headlight washer nozzle cover must be clearly in place. The calculation can be done using a ruler so as not to be mistaken with the accuracy of the fit.
- After the cover is in place, the hoses are connected to electricity.
- The headlight washer button comes into effect.
You can see how to replace the device with your own hands in the video from the author Oleg Zuyeff.
Installation guide
- To install a universal device, no special abilities are required. The only obstacle that a motorist may encounter is self-drilling holes in the tank to secure the injectors. To do this manipulation, you need to remove the bumper from the car and make several holes on the back side.
- The headlight washer cover should be repainted according to the color of the car. After that, it is necessary to fix the nozzles in the already prepared hole.
- To install the pump in the car, you need to equip the tank with another hole, then fix the pump with electrical tape. After the work done, you can mount the tank in a previously prepared place. It is important that the reservoir is not located near components that can build up high temperatures.
- After the above steps, you can return the car bumper to its place and complete the work - install hoses, valves and tees.
Exploitation
Operation will vary depending on equipment and installation option selected.

For example, if the device is combined with the wiper button, then the liquid consumption will increase several times, because to supply high pressure water, you will have to constantly add liquid to the tank.
To avoid abuse, you can connect the device to a separate button in the salon. It is also convenient in winter, because then the water can ruin the system pump. If the lighting fixtures freeze to the bumper during operation, then the headlight washer motor will be damaged.
For proper operation of the system, it is necessary to periodically test it. This will help prevent contamination of the nozzles and prolong the life of the appliance. Some drivers, in order to keep the device in good condition, pull the fuses out of the system when frost sets in.
DIY installation video
How to install a headlight washer with your own hands can be found in the video.
Clean headlights in a car are a guarantee of safety on the road. - modern, necessary, convenient, automated option. The installed headlight washers are the guarantor of safety and comfortable driving on dirty roads, at any time of the day, in adverse weather conditions.
In our certified service center, professionals in their field will help you install headlight washers. We have all the headlight washer kits in stock.
Install the headlight washer in a professional installation center
Installing a headlight washer involves several stages of work:
- Selection and selection of a headlight washer kit for your car model. We have Sho-Me washer kits and Hella headlight washers in stock.
- Preparing for installation.
- Washer installation.
- Checking the system operation.
Installation of washers may be due to the difficulties of the lack of regular places for the washer. Telescopic headlight washers are practically invisible on the bumper body, only at the moment they are turned on they move out and wash away dirt from the headlights.
You can install a headlight washer in our specialized center. Do not hesitate, our experts will select and install the best set of washers for your car, which will meet all the parameters of reliability, convenience and safety.