Modern cars are a complex complex of various parts and mechanisms, therefore, maintaining the proper condition of the constituent elements can be problematic. But worst of all, when at the most crucial moment the car suddenly breaks down.
Therefore, a thorough technical inspection of important systems should be carried out before the next departure. The most common is to check the condition and level of engine oil, tire pressure, coolant level. Also, do not forget to check the alternator belt, namely the degree of its tension.
The generator must work properly and provide the required voltage for the normal functioning of the vehicle's electrical systems. Performance depends on the speed of the pulley, so the belt drive is very important. The mere presence of a belt will not be enough for normal operation of the generator, it must have a tension of a certain level. Only in this case you can really not worry about the power supply of the car.
To check the tension of the alternator belt, you need to press on it with your finger
The belt transfers rotational motion from the crankshaft to the generator. It is made from highly durable elastic reinforced rubber. It connects two (or more) pulleys, the rotation speed of which is several thousand revolutions per minute. In such conditions, it is important that the belt fits as closely as possible to the corresponding groove in the pulley. This will prevent possible slippage. Weak alternator belt tension is often accompanied by a characteristic whistle from the engine compartment. Belt tension can be:
- insufficient;
- excessive;
- optimal.
When the belt is loose, it can slip, which reduces the efficiency of the generator. Also, belt slippage causes premature wear. A too tight belt will damage the alternator bearings.
The correct tension can be checked by pushing the middle of the belt between the two pulleys.
How to tension the alternator belt
The generator is mounted on the engine in such a way that it can rotate within a certain range about the axis of the fastening bolt. The position of the generator is fixed by an arcuate bar with a special slot and a nut. The optimal tension of the alternator belt is performed by observing the following sequence of actions:
- First you need to unscrew the nut that is on the bar.
- Using a spudger or other suitable tool, depress the generator.
- Then we tighten the nut on the bar back.
- Now you can check the belt tension and if necessary repeat the whole process.
How to tighten the alternator belt using the adjusting bolt

The easiest way is to tension the belt using an adjusting bolt.
The most advanced, convenient and practical method is the bolt tension control. For a high-quality performance of such a procedure, you must adhere to the following algorithm:
- The tightening of the nuts of the lower and upper levels of the generator fastening must be loosened.
- The adjusting bolt turns strictly clockwise. Then you need to take the generator away from the main unit, while simultaneously controlling the degree of tension on the belt mechanism.
- At the end, the generator mounting nuts must be properly tightened.
Regardless of the selected adjustment system, after completing the entire procedure, using a special key, make 2-3 shaft turns, and then check the tension again. Also, the measurement will need to be carried out after a short trip.
Waxing the body or pouring magical additives into oil or a fuel tank does not mean monitoring the condition of your car. Wax and additives can be not only not useful, but also harmful, and in the case of domestic front-wheel drive VAZs, it is much more useful to check the condition of the brakes and the engine before each exit. However, there is one thing that is often forgotten and then regretted. This is the drive belt of the VAZ-2114 generator. Let's take a closer look at it.
Whistling and skidding? Diagnosing the alternator belt
As long as the belt is working properly and adequately, we do not notice it. The generator operates in normal mode and provides reliable power supply to the on-board electrical network and recharges the battery.
This is evidenced by stable ammeter readings and quiet operation of the engine. Nevertheless, one fine day, the belt makes itself felt with a shrill squeal or lack of charging current on the battery. This will be indicated by the ammeter on the instrument panel and the battery charging indicator lamp.
Alternator drive belt
We open the hood and see if the belt is in place at all. For some would-be drivers, belts burst right on the road, and it is quite difficult to find a replacement for him.
On the VAZ-2114, the engine is located transversely, therefore, the generator belt is located on the opposite side of the gearbox, to the right in the direction of travel. If the belt is in place, it is enough to tighten it and the operation of the on-board electrical system will stabilize.

Not a tricky lever!
For this, only two keys from the standard set of tools are useful - for 10 and 13, but it is more convenient to use ratchet heads. And preferably a lever! Everything is ready, you can get to work.
How to tighten the alternator belt on the VAZ-2114

The procedure for tightening and adjusting the belt will take five minutes at most, but it is important to know a few subtleties that will save you from problems on the road in the future.
The first subtlety - overtightening the belt is just as dangerous as under-tightening it. You can ditch the generator bearings, and replacing them will cost five times more than the most expensive belt. In addition, to replace the bearings, you will have to completely disassemble the generator or. Overtightening the belt is not permitted!
The belt tightening procedure is simple and even a child can handle itif you follow a simple algorithm and do not break a certain sequence:

Generator drive diagram: 1 - mounting bracket to the engine block; 2 - connection of the generator with the bracket; 3 - tension screw; 4 - generator set pulley; 5 - axial screw; 5 - drive belt; 6 - alternator pulley on the crankshaft.
- It is better and easier to tighten the VAZ-2114 generator belt either in a pit, or simply on a flat and dry area, since you have to dive under the car, and several times.
- We install the car on the site and put it on the handbrake or in first gear.
- If a crankcase protection is installed, then you can try to loosen the generator mounting bolt from under the hood. To do this, you need a head for 13, but if there is no protection, then it is easier to loosen the bolt from under the car with an open-end wrench. We just rip off the nut and turn it a few turns.

We loosen the lower bolt of fastening the generator
- Before tightening the alternator belt on the VAZ-2114, we loosen the upper fastening nut, which presses the generator case against the adjusting bracket. We use the same key at 13.

Loosen the upper generator mounting nut
- To tighten the belt, you need to find a tension bolt, it is installed directly perpendicular to the axis of rotation of the generator. By turning the tensioner bolt clockwise, we will tighten the belt, against - we will loosen it. When the belt is tensioned, the alternator housing will move away from the cylinder block. In details .

We tighten the alternator belt
- We control the tension of the belt after tightening. From above, this is quite problematic, since the engine support interferes. It is easier to do this from below, where the entire belt branch is accessible for inspection. Some experience is required to visually check the tension, but according to the VAZ instructions, the belt deflection should not exceed 10-15 mm with an applied force of 10 kg and after several crankshaft revolutions so that the belt settles in place.

Checking the belt tension after tightening
- If the belt is tensioned correctly, tighten the lower generator mounting nut, then the upper one, which fixes the generator housing to the adjusting bracket.
When should you tighten?
Actually, reasons why a belt tightening is necessary, are simple - the generator does not generate enough current for the operation of all consumers on board and cannot provide battery charging. The first sign of a weak belt tension will be a whistle from under the hood. Nevertheless, the belt can whistle even when water gets in, sometimes when the pulleys are oiled, even less often when the generator bearings fail. If the belt does not lend itself to tension or the adjusting rack does not allow moving the generator further, it is necessary to replace the belt.
Second subtlety. Rubber tends to crack, and even taking into account the reinforced structure of the drive belt, it will not last long with cracks.
The most common mistake is storing a spare belt under the hood, in one of the niches. Even the best and newest belt can become unusable in just a couple of months from a constant high temperature, if it lies under the hood with a dead weight. Store new or replacement belts in your garage or trunk.
It is quite simple to tighten the alternator belt on the VAZ-2114, the main thing is to do it in moderation and adhering to simple rules and manufacturer's standards. Then the generator (see "") will last longer and there will be less troubles on the road. Strong belts to all and good roads!
Video on how to tighten or loosen the alternator belt on VAZ front-drive cars
Water pump, compressor and generator drive
carried out by V-belts, from reliable performance
which depends on the normal operation of these units. Therefore at
during daily engine care, protect belts from
ingress of oil and fuel, control their tension and
regulate it. Check tension especially carefully
belts during the first 50 hours of engine operation, since this
time, their greatest extraction occurs. Belt tension
should always be normal, since both unnecessary and
insufficient tension leads to premature exit
them out of order. In addition, excessive tension on the drive belt
water
serve
cause
destruction
pump bearings.
Fine
tensioned water pump belt when
pressing the middle of a long branch with a force of 40 N (4 kgf)
deflects 7–12 mm (Fig. 55) or 10–15 mm (Fig. 56), and the belt
compressor - 4 - 8 mm on the short leg (Fig. 58).
Check the tension of the alternator drive belts by pressing with
force of 40 N (4 kgf) in the middle of the branch of each belt (Fig. 59),
while the alternator drive belts should bend by 10 -
15 mm. If the belts deflect more or less than specified,
adjust their tension.
Tension of the belt of the water pump of YaMZ-236NE engines,
HE2, BE, BE2 (fig. 55) should be adjusted with a tensioner, for
1 loosen the bolts of the tensioning arm bracket
devices;
2 using a Ø12 mm screwdriver inserted into the hole
bracket
tension
devices,
tension the belt;
3 without loosening the tension, tighten the fastening bolts
tensioner arm;
4 check the belt tension.
Figure: 55. Checking the tension of the water pump belt
engines YaMZ-236NE, NE2, BE, BE2
Figure: 56. Checking the tension
water pump belt
Figure: 57. Withdrawal
shims
engines YaMZ-236N, B
| |
|

|

Tension of the water pump belt for YaMZ-236N, B engines
adjust with shims (fig. 56, 57). To tension the belt
unscrew the nuts securing the sidewall of the pulley and remove one or two
shims (fig. 57). Put the spacers on
the outer side of the sidewall and sequentially, in several
tricks, tighten the nuts, turning the pulley after tightening
each district. Then check for correct belt tension.
When replacing an old belt with a new one, place all spacers between
hub and removable pulley sidewall and adjust the tension
belt as above.
Adjust the compressor belt tension with the tensioner
device. Before adjusting, loosen the lock nut one
turnover, the nut of the tensioner pulley axle - on
half a turn and the nut of the tensioner bolt two turns.
Turning the tensioning bolt, adjust the belt tension.
After adjustment, tighten the axle nut and locknut
moment 120 ... 150 Nm (12 ... 15 kgfm) and the nut of the tensioner bolt
- a torque of 10 ... 20 Nm (1 ... 2 kgfm), with a greater torque
tightening will be out of alignment due to axle movement
tension
compressor
Check
tension
generator
Check
Tension
generator
regulate
by moving the generator relative to the axis of its attachment.
|

|

adjusting
let loose
fastenings
alternator, alternator rail fastening nut and fastening bolt
generator to the bar. After adjustment, securely fasten
generator. With increased exhaust and breakage of at least one of
alternator drive belts, replace both belts with a set for
ensuring a uniform load on them.
Tightening fasteners
CYLINDER HEADS
Figure: 60. The order of tightening the nuts for fastening the heads
cylinders:
a) - common cylinder head;
b) - an individual cylinder head.
Check the tightening torque of the head fastening nuts
cylinders
calibrated
cold
condition
engine and, if necessary, tighten them to the moment
235 ... 255 N . m (24 ... 26 kgf . m).
produce
sequences,
shown in Fig. 60.
ATTENTION!
FORBIDDEN
TIGHTEN
IN A MOMENT
IT IS INDICATED AS THIS WILL LEAD TO BREAKING THE STUD AND
CYLINDER HEAD BREAKAGE AND LEAKAGE
THIS WILL NOT RECOVER CONNECTIONS.
|

|

After tightening the cylinder head nuts
adjust thermal clearances in the valve train and
install the cylinder head covers.
CLEARANCE ADJUSTMENT IN
VALVE MECHANISM
The thermal clearances in the valve train are designed
to ensure a tight fit of the valve on the seat when
expansion of valve drive parts during operation
engine. The size of the thermal gap at the inlet and outlet
of valves is set the same and is regulated within
0.25 ... 0.30 mm. When re-checking clearances after scrolling
crank
regulated
engine
perhaps
changing them to the limits of 0.20 ... 0.35 mm due to an error
location
surfaces
distribution mechanism, which is permissible.
If the thermal gaps are too large, the
valves,
due to
get worse
filling and cleaning of cylinders, shock loads increase and
the wear of the parts of the gas distribution mechanism increases.
With very small clearances due to thermal expansion
parts of the gas distribution mechanism are not provided
fit
valves
violated
gas-dynamic processes in engine cylinders worsen
power and technical and economic indicators of the engine.
In addition, reduced clearance in the exhaust valve actuator
can lead to overheating of the valves and burnout.
Adjust thermal clearances on a cold engine or
not earlier than 1 hour after it stops.
When adjusting thermal gaps and re-
On the head of the right bank of cylinders
rocker arms
exhaust valves to the end of the axle, intake valves to
thrust washer;
On the head of the left row of rocker arm cylinders you
start valves to thrust washer, intake valves
- to the end of the axis.
The exhaust valves of the right bank of cylinders are
placed closer to the fan, the left bank of cylinders - to
flywheel.
Adjustment sequence:
1 Switch off the fuel supply.
2 Remove the cylinder head cover bolts
and remove the covers.
3 Check the tightening torque of the axle bolts
rocker arms,
(12 ... 15 kgf · m).
4 Turn the crankshaft clockwise (when
view from the fan side) from the front with a key for the bolt
fastening the pulley or behind the crowbar for the flywheel through
the hatch at the bottom of the flywheel housing using
holes in the flywheel (fig. 61), set the moment when
inlet
cylinder
totally
will rise (i.e. close). Continuing to rotate
crankshaft, turn it another about 1/3
turnover (≈120º). This is the position of the crankshaft
corresponds to the compression stroke in the first cylinder and both
the valves of this cylinder will be closed.
Figure: 61. Cranking the crankshaft
|

|

5 Check with a feeler gauge the gap between the end of the valve and the nose
rocker arms at the inlet and outlet valves of the first
cylinder and, if necessary, adjust.
Figure: 62. Clearance adjustment
valve train
adjustments
turn away
the adjusting screw, insert the dipstick into the gap and, turning
screw with a screwdriver (Fig. 62), set the gap 0.25 ... 0.30 mm.
Hold the screw with a screwdriver, tighten the nut and check
gap size. When properly adjusted
clearance feeler gauge thickness
0.25 mm should enter at
light pressure, 0.30 mm thick - with effort.
adjustments
valve
mechanism
the remaining cylinders, turn the crankshaft in
the same direction until the intake is completely closed
valve of the controlled cylinder and additionally still
1/3 turn. Adjust clearances as described above
Adjustment
carry out in accordance with the order of their work
1–4–2–5–3–6. The cylinder numbering scheme is given in
section "Technical characteristics".
endings
adjustments
run
engine and listen to its work. Knocking in the valve
mechanism
characteristic knock of valves to stop the engine and
repeat the gap adjustment.
|

9 Fit and secure the cylinder head covers,
check the condition of the gaskets. At the place of contact
oil should not leak.
CHECKING AND ADJUSTING ANGLE
The article describes in great detail why the generator drive is stretched and why it cannot be tightened or loosened strongly. There is also a step-by-step procedure for changing the belt and adjusting it.

How the alternator drive belt is tensioned determines the operation of parts in the engine, such as the water pump, crankshaft bearing and tension roller. If the belt is loosened, it will not generate a certain amount of current to recharge the battery. And if the belt is tightened more, the generator may break. It is recommended to change the generator drive belt every 15 thousand kilometers, or when there are cracks, rubber delamination and tears on the belt. All procedures were carried out on a VAZ 2110 car; on other brands, do the same.
- Also read about.

- It is important that when checking the belt, the car is not started.
- It is more convenient to work with the alternator drive belt under the car. Therefore, the front of the machine must be lifted with a jack and the engine crankcase protection removed.
- After that, the belt should be pressed by hand up in the center between the crankshaft and the generator pulleys, and the force should be about 10 kgf. Using a ruler, we measure the amount of deflection, which should be no more than 10-15 millimeters.
Tension adjustment
If the deflection value does not correspond to the figures, then the alternator drive belt must be adjusted. For this you need:


The tension or loosening of the alternator drive belt should be approached very competently, since with high tension on the belt, tension roller and alternator bearings, increased loads will be produced, which will affect their rapid breakdown. And if the tension is not enough, then the belt will slip on the pulleys, which has a bad effect on battery charging.

If the belt cannot be repaired, then it should be replaced. To do this, you need to do the following:
- Loosen the bolt on the upper and lower mounting of the generator, and unscrew the adjusting bolt as much as possible.
- Move the generator as close to the cylinder block as possible.
- Remove the loosened belt from the alternator pulley and the crankshaft.
- The new belt must first be put on the pulley in the crankshaft and then on the pulley in the generator. If the belt is worn with a tension, then the crankshaft should be turned slowly until the belt is put on.
- Tighten the bolts at the bottom and top of the generator mount.
- Check the belt tension.
The role of the generator in the power system of a car is one of the leading. In any vehicle, the current generator is one of the most important components. He is responsible for the supply of electricity (direct current 12 - 24 V) to all mechanisms and units of the machine. The generator is responsible for the safety of the battery and keeping it in constant working order. Therefore, checking the tension of the alternator belt should be carried out regularly, even if there are no obvious signs of a loosening of the belt tension.
Signs of a weak generator drive tension
First of all, at low tension, the belt begins to emit a characteristic "squeal" with a sharp increase in engine speed. This is especially noticeable when starting off the car or when entering a turn, when an unpleasant squealing sound is heard at the time of gear shifting. Another sign is the "flickering" of headlights in the dark. When the alternator is working normally with the correct tension, the headlights are even and bright. If the tension of the alternator belt is weak, in the dark, the headlights constantly change brightness while the engine is running.
Visual inspection methods
The car enthusiast should know how to check the tension of the alternator drive. This is just the necessary knowledge for the correct operation of the vehicle. The alternator belt tension scheme is different for each engine model. It depends on the location of the unit on the engine. From the number of connected additional modules (hydraulic power steering, air conditioning drive, etc.). Therefore, the procedure for checking the tension is different for each motor model. For example, the j20a engine alternator belt is tensioned according to the diagram shown in the figure below.
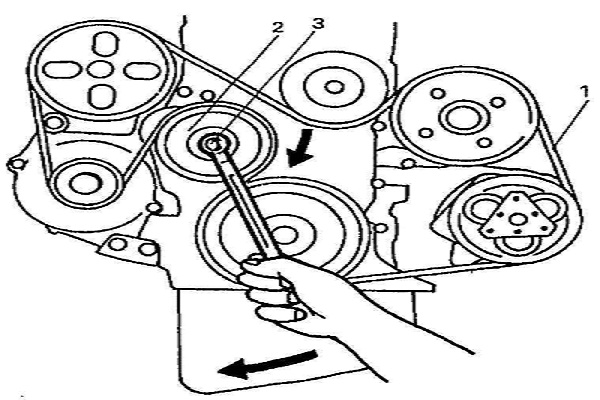
Here, at number 1, the drive belt itself for additional equipment, number 2 - tensioner roller and number 3 - tension roller nut.
Different installation methods also mean different methods for checking the degree of tension, but there is one thing in common. The check is done on the largest free area of \u200b\u200bthe drive. So, an experienced locksmith checks this parameter by slightly turning the strap by 45 degrees. The belt goes to this angle without much effort. Further resistance grows. V-belts flex when pressed by 5 mm relatively easily, further the force increases.
Important! It is also not allowed to tighten the alternator drive belts. This leads to rapid wear of bushings and bearings, failure of engine components and assemblies.
But the more reliable, of course, is checking with instruments.
Tensioning methods for drive belts
Different engine models have their own methods of tensioning the belts of the generator and other units. They are divided into three types:
- aggregate;
- roller;
- auto.
With the aggregate method, the drive is tensioned by moving the body of any unit on a movable basis. This could be the generator itself, a power steering pump, or an air conditioning compressor.
The roller method assumes that the tension is produced by an eccentric roller. Due to the offset axial bore, when the roller housing is rotated, the offset produces tension.
Finally, an automatic generator belt tensioner. This is the most advanced stretching method. The tension roller is mounted in a mechanism with a powerful spring with a precisely calculated force. When installing a new belt, the roller swings to the side and releases when it is in place. The spring resting gives the required tension.
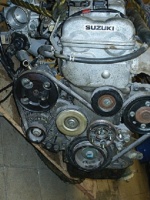
J20a motor with automatic tensioning
Important! With the automatic method, the belt does not require tightening or force testing. When weakened, it is only replaced. And it's very easy. The spring roller is pivoted to the side of loosening and the entire drive can be easily removed.
Specialized belt tension testers
There are also special devices for checking the degree of belt tension. They are of two types:
- mechanical;
- electronic.
Mechanical instruments are based on the dynamometer principle. A built-in spring is used to measure the force applied to the deflection or pullback. This parameter is necessarily indicated in the car passport. Therefore, this tool is available to any user. And it may well take a place in the arsenal of a simple car enthusiast, trying to do at least part of the work on his car with his own hands
Electronic devices are based on the principle of picking up high frequency sounds. The user, holding the device to a certain point of the belt, strikes a light blow on its surface. The device picks up the vibration frequency and displays the result in digital format on the mini-screen. But using this device already requires deeper knowledge and skills. Therefore, it is more of a professional tool.

Such devices are already suitable for a reputable service station that cares about its reputation and is ready to spend money on both serious equipment and personnel training to work with it.
Mechanical tension control device
What threatens a weakly tensioned belt
A weak tension in the alternator drive belt reduces, first of all, the battery charging current. In case of a weak charge, the battery's own internal resource is consumed and, accordingly, its service life is sharply reduced. Shattering of the plates or a short circuit may occur, and the battery of a modern type (not repairable) will only have to be thrown away. In addition, voltage surges due to insufficient tension negatively affect all electronic systems of current cars, up to and including their failure. A loosely tensioned belt can simply jump off the pulleys and cause trouble at a high speed of rotation of the crankshaft pulley. He is even able to pierce the hood of a car.
Excessive tension

A very strong stretch will not lead to anything good either. There is an increased load on various rubbing parts of additional mechanisms. The first sign of constriction is an unpleasant hum. Most often, this is how the generator belt tension roller makes noise. But this is the least trouble that can happen. It is much worse when the bearings of the generator, air conditioning compressor or power steering, or the bushing of the water pump begin to emit such a noise. In these cases, the repair will be much more serious and expensive.
Therefore, adjusting the tension of the alternator belt is a very important element in vehicle maintenance. Even if an automatic tensioner is installed, such as, for example, on the j20a engine or the Peugeot 306, it is necessary from time to time to check the special marks on the belt tensioner housing, signaling the time of replacement if necessary.
Tools and materials for the prevention of the generator drive mechanism
The variety of installation types for various types of engines of a huge number of different types of generators does not allow us to unambiguously name a single tool for this operation. As a rule, it is different for each model. Although there are some common features.
Tools
Usually, for the prevention of a drive with aggregate adjustment, wrenches are needed to loosen the bolts of the assembly and a wrench to rotate the adjustment bolt. Plus a small pry bar to hold the assembly in position. For roller drives, a wrench for loosening the roller nut and a special wrench for turning the roller itself. For an automatic drive, only a pry bar or a wrench to wring out the roller when changing the belt and wrenches to replace the roller itself.
Belts and rollers
Each engine has its own alternator belt tension roller, and the belt itself must be its own. All of them have special markings and their own signs.
Important! The installation of parts that do not correspond to the intended purpose of this particular motor model can lead to major breakdowns with capital costs.
Therefore, the most reliable way to purchase spare parts is to identify the necessary parts by VIN-code. This is a modern way of obtaining spare parts and parts for a machine. Any vehicle has its own identification number located on a special body plate

In normal auto parts stores, it is no longer necessary to carry a broken part for identification (only in very rare cases). It is enough to dictate this code to the seller, and using a special program, having contacted the global database of identifiers, the seller will confidently tell you the type and size of the required part. If necessary, will order its delivery to the store within an acceptable time frame. This is the best method to use to obtain the attachment drives and idler rollers that your machine needs.
Replacing the alternator belt with an automatic tensioner roller is well shown in the video using the example of the Peugeot 306: