In search of means to ensure an easy start of the power plant in conditions of low temperatures, many car owners opt for antifreeze preheaters operating from a 220 V network. In such devices, powerful heating elements provide a fairly quick warm-up of the engine in winter.
At the same time, motorists often give preference to such domestically produced devices, including the Alliance pre-heater.
This decision is often due to the fact that domestic devices are cheaper than foreign ones, with a tolerable build quality and acceptable performance of their functions.
This manufacturer appeared on the market of equipment for heating power plants for a long time, and its products are in demand.
Types of heaters, features
The company offers a choice of a range of models with different designs and specifications. In most cases, the devices are intended for use on domestic cars and trucks - VAZ, GAZ, UAZ, GAZelle, etc. But at the same time, installation of the Alliance heater is quite possible on foreign cars.
The catalog of pre-heaters of this company includes models:
"Alliance-2-PC"

The only tank-type model on the list, the design of which includes a pump that circulates coolant through the system while the heater is operating. This ensures a more even heating of the cylinder block. The equipment has a vertical design. Heating element power is 2 kW;

This model is of two types - 1.5 and 2.0 kW. Outwardly, it is identical to the model with a pump, but this version does not have a pump. Liquid circulation - gravity;
Alliance-07

Horizontal model of flow-through type with perpendicular arrangement of leads. Designed for installation on cars, in the design of which a shortened return pipe of the cooling system and an angular supply of antifreeze to the thermostat housing are used (VAZ classic models and some front-wheel drive models). The power of the heating element is only 0.7 kW, so it is more suitable for maintaining the temperature, rather than heating the coolant;
"Alliance-08" and "08 Universal"

A flow-through model with a horizontal position of the leads. The first version is intended for installation on GAZ cars, the second is universal and can be used on foreign cars. Heater power - 0.8 kW;

Horizontal tank-type model with perpendicular outlets and a power of 3 kW. This heater is designed for use with truck engines;
The type of device affects how it works. If everything is clear with a tank heater equipped with a pump - when the pump is turned on, it circulates, then the gravity ones should be considered in more detail, since the scheme of its functioning is quite interesting.
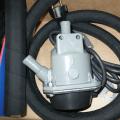
Design and working principle
The design of the device "Alliance 1.5" consists of a body with two outputs - a side feed and a central outlet. This body also plays the role of a reservoir, therefore a heating element is placed inside it. The TEN's leads go through the bottom cover, where it is connected to the power cable. Additionally, a thermostat is used in the design, which turns on / off the device when a certain temperature is reached (the upper limit is 85 degrees C, and the lower limit is 50 degrees C).
To ensure the gravity flow of the coolant, a ball valve is installed in the underwater outlet.
Everything works like this: initially the valve is open, so the tank is filled with antifreeze from the system. As the coolant is heated by the heating element, it begins to expand, with the result that the valve shuts off the flow. Further expansion leads to the fact that the already heated antifreeze is pushed out through the central (drain) outlet. A drop in pressure occurs inside the housing and the valve opens again, starting up another portion of coolant.
As for the flow-through models, they represent a regular tube in which a heating element is installed. In such devices, gravity circulation is carried out due to the temperature difference.
Connection diagrams
Each type of model has its own connection diagram, which must be followed, otherwise the circulation of antifreeze will not be ensured (applies to gravity models).
There can be several options for inserting a heater into the system. For example, on some cars, the classic connection scheme is used, in which the liquid is supplied from the hole for the drain plug (a fitting is installed instead), and the output leads to the upper pipe coming from the radiator (the connection is carried out using a tee).

But more often a slightly different connection scheme is used. In it, the supply of antifreeze is done through the same drain plug, but the drain is made into the hole in the temperature sensor of the cylinder block. For such a connection, a tee fitting is included with the device. It is screwed in instead of the temperature sensor. The sensor itself is then screwed into the end of the fitting, and the pipe from the heater is put on the side outlet of the tee.

As for the flow-through models, their installation is much easier, since they simply cut into the required branch pipe of the cooling system.
In general, installation work should not cause difficulties, since nothing needs to be redone, it is enough just to make the insert correctly.
Finally, a little about the operation of the device. After connecting the heater to the cooling system, the device itself (tank type) must be fixed to the engine (there is a bracket for this in the kit)
All pipes and wiring from the equipment should be laid so that they do not touch moving and very hot elements during the operation of the power plant.
Although all Alliance models are equipped with a thermostat, you should not rely only on it. Therefore, it is better to connect the device to the power supply through an adapter with a timer.
Video describing the heater "Alliance"
Related articles:
ATTENTION! Installation of electric heater Siberia for UAZ cars with a UMZ 414,417,421 carburetor engine, it is recommended to be carried out by specialists at a service station.
Before starting the installation and operation of the Siberia electric heater, carefully read the installation manual.
Electric heater delivery set:
|
Name |
Quantity, pcs. |
Note |
|
|
Electric heater |
|||
|
Bracket 190 |
|||
|
Tee 1 |
|||
|
Spring washer 6 |
|||
|
Clamp S16-25 |
|||
|
Mounting strap |
L \u003d 200 mm |
||
|
Sleeve (hose) 16 |
L \u003d 1000mm (400-600) |
||
|
Installation guide |
|||
|
Instructions |
|||
|
Packing bag |
Note: if necessary, the company can, according to your order, manufacture and send the parts required for installation..
Picture 1
Attention! The electric heater must not touch the engine or other parts of the vehicle. The electric heater must be installed in a vertical position with the outlet pipe up ( see fig. 1), while a slight (not\u003e 15 degrees) tilt is allowed.
- Drain the coolant by unscrewing the drain plug of the cylinder block, clean the hole.
- Apply sealant to the thread of the K1 / 4 fitting and screw it in instead of the drain cock ( Fig. 1).
- Fasten the bracket to the electric heater using M6 * 45 bolts using spring washers and nuts.
- Cut the sleeves into lengths: input L \u003d 400 mm and output L \u003d 600 mm.
- Remove the bolt securing the right engine support cushion, then fix the bracket with the heater with this bolt ( Fig. 1).
- Put the inlet hose on the K1 / 4 fitting and connect it to the heater inlet. Tighten the clamps ( Fig. 1).
- Cut the sleeve connecting the heater radiator pipe and the valve in the cylinder head at a distance of 60 mm from the point where the sleeve exits the hole in the body. Shorten the hose piece on the tap side by 25mm. Insert a tee into the cut of the sleeve and seal the connections by tightening the clamps ( Fig. 1).
- Connect the tee and the outlet of the electric heater with the outlet hose, tighten the clamps ( Fig. 1).
- Make sure the hoses run at a sufficient distance from the outlet pipe and the outlet manifold.
- Fill the engine cooling system with coolant.
- Fix the electrical cord on the car body so that there is no contact with moving and heating parts of the engine.
Preparation for work
- Check the connection for leaks.
- Start the car engine and let it run for 5-10 minutes. Then stop the engine and add coolant if necessary.
- Connect the electric heater to the mains.
- After 2-5 minutes of operation of the electric heater, check the inlet and outlet hoses. The outlet sleeve should be warmer than the inlet
ATTENTION ! The electric heater can only be operated after the engine has warmed up to operating temperature (the thermostat must be open) and the efficiency of the interior heater has been checked. This must be done to eliminate air pockets in the cooling system.
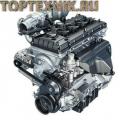
Electric pre-heater AUTO + SPUTNIK for UAZ models with a 1.5 kW UMZ engine is designed for preheating the coolant of internal combustion engines of vehicles and units in the cold season.
Specifications:
Supply voltage, V 220
Power consumption, W no more than 1500
Temperature control thermostat (shutdown), 95 ° C
Thermostat return temperature (turn on), 65 ° С
Electric shock protection class I
IP34 moisture protection
Installation and operation:
Installation:
The electric heater must not touch the engine body or other parts of the vehicle.
The electric heater must be installed in a vertical position with the outlet pipe upwards, with a slight tilt (no more than 15 °).
Cut the sleeve into lengths: inlet sleeve 400 mm, outlet 230 mm. Fasten the bracket to the heater with studs using washers and nuts. Put the sleeves on the corresponding pipes of the heater and fasten the connections with clamps.
Open the drain cock and drain the coolant. Unscrew the drain cock. Unscrew plug with K1 / 2 thread from the engine block on the right side in the direction of the vehicle. Clean holes. Unscrew the bolt securing the engine foot on the right side in the direction of the vehicle.
Apply sealant to the thread of the K1 / 4 fitting and screw it in instead of the drain cock.
Apply sealant to the thread of the K1 / 2 union and screw it in instead of the plug.
Fix the bracket with the heater with the engine foot bolt.
Put the clamp on the outlet sleeve. Put the outlet hose on the K1 / 2 union and secure the connection with a clamp. Pour 250 ml of coolant through the inlet hose into the heater. Put the inlet hose onto the K1 / 4 threaded fitting and secure the connection with a clamp. Refill the cooling system.
The mains wire should be laid and fixed with straps to ensure its safety from mechanical damage, as well as to exclude possible contact with moving and heating parts of the engine.
Check connections for coolant leaks, repair if any. Start the engine for 3-5 minutes, and after stopping the engine, add coolant to the required level.
Preparing for the first launch:
Fill the cooling system, check connections for leaks.
Start the car engine and let it run for 5-10 minutes. Then stop the engine and add coolant if necessary.
Connect the electric heater to the mains.
After 2-5 minutes of operation of the electric heater, check the inlet and outlet hoses. The outlet sleeve should be warmer than the inlet.
Precautions:
The heater can only be operated after the engine has warmed up to operating temperature (the thermostat must be open) and the efficiency of the interior heater has been checked. This must be done to eliminate air pockets in the cooling system.
Do not use extension cords without a grounding wire and rated for less than 15 A.
It is forbidden to plug in the electric heater with the cover removed.
Do not use the heater if there is no coolant in it.
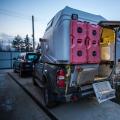
A task: install a homemade 220V engine pre-heater on UAZ 31512
The progress of work on the installation of a home-made pre-heater 220V for UAZ 31512
Installed on the frame below the coolant drain valve from the block. As if on purpose, I had some kind of bracket on the frame. He pulled him with a clamp.

View from the side of the cooling radiator
Instead of this, the tap screwed in a K1 / 4 threaded fitting - this is a cold coolant intake.


At first I planned to bring the supply of heated coolant into the block, too, there is a plug for the K1 / 2 fitting above the oil filter ...

It should have turned out something like this

... but I could not unscrew it and had to connect it through a tee to the hose that goes from the head of the block to the radiator of the stove.

Poured the drained antifreeze + about a liter more. Started up, drove the system from air jams.
In the morning, after a night frost, I turned on the heating. after 2-3 minutes, the hose from the heater is already warm. After half an hour, the block head warmed up. in 40 minutes already the block itself.
Now the engine starts half a turn, as in summer, and does not triple for the first 5 seconds, as before.


Heater operation diagram

Heater operation diagram. Styrena from the Internet
Added 02.02.2015
I post a small report on the work.
The temperature after spending the night is -4.7 degrees. It was possible not to heat, but the device was at hand and decided to take a measurement.

We turn on the heater and after 20 minutes the block head warmed up to +12.2 degrees
 Rating 0.00