Found a cheaper product in another store? Let us know, we will promptly check the information and make up the difference when buying online. Conditions
Article: 3151-1308008-10
Dimensions of goods in packing (mm): 430x95x526
Weight, kg: 3.25
Specifications
Voltage, V - 12
Consumption current, A, no more - 8
Rotation frequency - 2700
Weight, kg - 1.9
Impeller outer diameter, mm - 285
Air capacity, m3 / s - 0.54
Head, Pa - 90
The radiator will only operate if there is airflow through the radiator core. While driving vehicle The radiator receives natural airflow, but when the vehicle is idle or moving slowly, the airflow from the main fan may not be sufficient to operate the radiator. This is why an additional radiator fan is so important. Installing an additional fan will help circulate air through the radiator and allow it to keep your engine cool. Otherwise, you risk overheating and ruining the engine.
Advantages of an electric radiator fan over a mechanical one
A mechanical fan is driven by a motor and spins faster or slower as the motor accelerates and decelerates. This means that for more low revs the fan also rotates slowly. This is not very useful considering that the engine runs on idling... In addition to this, mechanical fans use the energy of the engine, resulting in reduced power and fuel consumption.
An electric fan connects to the vehicle's electrical system and provides constant airflow even when the vehicle is stationary ( traffic jams) and your engine needs it the most. Since the fan is powered by electricity, it does not impose a mechanical load on the fan rotation on the engine, which means fuel savings, and the power supplied by the engine to the wheels is transmitted without loss.
When dismantling the main fan in winter period The electric fan will offer another huge advantage - quick warming up of your car. the fan does not turn on until a certain temperature.
Advantages of the UAZ "Autogur73" electric radiator fan
- improving the efficiency of the cooling system without losing engine power;
- reduced fuel consumption;
- increased resource of the car engine;
- comfort of use in winter;
- ease of installation;
- comes with a mounting kit;
- competitive price.
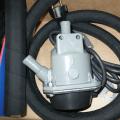
Equipment
- electric ventilator
- shroud
- pipe with a sensor (depending on the car model, one of two options for pipes and sensors is used)
- fan relay and fuse
- electric pads with contacts
- wiring
Sensor type TM 108. Temperature incl. 92 C, shutdown temperature 87 C. Diameter of the pipeline 36 mm.
Operating principle.
Sensor type TM 108-02. Temperature incl. 87 C, shutdown temperature 82 C. Diameter of the pipeline 42 mm.
Operating principle.
The push-type electric fan is installed in front of the radiator (in the direction of the vehicle) in addition to the standard fan located behind the radiator. Turning on and off the electric fan is automatic, according to a signal from a sensor installed in the radiator pipeline.
Installation of an additional fan on the UAZ 452 doors. 409
- Detach hose from radiator to expansion tank.
- Unscrew the protection of the engine and gearbox on the right side, for ease of operation.
- Unscrew the connector brake pipes from the front traverse.
- Disconnect the oil hoses from the oil rod.
- Unbolt oil cooler.
- Unscrew transition corners from left and right cooling radiator.
- Buy 8 bolts 8x20.
- Buy 2 new oil hoses 10-15 cm longer, or clamps, connectors, 50 cm oil-resistant hose in place, cut and connect.
- Install an additional fan, oil cooler on its casing and the rest in reverse order.
Sale is carried out from a warehouse in Ulyanovsk. Delivery of the product "UAZ electric fan (additional) carburetor engine with the installation kit "Autogur73" "is carried out to Moscow, Samara, St. Petersburg, Nizhny Novgorod, Yekaterinburg, Saratov, Krasnodar, Kazan, Perm, Orenburg, Penza and any other cities and regions of Russia.
We are the manufacturer of this product! Buying it from us you save time and money!
For regular customers and wholesale buyers, cooperation with us is beneficial, thanks to the existing system discounts, the program of which, you can find out from our managers.
Installation of electric fans on UAZ
Sergey "ss"
The first step is to dismantle the old casing and the old fan. To prevent the regular pump pulley mounting screws from clinging to the pump itself, you need to place the washers to the thickness of the standard fan.
The second step is to prepare the covers of the electric fans (EV). To do this, cut off or saw off the excess ears and cut out the excess metal edge (Fig. 1)
And also make cuts on the opposite side of the side so that it is possible to bend the edge (as shown in Fig. 2) 
Now you can fasten the covers at 3 points (2 regular holes on the ears and drill one with a 6.5 mm drill at the point of contact of the fan rims perpendicular to the plane of the ears).
Having made the cuts, straighten the bent edge and bend the edges along the lines by 90 degrees along each line in the same direction (it should look like in Figure 3) 
Next, you need to very carefully measure out the places of the holes. To do this, either remove your radiator, or find somewhere similar and, applying, measure it out! Then, with a 6.5 mm drill, drill the holes at the measured points.
You take a metal tube with a hole of 10-15 mm and cut out "bushings" from it, which must be inserted between the planes like such washers stretched in space (push a bolt into the hole of the tube).
Now we need to attach the electric motors. To do this, you remove the fans from them (do not lose all sorts of small parts!) You knock out the standard riveted bolts, straighten the ears, put the fans back on and attach the motors to the casings through rubber bushings (to reduce vibration).
Next, you remove the radiator fasteners (if you have not removed the radiator before), and install the assembled structure in its native place. The radiator braces will have to be bent slightly to put them in place. If the structure touches the pump pulley, you need to bend the radiator forward using these stretch marks. I got a distance of about 2 cm.
Next is the electrician's business. The connection diagram is on electric fan control device, which can be bought in Moscow at the Mitinsky radio market (metro Tushinskaya), place N-14. Manufacturer's website.
Chief
Installation requires:
- 2 fans. Ours are suitable from AZLK, VAZ (four- or eight-bladed, in principle, no difference, I took 8.) or BOSH 0130304245 (the latter is better and more reliable, but also more expensive). It's better to take ours in the store - there are a lot of "left"
- 2 fan covers from Oka or VAZ 2108 (09)
- 1 threaded pipe for a fan sensor from the Volga, or electronic device to turn on the fan (controlled by a standard temperature sensor)
- 1 switch on sensor (preferably from Moskvich at 87-82 g, or from the classic at 92-87 g). Beware of the "left" - without the OTK brand and marking!
- a universal relay, wires (section 2.5 mm) and a 30 A fuse (I put a bimetallic one), male-female connectors and preferably a relay block.
We act like this.
It is advisable to remove the radiator or take it from somewhere as a template. On the covers, we cut off all the existing legs and pins for attaching to the radiator. We fasten them to each other through two holes in the stamping with M8 bolts (in this case, you will have to slightly cut the flat part to be joined). The result is a horizontally double casing. The outer edges of the casing will protrude beyond the radiator - they need to be bent "forward" in the direction of travel by making small cuts in place from the edges (approximately at the level of the "circle" for the fan). In place, the "upper" and "lower" parts of the casing are slightly bent (with a radiator from 3160 it fits like this). As a result, the casing covers the entire "honeycomb" part and bends around from the edges of the standard casing mounting plate. Further, through the holes for fastening the standard casing (there are 4 of them), we outline and drill 4 holes 6 mm in the new casing. We screw M6 bolts 25-30 mm long into the radiator. Thus, we get "pins" for attaching the new casing. In order not to deform the casing when tightening the nuts, you need to make either distance bushings, or (as I did) screw several nuts under the casing, achieving the same effect.
Having installed the fans in the casing, we try on everything in place (to the radiator). The cover must be tightly fastened and the fans must not cling to anything. It is advisable to lay a strip of rubber or polyethylene foam between the casing and the radiator pipes - to avoid rubbing. We build a tube with a hole for the sensor into the lower radiator hose and screw it in.
It remains to collect everything and connect the electrician. We throw one wire of the sensor to ground, and the other to leg 85 of the relay. We connect leg 86 to the ignition, and to the remaining extreme legs we cling "+" through the fuse and "+" to the fans (it is blue). We put the black wires from the fans on the ground.
It remains to check everything in action. To begin with, with the ignition on, close the sensor contacts - the fans should turn on and off when opened. Well, then we warm up the engine. If you're lucky and the sensor is normal, they should turn on at 90, and turn off at 85 degrees.
The thermostat responds to the temperature at the engine outlet and the sensor to the radiator outlet. That is, the sensor sets the temperature to which the water in the radiator is cooled. That is, it cannot "overcool" the engine. But you can raise the operating temperature.
P.S. The motors are really useful to disassemble and check for quality (especially how the magnets hold), and lubricate at the same time.
Reversing the fans allows you to eliminate the "dead zone" when the propellers are running. It makes up about 3-4% of the total radiator area. A lot or a little - everyone decides for himself. In addition, the blades are "more correct" in the diffuser, reducing the "suction back". At one time, I very carefully studied this issue. The fact is that the Oka or the figure eight has a fan "sandwiched" between the engine and the radiator. Those. every millimeter is important there. Therefore, the design of the casing is not very "competent". For example, on the 41st Moskvich (where there is no size limit), the fan is moved 2-3 cm away from the radiator and the drain is almost uniform over the entire area.
AVG
1. Fans, in my opinion, should be taken with 8 blades, immediately disassembled, lubricated, assembled with a sealant, which you should not regret.
2. Cases, I took shackles - the cheapest. Modify with a grinder, so as to press one to the other and rivet. Further, with corners along the entire length from above from below, it is also better to walk with a riveter. The bottom corner fits well into the groove on the radiator. We attach this design to the radiator, prepare two vertical corners, and by applying we determine where to stick them in order to get into the native holes of the old casing.
You may have to fold the radiator forward, especially if the power steering is standing. I bent the standard radiator rods the letter "G", cut it off, cut the thread and brought it out forward in the direction of travel, it turned out conveniently, but only two nuts stick out in the area of \u200b\u200bthe hood buttons.
3. There are no questions with the relay, regular VAZ, fans eat about 10A. At the same time, put the 3-position toggle switch. In the middle of the load, on one shoulder with 12v cash, on the other through the reels.
It turns out: the middle position is "forced off", and the extreme "on in life", "on automatically".
4. About the control unit. In my opinion, you can put either only something highly reliable in the machines, consider it technologically advanced, and I would think the blocks soldered on the knee. Although the solution has its advantages, for example, adjusting the response threshold, but once again I say my deep IMHO - the simpler the better. The gauge is not reliable, but it will not take long to change it. I screwed it in with an adapter from the RAF that I bought in a store, a great rarity. Some solder brass bushings into tanks.
5. Wires. For a thicker fan - 2.5 sq. Mm, for a sensor don't care, at least 0.5 On earth wires it is better not to save money. RostovDriver
 for attachment to the radiator, I cut out two adapter plates (25x400), which I screwed to the native radiator mounts, and already screwed the resulting structure to them, much of the plate is visible in the upper part of the photo
Since this whole structure could hardly fit clinging to the pump shaft, I had to remove the standard radiator rods and tilt it forward a little (do not forget to let the lower fasteners a bit before that) fixed it with a long hairpin and a bolt drilling holes in the radiator shaft (Well, I don't know how to do it correctly name, but when you tilt the radiator, it becomes clear where to drill where to twist). In the photo, these moments are not visible, because then I screwed in place the sidewalls covering the radiator, they became a little crooked, due to the casing of the fan diffusers, but steel.
 I really didn't want to torment the radiator by pushing the switch-on sensor into it, so the Volgovskaya pipe and the sensor at 87-92 degrees were bought, since the radiator is slightly tilted forward, it was easy to insert the pipe into the cut of the pipe between the radiator and the thermostat.
 We connect all this through a relay and through a toggle switch in case it is necessary to turn off, for example, before fords. Photo "relay". I did not give a forced inclusion, because I do not see the point in this.
Tests have shown that this whole economy starts blowing as hard at a temperature of 92 and stops at 80. The trouble is that at idle, with the close one turned on, the generator cannot cope and the discharge is in progress. There is an idea for the future to install another sensor somewhere else, at a different temperature, so that they do not always work together.
It may also be necessary to cover the parts of the diffusers protruding on the sides behind the radiator with something, because as such, a perceptible part of the air does not go through the radiator, but from the sides bypassing it, and the efficiency of the system decreases, further tests will show the need to do this, but for now I will not.
The natural flow of air when the vehicle is moving is not sufficient to cool the engine. For its strengthening and directionality, the fan, which is installed in front of the radiator, is intended. This greatly increases the efficiency of heat dissipation. Previously, this unit was driven only by a running motor through a belt pulley.
Now they use more modern drives - electric motors and fluid couplings. They allow you to control the airflow regardless of the operating mode of the motor. Symptoms of faults in this unit are:
Accelerated engine overheating;
Extraneous noise and vibration;
Inability to start the motor.

In addition to the type of drive, they can differ in the number and material of the blades, the number of which ranges from four to twelve, and they are made of metals and plastic. You can buy all types of impellers from us to replace damaged parts.
Our suggestions
The cooling systems of cars of the Ulyanovsk Automobile Plant have differences, including the number of units that need forced heat removal. Our catalog contains the following types of fans:
Radiators for UAZ "Patriot", "Hunter", UAZ-469 and others;
Injection;
Carburetor;
With mechanical, hydromechanical and electrical drive.
More expensive than other products with a fluid coupling, but they are ideal for the most difficult operating conditions. We also offer to buy spare parts and accessories for their repair and maintenance. These are belts, drive rollers, pulleys and more.
Our prices for goods for repair and maintenance of Ulyanovsk cars are unrivaled. We offer them with delivery anywhere in Russia and the CIS countries. Forms of payment - cash and non-cash payments. Delivery of goods on credit is possible.
Connection: mechanics
I have long wanted to install electric fans and now, finally, my hands got around. Two LSA electric fans from the VAZ-classics and two diffusers from the VAZ-2108/2115 were bought.
I drained the antifreeze and removed the radiator, tk. there was no other UAZ radiator at hand ...

We dismantle the standard meat grinder impeller. We put thick washers under the bolts so that they do not touch the pump body

Fitting on the radiator. The naked eye can see that there is too much

Outlined in red is what is cut off without hesitation
Then we begin to cut only thoughtfully and after careful calculations.
to fasten the diffusers together, cut off the excess right along the edge of the diffuser. There is no point in cutting anymore, because the fan in the diffuser fits very tightly, from the edge of the blades to the wall of the diffuser, about 3 mm. I twisted the diffusers together with M8 bolts, which sat very well in the standard holes.
In photo 3, it is clearly visible that the diffusers protrude beyond the radiator. So, the outer parts need to be cut right at the end of the circle and perpendicular to the upper and lower radiator tanks. The choice on the grinder and welding fell due to the fact that the diffusers are stamped in three planes. It is practically impossible to bend the edge of the diffuser into a corner for attaching to the radiator without damaging the diffuser itself.
Therefore, only "cut". Cutting off the excess and bending as we need (from the cut we make a corner with one shelf 20 mm), the other shelf repeats the bends of the diffuser, because cut off from him. Cook carefully and with tacks, because metal - foil. We clean the seams and put on the fans in order to make sure that the diffusers do not work during welding.


You can see how the welded edge of the diffuser is curved. The radiator spacers were slightly bent so as not to touch the diffuser

You can see how the welded edge of the diffuser is curved.

The distance from the pump to the diffusers is about 10-15 mm. The tightening bolt between the diffusers is visible. Tightened with an M5 screw through the sleeve

"Volgovskaya"; pipe in the upper branch pipe with TM-108 sensor at 92-87 degrees

The sensor is in the down pipe at 87-82 degrees. The "Volgovskaya" pipe does not fit in diameter, because dangles in the pipe like a pencil in a glass. I welded on the nut, additionally missed the weld with sealant


Bend the radiator strut so that it does not touch the diffuser
I haven't connected an electrician yet.
According to my idea, each fan will be controlled by its own relay and triggered by its own sensor.
Those. the algorithm of work according to the idea is as follows: if too hot coolant comes out of the engine, the sensor is triggered to a temperature of 92-87 degrees C. and one electric fan is turned on. If there is not enough cooling in the radiator and a second sensor is triggered at the exit from the radiator to a temperature of 87-82 degrees C. then the second electric fan is turned on.
Purchased:
electric radiator fans 2103-08 LSA 2 pcs.
Diffusers 2108-2115 2 pcs.
"Volgovskaya" pipe to the upper branch pipe 1 pc.
Sensors TM-108 2 pcs. - 70 UAH
Relays for electric fans and connectors 2 pcs.
Clamps D40-60 mm 2 pcs.
Connection: electrician
Yesterday I connected electric fans according to the scheme:

each fan is connected in this way.
Used a 5-pin relay 75.3777. One leg in the chain is not involved.
Contacts 30 and 86 are closed with a loop. I hooked up a 20 amp fuse in front of the loop

I control the fans from the passenger compartment with the following toggle switch:

previously unscrewed the screws from the toggle switch. The connectors "mother" fit on the contacts of the toggle switch like relatives
Last night, during testing, I noticed the following:
1. The motor warms up almost twice as fast.
2. While waiting for a check of the work done, I even stuck a neutral in the transfer case, and a gear in the checkpoint to create a load. Just in case, a 5-liter carbon dioxide fire extinguisher was taken out of the trunk and stood "on the watch" (otherwise hell knows what I have done with wires).
3. When the temperature reached by the sensor in the passenger compartment, the right fan turned on (which is in a pair with the sensor at 92-87 degrees) and after one and a half or two (!) Minutes it turned off. The temperature on the device in the cabin dropped almost before our eyes. Those. on the track, the fans will be silent, and the (first) will work only in locality at traffic lights. Anyway, I think so ...
4. To turn on the second fan on the "automatic", you probably need to crawl through the soggy plowing and pull some ballast behind you ...
For two days I sat with a soldering iron and soldered the wires to the contacts, but then I gave up on this thankless job, did not get embarrassed, went to the car market and bought a crimp for car terminals. Compressed the whole scheme in one evening, within three hours ...
Here is an example of an indication of the operation of electric fans:
almost at the very end of the video, first one yellow warning lamp lights up on the tidy, then the second. Which indicates that one or another electric fan is turned on ...
Purchased:
swaging - 85 UAH (in the future, it will come in handy on the farm)
fuses (2 pcs) - 14 UAH
connectors "mass" (round) and "female" 20 pcs. -10 UAH
wire with a cross section of 2.5 squares 10 meters - 100 UAH
relay 75.3777 with connectors 2 pcs. - 40 UAH
three-position toggle switch - 12 UAH
signal lamps with sockets 2 pcs - 20 UAH
https://www.drive2.ru/l/1544611/, https://www.drive2.ru/l/1562397/
Specifications
Voltage, V - 12
Consumption current, A, no more - 8
Rotation frequency - 2700
Weight, kg - 1.9
Impeller outer diameter, mm - 285
Air capacity, m3 / s - 0.54
Head, Pa - 90
The radiator will only operate if there is airflow through the radiator core. While the vehicle is moving, the radiator receives natural airflow, but when the vehicle is idle or moving slowly, the airflow from the main fan may not be sufficient to operate the radiator. This is why an additional radiator fan is so important. Installing an additional fan will help circulate air through the radiator and keep it cool to your engine. Otherwise, you risk overheating and damage to the engine.
Benefits electric fan radiator in front of the mechanical standard
A mechanical fan is driven by a motor and spins faster or slower as the motor accelerates and decelerates. This means that at lower engine speeds, the fan also rotates slowly. This is not very helpful considering the engine is idling. In addition to this, mechanical fans use the energy of the engine, resulting in reduced power and fuel consumption.
An electric fan connects to the car's electrical system and provides constant airflow even when the car is stationary (traffic jams) and your engine needs it most. Since the fan is powered by electricity, it does not impose mechanical stress on the fan rotation on the engine, which means fuel savings, and the power supplied by the engine to the wheels is transferred without loss.
When dismantling the main fan in winter, the electric fan will offer another huge advantage - quick warming up of your car, because the fan does not turn on until a certain temperature.
Advantages of the UAZ "Autogur73" electric radiator fan
improving the efficiency of the cooling system without losing engine power;
reduced fuel consumption;
increased resource of the car engine;
comfort of use in winter;
ease of installation;
comes with a mounting kit;
competitive price.
Equipment
electric ventilator
shroud
pipe with a sensor (depending on the car model, one of two options for pipes and sensors is used)
fan relay and fuse
electric pads with contacts
wiring
Sensor type TM 108. Temperature incl. 92 C, shutdown temperature 87 C. Diameter of the pipeline 36 mm.
Operating principle
A push-type electric fan is installed in front of the radiator (in the direction of the vehicle) in addition to the standard fan located behind the radiator. Turning on and off the electric fan is automatic, according to a signal from a sensor installed in the radiator pipeline.
Installation of an additional fan on the UAZ 452 doors. 409
0disconnect the hose from the radiator to the expansion tank.
Unscrew the protection of the engine and gearbox on the right side, for ease of operation.
Unscrew the brake pipe connector from the front yoke.
Disconnect the oil hoses from the oil rod.
Unbolt oil cooler.
Unscrew transition corners from left and right cooling radiator.
Buy 8 bolts 8x20.
Buy 2 new oil hoses 10-15 cm longer, or clamps, connectors, 50 cm oil-resistant hose in place, cut and connect.
Install an additional fan, oil cooler on its casing and the rest in reverse order.