Most of the aggregates and nodes in the Lada Samara model line cars can be changed with their own hands. To do this, sufficiently stock the right tools and purchase new detail. In this material, it is described in detail how the VAZ 2110 benzone pump is replaced and its filtering element - grid. The work is quite simple, as it does not require anything to install a new product. looking Jama or lift. Having studied this material, the reader finds out how to change the fuel pump when you need to do and how to determine that the unit has failed. To make sure that the device came out the device, it is necessary to measure its pressure - the article presents several ways to perform this action.
Tip! Many Samara owners put themselves with a gas station VAZ 2110 Bosch. Despite the higher cost, the import unit has a long service life, and it is easier to maintain it if you compare it with a standard device.
Operation of the pump and its malfunction
From the title, it can be understood that the fuel pump carries out a fuel from the tank in the engine nozzles. Accordingly, if the unit is faulty, the injection of gasoline will not be, and power point will not turn on to work. There are options for the injector and carburetor. The car VAZ 2110 is equipped with an injector, respectively, the fuel pump must be approached by this system. If the "dozen" was upgraded by installing the carburetor, then the unit will have to take abnormal. Located Aggregate B. fuel tank - Under the left rear door, the electrician comes out under the seats of the rear row.
It is easy to understand that in the pump or its grid there is simply simple:
- The car does not start. The reasons for this malfunction mass, but before performing full diagnostics, it is necessary to check, not clogged or the grid of the pump.
- On the first transmission there are tangible jerks. There are also many options here, but one of them is non-working fuel pump.
Replacing the pump and its filter
Required tools
Buy new aggregate There is only checks for its pressure and the status of details. To replace the fuel pump manufactured by Bosch. If a regular unit is chosen, its freight number 2112-1139009. The following tools will be needed for work:
- Screwdriwer set.
- Rag.
- Set of wrenches.
- Set of end heads.
Replacement process
Replacing the filter or the entire unit will take no more than an hour. Works work on the following scheme:
- First you need to disconnect the minus terminal from the battery;
- Next, you need to dismantle the plastic lid, which is located under the armchairs of the rear row;
- The key to "17" should be loosen or completely unscrew the hoses, as well as turn off the power of the unit;
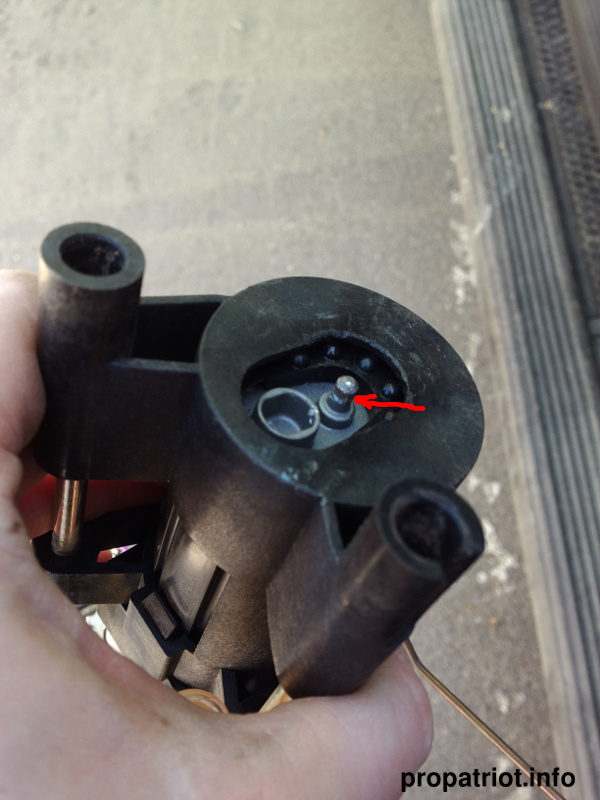
- The next step will be unscrewing the nut. You need to perform an action so as not to damage the float. Sometimes a plastic element remains in the tank, which is problematic to extract;
- After that, the filter (mesh) can be dismantled, clean and replace if necessary;
- If the replacement of the "consumage" of the expected results did not bring, then it is worth checking the work of the aggregate itself and its pressure - a separate item is given to this issue;
- The fuel pump is attached to the housing using eight bolts. After that, you can remove the sealing ring;
- Now the unit can be removed along with the float and remove the rubber seal;
- Setting a new device you need to make sure that the arrow is sent to the back of the machine;
- By connecting all the highways, the cover can be closed - the replacement is completed.
How to measure the pressure in the fuel system?
The easiest way to measure pressure using a special instrument is a pressure gauge. The kit also includes an adapter and drain. You can find out with the help of a air pressure gauge. This device is present practically every motorist, since it is measured with tire pressure. A normally functioning pump in the VAZ 2110 must have an indicator of 2.8-3.2 atm. The pressure gauge must be connected and check which indicator when the engine is not working, but with a gas station on. It must be no less than 2.8 atm.
Hello everyone. Today I will tell how to replace the benzone pump mesh on the Lada Priora At home. Step-by-step photo report replacement fuel pump will help you execute this procedure Alone in the event of such a need.
Replacing the benzone pump mesh Priory Not much different from replacing the mesh on, which I wrote here. Symptoms indicating the need to change this grid are the same as everyone: interruptions in the engine work, jerk while driving, problems with launch, etc.
To replace the benzone pump mesh on the prior you need to have:
- Head on "10", flat screwdriver;
- Rag;
- New gas-pump mesh.
Replacing the benzone pump mesh - step-by-step instruction
Attention! We will work with a flammable substance, so the first thing remove any sources of fire. Do not try to smoke during this work! Some, by the way, be sick, performing similar works. As a result, for its inattention and violation of elementary safety, they pay very expensive.
- Disconnect the power or get that the fuel pump is responsible.
- Get the engine and let it work until it stalls. Thus, you will remove excessive and spend the minimum of gasoline during the removal of the fuel pump.
- Next, you need to remove the rear sofa (seating).
- On "Any Fireman" Remove "-" Battery Terminem, gasoline is easily flammable, you never know what ...
 5. Using a vacuum cleaner and a rag, make cleaning "workplace" in order to take anything during the removal of the fuel pump in the tank.

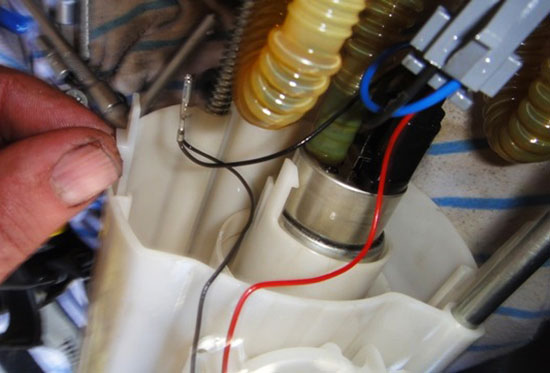
6. Put the rag for fuel hoses and disconnect them from the fuel pump. Be careful, gasoline isp. Disconnect hoses by pressing the metal bracket.

8. Remove the metal ring holder.
9. Gently get, do not hurry and make sure that it is inappropriate not to damage the float of the fuel pump.

10. When the gas station is dismantled, it is necessary to disconnect the plastic pipe, after which the pump itself can be disassembled.

11. It is necessary to remove two small locking rings located on both sides of the guides.
12. Carefully remove the plastic ears, holding a glass, after that you will have access to the messenger itself.
13. To remove the mesh enough to fit it with a flat screwdriver.

14. Replace the mesh and collect everything in the reverse order.
As I already wrote, I don't have a new car, fuel eats very well. And so, on the advice of more experienced colleagues, I decided to replace the grid of the benzonasos, since according to them, if it is clogged - it is poorly reflected in the operation of the engine and the flow rate, because the fuel pump cannot give the engine the right amount of gasoline. After reading the Internet and looking at how people do it, I decided that there was nothing complicated in this and started replacing.
In the online store it was purchased with two spare nets of fuel pump, everything is as expected for my Euro-3 car. I even bought a rubber gasket on any case to change it if the old suddenly was worn out. Those. I felt pretty confident that I have all the spare parts and I can safely replace it.
In principle, there are videos on YouTube and there are publications on the Internet on a similar topic, but nowhere is not painted how to do everything in steps, so that the replacement of the grid of banzoneasos can perform the most novice. Also anywhere possible problems and difficulties that are inevitably found. Therefore, I decided to write down the most detailed.
The hatcher through which we need to access the fuel pump is exactly under the front right passenger seat. Thus, it is necessary to first remove this seat. We begin with the removal of decorative elements of the lounge of the salon under the seat. To do this, you must carefully get the pistons, holding the elements of the object of the front and rear. Front fragment of the trim gets without any problems. But to remove the rear, you need to first remove the seat belt bolt below. To do this, you need to remove the plastic cap from the head of the bolt and turn it out with the key to 17. When you take the rear element of the courtyard from under the chair, its top may touch the wire-toxic, which is tied to the lever of adjusting the depth of the seat. If this happened, it is necessary to get an element in front, holding the adjustment lever pressed to the stop (the wire is raised) and pushing the upholstery element back.
Removing the decorative elements of the upholstery, it is necessary to unscrew the bolts that hold the chair itself: two bolts in front:
and two bolts from the back:
 then remove the chair while behind and so that it does not interfere with you, turn it on the side into the passage between the front and rear seats. Now you need to remove the seating frame that is attached to the floor. To do this, it is necessary to get a noise insulating rug, which lies inside the frame and unscrew the holding bolts inside from both sides:
 and two more bolts in front, which are hiding behind felt. And in order to be felt, you will have to unscrew the screws with a plastic lining at the threshold, holding felt:
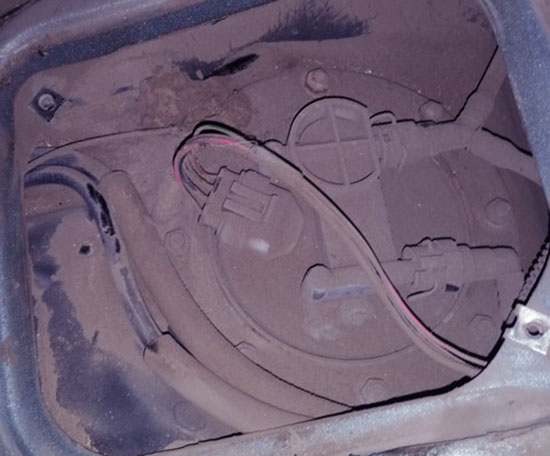
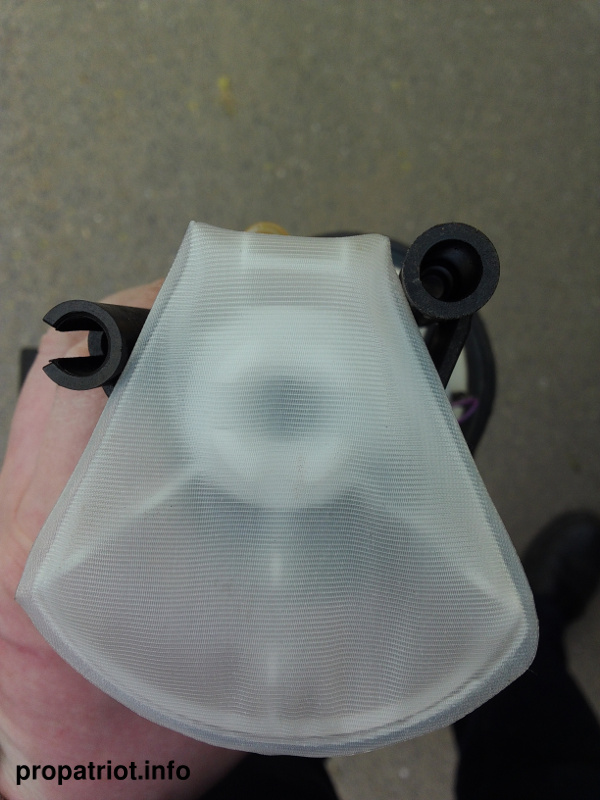
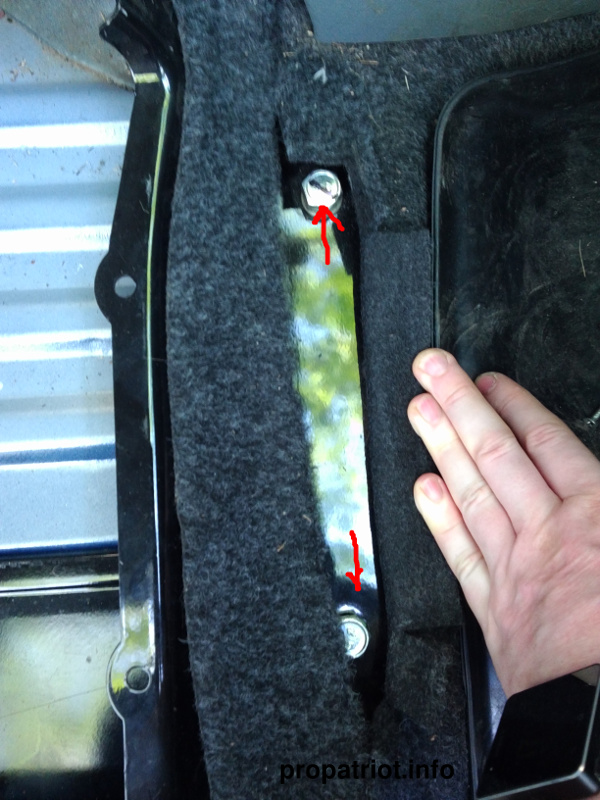 After that, you remove the frame and the lid of a small hatch is turned out to be in front of you, which is removed by unscrewing two screws around the edges. The cover on the edges has a rubber gasket, so it may be possible to pry it with a flat screwdriver if the hatcher after unscrewing the screws is not removed. And here you are overlooking the outside of the immersion module of the fuel pump:
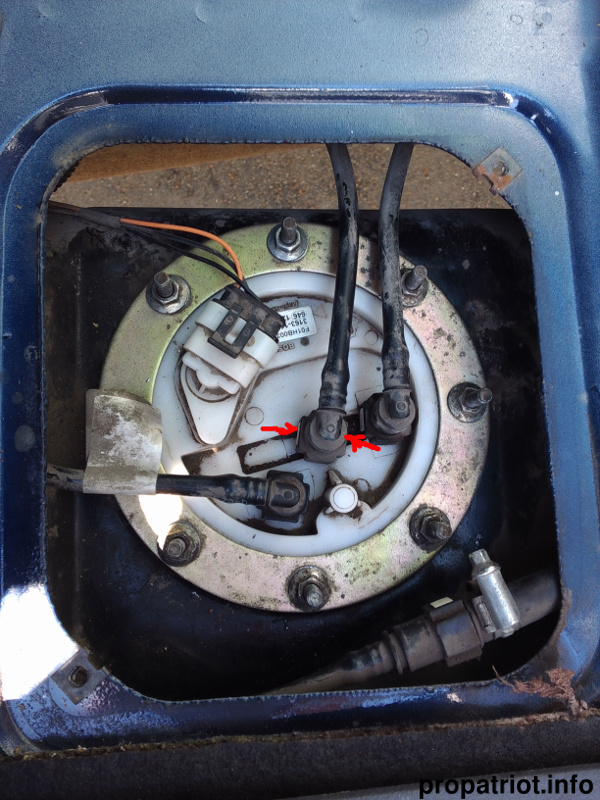 As you can see, three fueling of the module comes into the module. The arrows are white squares on the sides of the latches to which you need to click to remove the fuel line. I could not push my finger to press the right right-hand risk on the right side and made it a flat screwdriver. Before you shoot fuels, it is recommended to reset the pressure in the fuel supply system (or just wait a couple of hours after turning off the engine). Disconnect the electrical connector, and take turns to remove the fuel lines. Of these, some gasoline may result in, so be ready for it. Prepare any way to mark where what fuel line should be inserted, so as not to confuse, when you put everything back (for example, take color markers and paint white squares of latches in different colors, and on the most lid of the submersible module, circle the same color around the fueling connector).
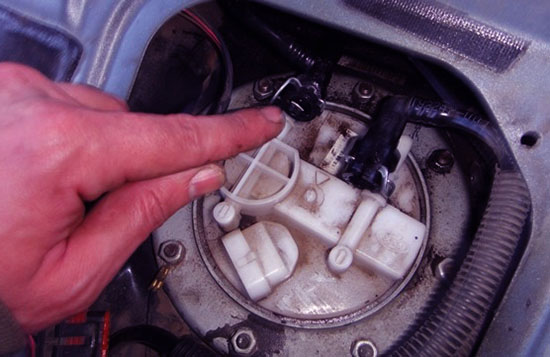
After you have thoughted wires and fueling, unscrew all the nuts in a circle, having sprinkled them with WD shock so that it was easier to spin.
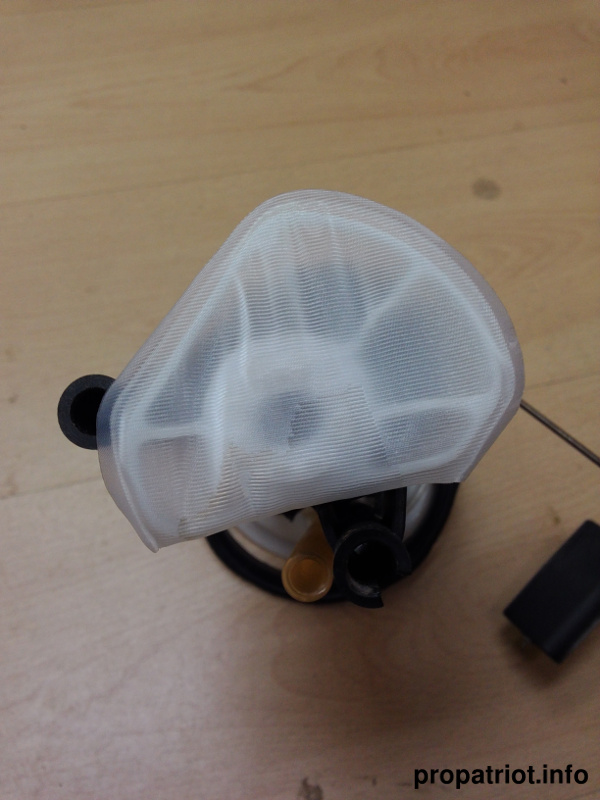
In fact, it's not entirely correct to talk about the grid. Correctly talk - grid submersible module Baszonasos The fact is that in the right tank UAZ Patriot. There is a submersible module inside which there is a glass, in which the mesh desired by us is located, behind which there is a fence hole of the fuel pump, which in turn drives gasoline into the holes that come out to which fastened fuel hoses on the latches (by someone on the fittings) . Also, the fuel level sensor in the gas tank and float, which actually leads this sensor actually, is attached to the submersible module.
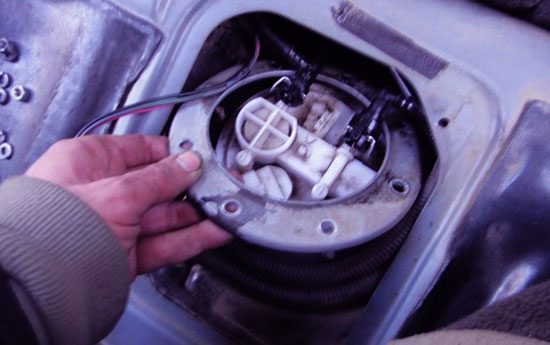
So, when you unscrew all nuts and remove the ring holding module, you need to carefully, without applying forces, remove the entire submersible module by pulling it behind the lid. You will see a rubber gasket between the outside of the immersion module and the gas tank - do not remove it separately, remove the module along with it, otherwise it is then toastsed to wear it back, and it does not interfere at all. The glass and the float of the sensor pass into the hole hardly, but it is enough to remove everything without any problems.
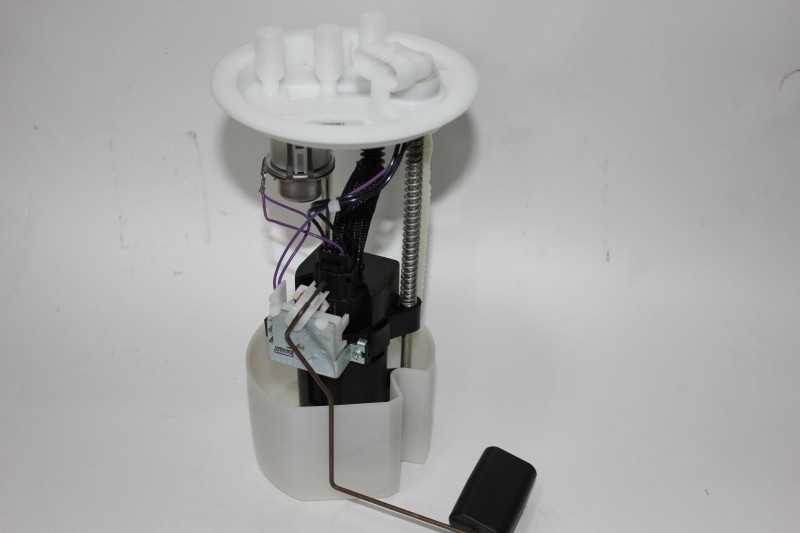
Unfortunately, I got only a major photo of the outside of the module, where you can see the model numbers and the brand:

So I will cite a photo of the module I bring it from Yandex-pictures
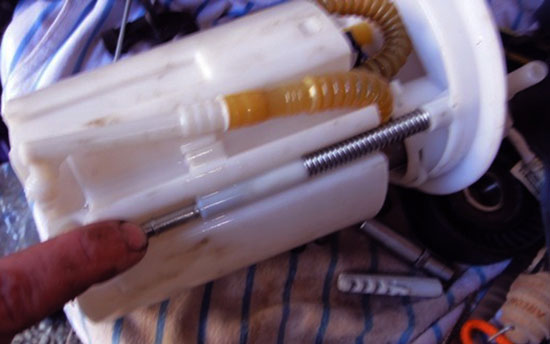
Below you can see a plastic glass, about which I said. It needs to be removed and you will see the grid itself. My grid was very polluted, and there was a lot of garbage in the glass. I removed the garbage and washed with a glass of gasoline. But the adventure began with the grid. She was planted to death. On the Internet, the people wrote that they also take off hard, but I tried my best, but I could not remove it. As I still wanted to change it, I solved the problem drastically - I took the windows and gradually choking the plastic, the following grid (or rather what remained from her). Finally, the victory, the grid is removed:
But I was glad early. Taking into the hands of the grid that I bought in the online store, I tried to put it, but it was not there. The grid did not come! Shock! I bought the grid precisely for Euro-3, i.e. She must be native! But it nevertheless did not fit. Here you and Euro-3 and compatibility of spare parts. Here are both grids:
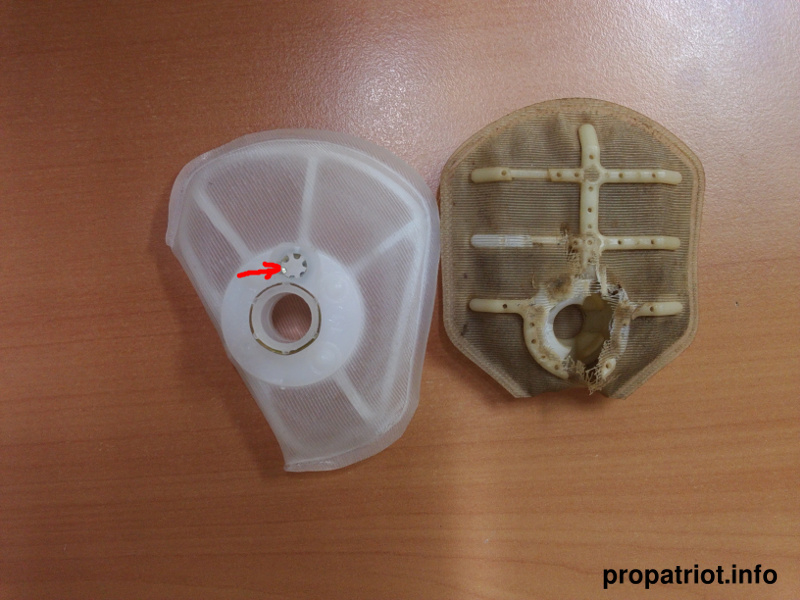 To the right, that stood and you see what it is dirty. On the left, what was supposed to come. Now I explain the meaning of the shooter on the previous photo and on this. You can see how the grid itself is attached. In the attachment there are such cloves, and on the previous photo there is some skin with a circular groove where these teeth fall when putting on. And that's all! Sits tightly, nothing and nothing!
So, returning to the grids. It seems that they have the same sizes, but it is clearly seen that the place of attachment from the left grid is shifted relative to the place of attachment to the right. And when trying to put this grid, it rests on the edge of the glass support:
 And all - the glass is not to wear! My more experienced colleague argued that the grid of the gas station is a very running goods that everyone has a very running product. I took both mesh and traveled two nearest auto-car, but the grids were literally at one person and despite the bag of grids different typesThey put in front of me, he had no one that would come to me. So you should For sure Know what the grid you need and do not listen to those who say that they will suit anyone, although even from Zhiguli. Not suitable!
Tested on your own experience!
And all - the glass is not to wear! My more experienced colleague argued that the grid of the gas station is a very running goods that everyone has a very running product. I took both mesh and traveled two nearest auto-car, but the grids were literally at one person and despite the bag of grids different typesThey put in front of me, he had no one that would come to me. So you should For sure Know what the grid you need and do not listen to those who say that they will suit anyone, although even from Zhiguli. Not suitable!
Tested on your own experience!
As a result, in one of the nearby spare parts stores for gas and UAZ, I found the same grid. She was not the same as it was originally, but the seller assured me what exactly would fit. There was nowhere to go and paying 80 rubles (only 80, and not 300) I became a happy owner of this mesh:
 and despite my fears, she really came up:
 Now that you tightly inserted the grid into the mount, wear a glass back and lower the submersible module into the benzobak. Begin back assembly. Make sure all the nuts that you unscrewed are at your hand.
The racks of the submersible module are spring-loaded. Therefore, when you install a rubber gasket, start pressing the top of the submersible module to it, then you will feel the resistance of the springs. Be very careful! See to lay the gasket smoothly, and the upper part of the submersible module lay on it strictly vertically, without distortion! Then pressing the upper part of the submersible module and keeping it tightly pressed to the laying and the gas tank, you put on the studs of the metal ring you removed. One thing is not very comfortable, but I coped. Do not release the top of the submersible module for a second - it must be tightly pressed all the time. It is in this position that begins to spin the nuts. They must be twisted the cross will cross. Those. At first, the top, then the bottom opposite it, then the left, then the right opposity of it, etc. Until all nuts are twisted with a small tension.
Now you can release the upper part of the submersible module, i.e. No longer put pressure on it. And touch all nuts. See, do not overdo it. I explain why it was impossible to immediately release the lid and twist the nuts or why it is not necessary to twist the nuts too much. There are two reasons for that:
- The immersion module is possible and then no matter how you rotate, gasoline will be seized from under the gasket
- You can cut off the fastening of the studs and it's even worse. Fastening studs, if you did not notice, planted on point welding and rather fragile. The people have gaped and drove the mount. Then it had to suffer for a long time with different adhesives, but it is still not that.
Car heart - engine. It can not work without the correct receipt of gasoline to him, as the blood flow through the human body.
The main fuel supply assembly in the car VAZ 2112 is a gasoline pump that carries out gasoline in the system of its feed to the filter, and after the combustion chamber. From how much pure gasoline will enter the gas station depend on its period of operation.
There are situations where the car moves by jerks or got up at all. It is necessary to start repairing in such a situation with the easiest - the replacement of the VAZ 2112 gas station mesh must be performed.
The grid can clog to such an extent that even experienced auto mechanics surprises. The main reason for this is poor quality Gasoline.
When the mesh replacement is needed on the fuel pump
On the state of the node can be judged about its performance and developed pressure.
To do this, you need to fuel system Through a special adapter to connect a pressure gauge. This diagnosis is done per service station.
It is easier to diagnose the fuel pump at home as follows:
- Turned on the ignition, and does not work, there is no characteristic hum or issues loud noiseWhat entails an overload of the node and reduces its period of operation.
- Pump performance falls, which is clearly visible when moving at the third and fourth speeds along a flat road. Does not react to the car when the driver presses the gas pedal.
- If the car VAZ 2112 "spontaneously" slows down while driving. This is most likely indicated that there are problems with fuel supply to the benzobac.
- Causes can be: scored filters rude or thin cleaning. A mandatory replacement is subject to a fine filter, and a rough (mesh) can be used to rinse. But this will give only a temporary effect, after a short period of time it will still need to replace the gas station mesh on the VAZ 2112.
Any car owner can purchase it in a car shop without problems. The price of the detail is small, the work process will take some time, but the reliability of the operation of the gas station for a long time will increase.
How to clean the grid of the fuel pump
For work you will need:
- Compressor.
- Gas station seal.
- Gaskets under the fuel fuel fitting.
To clean the filter of coarse cleaning, as indicated by the instruction, it is necessary to extract gasoline pump from the tank.
This is done in this way:
- The car is dealers.
- FROM rear seat Pillow is removed.
- Self-tapping screws are unscrewed and the cover from the hatch is removed.
- Disconnecting electrical stop.
- Disconnects the fitting on the tube through which fuel is served.
- A tube is assigned to the side.
- Similarly, the fitting is disconnected and falling toward the pipeline tube.
- Remove the clamping ring.
- The fuel pump is raised, the float is excreted from the tank hole and removed simultaneously with the gas station.
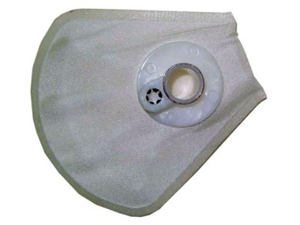
- At the bottom of the benzonasos is a mesh, which is a coarse filter. The general type of mesh is shown in the photo.
Pollution mesh is not always determined by the eye. Very small particles are often translucent, and the filter seems clean.
Tip: For high-quality rinsing of the grid, she needs to be able to bump out. This uses detergents for cleaning the bathroom, making science and other similar.
They are bred by water 1 to 10, one hour the grid remains in solution. After careful washing, you can see the main flare.
So:
- Using too detergent And a brush with thin veins (canned) mesh is well washed.
- Blow out compressed air From the compressor. In the absence of the latter, you need to give the filter to dry, you need to follow, so that the dirt and dust do not get.
- After complete drying, the fuel pump mesh can be collected.
Tip: After carrying out the cleaning operations, it is necessary to visually consider it and determine whether it is possible to use it or better if the mesh is replaced on the VAZ 2112 fuel pump. It should not have visible deformations that can be dents, cracks, breaks or stretching.
- The VAZ 2112 gas station assembly is performed in the sequence of the return disassembly.
- The car starts, the quality of the operations to eliminate defects is checked.
How correctly replaces the gas station mesh on the VAZ 21124, it is clearly visible on the video. If the VAZ 2112 car replaces the fuel pump mesh regularly and correctly, then large problems with fuel supply from the tank to the engine can be significantly reduced.