Replacing a support bearing is a rather complicated process and has its own nuances, so you should familiarize yourself with its design and types. The journal bearing is one of the most important parts of every vehicle. It is he who provides unhindered turns.
To check it, it is enough to raise the car and turn the wheels by hand. This should happen smoothly, without getting stuck, if there is a hydraulic booster, then you should start the engine, then turn the steering wheel, and at this time the second assistant will listen in the area of the wheel.
Since it consists of several elements, there can be several types of malfunctions:
- Increased crunch when cornering.
- Biting and tapping during maneuvers.
- Destruction of the entire support node and auxiliary elements.
Bearings can be of two types according to the principle of operation:
- rolling;
- slip.
Each of them has its own disadvantages and advantages. Sliding devices are two steel clips into which bronze bushings are pressed. A prerequisite when using this type, there is a constant abundance of lubrication and cleanliness from dirt. These bearings were first installed on Nissan Qashqai vehicles. They made it possible to increase the trouble-free service life from an average of 100 thousand km to 200.
The first type, rolling, is classic and is used in all other cars, including previous models Nissan. But their effective term can be from 30 thousand, as a rule, cars Opel brands, SkodaOctavia, and up to 100 thousand km for Audi 100, ChevroletLacetti.
The service life of the journal bearings depends on the driving intensity and the conditions in which they operate.
As a rule, when constantly high humidity, driving through puddles simply leads to washing out of the lubricant, and getting inside the sand. And this can lead not only to squeaks and knocks, but to the destruction of the entire clip.
Types
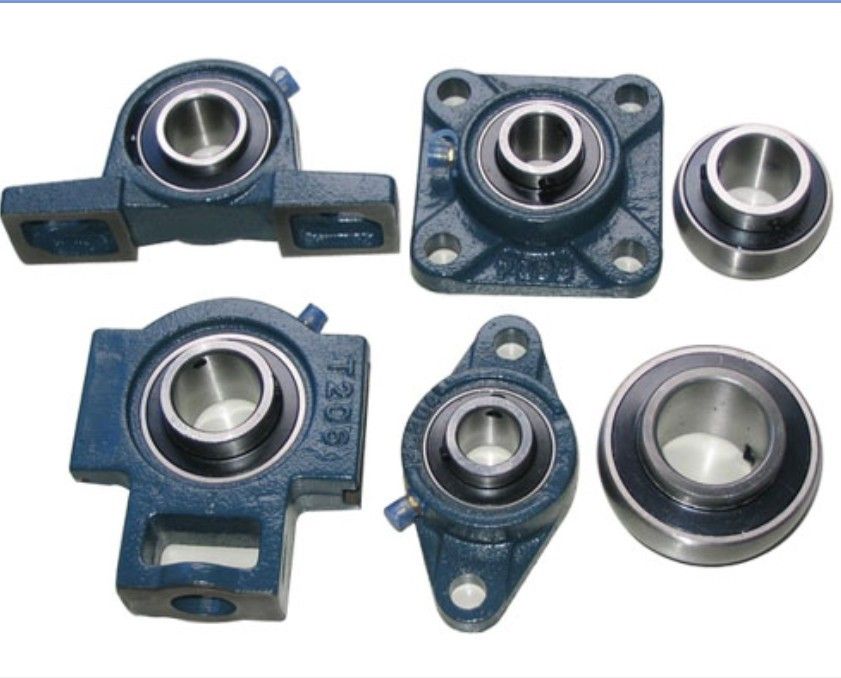
Pillow block bearings can also be of several types according to their design. Based on it, one can judge the durability and endurance:
- With integrated rings, both outer and inner. The design features of this type are the presence of mounting holes directly in the cage. Therefore, for its installation, additional clamping strips and plates are not required. Another advantage of these bearings is that they are equipped with spacers between the rings, and this allows you to avoid any adjustments.
- With separate outer rings to allow the inner rings to rotate. In them, the outer ring can be removed separately, and the inner one is connected to the body. This type is used where unreliability and accuracy of movements are required. It is quite easy to check them because when they fail, they are often destroyed and create a characteristic sound when cornering.
- With detachable inner rings for outer rotation. Used in the same place as the previous model.
- Single-split. The principle is the same as with the previous ones. You can check this type in the same ways as described above.
Replacement
Replacing the support bearing on all cars is almost the same and differs only in some constructive designs the machine itself. On brands, for example, Golf 1,2, the steering lever is located at the bottom of the rack, while on others, for example, OpelCadet, VAZ 2110 and others, it is located on top of the rack. This indicates the same top position of the steering rack. In addition, the differences may be in the limited space, for example, DaewooNexia.

How to change thrust bearing? Consider an example on a car Ford Mondeo, bearing replacement consists of the following steps:
- In order to get started, you need to install the car on hand brake and lean on secure stands.
- After securing secure installation both wheels must be removed. Replacement of paired spare parts in the chassis of the car should be completely, because due to the development of one, the second will also be subject to increased wear.
- It is imperative that before starting to untwist all connections, they should be pre-treated with WD-40, having previously cleaned them from dirt. This will significantly increase the service life of all elements.
- Further, using a 15 or 18 spanner wrench, it is necessary to loosen the clamping nut of the rack in the glass. On other brands of cars, you may need a 22 socket and a 6 hex socket.
- The next stage of replacement will require unscrewing the upper tip of the stabilizer bar. This requires a spanner and a hexagon.
- Be sure to remove the brake hose and the wiring to the sensor from the clamps on the strut housing.
- Next, you will need to completely unscrew the bolt securing the rack to the pivot arm.
- Using a 13 socket wrench, you need to unscrew the drive mounting bolt on the hub.
- At the next stage, you will need the help of an outsider. He must press the lever, and in the meantime, with the help of a pry bar, inserting it into the cut of the rack fastening clamp, it is necessary to push its halves to the sides. The hub drive arm should be safely off the rack. Replacing a bearing with a Mondeo precisely because of this stage is the reason why many people go to service centers. When assembling, keep in mind that there is something like a cotter pin on it, which should go into the cut of the clamp.
- Next, you need to unscrew the three bolts securing the rack to the glass, they hold the thrust bearing.
- At this stage, its own replacement begins. To do this, you need to tighten the spring using a special tool.
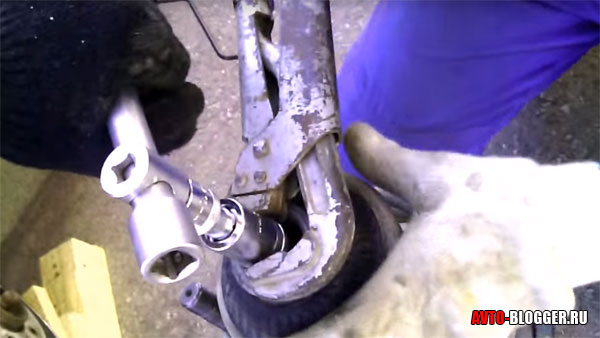
- Using a head and a hexagon, it is necessary to unscrew the clamping nut of the bearing itself.
- In the disassembled state, it is removed from the body of the support mechanism using a screwdriver.
- When installing the bearing, its rotary part must be turned relative to the protrusion on the stationary part by an angle of 60. This measure is mandatory and is decisive when working and distributing loads on it. You can check the angle using a protractor.
- Assemble all units and mechanisms in reverse order... Camber does not have to be done, because the drive lever did not unscrew from the hub. After installing all parts, check the bearing for runout. To do this, in the air, it is enough to jerk the stand with strong jerks.
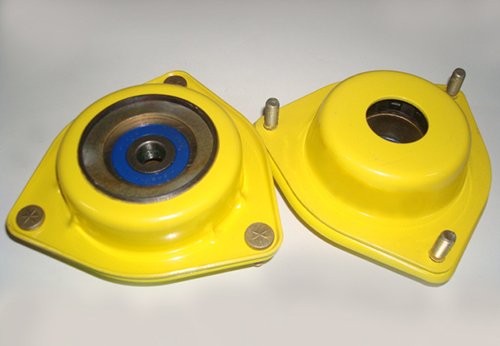
Front support posts, as well as the thrust bearings are constantly subjected to severe stress, especially when the vehicle is moving on uneven roads or rough terrain. Timely replacement of support bearings prevents complete failure of the entire chassis, and the need for its overhaul.
As you know, faulty chassis is fraught with loss of controllability, therefore, there is a threat to the safety of the life of the driver and other road users.
In this article I will talk about how to replace the support bearing of the front pillar on the VAZ 2110 do it yourself without the need for wheel alignment. The replacement of the support bearing will be done without unscrewing the camber bolts, this will allow us to avoid the need to adjust the camber-convergence.
Before replacing the VAZ 2110 thrust bearing, you need to take care of the instrumentation. To complete this work, you will need:
- Spring brace, special tool for loosening the nuts of the uprights.
- Steering tip puller.
- Standard set of keys.
- Jack, hammer, assembly.
- Assistant (preferred).
- New support bearing.
Replacing the support bearing of the front strut VAZ 2110 - step by step instructions
1. The first step is to remove the hub cap and loosen the CV joint nut.
 2. Ask the assistant to press the brake pedal, while at the same time, using the head or wrench, rip off the nut.
4. To unscrew the steering end nut, it must be unpinned. Using a hammer and a pry bar, press out your finger.
 5. To do this, unscrew the 2 fastening bolts.
 6. Remove the brake hose by pulling it out of the rack clamp.
 7. Next, unscrew the 2 caliper bolts, having previously unclosed the washer petals. Move the caliper to the side so that it does not interfere with the work and hang it on a wire, it must not hang on the brake hose.
 8. For the convenience of working with the stand removed, rip off the stand nut, but do not unscrew it completely. Then unscrew the 3 support nuts.
 9. Then unscrew the SHRUS nut. Take out the rack while pulling the CV joint from the splines.
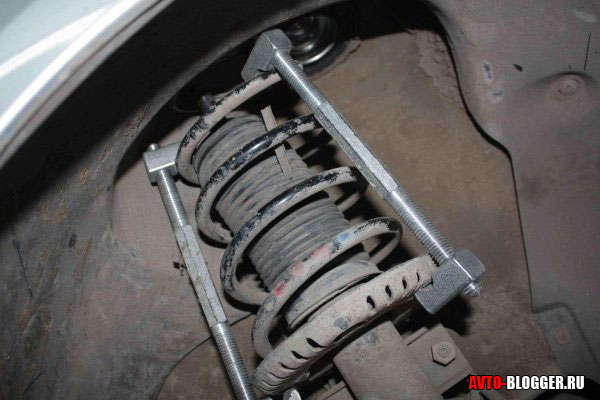
 10. Use zip ties to flatten the spring. Place the tie on the turns and tighten each side evenly with a wrench. When the spring is compressed, you can unscrew the support bearing.

 11. Now you can replace the thrust bearing, to do this, remove the old support and install a new support bearing in its place.
 The assembly is carried out upside-down.
Replacing the support bearing VAZ 2110- not the most simple job, however at the right approach and "even hands" can produce it at home in a few hours.
Watch the video do-it-yourself replacement of the VAZ 2110 support bearing:
We have already talked, however, it is not eternal. If you believe the masters at the service station, it needs to be changed along with the racks - that's right! But there is not always money for shock absorbers, and many do not even remember such a thing as a "support" and do not know why it is needed. In general, there is a replacement without them! But after a short mileage, problems can begin ...
To begin with, I’ll say, guys, a "support" is just a bearing and it is far from eternal. Very heavy loads act on it, because it must keep the shock absorber drain. Of course, this part is strong enough, it works for many thousands of kilometers. But our roads, and big runs destroy it. Therefore, it is advisable to change them every time the shock absorber struts are replaced - this is a normal practice.
The main reasons for failure
Before we talk about the replacement, I propose to talk about the reasons for which it fails. There are only two main directions here, these are mechanical impact and the time factor.
- Mechanical impact - as you probably guessed - these are broken roads, bumps and holes. The strut forcefully hits the thrust bearing, thereby destroying it. By the way, he himself was a witness when he broke down already at 45,000 kilometers.
- Time factor - there are other reasons, the first is, of course, the tiredness of the metal and plastic parts themselves from time to time and high mileage, that is, corny wear and tear. The second is water, dust, dirt - the whole thing gets into the bearing and destroys it. For example, from water, it begins to rust and collapse. The situation is aggravated by the fact that it has practically no protective enclosures.
In general, the third is not given here, either you break it, or it will be devoured by rust, the result is one - destruction.
How do you know if a thrust bearing has failed?
Very simply, any bearing in case of failure will either vibrate, or creak - buzz (crunch), or it will simply jam.
Therefore, if you notice that when you turn the steering wheel, you have some strange sounds, such as a crunch or squeak, then the reason may be in the "support". Also, the steering wheel will become much heavier.
Self-diagnosis:
- You need an assistant, we put him behind the wheel, turn off the engine.
- Open the hood and remove the cap from the top.
- We put our hand on the "support" and ask your friend to turn the steering wheel to the right and to the left, not necessarily strongly, perhaps small movements (steering wheel in half a turn). There should be no creaks and crunching, as well as no beating.
- Without releasing your hand from the bearing, we ask a friend to come out and swing the machine from side to side. If the stand starts to walk (beat) in the "defensive midfielder" then there is a high probability that he is out of order.
At the service station, they usually check by "swinging", the beating cannot be confused with anything, some even click.
Can I ride with a non-working person?
NO, guys - you can't, it can get jammed corny, and at speed you just won't turn the steering wheel! So much for the accident. In my practice, it broke (tore apart) - that is, the drain rod went up through it - pierced the hood through and through! You think it’s not real yet how real, the weight of the car is large, and the structure is broken.

So much for the savings, a broken hood is very difficult to repair, most likely you will change it. It is better to change bearings on time, and they do not cost global money! Originals from 600 to 2000 rubles, depending on the brand and class of the car. ON SUVs can be a little more expensive.
How to remove and replace with your own hands, is it possible from above?
We came to the most interesting - how to shoot? You know, here I immediately want to answer all those who are trying to change it from above - GUYS, this is unrealistic! It is locked by the car body (if you want the front "glasses" of the racks), it is against them that it rests and removed - it is unrealistic to replace it from above, only from below.
Well, let's go, I will tell you in detail point by point:
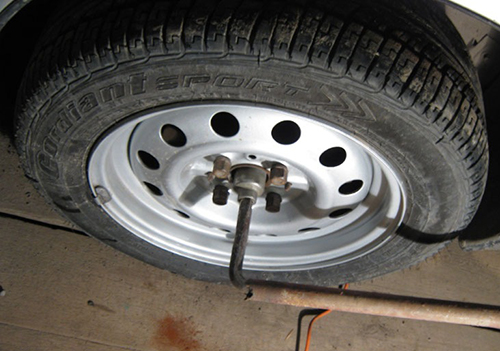
- First you need to understand that we need to remove the front drain completely. To do this, we raise the car, the front part. We remove the wheel.
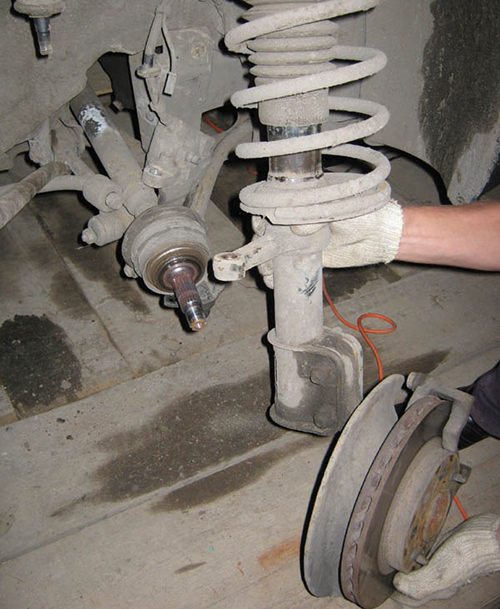
- We need to disconnect all the auxiliary mounts from the strut, this can be the caliper mount, the stabilizer bar mount, the ABS sensor and brake hose mounts.

- From the top (from under the hood), unscrew three nuts - take out the shock absorber strut.

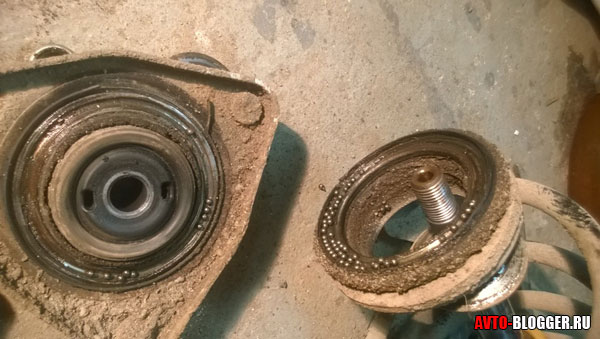
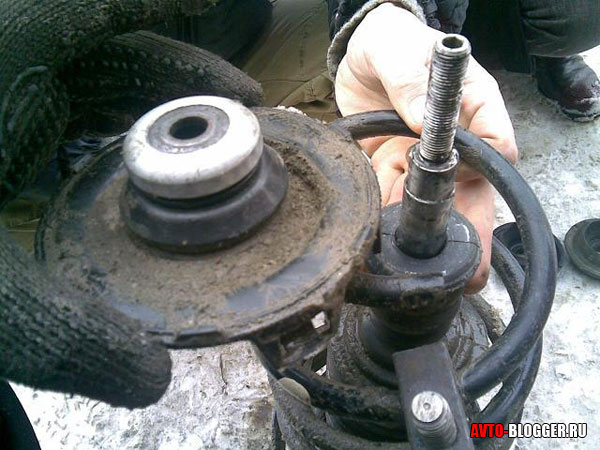
- Now we need to "tighten" the spring, because it often rests against the bearing itself, that is, it is the upper thrust cup.
- Then we need to unscrew the nut from the strut (the one that secures the bearing and shock absorber rod). This is a problem, because if you turn the nut, it will rotate with the stem. For such work, a special key is needed, or the head and the bit are usually used T Turn the head with a gas wrench, and fix the bit with a holder.
- After that, the support bearing will be removed, now it can be replaced. Then we repeat the process in reverse order.
Probably, the instructions are a little incomprehensible, so we are watching the video version.
This is how to remove and replace the "defensive midfielder", I think he explained it clearly. Read our AUTOBLOG, there will be many more useful articles and videos.
The process of replacing the support on cars of the VAZ 2109 and VAZ 2110 brands does not present difficulties and does not take much time even for people who are inexperienced in car repairs. Therefore, each owner will be able to independently change the bearing on his car.
- This is one of the most important parts of the front suspension, which performs the function of rotating the shock absorber around its axis and damping vibrations when the car moves relative to the body. It is installed on the strut support at the junction of the body and shock absorber. By type it belongs to rolling bearings. These bearings are able to withstand large axial and radial loads due to design features... The material of manufacture is stainless steel. The wear of a VAZ 2109 (VAZ 2110) bearing is often associated with road irregularities, since when driving over bumps, heavy loads act on it. These operating conditions reduce the life of the part. Distinctive feature The wear of the thrust bearing is the runout when driving.For VAZ 2109 (VAZ 2110), grasp the shock absorber with your hands for serviceability and shake the car. If a sound is heard during rolling, accompanied by a beat or squeak, then the bearing must be replaced immediately (see video below)Ignoring the timely replacement of a VAZ 2109 (VAZ 2110) bearing can lead to quite serious problems. Firstly, the wheel alignment will fail, which affects the safety of the vehicle and the wear of the shock absorber. Secondly, the shock absorber can completely fall apart, as a result of which the strut is capable of piercing the car body.
The support bearing is non-separable by design, which means it is not repairable. Therefore, do not try to disassemble and repair it. Better buy a bearing and start replacing.It should be noted that bearing manufacturers produce parts of different quality and service life. Choose bearings whenever possible Russian production... There are several manufacturing plants in our country. There, you yourself can choose which plant to give preference to.
The procedure for replacing a support bearing on a VAZ 2109 (VAZ 2110):
Prepare everything first necessary tools and special pullers. These include:- set of wrenches,
- screwdrivers,
- hammer,
- pliers,
- jack,
- ties for springs,
- removable tool for rack nuts,
- puller for the steering tip.