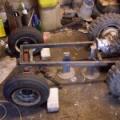
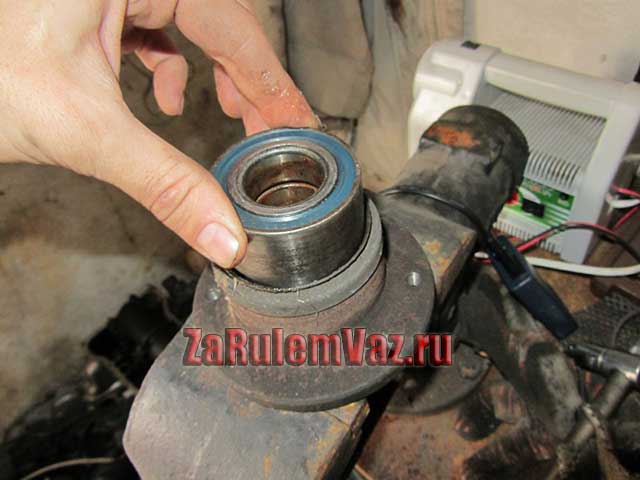
Appearance rear hub bearing VAZ 2109
Do you hear a hum when driving from behind? You need to replace the rear bearing of the VAZ 2109 with a new one. Its repair is impossible, and the price is quite low - within 400 rubles apiece. The symptom of a breakdown is noise that increases as the speed rises. The sensations are not pleasant, as it seems as if you are not in a car, but in the cockpit of a fighter jet. The repair takes very little time, the main part of the work is removing the hubs and pressing out the bearings. It is these points that are worth considering in more detail.
Removing the hub
First, prepare for the repair - place stops under both front wheels. When replacing the rear bearing with a VAZ 2109, it is best to work first with one side, then with the other. To do this, place a jack under the rear and remove all four bolts.
The vehicle can then be raised to its maximum height and securely supported under it. To carry out repairs, you need two specific tools:
- Key with a head for 30 (socket).
- Rear hub bearing puller.
When the wheel is raised, remove all four bolts. So, now the question is, what kind of rear brakes are installed - standard drum or "tuned" disc? In the second case, you will need to completely remove the calipers to provide access to the hub. In the first case, it is necessary to unscrew the guides and remove the drum.
Now, armed with a 30 wrench with a long lever (meter or two pipe), you need to unscrew the nut from the hub. When you get rid of the nut, slide the wheel over the hub and tighten the two bolts. This will have to be done if it is not possible to knock her off the axis. Remove the hub with a quick jerk. Everything, when it is in your hands, you can start replacing the rear bearing on a VAZ 2109 car.
Removing and replacing a wheel bearing on a VAZ 2109
Not an easy task if you don't have a puller. Spend a lot of time, and you can do much harm. It is quite simple to work with a puller - we installed it and, holding the hub in a vice, gradually turn the bolt with a wrench.
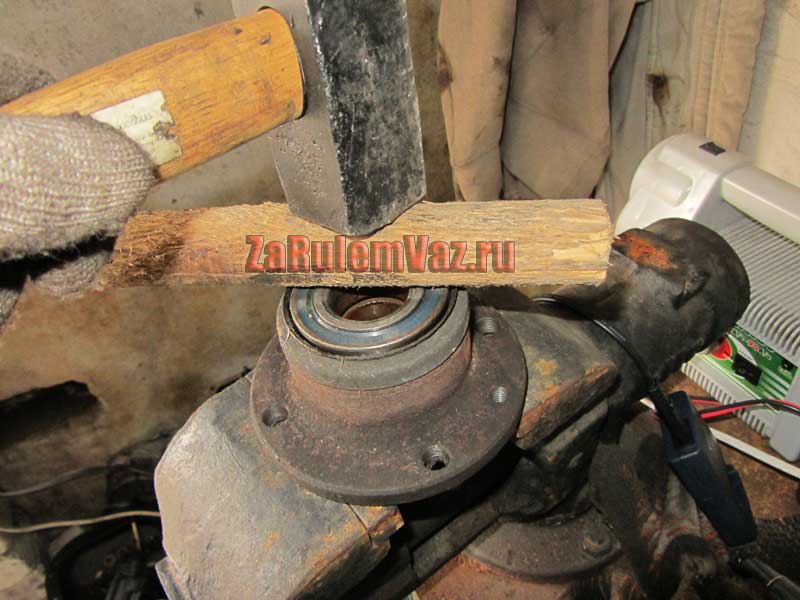
It is much more difficult without it - you need a spacer that is installed on the clip. And swinging a good hammer, hit the spacer. Long and tedious, but you can do it. Just do not forget to remove the retaining ring from the groove, otherwise problems will not be avoided.
The second step is to install a new element. If it's really straight, then it is better to use a puller here, since pressing with a hammer is an overly barbaric method. You can heat the hub a little (just not much, since there are rubber elements in the bearing structure).
And put the bearing itself in the freezer long before the start of the repair. Simple physics, nothing more - the hub expands and the bearing contracts. As a result, the installation is much easier. After pressing in, you just have to reinstall the retaining ring and start assembling the entire unit.
During the movement of the car, a specific hum may occur, changing the tonality to a low one at low revs or noise with a possible grinding on high speed... The hub bearing can create such troubles. Performance characteristics, laid down by the manufacturer, should allow the driver not to think about this wheel element for a long time.
However, road realities make their own correction. The main reason for the replacement of the rear hub bearing is not physical wear, but mechanical deformation... The driver does not have time to notice all the holes on the road, and for the failure of vulnerable parts, it is enough to hit only one of them.
Constant hum from rear wheels should alert the driver, while it is necessary to stop at the nearest place and check the bearing's performance. The term of its high-quality work is usually about 100 thousand km of run. While approaching such a parameter, you need to engage in diagnostics of their condition.
For this work, you will need to perform the following actions:
- would need lock the wheels located diagonally to the diagnosed ones, because you need to check on both sides, since in the cabin it is not always clearly possible to understand where the noise is coming from;
- jacked up spin the wheel as much as possible hands until the familiar hum is heard, usually the characteristic problematic sound is noticeable almost immediately, because a high-quality bearing works without grinding, crunching and humming;
- on a dubious wheel it is worth checking the lateral play using a simple procedure, grasping the wheel, you need to shake it away from you and towards you, and the presence of a noticeable movement is an indication for replacing the bearing.
You need to know that most car dealerships offer a hub assembly with a bearing, but if the bore diameter does not have wear or deformation, then you can not change the hub, but buy a separate repair bearing.
Replacement procedure
Before changing rear bearing hubs, block the car with wheel chocks. We loosen the fasteners on the wheel being diagnosed. Also, having got rid of the central cap, release the central nut by 1-2 turns. You can now jack up this side.
We install safety stands under the body and remove the wheel. Seat brake drum can be filled with WD-40 for easy dismantling. In some cases use brake fluid or diesel fuel. Before unscrewing the guide bolts, they are usually tapped with a copper hammer so that the "stuck" thread "yields".
Dismantle brake drum... In problematic cases, a special puller is used for such an operation, and for easier situations, bolts are screwed into the thread intended for them, with their help, an interference is created for removal.
 Step 1. Remove the cap
  Step 2. Unscrew the nut with a puller
 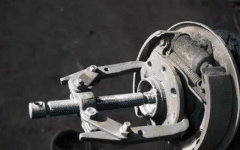 Step 3. Remove the hub with a puller
  Step 4. We take out the ring and prepare the bearing
 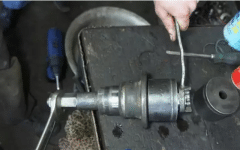 Step 5. Press in the bearing with a puller
  Step 6. Mount the hub back
  Step 7. Rolling the nut
Remove the central nut and extend the entire hub axially. Sometimes a bearing cage remains on the shaft, then using a puller or chisel, dismantle it separately after the hub... We carry out the operation so as not to damage the seating surface.
We carry out an inspection of the axle to identify the rotation of the bearing cage. If there are such traces (the presence of grooves on the landing diameter), then the hub will also have to be changed.
You need to know that the formation of serifs with a chisel or a breakdown on a worn surface for a more rigid fit of the bearing cage is categorically unacceptable! It is necessary to replace the worn out hub completely in such a situation!
Current replacement of the rear wheel bearing can be carried out with concomitant diagnostics of other elements. It is worth checking at the same time brake cylinder for leaks, and brake pads are monitored for wear.
Using a removable device, we take out the retaining ring, and, if necessary, fill it with a cleaning special fluid under it, so that the bearing can be pressed out more easily. It is customary to use one of three popular methods for dismantling the outer race from the hub:
- using a hydraulic press, which is not found in every garage;
- reusable puller, its cost is affordable, and the unit can be used in the future;
- with a hammer or sledgehammers 2-3 kg, for this method a special spacer of the corresponding diameter is necessarily used.

We install the hub on a hard surface and apply a couple of blows to the prepared mandrel with a hammer. This is done carefully so as not to damage the seating surface with a mandrel or other parts with a heavy hammer.
The surface freed from the clip can be cleaned with fine emery paper from possible corrosion spots and then lubricated with oil (it is allowed to use mining). It will facilitate the installation of a new bearing, which must first be assembled using two washers and a bolt. The outer diameter of the washers should be 2-3 mm less than the bearing diameter.
Grease can be added to the double row separator prior to assembly. Using a hammer, preferably with a copper or bronze end, lightly tapping on opposite sides, "set" the bearing.
You need to know that bearings are made of high-alloy steel, which can crumble under strong dynamic loads (sharp impacts), therefore it is recommended to use a "soft" copper or bronze spacer so as not to damage the cages.

If at the initial stage the approach turns out to be tight, then there is probably a bias, so it is worth aligning with light blows, and not applying unnecessary force. When the new clip is halfway down, the old one can be used as a spacer. Continue until the groove for the retaining ring appears. We fix the bearing with a ring.
Mounting the hub
We get rid of the tightening device from the bolt and two washers. Now you can return the hub to its place. We must install a new central nut, after having lubricated the thread with "lithol" or other grease.
We install the brake drum on the fasteners. We put the wheel and fix it with the mounting bolts. We turn the wheel "by hand" and listen to extraneous noise... The absence of hum or rattle, as well as free rotation, indicates the correct assembly.
We lower the wheel with a jack, and only after that we carry out the final tightening of the central nut. It is recommended to use a torque wrench for this operation. The tightness value should be close to 20 kg / m. This value is large enough, therefore, without a special key, it will be necessary to increase the key length. Now the hook can be screwed in and the fastening bolts on the wheel can be tightened to the required torque.
If there is a constant extraneous sound (hum) from the rear wheels when driving, you should pay attention to the condition of the wheel bearing. For VAZ 2114 this detail It is quite durable and it happens that the bearing travels more than 200,000 km, but in the case when it starts to howl, its replacement is obligatory.
In order to replace it ourselves, we need the following tool:
- Vise for more convenience
- Special puller with swivel arms
- Circlip pliers
- Wooden block
- Hammer
- Ratchet and crank
- 7 and 30 mm sockets
At one time I did a video review on this topic, but due to the fact that at that time I did not have everything at hand the necessary tool and a vice, which is very handy when performing this repair, everything did not work out quite the way we wanted. But the essence of the work is garage conditions you can still understand.
Video on replacing the rear wheel bearing VAZ 2114
In order to watch all video reviews on the repair of VAZ " front-wheel drive», You can go to my channel and familiarize yourself with many materials.
Now, below you can look at the entire repair process with all the necessary tools.
Photo report on replacing the rear hub bearing on VAZ 2114 and 2115 cars
So, first of all, you need to remove the cap of the nut of the nut and rip it off with a good wrench. Then raise the rear of the car with a jack, having first loosened the wheel bolts. And then you can completely remove the wheel.
Unscrew the hub nut to the end, as shown in the photo below.

When the nut is completely unscrewed, it is also worthwhile to immediately remove the washer using a screwdriver or a magnetic handle. And now, use a puller to remove the entire hub assembly from the axle shaft:

By scrolling the puller rod, the hub slides off the axle shaft by itself and it can be completely removed without any problems:

If the inner bearing race remains on the half-shaft, which sometimes happens, you can remove it using the same puller. Then we take the hub assembly and clamp it in a vice so that the inside is facing up. And with the help of pliers we take out the retaining ring:

And then you can turn the hub upside down:

We take a suitable drift in size and knock out the old bearing with its help. I did it with a large socket and a wrench:

And after a short work we get the following result.

We can say that the dismantling of the bearing went well. Now we take the lubricant, and apply it in a fairly abundant amount to the inside of the hub.

And we point the new wheel bearing exactly in the center:
And in order to press in a new one exactly without distortions, it is better to use an old bearing for this purpose. When it goes deep enough, you can finally press it in.
This must be done until a groove appears for installing the retaining ring.

After that, we lubricate the axle shaft with lithol and put the hub assembly in its place. The price of a new bearing is about 300 rubles, if assembled with a hub - at least 700 rubles.
The wheel bearing, brake drum and disc of the wheel, there is a forward movement, braking, steering of the wheels of the car, which ensures the safety of the driver and passengers. Replacing the hub of a VAZ 2109 is quite possible with your own hands, if you have everything at your disposal necessary materials and tools.
The time norms for replacing the hub, according to the technical data for the VAZ 2109, are 27 minutes at removed wheel... Change rear hub this instruction with a photo will help.
How to identify a malfunctioning suspension and hub
A sign of replacing the hub with a VAZ 2109 may be loud noise or knocking while driving. But this is an unreliable source, since there can be several reasons for knocking: parking brake strips, brake pads, rear pillar bushings can also knock. It's hard to guess.
To be more precise, you need to take a jack, lift, twist, wobble and check. The wheel bearing usually does not knock, but it can buzz and vibrate on the body. A knock, and quite strong, will only make a bearing requiring replacement.
Check bearing condition it is not difficult - we raise the necessary side with a jack, twist and shake the wheel, if there is a hum - the bearing for replacement. If there is any play, check the tightness of the hub nut and wheel bolts.
It is not allowed to eliminate the play in the wheel hub bearings by overtightening the nuts. The tightening torque of the front and rear hub nuts should be: hub bearing nut rear wheel 186.3-225.6 (19-23) N * m (kgf * m), hub bearing nut front wheel 225.6-247.2 (23-25.2) N * m (kgf * m).
When replacing a wheel bearing, be sure to inspect the hub, if the new bearing will be installed on it very easily, then such a hub must be replaced with a new one otherwise it will dangle. And, despite replacing the bearing, provoke vibration and knocking.
In the hubs of the front and rear wheels, double-row ball bearings with seals are used, which do not require relubrication and adjustment during operation.
When the wheel hubs are pressed out, the bearings are destroyed. Therefore, pressing out the hubs should be carried out only in cases of increased bearing noise or a significant increase in the clearance in them: more than 0.015 mm in the front and more than 0.030 in the rear.
When choosing a wheel bearing, you should know its dimensions:
- the size of the bearing of the rear hub of the VAZ 2109 - 60 mm (outer diameter), 30 mm (inner diameter), 37 mm (width), catalog number 6256706Е1С17;
- the size of the front hub bearing of the VAZ 2109 is 64 mm (outer diameter), 34 mm (inner diameter), 37 mm (width), catalog number.
The price of a VAZ 2109 bearing is 600 rubles, relevant for Moscow and the region (spring 2017).
To replace the hub VAZ 2109 you need such a tool:
- jack and wheel wrench;
- a 30 mm socket wrench and a long pipe on it;
- pliers for removing retaining rings;
- simple pliers or box wrench "12" (for unscrewing the guide pins of the rear brake drum);
- wooden block and hammer;
- chisel and pry bar;
- universal puller for pressing out the hub or a reverse hammer;
- a new hub for a VAZ 2109 with an article number or.
1. Remove the hub nut protective cap by hooking it up with a screwdriver.
3. Engage first gear and place chocks under the front wheels.
Raise and support the rear of the vehicle. Remove the wheel.
The vehicle must be on the ground when unscrewing the hub nut.
Loosen and tighten the wheel bolts only when the vehicle is standing on the ground. The tightening torque of the bolts is 65-95 Nm (6.5-9.5 kg / m).
4. Remove the brake pads.
|
5 |
|
|
|
|
 ... Unscrew the hub nut completely and remove the thrust washer.
 6. Press the hub off the axle with a puller.
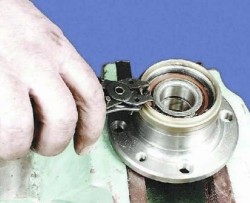 7. Fasten the hub in a vise and remove the retaining ring from
 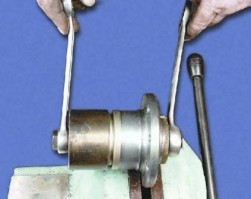 8.Using a puller, press the bearing out of the hub
Universal puller for pressing out wheel bearings.
A double-row ball bearing is installed in the wheel hub, which does not require adjustment and lubrication during operation.
When pressed out, the bearing is destroyed. Therefore, only press the hub to replace the bearing.
In the absence of a mandrel or puller, you can use the rings of the old bearing to press out and press in the bearing.
9. Press in the new bearing using a puller and install the circlip. Thoroughly clean all parts from dirt before assembly.
10. Press the hub onto the journal by applying force to the inner ring of the bearing.
11. Install the pads and the brake drum.
12. Install the wheel.