Unfortunately, sometimes our cars break down and need to be repaired, it is necessary to change various parts, optics, and in some cases it is necessary to replace the bearing rear hub, however, as statistics show, this happens quite rarely.
How to recognize a hub problem?
The fact is that the hub is an essential element of any rotating mechanism, including a car wheel. It is the central part of the rotating parts with a hole to fit it onto an axis or shaft. Thus, its main task is to provide rotary motion. In order for the rotation on the axle not to be free, rolling bearings or special plugs are pressed into the hole of the hub. In addition, it is thanks to the bearings that the hub, as well as the wheel, can rotate.
It is quite easy to notice that the replacement of the hub bearing is urgently needed, in this case there is a characteristic knock in the rear lower part of the body, most often, it intensifies when driving on an uneven road or when driving into pits, as well as bumps. While driving on a relatively flat road surface, hum may occur. In addition, the brake drum gets very hot.
We check if it is necessary to replace the bearing of the rear wheel hub
First of all, the reason for such a breakdown is bad uneven roads, especially since in some cases our road surface generally difficult to call expensive. The second reason why the bearing may become unusable is the poor quality material from which it was made. rear wheel - not a very complicated process, so it can be done quite easily on your own at home.
However, before proceeding directly to the action, you should find out whether the case is really in it. To do this, it is necessary to hang out the wheel from which the hum is heard, and, swinging it with your hands, check the backlash. If, during the implementation of these actions, a backlash is detected, and dull knocks occur, then it is impossible to hesitate with the replacement. A bearing that falls apart on the road will damage other parts of the wheel hub system.
The key to fast and quality work is the right tool and high quality materials, in this case the bearing. Therefore, do not try to save on it, purchase options only from good producers, because the service life largely depends on this.

Rear hub bearing replacement - your steps step by step
From the tool you will need a screwdriver, jack, wheel wrench, lithol, hub nut puller, sometimes chisels and a pry bar. Further, having prepared everything you need, we proceed as follows. We put the car in first gear, having previously placed "shoes" under the front wheels. We lift the car with a jack and dismantle the desired wheel. Having unscrewed the guide pins, it is necessary, most often it is knocked down. Now the hub nut is unscrewed with a special puller and the hub itself is knocked off the trunnion. It must come off with the bearing ring, otherwise it must be removed with a pry bar and chisel.
In order to press in the bearing itself, it is necessary to remove the retaining ring with special pliers and knock down the metal boot. Then you need to lubricate seat and press the new bearings back using a special puller. At the same time, keep in mind that it is highly undesirable to score them.... Now back and retaining ring. Striking the inner ring of the bearing, we put the hub back onto the journal. Next, you need to tighten the trunnion and hush its sides as best as possible. The process is almost complete, the pads, the brake drum and, of course, the wheel are being installed in their original places.
On the VAZ 2109, the rear hub bearings play an important role and without them there is no point in thinking about the normal functioning of the car. On the VAZ 21093, the rear hub bearings fail over time and then they need to be replaced, which can be easily carried out on their own.
This is what will be discussed in an article written specifically for novice drivers.
The main reasons for the failure of the rear hub bearings and symptoms

Typically, the main causes of bearing failure are:
- the tightness of the seal is broken, as a result of which the grease has leaked;
- damaged tracks and rolling elements;
- the clearance was incorrectly adjusted during installation.
Bearing installation rules

They are pretty simple:
- Under no circumstances should the forces applied when pressing the bearing be transferred through the rolling elements. Therefore, it is imperative to use special mandrels or old bearing races.
Note. When pressing the bearing into the hub, force should be directed by means of a mandrel to the outer ring. In the event that the bearing needs to be installed on the axle, then the force, again through the cage, is transferred to the inner ring.
It is forbidden to use sharp objects during the installation of new bearings. This can easily damage the sealing material of the bearing, resulting in a waste of time.
After a while, the unprotected bearing will lose lubrication and fail.
Malfunction symptoms
Noise is the main sign that something is out of order. The noise is usually preceded by a hum that can be heard by experienced drivers.
This very hum will make it possible to timely determine the bearing failure. You can still ride on such a bearing for some time, but who knows where it will "die".
therefore experienced driver will never pull: noticing the hum, he will immediately begin to replace the old and faulty bearing.
Determining which bearing is humming or humming is not easy. Sound can travel around pretty quickly.
Feelings in this case may be wrong, because the hum coming from the right side of the car may indicate a malfunction of the left bearing and vice versa.
Below is the the right way defining a faulty bearing:
- The rear wheels of the car are hung out.
- Then the wheels are removed.
- The noise that is heard now will definitely indicate the very bearing.
Note. There is another way to identify a faulty bearing. It is based on the laws of physics and implies more and more noise as the load increases.
In a faulty bearing, the rolling elements run like on a cobblestone pavement. So, if the hum increases when turning to the left, there is a high probability that the right bearing is faulty.
Acquaintance
The bearing also has another name - bearing 256706. The rear wheel hub of a car is its main application. It is used not only for VAZ 2109 cars, but also in almost the entire line of Samara models.
Typical design features:
- Double row.
- Ball bearing.
- Radial thrust.
- Closed, that is, sealed on both sides.
Note.
Due to the fact that this bearing is double-row, it is able to fix the shaft under axial load in both directions. Known and a roller version of this bearing, which has an even higher carrying capacity, but with a lower rotational speed.
Today the demand for these bearings is so great that it is produced at 3 factories in the country:
- At the Vologda Bearing Plant, also called VBF. It is considered among motorists as a reliable plant, whose products are rarely counterfeited.
- Saratov plant or OJSC SPZ. Like the Vologda version, it is very reliable and very popular.
- SPZ 4 is the same Saratov plant that produces products for those who are used to saving money. Bearings in this series are cheaper, but inferior in durability.
- Kursk 20 GPP - produced products during the Soviet era and some time after its collapse. Currently the plant does not produce bearings.
Replacing the rear hub bearings
So:
- The car is put into 1st gear.
- Wheels are hung out and removed.

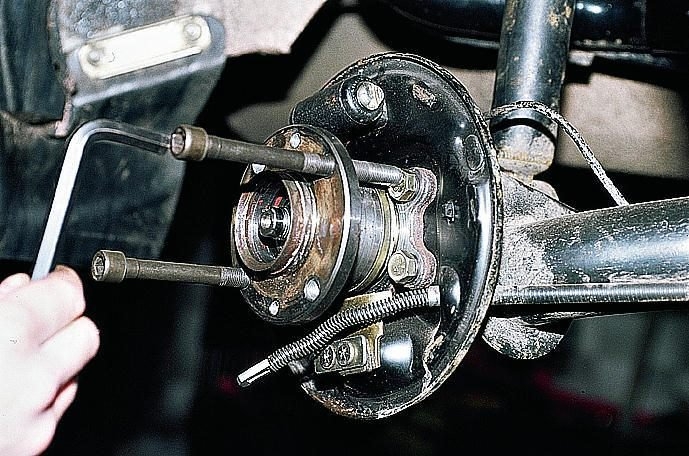
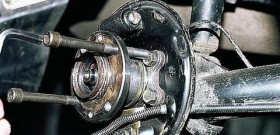
- Now you need to unscrew the guide pins.
- We shoot.
- The hub nut is unscrewed.
- The hubs are knocked off the trunnion using a puller.
Note. If there is no puller, then you can use the grandfather's method: screw the wheel into place and pull it with a jerk, thus removing the hub.
- The retaining ring is removed with special pliers or narrow-nose pliers.
- We press out the old bearing or knock it out.
- We take more grease and process the seat of the new bearing.
- We press in a new one.
- We put the ring and the boot.
- We put the hub back, always using a mandrel.
- We tighten the nut.
- We collect pads, brake drum and wheel.
The above instruction implies the use of auxiliary photos and video materials. Do-it-yourself work is recommended to be carried out with an assistant.
Price self repair will be very low, because only new bearings will have to be spent.
Wheel bearing, brake drum and wheel disc, there is a forward movement, braking, steering of the wheels of the car, ensuring the safety of the driver and passengers. Replacing the VAZ 2109 hub is quite possible with your own hands, if you have everything at your disposal necessary materials and tools.
The time norms for replacing the hub, according to the technical data for the VAZ 2109, are 27 minutes at removed wheel... This instruction with a photo will help to change the rear hub.
How to identify a malfunctioning suspension and hub
A sign of replacing the hub with a VAZ 2109 can be loud noise or knocking while driving. But this is an unreliable source, since there can be several reasons for knocking: the parking brake strips can also knock, brake pads, rear pillar silent blocks. It's hard to guess.
To be more precise, you need to take a jack, lift, twist, wobble and check. The wheel bearing usually does not knock, but it can buzz and vibration on the body. A knock, and quite strong, will only make a bearing requiring replacement.
Check bearing condition it is not difficult - we raise the required side with a jack, twist and shake the wheel, if there is a hum - the bearing for replacement. If there is any play, check the tightness of the hub nut and wheel bolts.
It is not allowed to eliminate the play in the wheel hub bearings by overtightening the nuts. The tightening torque of the front and rear hub fastening nuts should be: rear wheel hub bearing nut 186.3-225.6 (19-23) N * m (kgf * m), hub bearing nut front wheel 225.6-247.2 (23-25.2) N * m (kgf * m).
When replacing a wheel bearing, be sure to inspect the hub, if the new bearing will be installed on it very easily, then such a hub must be replaced with a new oneotherwise it will dangle. And, despite replacing the bearing, provoke vibration and knocking.
In the hubs of the front and rear wheels double-row ball bearings with seals are used, which do not require relubrication and adjustment during operation.
When the wheel hubs are pressed out, the bearings are destroyed. Therefore, pressing out the hubs must be carried out only in cases of increased bearing noise or a significant increase in the clearance in them: more than 0.015 mm - in the front and more than 0.030 - in the rear.
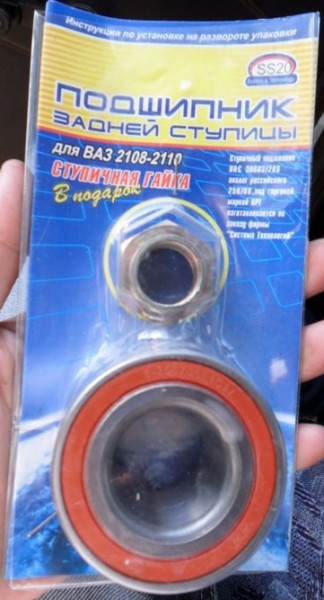
When choosing a wheel bearing, you should know its dimensions:
- the size of the rear hub bearing of the VAZ 2109 is 60 mm (outer diameter), 30 mm (inner diameter), 37 mm (width), catalog number 6256706Е1С17;
- the size of the bearing of the front hub VAZ 2109 - 64 mm (outer diameter), 34 mm (inner diameter), 37 mm (width), catalog number.
The price of a VAZ 2109 bearing is 600 rubles, relevant for Moscow and the region (spring 2017).
To replace the hub VAZ 2109 you need such a tool:
- jack and wheel wrench;
- a 30 mm socket wrench and a long pipe on it;
- pliers for removing retaining rings;
- simple pliers or box wrench "12" (for unscrewing the guide pins of the rear brake drum);
- wooden block and hammer;
- chisel and pry bar;
- universal puller for pressing out the hub or a reverse hammer;
- a new hub for a VAZ 2109 with an article or.
If a constant extraneous sound (hum) occurs from the rear wheels when driving, you should pay attention to the condition of the wheel bearing. On VAZ 2114 this detail It is quite durable and it happens that the bearing travels more than 200,000 km, but in the case when it starts to howl, its replacement is obligatory.
In order to replace it ourselves, we need the following tool:
- Vise for more convenience
- Special puller with swivel arms
- Circlip pliers
- Wooden block
- A hammer
- Ratchet and crank
- 7 and 30 mm sockets
At one time I did a video review on this topic, but due to the fact that at that time I did not have all the necessary tools and clutches at hand, which are very useful when performing this repair, everything did not work out quite as I wanted. But the essence of the work is garage conditions you can still understand.
Video on replacing the rear wheel bearing VAZ 2114
In order to watch all video reviews on the repair of VAZ " front-wheel drive», You can go to my channel and see many materials.
Now, below you can look at the entire repair process with all the necessary tools.
Photo report on replacing the rear hub bearing on VAZ 2114 and 2115 cars
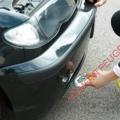
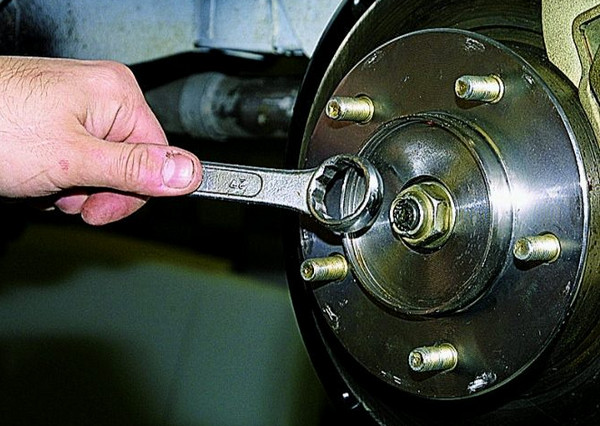
So, first of all, you need to remove the cap of the nut of the nut and rip it off with a good wrench. Then raise the rear of the car with a jack, after loosening the wheel bolts. And then you can completely remove the wheel.
Unscrew the hub nut to the end, as shown in the photo below.

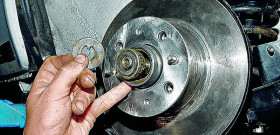
When the nut is completely unscrewed, it is also worthwhile to immediately remove the washer with a screwdriver or a magnetic handle. And now, use a puller to remove the entire hub assembly from the axle shaft:
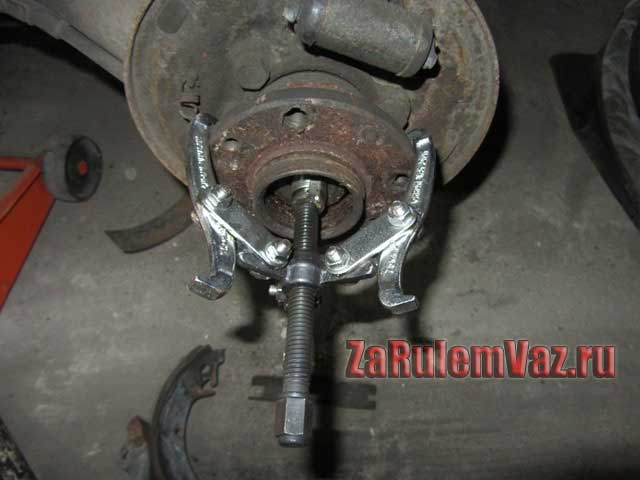
By scrolling the puller rod, the hub slides off the axle shaft by itself and it can be completely removed without any problems:

If the inner bearing race remains on the half-shaft, which sometimes happens, you can remove it using the same puller. Then we take the hub assembly and clamp it in a vice so that inner side was pointing up. And with the help of pliers we take out the retaining ring:

And then you can turn the hub upside down:

We take a suitable drift in size and knock out the old bearing with its help. I did it with a large socket and a wrench:

And after a short work we get the following result.

We can say that the dismantling of the bearing was successful. Now we take the grease, and apply it in a fairly abundant amount to the inside of the hub.

And we instruct a new one wheel bearing exactly in the center:
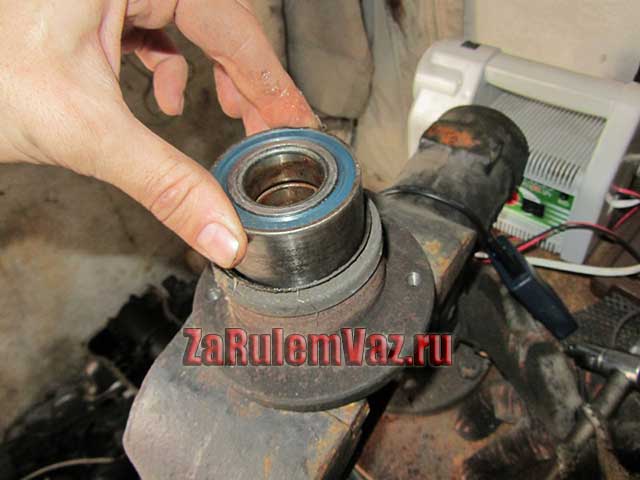
And in order to press in a new one exactly without distortions, it is better to use an old bearing for this purpose. When it goes deep enough, you can finally press it in.

This must be done until a groove appears for installing the retaining ring.

After that, we lubricate the axle shaft with lithol and put the hub assembly in its place. The price of a new bearing is about 300 rubles, but if assembled with a hub - at least 700 rubles.
VAZ-2109 became the last car soviet era... For its time, it was the subject of dreams of many motorists: good aerodynamic characteristics, maneuverability, design. After the VAZ-2108, he became the second soviet car with front-wheel drive. The Cherry Nine is one of the symbols of the era.
The first models were pretty good quality and rarely let their owners down, but then came the 90s and the general degradation of the auto industry. Cars before and after 1991, as they say, are two big differences. First of all, this is a question of the used spare parts and the quality of the metal.
Soviet developers made the VAZ-2109 car with the aim so that every motorist could repair it, sometimes even in the middle of the field with a minimum amount of tools. Thanks to this, many nines continue to plow the roads of Russia and neighboring countries.
This also applies to our question - replacing the bearing in the rear wheel hub.
Replacing the hub bearing is an important issue
If the hub bearing falls apart, it can damage the entire rear wheel and cause a serious accident. The main signs of a malfunction on the VAZ-2109 will be the corresponding crunch, and in some cases, the wobbling of the rear wheel. Replacement is the only way out.
On a VAZ-2109 car, this is quite easy to do. In fact, to replace the bearing, the tools that should be in the trunk of every VAZ-2109 driver are enough: pliers, socket wrench No. 30, box wrench, puller, hammer, pry bar, wooden bar, jack.
How it's done
The whole process of work can take about an hour, although professional craftsmen do it in fifteen minutes:
- The first step is to remove the protective cap from the hub (not all VAZ-2109 have it). After that, you need to open the hub itself with a chisel and a hammer. The next step is to loosen the hub bolt. This is done using a 30 socket wrench.
- Then the car is put on the first speed, "shoes" are placed under the other wheels, which will not allow it to move in the event of an unforeseen situation.
- The next step is to remove the wheels. For this, the bolts are loosened, after which the car is lifted onto the jack. Modern jacks have one significant drawback - they can fold at the most inopportune time. Therefore, when the car is jacked up, it is worth substituting any objects under it that will prevent it from falling. It can be bricks, a wheel, etc.
- Unscrew all the bolts and remove the wheel.
- It is necessary to remove the guide pins. However, your car may not have them.
- Removing the brake drum. If it cannot be removed, it must be carefully knocked out with a block from the back along the edges. This must be done carefully, as the pieces of the edges can fly off.
- The hub nut is unscrewed and then removed from the trunnion. This is easier to do with a puller, but if it is not there, use a pry bar or some other handy item.
- The wheel must be put back in place and bolted. It is not necessary to do this until the end.
- After the wheel is screwed on, you need to sharply pull it towards you. The hub will pop out along with the wheel. This is not always easy, as bearing parts may remain on the trunnion. If this happens, you should use a chisel, hammer, pry bar or puller.
- The bearing in the hub is fixed with a special retaining ring that can be pulled out with a screwdriver.
- In order to finally pull the bearing out of the hub, it is advisable to use a special puller, and if not, then a pipe of a suitable diameter. After a series of hits on it, the bearing will fly out.
- The hub is cleaned and lubricated. After that, a new bearing is pressed into it. If the old one has been preserved, then you can insert it, but this is not recommended. Pressing in takes place using a puller and a vice or with a hammer and spacer. The latter (metal or wooden) is inserted between the hammer and the bearing, after which the bearing is hammered into the hub by blows into place.
- The circlip is inserted into place, the hub returns to the axle. If it does not come in, then you can use a hammer and a pipe of a suitable diameter. After a few hits, the hub will snap into place.
Completion of the operation
After that, the washer and nut return to their place, and the hub is driven in completely until it stops. After this is done, brake disk returns to its place, puts on the wheel, screwed all the bolts, and the car is removed from the jack. After completing all work, it is necessary to tighten the hub nut. It is worth noting that the tightening torque should be 19-23 kgf / m. In other words, you need to tighten it up with the same effort with which it was filmed before.