Rotation of liners is one of the most common serious breakdowns engine. This does not lead to its failure, but affects performance. Further, the features and principles of the functioning of the liners are considered, as well as the replacement of the main liners.
Definition
The main bearings are engine elements that serve to limit axial movements crankshaft and ensuring rotation of the main journals in the cylinder block.
Functioning principle
Many rotating elements are used in the construction of cars. Their ease of rotation is ensured by the use of bearings. The most loaded rotating engine part is crankshaft... Therefore, it is also mounted on bearings, with sleeve bearings being the most commonly used. Modern parts of this type are represented by steel sheets with an anti-friction coating. These are indigenous liners.
Earbud types
In addition to the indigenous, there are connecting rod bearings... It is necessary to distinguish between them.
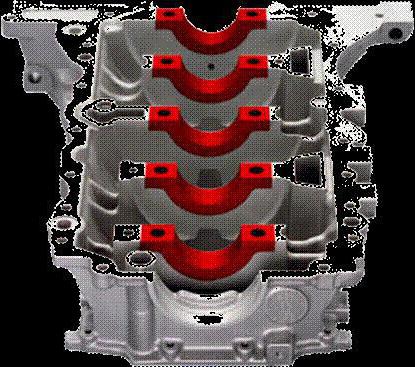
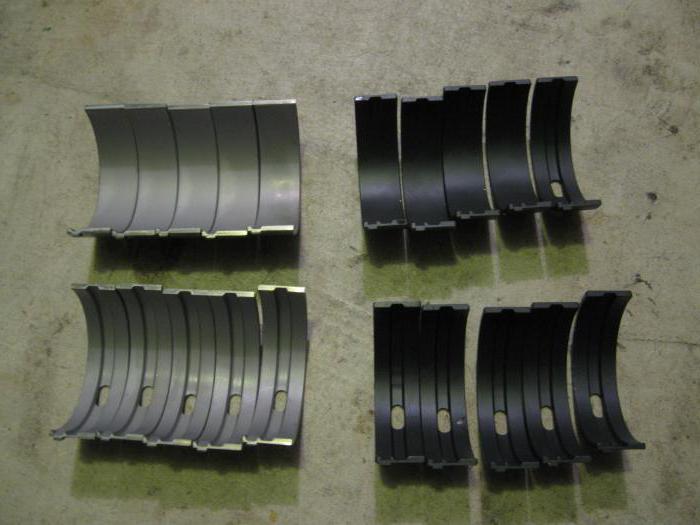
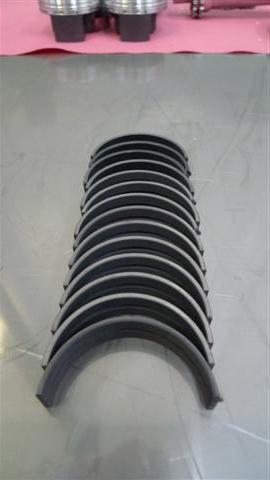
With the exception of the middle one, the liners have annular grooves. The parts of the middle support are wider than others. In total, there are 10 such inserts: 4 with a groove and 6 without. The main bearings with grooves and one without grooves are mounted in the cylinder block housing in third place. The rest are mounted in the main covers.
The connecting rod bearings are smaller in diameter. They are the same size so they are interchangeable and do not have annular grooves. An insert with a hole is mounted in the connecting rod, and without in the cover.
Installation features
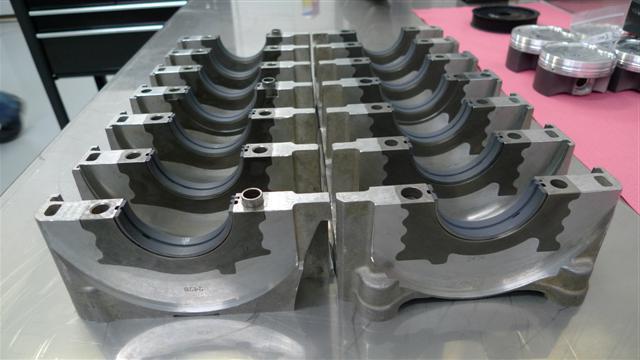
The set of root liners is set in a fixed position in special places called beds. The need for a fixed installation is due to two factors. First, some liners have oil holes and need to be aligned with similar channels in the beds. Secondly, it allows to ensure friction of parts on prepared surfaces.
Features of operation
During the operation of the engine, the liners are subjected to constant loads due to the mutual friction of these parts. Therefore, the installation of the main bearings must be performed securely in order to avoid displacement by the rotating crankshaft. For this, measures are taken:
- First, they take into account the features of the friction of the parts under consideration, which manifests itself when they slide against each other under load. Its value is determined by the coefficient of friction and the magnitude of the load on the interacting parts. Therefore, to ensure reliable retention of the liners, the impact on them of the crankshaft should be reduced. For this purpose, the coefficient of friction is reduced by the use of which is applied to the surface of the liners.
- Secondly, the root liners are held mechanically in places. Two methods are used for this. These elements are installed with an interference preset constructively. In addition, each of them has an additional element called a tendril, which also serves to hold.
Dimensions
The overall parameters need to be known in order to correctly install the main bearings, having provided an interference fit. The sizes of these elements are selected based on the bed diameter. By this parameter inserts are subdivided into size groups, the designation of which is contained in the marking.
In terms of size, the indigenous ones are divided into nominal and repair ones. There are four repair sizes with a difference of 0.25 mm. They are used if replacement is carried out for a ground crankshaft in accordance with its dimensions.
Causes of wear
As mentioned above, when the engine is running, friction force is constantly acting on each main engine liner, tending to displace it from its original place. In the initial state, in a serviceable engine, the strength of the parts is calculated with a margin in order to withstand such loads. For power units capacity up to 200 liters. from. the stresses on the liner are from 0.1 to 1 kgf. The magnitude of its force is proportional to the load at a constant coefficient of friction.
In addition, the main liners are protected by the fact that they function in the mode of fluid friction. This is achieved by the use of oil, which creates a film between the shaft journal and work surface liner. In this way, the parts in question are protected from direct contact and a minimum frictional force is achieved. The formation of an oil film is determined by the speed of mutual movement of rubbing parts. With its increase, the hydrodynamic friction regime increases. This term is understood as an increase in the efficiency of drawing the film into the gap and an increase in its thickness as a result. However, as the speed of the parts increases, the amount of heat generated during friction also increases, and, therefore, the temperature of the oil increases. This leads to its liquefaction, as a result of which the film thickness decreases. Therefore, for an optimal operating mode, it is necessary to achieve a balance between the considered processes.
If the integrity of the oil film is broken, the coefficient of friction increases. As a result, the torque generated by the crankshaft increases even under constant load.
However, sometimes the opposite situation occurs, when increased loads for some reason lead to a decrease in the thickness of the oil film. Also, as a result of this, the temperature rises, especially in the friction zone. As a result, the grease liquefies, further reducing the thickness.
These processes can be interconnected and manifest together. That is, one of them may be a consequence of the other.
Consequently, the cranking torque is significantly influenced by the oil viscosity. The relationship between these factors is directly proportional, that is, the higher it is, the greater the friction force. In addition, at high viscosity, the oil wedge increases. However, if the viscosity is too high, the oil does not enter the friction zone in sufficient volumes, as a result of which the thickness of the oil wedge decreases. As a result, the influence of oil viscosity cannot be determined unambiguously. Therefore, another property of this material is taken into account: lubricity, which is understood as the strength of its adhesion to the working surface.
The friction coefficient is determined by the roughness and accuracy of the geometry of the contacting surfaces, as well as the presence in lubricant foreign particles. In the case of the presence of particles in the lubricant or surface irregularities, the film is broken, as a result of which a semi-dry friction mode appears in some zones. Moreover, these factors are most intensely manifested at the beginning of the operation of the car, when parts are running-in, therefore, rubbing parts during this period are especially sensitive to overloads.
In addition, the crankshaft bearings rotate due to insufficient force to keep them in bed. It can be caused by an illiterate installation or be the result of wear as a result of the impact of the turning moment.
Rotating the liners
Often, the crankshaft displaces the main bearings from the installation sites (cranking). This may be caused by a decrease in the tension holding the parts in question in the beds, under the influence of the above factors, and the antennae alone are not enough to hold them.
The breakdown of the main liners from the beds can be determined by factors such as dull metal knocks during engine operation and a drop in pressure in the lubrication system.
Repairs
To replace the root bushings, wrench / screwdriver sets and a micrometer are required. The repair of the main bearings includes several operations.
- First of all, you need to provide access to the car from below. That is, you should set it above inspection pit or to the flyover.
- From terminal battery pack remove the negative wire.
- Then they are dismantled (this is the easiest way to access, you can start disassembling from above and hang out the engine).
- After that, the crankshaft rear oil seal holder is removed from the cylinder block.
- Then remove the camshaft drive cover with a gasket.
- Then they are removed from the chain.
- Next, you need to mark the relative position of the bearing caps relative to the cylinder block and connecting rods relative to their caps.
- Then, with a 14 key, unscrew the connecting rod cap nuts and dismantle it with the insert.
- These operations are repeated for all connecting rods.
- Upon completion, the lids are pushed up.
- Then take out the main bearings from the caps and connecting rods.
- Next, using a 17 key, unscrew the bolts of the crankshaft main bearing caps.
- First, dismantle the cover of the last one.
- It opens access to the persistent half rings in the grooves of the rear crankshaft support. They are removed by pressing on the ends with a thin screwdriver.
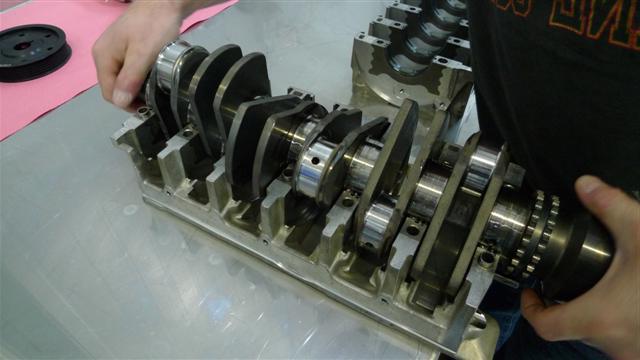
- These operations are repeated for the remaining bearing caps. In doing so, you must hold the crankshaft. It should be noted that the covers are numbered and are counted from the toe of the crankshaft.
- Then it is removed from the crankcase.
- First, remove the connecting rod bushings, and then the crankshaft main bushings.
- The crankshaft should be inspected for damage. If present, the part is changed.
- Also examine the connecting rod and main covers by measuring with a micrometer. The obtained data are correlated with tabular data.
- If necessary, parts are sanded. In this case, you will need to measure them to calculate the repair size of the liners.
- The crankshaft is cleaned by flushing with kerosene and blowing through the cavities.
- Then new bearing shells are installed.
- In the groove of the bed of the fifth bearing, persistent half rings are mounted with grooves to the crankshaft.
- Next, check the gap between these parts. The normal value is considered 0.06-0.26 mm. If it is more than 0.35 mm, use rings of increased thickness.
- The crankshaft is installed in the block, pre-lubricated with oil.
- Then the bearing caps are mounted and the freedom of rotation of the crankshaft is checked.
- Connecting rods, liners and covers are installed on it.
- Then the oil pan is mounted.
- After that, install the crankshaft holder with the rear oil seal.
- Finally, the remaining parts are installed.
- Finally, adjust the timing chain tension, alternator belt and ignition timing.
Working for manufacturing enterprise car repairs can be planned if the repair is ongoing, and even if the car is very necessary, you still try to make this repair, so that the car will work as long as possible until the next breakdown, eliminate all related problems, observing the repair technology, even if there is a shortage of spare parts. No one will then remember that the car stood for a long time being repaired, they would rather be reproached when it breaks down again, and even for the same reason. I cannot say the same about the repair of cars and other equipment in agriculture. If the car stopped during the sowing or harvesting season is a tragedy, and if you repair it for a long time it is almost a crime. For two years in my practice I had to work in agriculture, and I take off my hat in front of people who have devoted their whole life to this.
During the harvest, I had such a case, when changing the oil in the engine of a KAMAZ car, by oil filters copper shavings glistened. The first thing, of course, was to determine the source. As a rule, small chips appear if the crankshaft liners begin to break. They removed the pallet, unwound the crankshaft cover closest to the flywheel. Since here the liners are exposed to the greatest wear, and the liner was really broken, there were no traces of beating on the shaft, there was a slight depletion characteristic of the crankshaft. We decided to change the liners without removing the engine.
The cost of repairing the engine during the harvest season is compounded by the loss in earnings. If you have your own Kamaz, you suffer losses every day of downtime for repairs, because in agriculture, every day you feed the year, if you work at an enterprise, you lose your salary, the main earnings are paid during the season, not to mention what losses carries the enterprise.
If the crankshaft is not damaged, or the risks that have arisen on it are not very deep, you can change the liners without removing the engine from the car in a short time and continue working. In order for the upper liners to come out easily, the shaft should not be released more or less on one side, therefore, it is necessary to unscrew the covers through one, removing the 1, 3 and 5 cover, with a thin screwdriver, tap on the end of the liner from the side opposite to the lock, surprisingly the liner comes out easily ... Then we insert the insert from the side of the lock, make sure that the lock fits into the groove, insert the insert into the cover and install it in place, the upper and lower inserts must be located lock to the lock, and so on. Pressing the removed covers with a slight effort, but so that they tightly press against the block, unscrew the remaining covers, and do the same procedure. Then we pull the cover bolts with a torque wrench, preliminary pulling with a force of 95-120 Nm and the final one with a force of 275-295 Nm. Then we pull the tie bolts with a force of 147-167 Nm. The connecting rod bushings can also be changed in the same way. Then we put oil pump and close the pallet. After the car passed 2000 km, we changed the oil again for the main purpose, to make sure if the liners began to break again, but everything was in order, there were no chips on the filters. Subsequently, such a procedure had to be done on other machines, there were even cases when the wear of the crankshaft necks turned out to be significant, of course they risked it, but everything worked out. Later I wondered if others were doing it and if it could be done at all. By chance, on the Internet on the site, I found an article about the Ph.D. thesis of O. A. Kulakov. in which, he substantiates the fact that the liners on KAMAZ vehicles must be changed every 125,000 km. And in principle, I agree with him, rarely a new KAMAZ runs much more before the engine is repaired. So you don't have to wait for the earbuds to break.
Replacement of the main and connecting rod bearings.
Crankshafts yaMZ engines have high wear resistance. After 80-100 thousand kilometers, preventive replacement of the liners is recommended, which will extend the service life of the crankshaft before regrinding.
To replace the liners, the engine is removed from the vehicle. The liners must be replaced under conditions that prevent dirt from entering the bearings and crankshaft journals.
New liners must be of nominal size.
The connecting rod bushings are changed in order, starting with the bearing of the 1st cylinder.
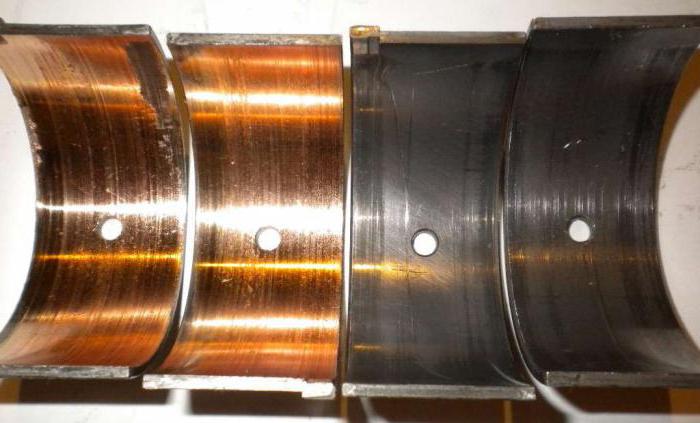
The removed liners are carefully inspected. In the presence of damages having the nature of unnatural wear, determine their cause.
The oil channels of the crankshaft are cleaned of contaminated oil and deposits, wipe the neck with a soft, clean cloth (the neck should be smooth, without deep marks, burrs and metal coating).
Before installing the bearings on the shaft, the journal and bushings are lubricated with engine oil.
The connecting rod bearing bolts are tightened with a torque of 200-220 Nm (20-22 kgf-m).
The main bearing shells can be replaced with a pin without removing the crankshaft. The pin is a steel rod 25 mm long, 6 mm in diameter and has a head 15 mm in diameter and 3 mm in height.
To remove the upper main bearing shell, the pin is inserted into the hole oil channel radical neck. The crankshaft is rotated to push out the insert.
To install the liner in the bed, it is placed on the neck and, by hand, is partially inserted into the gap between the neck and the bed. Then the pin is inserted into the hole in the oil channel and, turning the shaft, install the liner in place.
The vertical bolts of the main bearing caps are tightened with a torque of 430-470 Nm (43-37 kgf-m), and the horizontal bolts - with a torque of 100-120 Nm (10-12 kgf-m).
The need to replace the bushings is determined by the thickness wear and diametral clearances in the mating (Table 2-3).
If the wear in thickness exceeds 0.05 mm or the diametral gap is more than 0.23 mm, the liners are replaced with new ones. Liner thickness is measured in the middle of the liner. The clearance is checked by measuring the diameter of the crankshaft journal and the inner diameter of the bearing (after tightening the cover bolts).
Bearing liners are replaced if they have nicks, cracks, or crushing of the antennae to hold the liner in the seat.
The liners are re-installed only in those beds from which they were previously removed. The upper and lower shells of the crankshaft bearing are not interchangeable, since the upper shells have holes for supplying oil and grooves for distributing it.
Both lower connecting rod bushings are interchangeable.
For the repair of the crankshaft, there are six repair sizes of the liners. The stamp of the repair size is applied at the joint. The liner oversize number must match the oversize number of the corresponding crankshaft journal.
The crankshaft bearing shells should only be replaced completely on the entire engine.