During the operation of the engine, all parts gradually wear out, including the main and connecting rod journals, therefore, repair crankshaft liners are used to restore their performance. The main journal - the part of the bearing that connects the motor and the shaft, is the main bearing of the crankshaft. And the connecting rod journal is also a support, but already for connecting the shaft with the connecting rods. Therefore, the integrity of these parts is essential.
What are Crankshaft Repair Liners?
All connecting rod and main journals have their own repair dimensions (parameters that they can take after grinding in the process of boring the crankshaft), which must correspond to the dimensions of similar liners used as spare parts. Both types of liners play the role of bearings that significantly improve sliding, therefore, when they wear out, timely replacement should be carried out, accompanied by boring crankshaft.
For most engines, there are several oversize liners. For example, there are four such sizes for classic VAZ models. Accordingly, the crankshaft can be bored four times. Basically, this is simply sanding the surface of the rubbing parts to make it smooth and workable again. The outer size of the earbuds remains unchanged, and inner size adjustable by increasing their thickness... After each replacement of the liners, the engine must run more than one thousand kilometers if it is properly lubricated, i.e. other systems won't fail.
How to determine the wear of the crankshaft liners and help the mechanism?
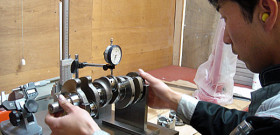
When repairing an engine, the question very often arises of how to determine the wear of the crankshaft liners and their next repair size (which they will have after the upcoming boring). As a rule, a micrometer is used for measurements (measures linear dimensions), but you can calculate this visually with sufficient accuracy. The possibility of further boring the crankshaft is immediately assessed.
Replacement is required almost immediately in the event that. The loud knock of the mechanism and the constant attempts of the motor to stall will tell you about this, sometimes the necks wedge, then you will definitely not be able to go further. In all other cases, a thorough inspection must be carried out, and if undulating grooves are observed on the necks that can be felt with the hands, it is necessary to bore and install liners of the appropriate repair size.
How to put the liners on the crankshaft - procedure
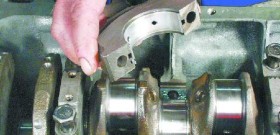
In most cases, the replacement of the liners is done at the service station, however, if desired, any driver who has repair skills and knows how to use the tool may well try to carry out this operation on his own. To do this, you need to consistently do the following:
- The first step is to check the clearance between the liner and the crankshaft. For this, a calibrated plastic wire is placed on the desired neck. After that, a cover with an insert is installed and tightened with the required force (approximately 51 Nm (Newton per meter), this value can be measured by tightening the examined unit with a torque wrench). After removing the cover, the gap is determined by the degree of flattening of the wire... To assess this parameter, there is a nominal clearance for each brand of car, and if the wire indicates that the clearance is larger, then a repair insert will be required.
- After checking the clearances on all connecting rod journals, it is necessary to remove the connecting rods, dismantle the crankshaft and send it to the bore. Grinding is carried out on a special machine (centripetor), which, of course, not everyone has. Therefore, it is better to do this with a master. After boring, you need to select the crankshaft liners, a micrometer will again help here and further fitting with measurement of the gap.
- When the size of the liners is finally selected, the crankshaft is installed in reverse order... Its elements must be placed on their own seats and screw on the main bearing caps.
- Next, you need to decide how to put the liners on the crankshaft and install the connecting rods in their places. To do this, they are lubricated with engine oil, their caps are screwed, so that the direct installation takes a minimum of time, not to mention the preparation. It is important to assemble the crankshaft with the same clutch and flywheel installed in the engine prior to repair.
It must be remembered that the crankshaft is one of the most expensive parts in any car. In addition, it carries the greatest load. Therefore, it is necessary to take all measures to extend its life. In this matter, the timely boring of the crankshaft plays a decisive role. After this procedure, all necks become perfectly smooth and ready for further work. It is this factor that determines the quality of the major overhaul.
A car engine is a complex mechanism made up of many parts. In the functioning of any engine, crankshaft liners (connecting rod and main) are considered very important parts. This article will focus on them.
Description
The liners are journal bearings and connecting rods that are installed between the crankshaft journals and the holes in the connecting rod heads. Their task is to withstand significant loads between the neck and the connecting rod, and also to reduce friction. On modern engines the liners are covered with a special anti-friction coating and are made of ductile alloys to increase resistance to stress.
When buying such spare parts, you must take into account the parameters own car... For example, if you are the owner of a VAZ, then you need to know that domestic cars have 4 different sizes of earbuds. In other words, the crankshaft can be bored no more than 4 times. Thanks to a special service for finding auto parts, which is located here: https://zap360.ru/, you can easily find any spare part for your car.
Purpose of earbuds
The main bearings of the crankshaft act as bearings, which serve to improve the sliding of the connecting rods. Since the parts wear out during operation, the motorist must periodically change them, which, accordingly, is accompanied by a shaft boring. Internal components during engine operation are subjected to significant loads. Therefore, friction must be reduced in the engine, otherwise it may fail.
To reduce the frictional force, each engine element functions in a micron oil film, such a layer appears only when there is sufficient fluid pressure. Metal inserts are reliable protection, due to which the resource of the shaft as a whole increases. We list for what reasons iCE operation will be impossible:
- if there is no lubricating liquid or when an abrasive has got into it;
- if a very viscous or insufficiently viscous oil is used;
- when the motor is constantly operated under overload conditions;
- if there was a slight interference when mounting the bearing caps.
Consider what are the earbuds and what is their role:
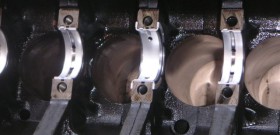
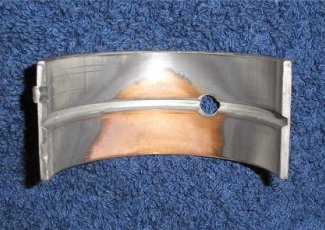
1. Root inserts. They are installed in the engine block in "beds". Their friction with the main journals of the crankshaft is carried out in 5 places in the lower part of the block. The main bearing shells have holes / grooves for better grease penetration. The entire crankshaft rotates and holds on them, therefore technical condition this detail is very important.
2. Connecting rod bearings. They are located in the lower connecting rod heads, which are attached to the crankshaft connecting rod journals. Their device is simpler, they are supports (plain bearings) for the crankshaft connecting rod journals and the lower connecting rod heads. After a certain run of the engine, even with a working lubrication system and quality oil, the connecting rod and main bearings wear out, which is why they must be replaced. Such a problem is indicated by a loss of oil pressure and knocking in the engine.
It should be understood that operating a car with worn parts contributes to the failure of the entire engine.
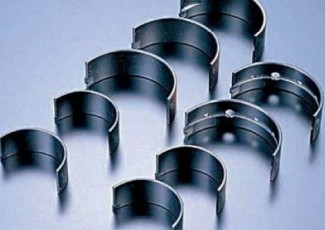
For smooth operation of the car engine, every detail is important. Special provision in the system are occupied by the crankshaft liners. Thin semicircular steel-aluminum plates surrounding the main and connecting rod journals are the outer cages of plain bearings, and the overall performance of the motor depends on their condition.
When is it necessary to replace the crankshaft bearings?
Under the conditions of those physical and temperature stresses that are brought to bear crankshaft, keep it on the axis and ensure the operation of the crank mechanism can only be plain bearings. The main and connecting rod journals function as internal clips, and the liners, respectively, external. The system of the motor block provides for a network of oil lines, through which, under high pressure, the liners are supplied engine oil... It creates a thin film of oil that reduces friction and allows the crankshaft to rotate.
Physical wear is the first and main condition due to which the liners have to be changed. No matter how much we would like to avoid wear, but the surfaces of the journals and liners are gradually erased, the gap between them increases, the crankshaft receives free run, the oil pressure drops sharply. All this leads to engine breakdowns.
Another reason for a forced repair is a situation where the crankshaft liners rotate. Every car owner has heard of such malfunctions, but not everyone knows how and why this happens. A thin liner plate fits into the so-called bed. On the outer walls of the half rings, special tendrils (protrusions) are provided, which, after assembly, abut against the end parts of the block or bearing caps.
Sometimes, when certain conditions occur, the antennae are not able to hold the liner and, sticking to the crankshaft neck, it turns. If the crankshaft liners are cranked, the engine cannot work. Typical reasons for such a breakdown:
- too viscous grease, its absence, abrasive ingress;
- too little interference when installing bearing caps;
- insufficient viscous lubrication and operation of the motor in overload mode.

Selection of crankshaft bearings
Whatever the reasons why the car owner is forced to disassemble the engine and replace the liners, you cannot do without grinding the crankshaft. New liners are installed either on a new crankshaft, or after grinding it. Even if only one neck is damaged or worn out, sand it to overall size all pass.
The motor is factory assembled with standard bushings. For VAZ engines, inserts of 4 repair sizes are produced. Accordingly, grinding of the crankshaft can be carried out no more than 4 times. The step between dimensions is 0.25 mm. Accordingly, after the first grinding it is necessary to buy inserts marked "0.25", after the second - 0.5, after the third - 0.75, after the fourth - 1.0. Two more bores up to 1.25 and 1.50 mm are available to the motors that are installed on the GAZ and Moskvich cars.
The dimensions of the crankshaft liners that need to be purchased can only be calculated by the specialist who grinds the crankshaft. Sometimes it happens that damages to the necks require grinding not to the next size, but after one. Bushings are sold only as a set for all main or connecting rod journals.
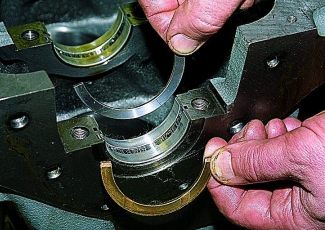
How to replace the crankshaft liners with your own hands
Considering that to access the crankshaft you will have to disassemble the engine completely, you can start such a repair only if the car owner has the necessary knowledge and skills in this matter. First of all, you need to remove and completely disassemble the motor. This can also be done in the garage, but it requires full set car keys and others, as well as a mechanical winch. To remove the motor, proceed as follows:
- remove the hood and;
- drain oil and coolant;
- free the engine from attachments:, starter, generator, fuel pump and the cooling system pump, the ignition distributor, remove the radiator and the cylinder head;
- then unscrew the clutch cover, pillow nuts and remove the block;
- having laid the motor on a workbench, remove: flywheel, pulley, drive cover camshaft, chain and gear wheel of the oil pump drive, drive shaft auxiliary units, flywheel, as well as the rear cuff holder;
- after the 14 bolts of the pallet are unscrewed, the crankshaft itself will become available to us;
- in order to remove it, you will need to unscrew the bolts of the five main bearing caps and the bolts of the four connecting rod caps.
By removing the bearing caps, you can immediately notice where the bushings have rotated. It is strongly recommended that you do not remove covers or remove the crankshaft before an expert can see it. Based on the characteristic signs of uneven wear, the specialist will be able to determine where the displacement or curvature has occurred. This requires that each insert stays in place.
Should you start installing the crankshaft yourself?
A car engine is a rather complex and specific device. Many motorists successfully carry out its complete disassembly and repair. However, in order to properly install the crankshaft bearings, you need to have certain skills. It is better if this work is done by an experienced minder. This is primarily necessary in order to avoid excessive or insufficient tension, which can cause the bushings to turn.
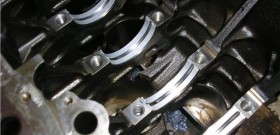
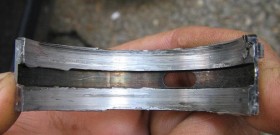
Checking the condition of the crankshaft main and connecting rod bearings
Checking the condition of the crankshaft main and connecting rod bearings
A - Scratched by foreign particles - grains are visible that have sunk into the working layer of the liner
B - Lack of oil - the top layer is worn out
C - Inserts incorrectly positioned during installation - shiny (polished) areas
D - The neck is tapering - the top layer is removed from the entire surface
E - Wear of the edge of the insert
F - Fatigue fault - craters or pockets formed
Despite the obligation to replace the main and connecting rod bearing shells during the overhaul of the engine, the condition of the old shells must be carefully examined, since a lot can be learned from it useful information the general condition of the engine. Bearing shells are graded in thickness and their belonging to one or another size class is determined by color coding.
Bearing failure can occur as a result of a lack of lubrication, the ingress of dirt or foreign particles, engine overloads, the development of corrosion and other adverse effects. Examples of the most typical defects in plain bearing shells are shown in the illustration. Typical wear examples of crankshaft bearing shells ... Regardless of the nature of the defect, the cause of its occurrence must be identified and eliminated before starting the engine assembly in order to avoid relapses.
For inspection, remove the liners from their beds in the engine block / crankcase, main and connecting rod covers and lower connecting rod heads. Place the removed liners on a clean, flat work surface in the order on the engine so that you can relate their condition to the condition of the corresponding crankshaft journals. Avoid touching the working surfaces of the earbuds with your hands to avoid accidental damage to the soft material.
Dirt and foreign particles enter the engine in different ways. They can be left inside after a major overhaul is completed, penetrate filters or the crankcase ventilation system. Often, dirt first enters the engine oil and penetrates into the bearings with it. It should not be forgotten that metal filings inevitably form during normal engine wear. If, after performing the restoration work, due attention is not paid to the procedure for cleaning the engine, abrasive particles will certainly remain in it. Regardless of the method of penetration into the engine, all foreign particles sooner or later find themselves embedded in the soft surface of the plain bearing shells and are easily recognized by visual inspection of the latter. The largest particles do not usually get stuck in the liners, but leave deep grooves and scuffs on their working surfaces and the surfaces of the corresponding shaft journals. The best protection from the appearance of such defects is a conscientious attitude to the performance of cleaning the engine after the completion of the overhaul and the installation during assembly of only absolutely clean components. Also, do not forget the need to perform regular and frequent changes of impellent oil.
Oil starvation can also be caused by several reasons, often closely related to each other. These include: engine overheating (leading to oil dilution), overloads (as a result of which oil is forced out of the bearings), oil leaks (associated with an excessive working clearance in bearings, wear oil pump, or excessive engine speed increase), etc. Violation of the permeability of the oil channels, most often associated with carelessness in the installation of components during assembly, leading to misalignment of the oil holes, also causes a reduction in oil supply to the bearings and, ultimately, to the failure of the liners. A characteristic feature oil starvation is the wiping and displacement of the soft working layer of the liners from their steel substrate. Sometimes the temperature rises to such an extent that purple spots are formed on the steel substrate as a result of overheating.
It should be remembered that driving style has a significant effect on bearing life. Increasing the load on the engine is facilitated by frequent full opening of the throttle valve, movement at low speeds, etc. As a result, the oil film is displaced from the working clearance of the bearings, which leads to the softening of the liners of the latter and the formation of small cracks on their working surface (fatigue deformation). Ultimately, the individual fragments of the working layer material are peeled off and pulled out of the substrate.
Driving behavior also has a significant effect on bearing life. Fully open movement throttle, driving on low gear lead to severe overloading of bearings and squeezing out of the working clearances of the oil film. In this case, the material of the liners softens, and the working layer cracks. This kind of modification of the bearing surfaces is called fatigue deformation. As a result, over time, the working layer begins to separate from the substrate in fragments and the bearings become unusable.
Operation of a car in the city cycle is often associated with many short trips, which leads to the development of bearing corrosion, since insufficient engine heating contributes to the formation of condensate inside it and the formation of corrosive gases. Aggressive products accumulate in the engine oil, forming sludge and acid, and since the oil continuously enters the bearings, they ultimately affect the material of the liners of the latter, causing it to oxidize and degrade.
Incorrect installation of liners during engine assembly also leads to their rapid destruction. If the fit is too tight, the working clearance will be inadmissibly reduced, which causes oil starvation in the bearings. The penetration of foreign particles between the backs of the liners and the bearing beds leads to the formation of areas of elevation of the working surface and the destruction of the latter in the process normal work engine.
As mentioned earlier in this section, replacing earbuds when overhaul the engine must be performed without fail, regardless of their condition (see Installing the crankshaft and checking the working clearances of the main bearings) - an attempt to ignore this requirement can only lead to apparent savings.