Rear suspension mounted on Ford focus of the second generation, has a multi-link design, due to this, the smooth running of the car, confident behavior of the car on the road is achieved.
But the multi-link system has not only advantages, but also disadvantages - when mechanical damage more parts have to be changed, and the repair of the chassis itself is not cheap. In this article, we will look at what is rear suspension Ford Focus 2: scheme, repair, what are the characteristic "diseases" of the chassis, how to replace the rear shock absorber and stabilizer bar.
Rear suspension Ford Focus-2 - independent type, with a cross member in the middle, with four levers each rear wheel (total levers - 8). The undercarriage consists of the following elements:
- crossbars;
- levers - rear lower, upper, front lower, longitudinal;
- springs;
- shock absorbers;
- compression buffers.
All elements, except for the crossbeam, are paired, also on rear axle stabilizer is installed lateral stability with struts and bushings. 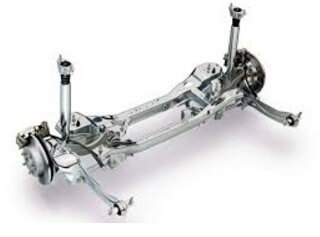
The Ford Focus-2 was produced in two body modifications - in the pre-styling version (2005-2008) and in the restyled version (2008-2011). After the modernization, there were some changes in the car, but the restyling did not touch the rear suspension - it remained the same.
In the domestic market, the vast majority of Ford Focus-2 are found only russian assembly, therefore, it is difficult to speak about the quality of spare parts installed on cars assembled in Spain and Germany. But the cars assembled in Vsevolozhsk near St. Petersburg are quite reliable, and the rear suspension lasts a long time during normal operation.
If you do not drive a car high speed on bad roads, more or less serious repairs chassis will require about 100 thousand km on the run, not earlier. As a rule, the longitudinal levers fail first, the silent blocks wear out in them. The lever can not be completely changed, you can do with repressing the silent blocks, but in order to make such a repair, it is necessary to disassemble almost the entire suspension. 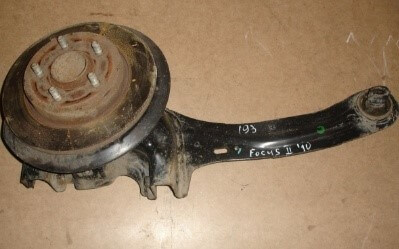
The rear shock absorbers on the "Second Focus" are distinguished by enviable "vitality", on average, the parts are nursed from 90 to 130 thousand km. Price original spare parts rather big, each shock absorber costs about 3.5 thousand rubles. But fortunately, on the Focus-2 there are parts of non-original production, moreover, of very decent quality. For example, Monroe or Kayaba shock absorbers can be purchased at a price of 2-2.5 thousand rubles. for 1 piece, and TRW spare parts are even cheaper. Also, these parts are produced by many other companies:
- Bilstein;
- SACHS;
- Koni et al.
The stabilizer struts are usually the first to fail on many car models, but on the Ford Focus 2 these parts are surprisingly tenacious, sometimes nursing more than 100 thousand km. 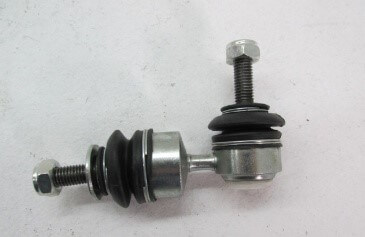
Car owners of "Second Focuses" need to know that many spare parts for the car are suitable from Mazda 3, in particular, many of the rear suspension parts are practically the same. True, there is one difference - native Ford spare parts are more reliable than Mazda spare parts, although they are more expensive.
If in the area of \u200b\u200bthe stem rear shock absorber oil stains appeared, and the car began to drive over bumps with the rear part of the body swaying, the shock absorber was out of order, and it must be changed. We carry out the work as follows:
Replacing the rear stabilizer bar
If there is a knock around the rear suspension, it is likely that the stabilizer struts are worn out. Parts are changed quite simply, if there are no complications during removal, you can replace the stabilizer rack in half an hour or even faster.
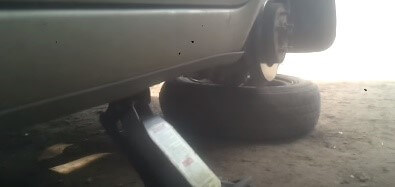
It is convenient to replace it on a pit or on a lift; you do not need to remove the wheel to perform the operation. We carry out the work in the following order:
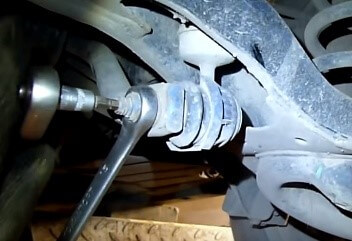
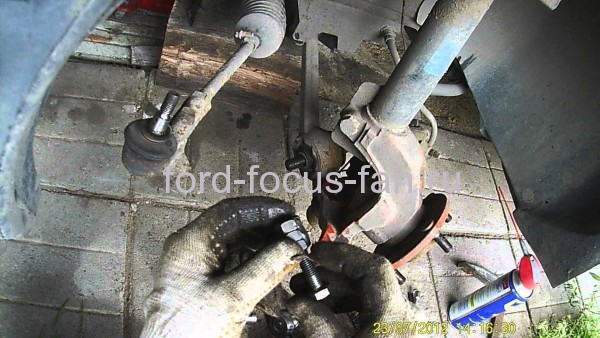
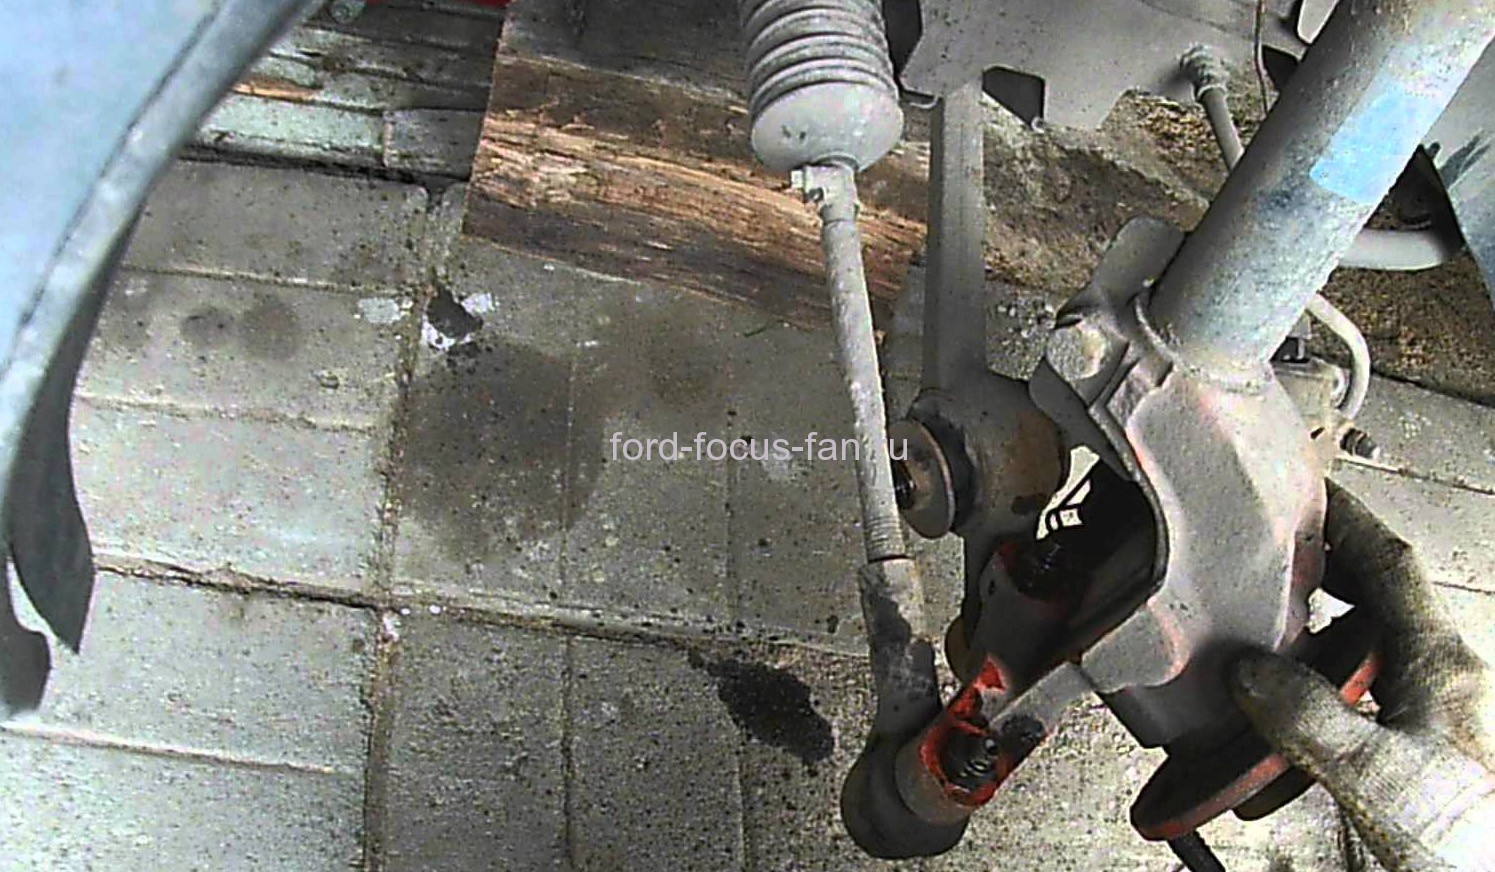
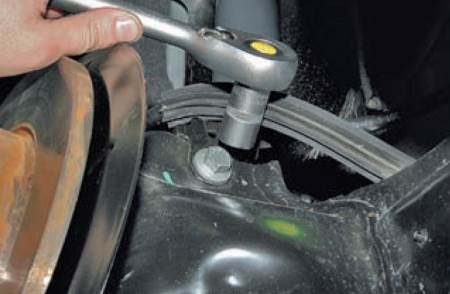
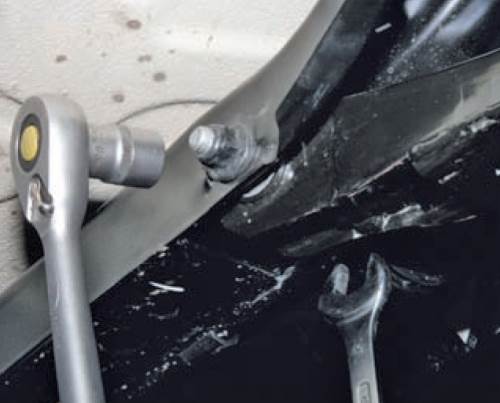
Everything was simple, but the old counter does not always turn away normally. The thread on the ball pin is clogged with dirt, and when you try to unscrew the nut, the hex wrench turns in the body of the pin. Before you start unwinding the connection, you must:
- clean the threads on the stabilizer post from dirt;
- sprinkle WD40 on it;
- wait 15-20 minutes for the remaining dirt to "eat off".
Only then should you start loosening the nuts. If, nevertheless, the ball pin scrolls in the body, and the nut rotates with it, you will have to use a small grinder - cut off the worn out stabilizer bar.
In this case, the replacement of the L-shaped stabilizer struts is considered, but stabilizer struts of the so-called "direct" type can also be installed on the Ford Focus-2. 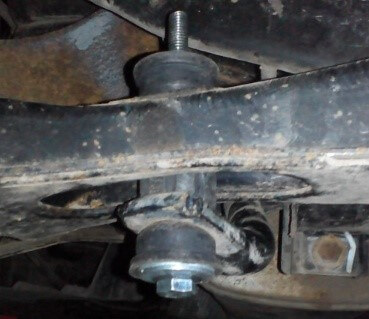
These details change even easier, there are practically no complications here.
Replacing the rear suspension ford focus 2: video
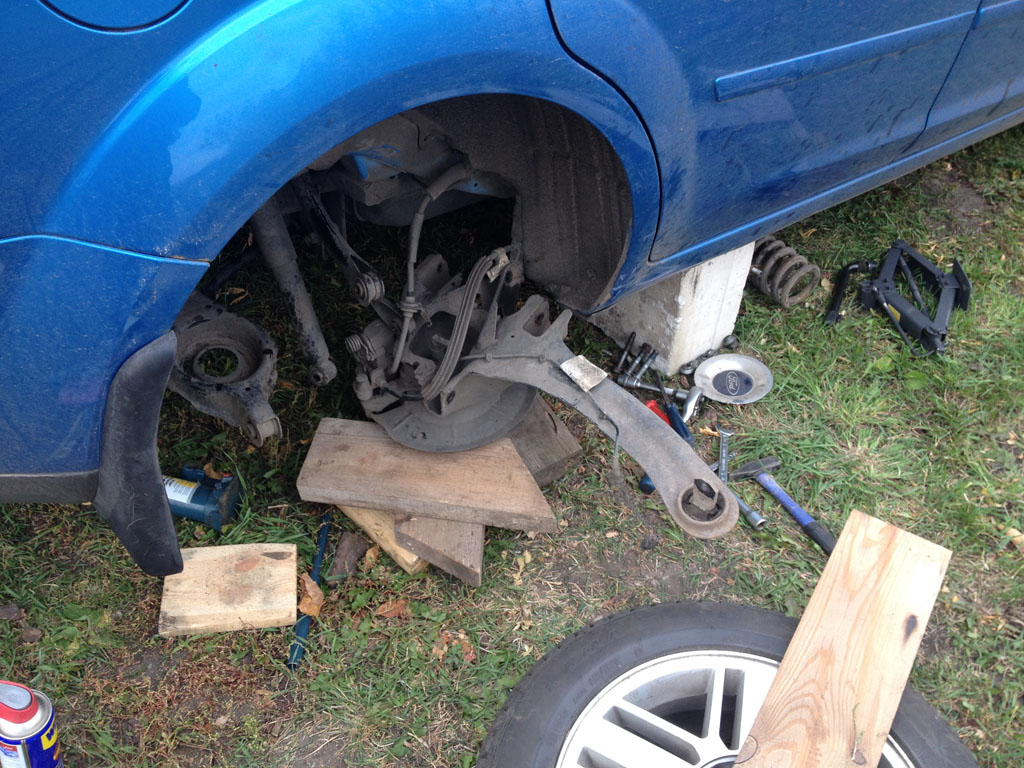
Let it be not in the topic of construction, which dominates on this site, but I still did not find a sensible guide for repairing the Focus rear suspension, collecting information in fits and starts on the forums. Hope it is useful to someone! Go...
All owners of the second Focuses, sooner or later, are faced with a rear suspension repair. First of all, the idea comes to visit a car service, where for this procedure a price will be announced that is comparable to the purchase of used Zhiguli. The service is not to blame, the idea belongs to Henry Ford, who offered to sell cheap cars and expensive spare parts for them, but now that's not the point. If the owner of the Focus has everything in order with his hands, a tool and has a piece of land or a garage, then there is an option to save money and repair everything with his own hands. In this article, using my example, I will show you how to do this. It's about the Ford Focus 2 pre-styling wagon 2006.
First you need to prepare.
We need the following tool:
- set of heads;
- a pair of sets of open-end wrenches;
- hexagons;
- hammer just in case;
- three-legged puller;
- car jack;
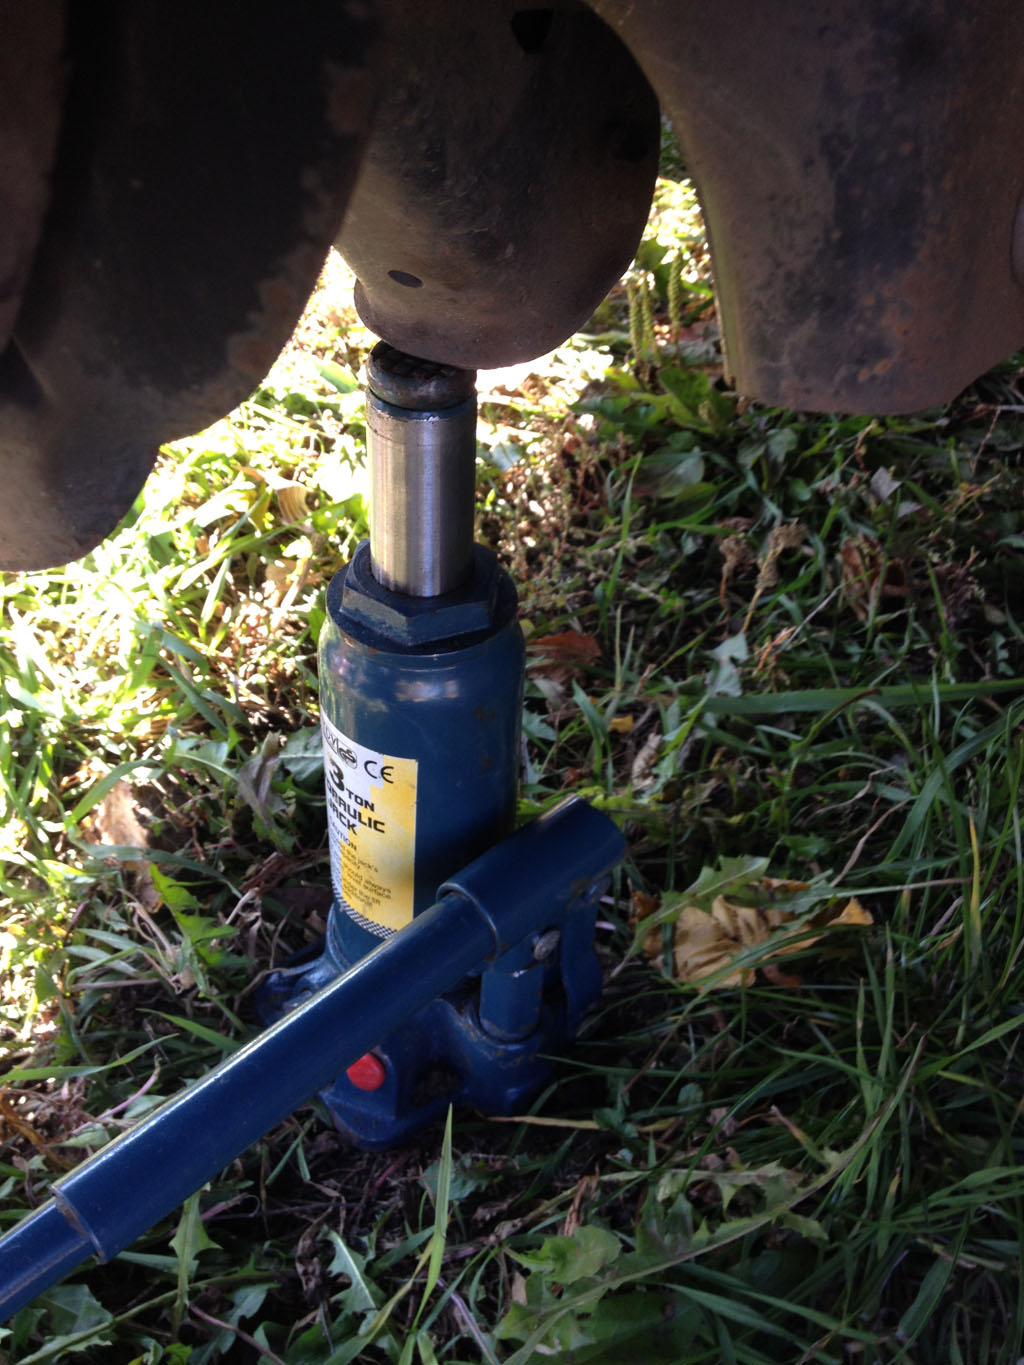
- hydraulic jack;
- ties for springs;
- vdshka or other similar slurry;
- in a bad situation angle grinder or in common people "grinder" with a disc diameter of 125 mm !!! This is important because 115 is missing there;
- lithol;
- a device for pressing out oil seals (we will dwell on it in more detail below);
- a bunch of scraps from the boards. You will definitely need to put something. I have a construction site, so there was no problem with that;
- a couple of days of free time (maybe someone will do it faster, but I got that much);
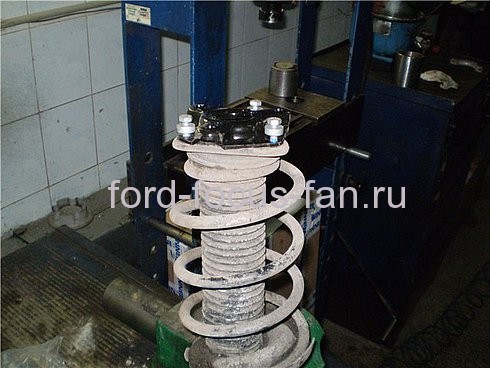
We put the ties on the spring, squeeze it as much as the ties allow. Most likely, it will not be possible to remove it, but this is not necessary.
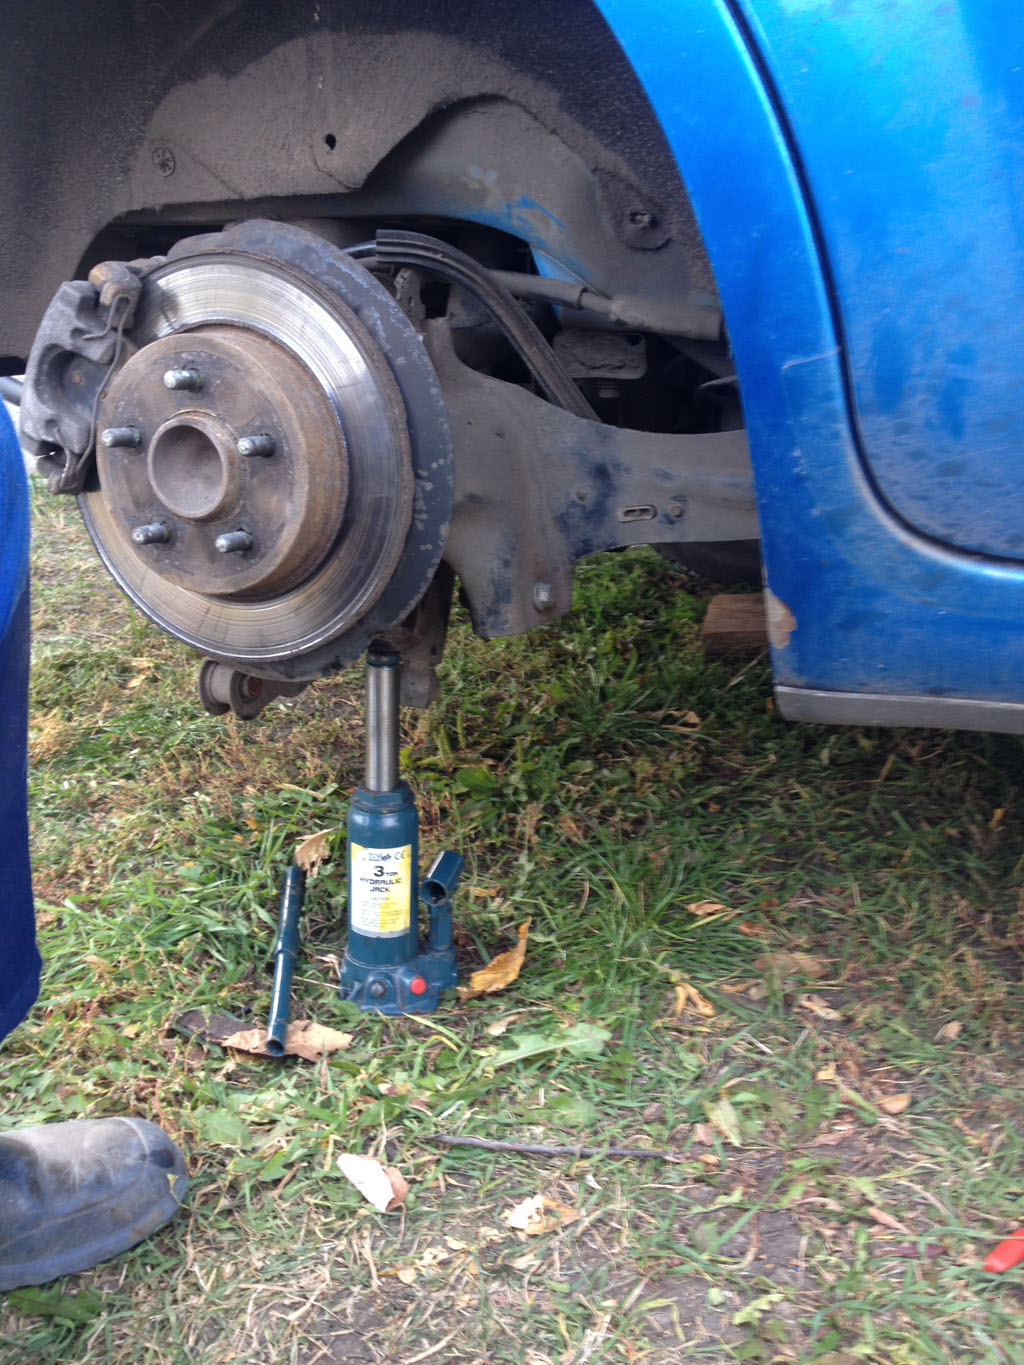
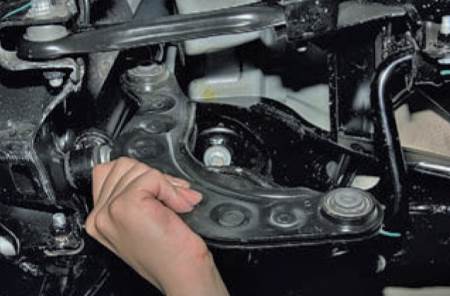
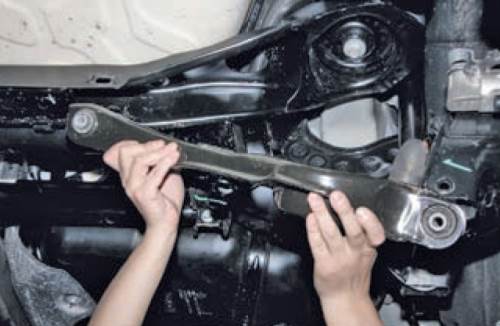
We lift the main lever on which the wheel is installed
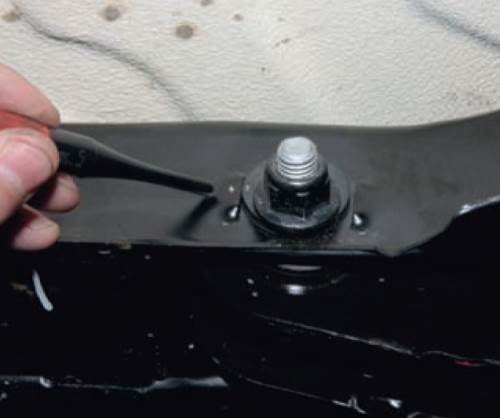
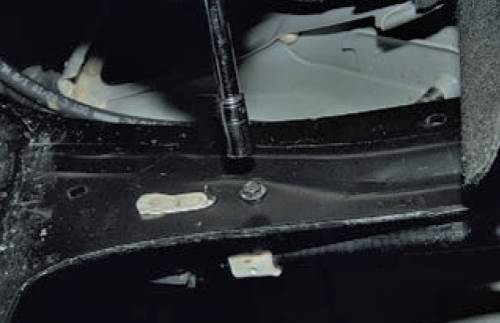
and unscrew the bolt that holds the spring arm.
We take out the spring, move the lever down so as not to interfere.
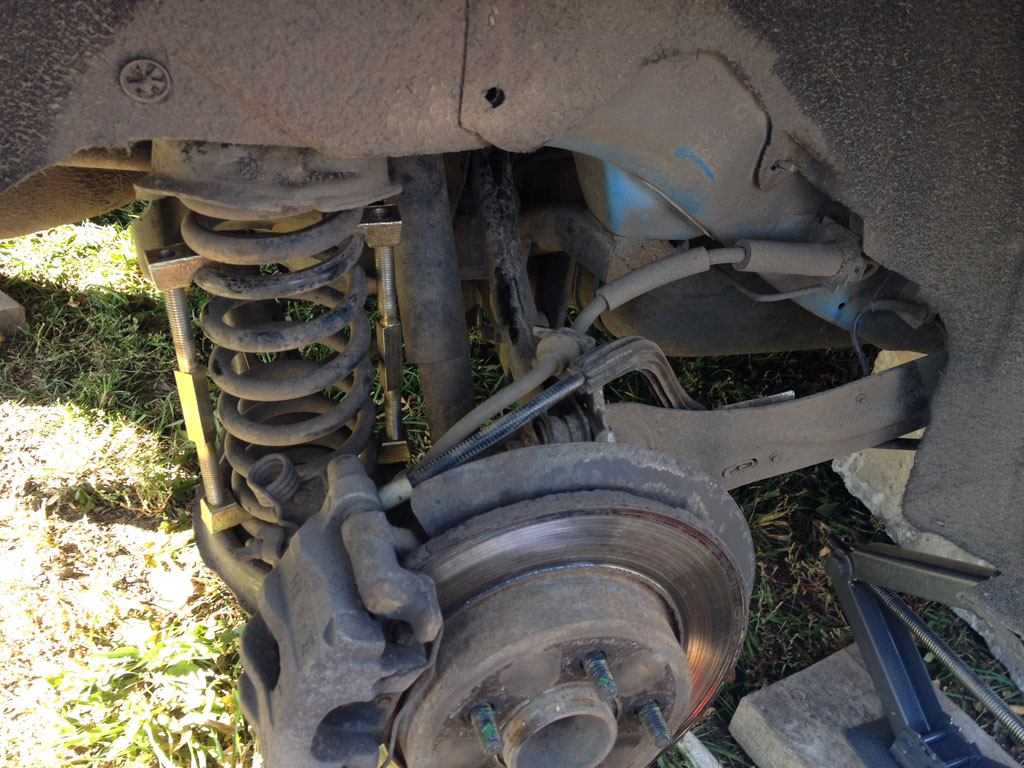
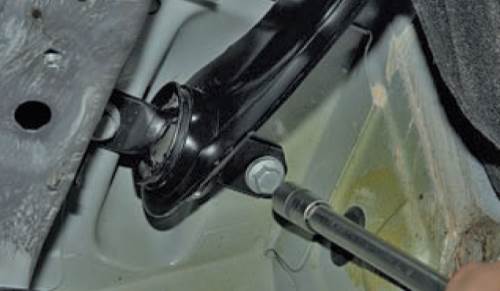
We unscrew the upper and lower wishbones, and at the same time the shock absorber from the bottom.

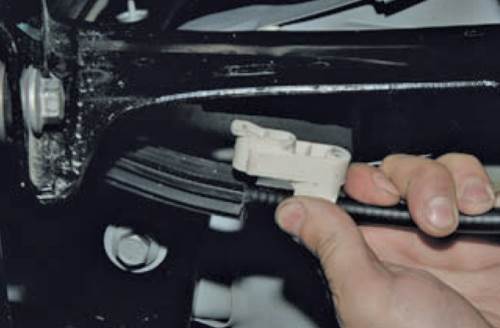
Remove the handbrake cable from the hook.
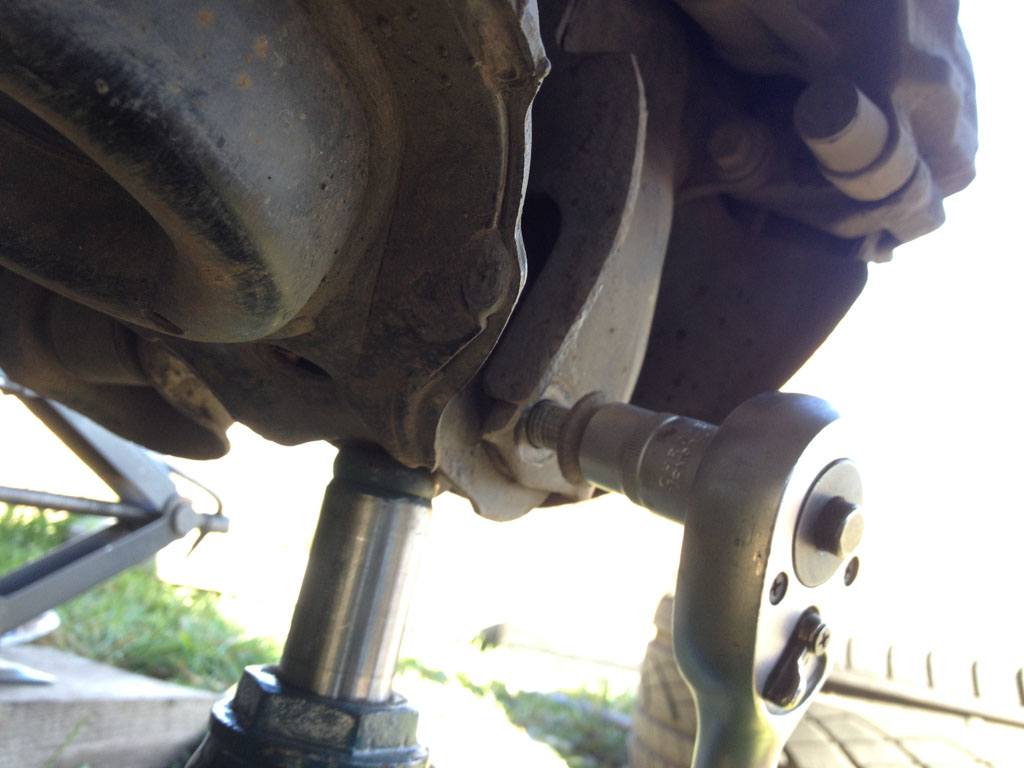
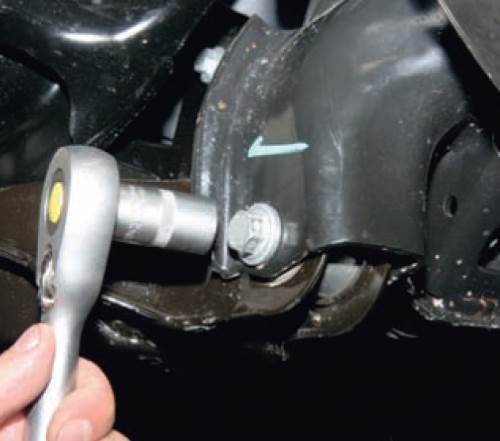
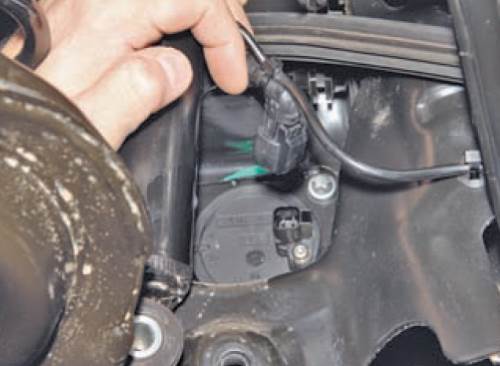
We unscrew the small bolt in the photo below, it is the wires going to the sensor anti-slip system (ABS)
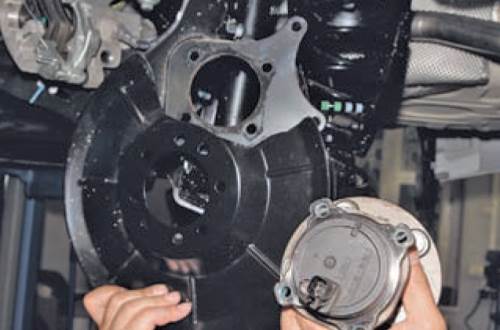
Disconnect the ABS terminal and unscrew the 2 bolts that hold the wishbone.
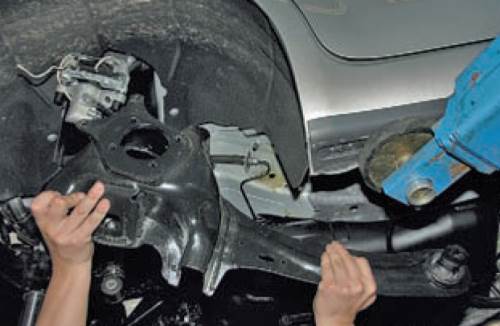
We carefully set it aside, trying very hard not to damage anything. We wipe the sweat from our forehead, take a break. Now there is free access to the transverse upper and lower arms, it's time to replace them.
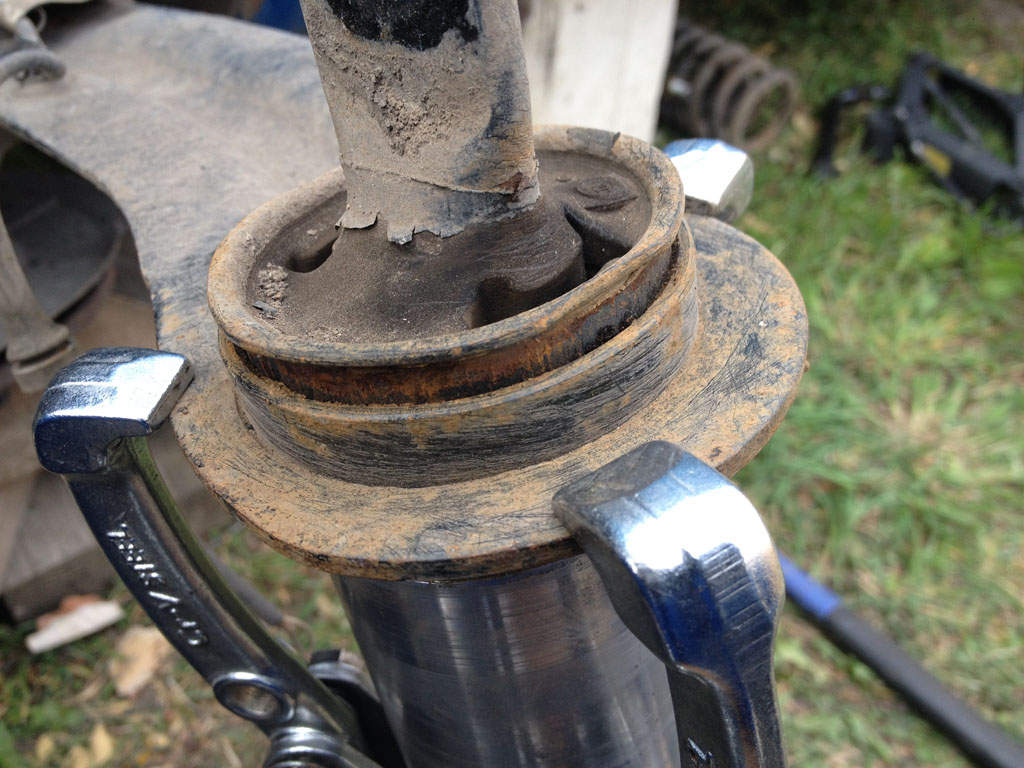
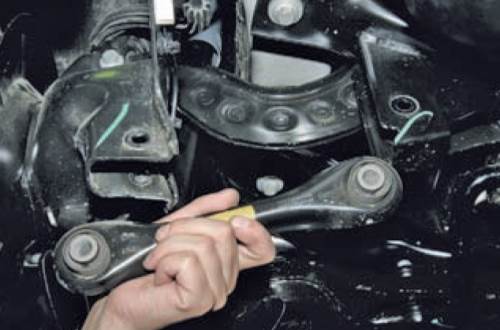
Here it is a longitudinal silent block rear arm.
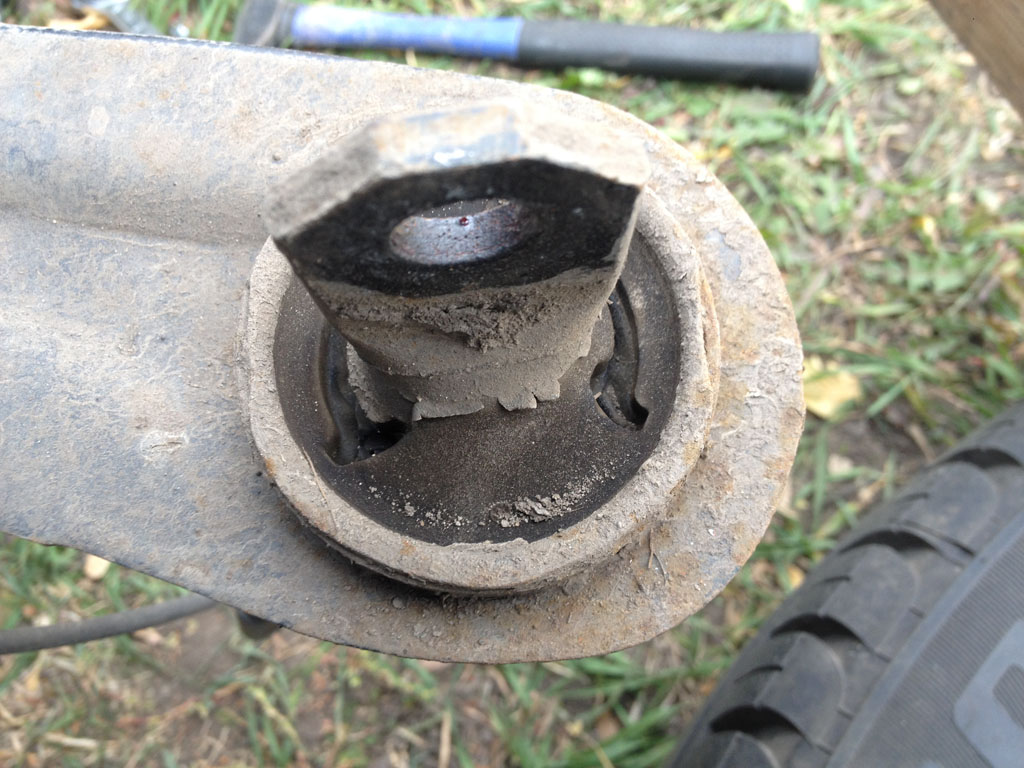
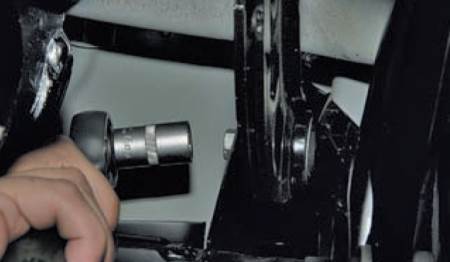
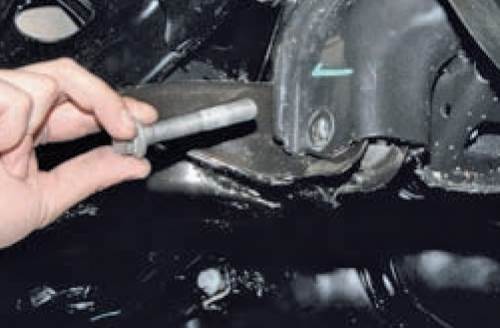
I have it even in normal condition, but since I started replacing it, I need to change it. The trouble is that you have to squeeze it out. don't try to knock it out, it's useless. This is where we need a special device in the form of a metal cylinder. I was made by his familiar turner at a very low cost. I know that turners are in short supply these days, but they exist!
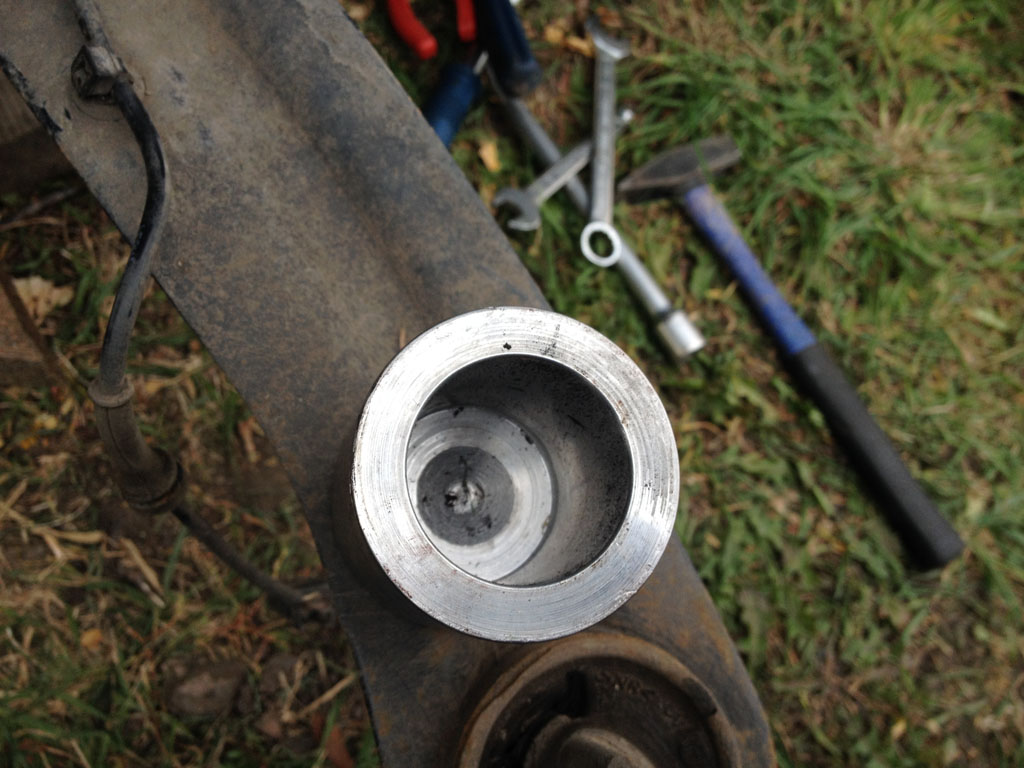
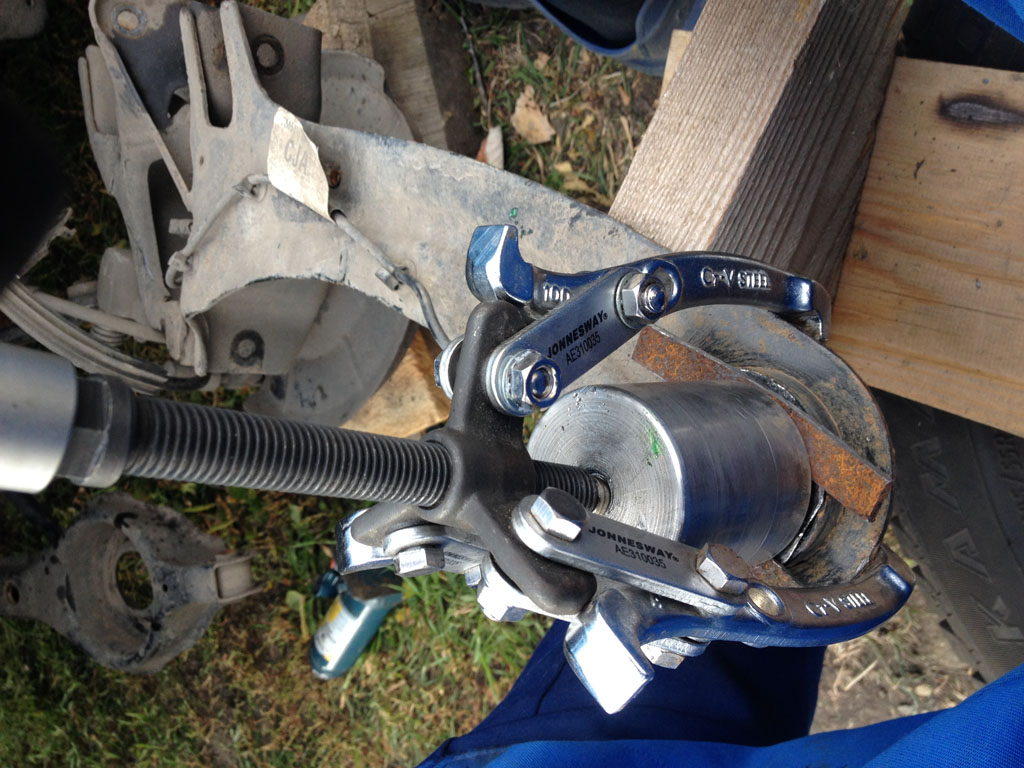
It is a cylinder with a diameter of 58 mm, a height of 70 mm, an inner diameter of 35 mm and a glass depth of 50 mm. We put on the puller and gently press
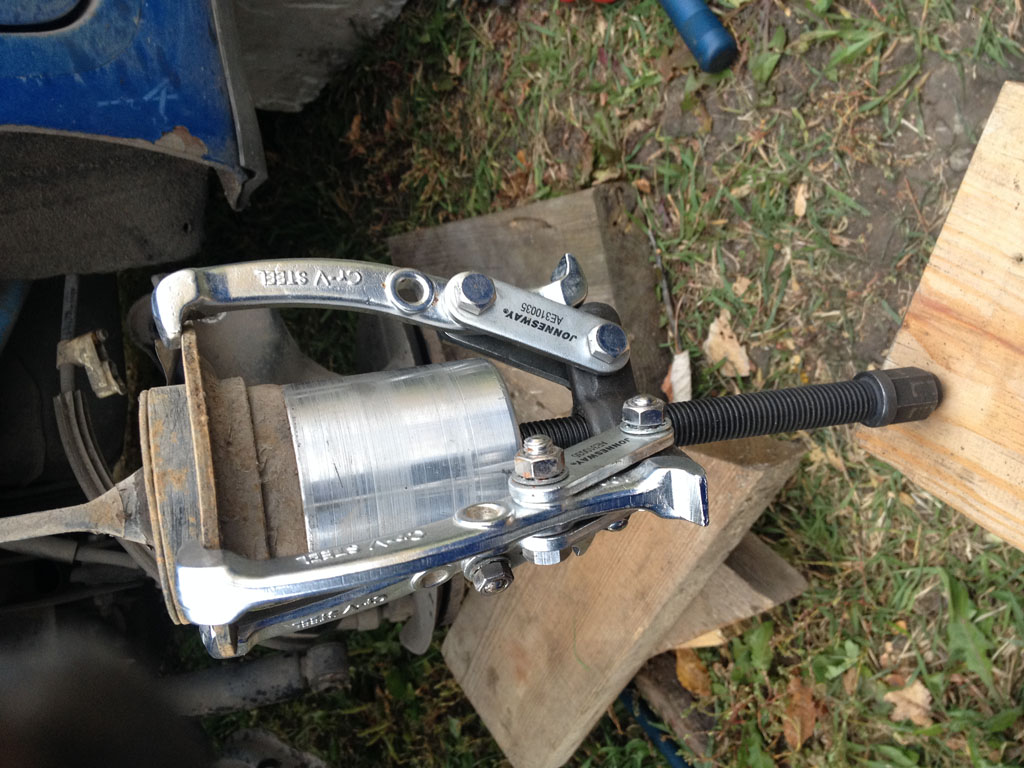
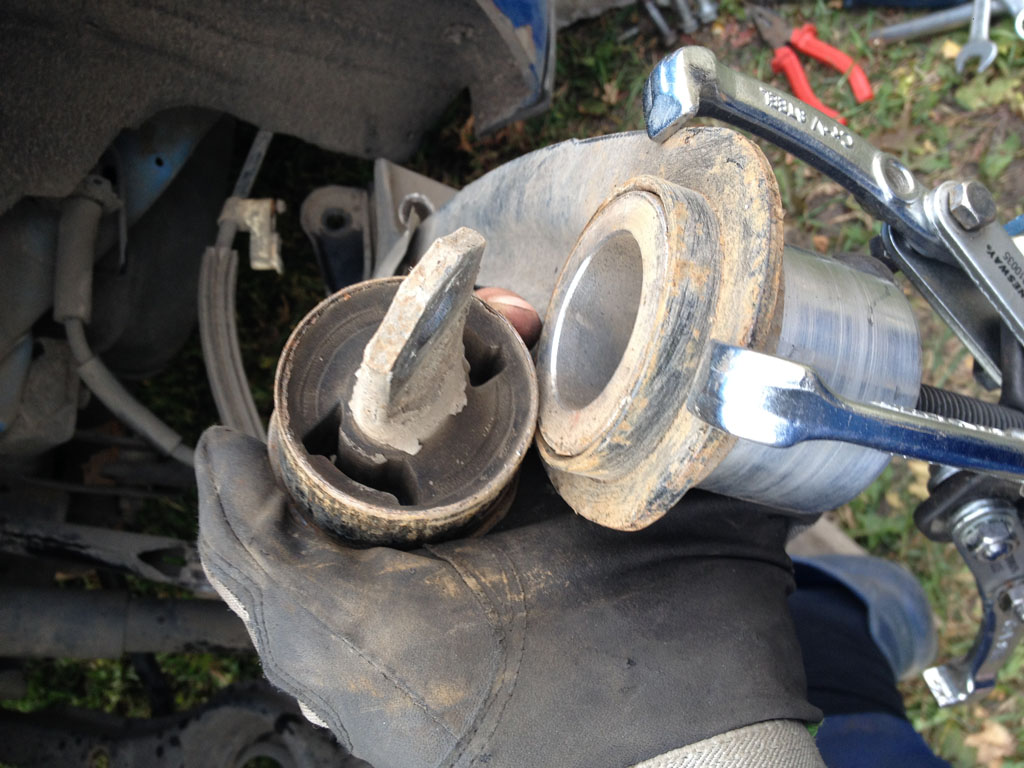
The glass allows you to evenly press on the entire silent block and it slowly comes out
Here is the result. Extruded silent block
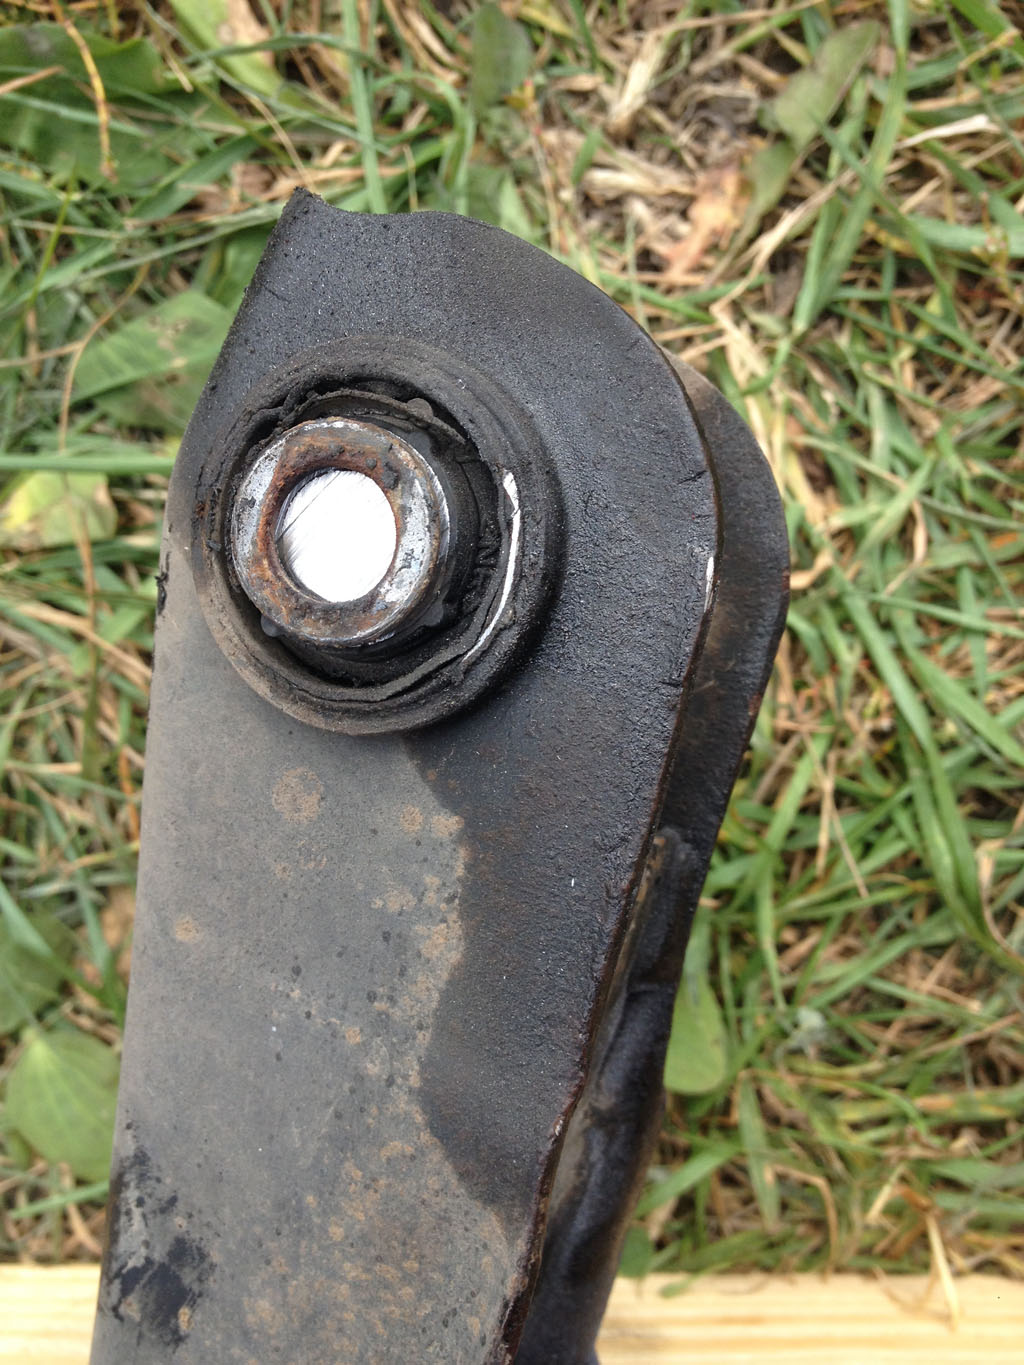
We change the silent block to a new one and press it into place. Try to position it the same way as the old one. I mean the location of the "ears". In the photo below, the final stage. Pay attention to the plates, I put them so that the adaptive glass would stand level.
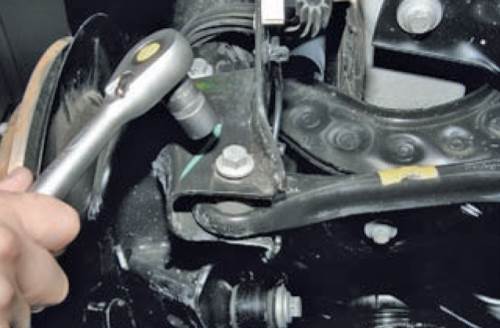
It remains to unscrew the spring-loaded lever. This was the most difficult action for me, both levers did not want to unscrew and I had to cut them down. It's not very pleasant, especially when lying under the car, but what to do ... must! The lever is attached to the beam with an eccentric bolt and you need to make two neat cuts between the lever and the beam. As a result, we get such an old lever with a sawed-off bolt.
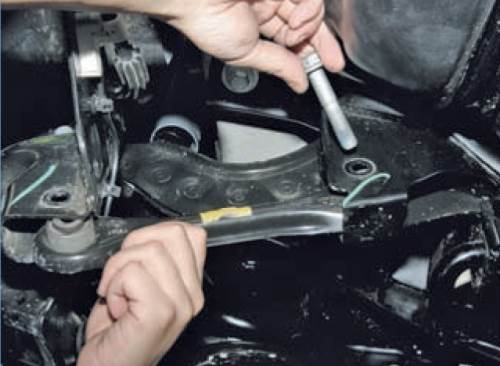
Next, we collect everything in reverse order... I would recommend that you first assemble everything without tightening it, put a jack under the lever, as in the photo below. This will simulate a wheel on the road and the rubber bands will fall into place.
After that, you can stretch everything thoroughly. In this way, for a couple of days off at the dacha, you can save a decent amount. And have a good time!
In any case, the restoration of such an important part as the front suspension of the Ford Focus 2, whether it is restyling or repair, is inevitable - everything, sooner or later, falls into disrepair and everything has its own term. For the suspension, this terminology is measured in kilometers traveled. Most of the components of the front suspension are able to "carry" you about 80-100 thousand km.
How to check the suspension
Do not forget about the errors that take place in our reality: we are talking about quality domestic roads: I really did not want to raise the topic again and again russian roads, but, in this case, they directly affect the service life of the entire suspension, reducing the "period" of use by 20-30 thousand km - the value is not so small, is it?
Let us briefly recall the main characteristics of the Ford Focus front suspension: it is a lever-spring, independent suspension like MacPherson.
"Composition" of the front suspension.
![]()
According to its "physiological" structure, the suspension consists of the following undoubtedly important parts, the total number of which hardly reaches one dozen:
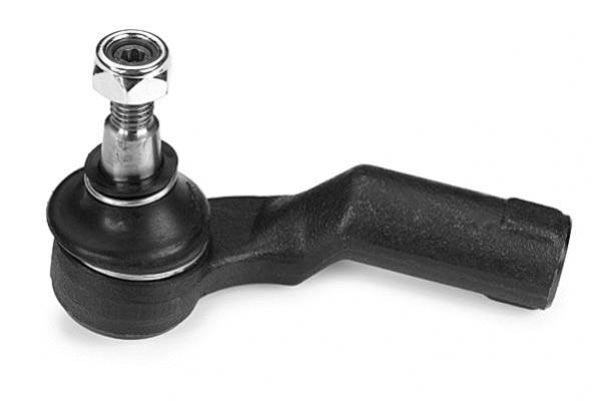
lever, coupled with a ball joint, as well as silent blocks;
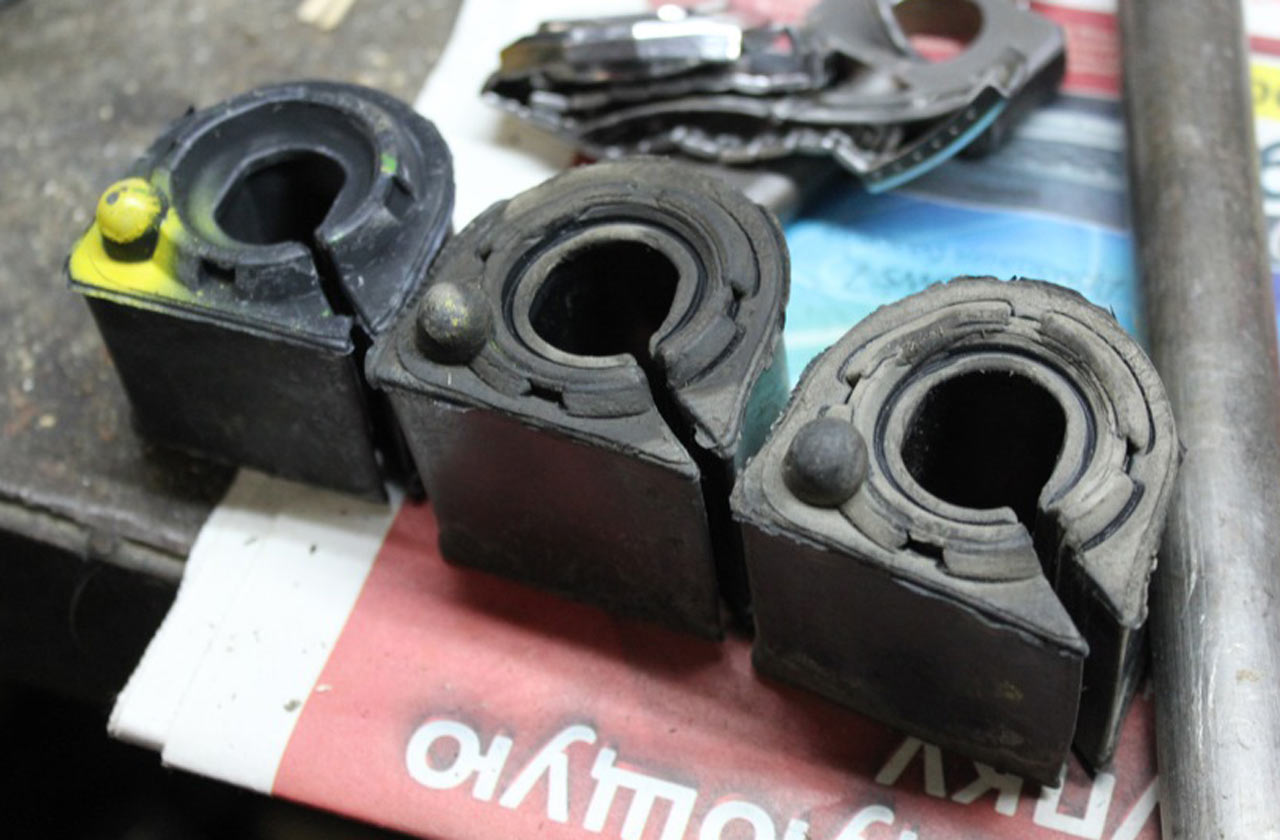
shock absorber, and anti-roll bar;
anti-roll bar;
bracket for attaching the stabilizer bar to the subframe;
hubs;
steering knuckle;
stretcher.

As you might have guessed, the parts are connected in a common chain, which creates the very concept of a front suspension. The lever of the front suspension of the Ford Focus 2, for example, in this symbiosis serves as an organ that perceives the braking and traction forces while the car is moving.
We are convinced of a malfunction of the front suspension
Perhaps you should start with a shock absorber. Why is it desirable to raise the car either with jacks or with a suspension mechanism. Next, you need to grab the wheel and "shake" it in the direction from yourself and towards yourself. Noticing free wheel vibrations (backlash), we get information about the need to replace the shock absorber. The brake will allow us to finally make sure of the situation. Having pressed on it and noticing the loss of backlash, we conclude that the most likely malfunction of the front hub bearing.
Of course, the initial "sampling" should be a visual inspection of the shock absorber for external damage and oil leaks.
Even earlier, you can make sure that the shock absorber is malfunctioning in the following way: without making any separation of the car from the ground, you only need to push on one side of the car and watch the continuation. In the event that the car returned to its original state with full or practically complete absence repetitive vibrations, it is reasonable to conclude about the general health of the shock absorber and only then proceed to longer checks. This is how our advice is distributed, the best should be read from the end, gradually moving to the beginning.
Checking the anti-roll bar is also not a super difficult task. Firstly, you need to check the covers of the ball posts for any damage, then, either by hand, or with a pry bar or any similar tool, you should try to move the stabilizer bar up and down. Is there any backlash in motion? Bad news for you: the stance is very likely to change.
Despite all the seemingly easy methods, the most recommended procedure will still be a trip to the nearest or most convenient service station, where experienced specialists will point out the shortcomings.
Are you convinced?
Fix it yourself
Having dealt with the reasons, let's move on to such a charming action as direct repair of the front suspension Ford Focus 2. To begin with, consider replacing the front suspension arm, brief information about which we received a few wounds.
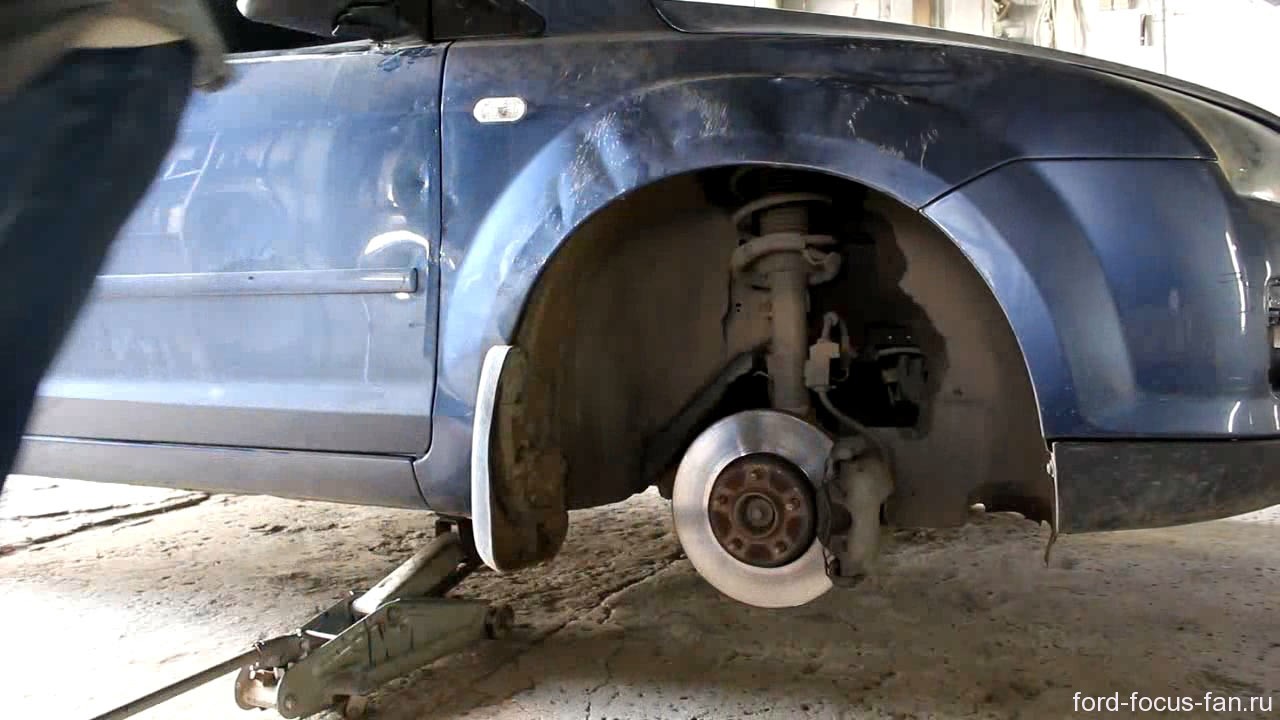
We start by lifting the car using any means convenient for the car enthusiast: a jack, a lift, and more. We remove the wheel and, then, get rid of the ball joint, for which it is necessary to drill and knock out three rivets securing the support to the lever. If the ultimate goal of the repair was precisely the ball one, then in this situation the support should be replaced with a new one and fastened with bolts and self-locking nuts. If you stubbornly want to go further, you will need to unscrew three bolts: one for the front attachment, and the other two for the rear attachment of the lever to the subframe. We got to the lever: we replace it with a new one, repeat the disassembly operation in back side, from the end, then, put everything together, we go to the auto repair shop to do the wheel alignment. This procedure possible only by experienced specialists
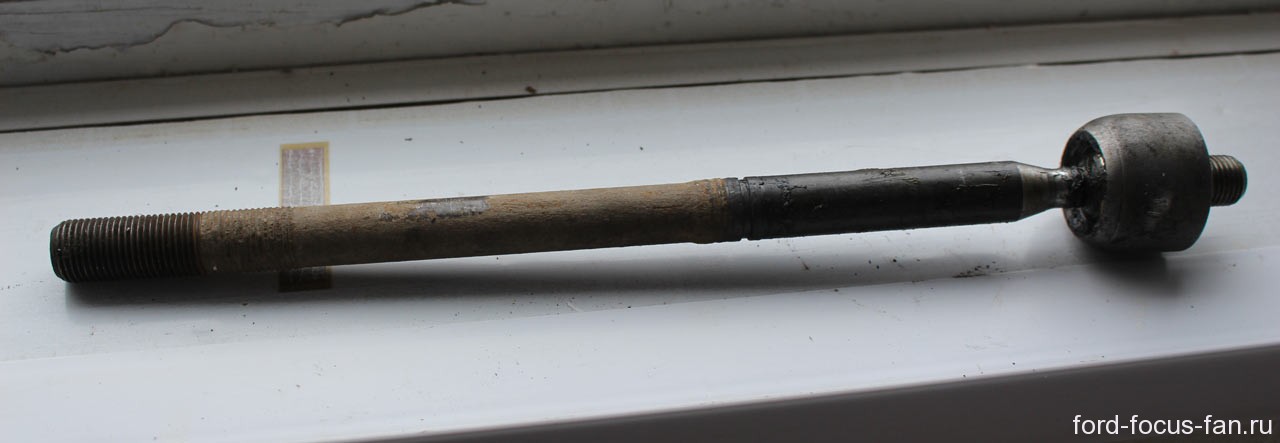
The second problem that most often occurs with the front suspension of the Ford Focus 2, whose repair schemes are readily available on the Internet (the schemes in these cases are an ordinary sequence of steps required to be performed in strict observance of the course of action), are the front hub bearings. So, the bearings, whose replacement is recommended to be carried out at the same time, that is, immediately change both the left and right front suspension bearings. Step one: raises the car on a jack, get rid of the wheel, unscrewing the hub bolt along the way. The next step is to get rid of the anti-roll bar. Then we unhook anti-lock braking systemby disconnecting the corresponding terminals. We unscrew the bolts holding the tip of the tie rod.
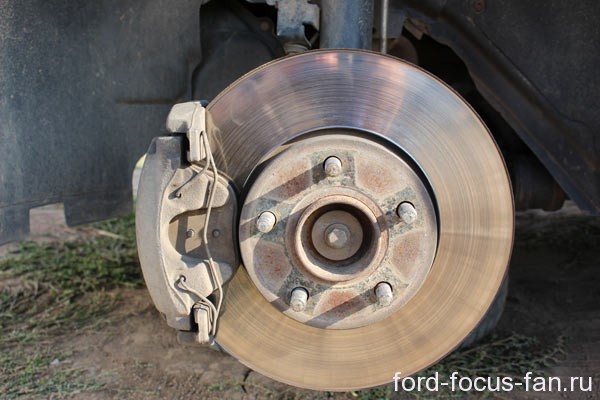
Moving on to brake caliper: we unscrew it, along the way getting rid of brake disc... After that, go to the ball strut mounting nut by unscrewing it. then, using a specialized puller, remove the "finger" from the lever. Tips on using a hammer to extract a "finger" are only available if you know where and how to hit. Otherwise, contact the auto repair shop exclusively for this operation.
We detach the terminal connection of the shock absorber and the steering knuckle. Next, we will need to free the shock absorber using a chisel and hammer in order to release the terminal connection.
![]()
Having pulled out the hinges of equal angular velocities front wheel drive, get rid of the steering knuckle. We got close to our goal and, at the last step, we press out the hub with the bearing, then, changing to new ones, we press it back in. For this procedure, you must use only a tool such as a puller. It is advisable, nevertheless, to contact the specialists from the auto repair shop on this matter, the procedure, in comparison with the general replacement of bearings, is inexpensive. After successful pressing, we collect all the parts in the reverse order of parsing and go to do the camber
In general, we can say that the repair of the front suspension for Ford Focus 2, or rather two of its most important and often failing parts, has been completed successfully.
Multi-link, independent. It is a rather vulnerable element in the Focuses, as it contains 8 levers and 14 silent blocks.
If over time your suspension starts to rumble, a slight wobbling of the stern appears while riding, then this article is for you.
Figure: Screenshot from the program for the selection of spare parts, suspension Ford Focus 1 and 2. it shows all the main arms of the rear suspension.The diagram shows:
5A638 - trailing arm silent block, 5500A "bone" lever, 5500b - sickle arm, 5K652 - large transverse arm, HB1 - mounting bolts (total 8 pcs.), HB3 - silent block bolt (4 pcs.)
The 5500b is a crescent-shaped lever; on the sedan and station wagon, they differ in shape (in this diagram, the lever for the station wagon is drawn).
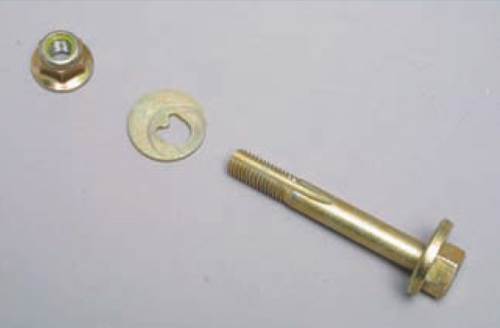
The arrows point to the breakup bolt, nut and washer, which must be changed each time the lever is removed (if this is not done, then it will not be possible to set desired angles installation of the rear wheels).
5A638 - silent block of the rear trailing arm, as a rule, requires replacement along with the levers. It is fastened with screws HB3, which are supplied only in the original (with variable thread).
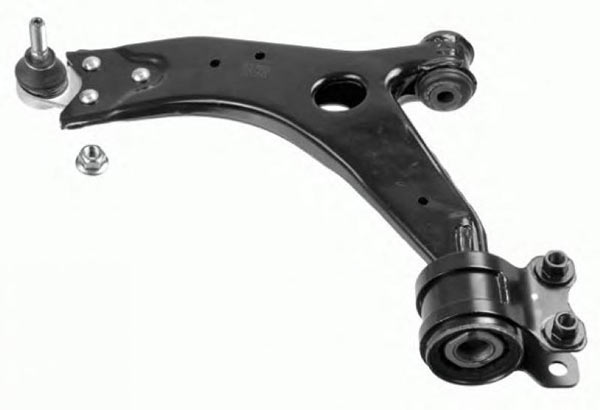
5500A is a small wishbone, the so-called "bone". These levers take a heavy load, I recommend installing the original, Febi, Lemforder or Meyle.
Drawing - a sickle of the rear suspension Ford Focus 1, 2 (sedan and hatchback)
Sickles on the station wagon
On cars in the station wagon body, crescent levers of a different shape were installed from the factory, this was done due to the fact that the load on the trunk is greater in the station wagon, and at the maximum load of the trunk in large pits, there could be blows of the standard crescent lever on the body. The crescent levers of the station wagon are banana-shaped. When buying levers for a station wagon, you can buy standard levers from a sedan and a hatchback, because "banana" levers are more expensive and there is less choice, these are either Chinese levers or expensive original ones. Standard "sickle" levers are cheaper and have no good counterparts. As practice shows, messages from the forums and so on, the standard "sickles" from the sedan are easily installed on the station wagon, and this does not lead to any shock or wear.
Drawing - Crescent lever of the station wagon "banana"
On Ford Focus 2 cars, two rear suspension options are installed.
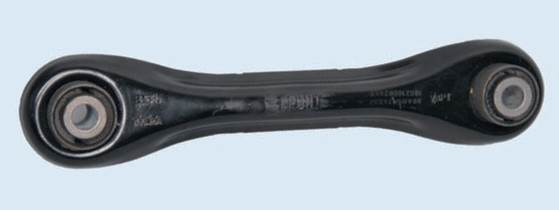
The first suspension option(straight levers) is the same with the Ford Focus 1 suspension, has straight spring levers. Straight levers are original and non-original.
Drawing - Straight Levers (OE number Ford: 1357317)
Figure Straight levers on the car Focus 2
On the "straight" levers is the stabilizer post "hairpin" (1719542).
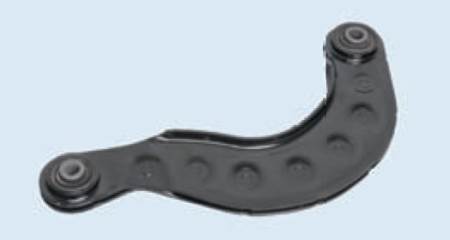
The second version of the suspension is distinguished by spring-loaded levers - they are "bent" there.According to statistics, such levers are found in 1 in 10 cars. Levers are only original. You can put levers from Mazda 3, they are absolutely the same, they even have a FoMOCo stamp.
Also, the suspension with "bent levers" has a different type of stabilizer bar. In order to determine what type of suspension is installed on your car, it is not enough to look at the VIN number in the catalog - there, in most cases, you cannot see what kind of rear suspension arms you have.
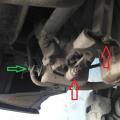
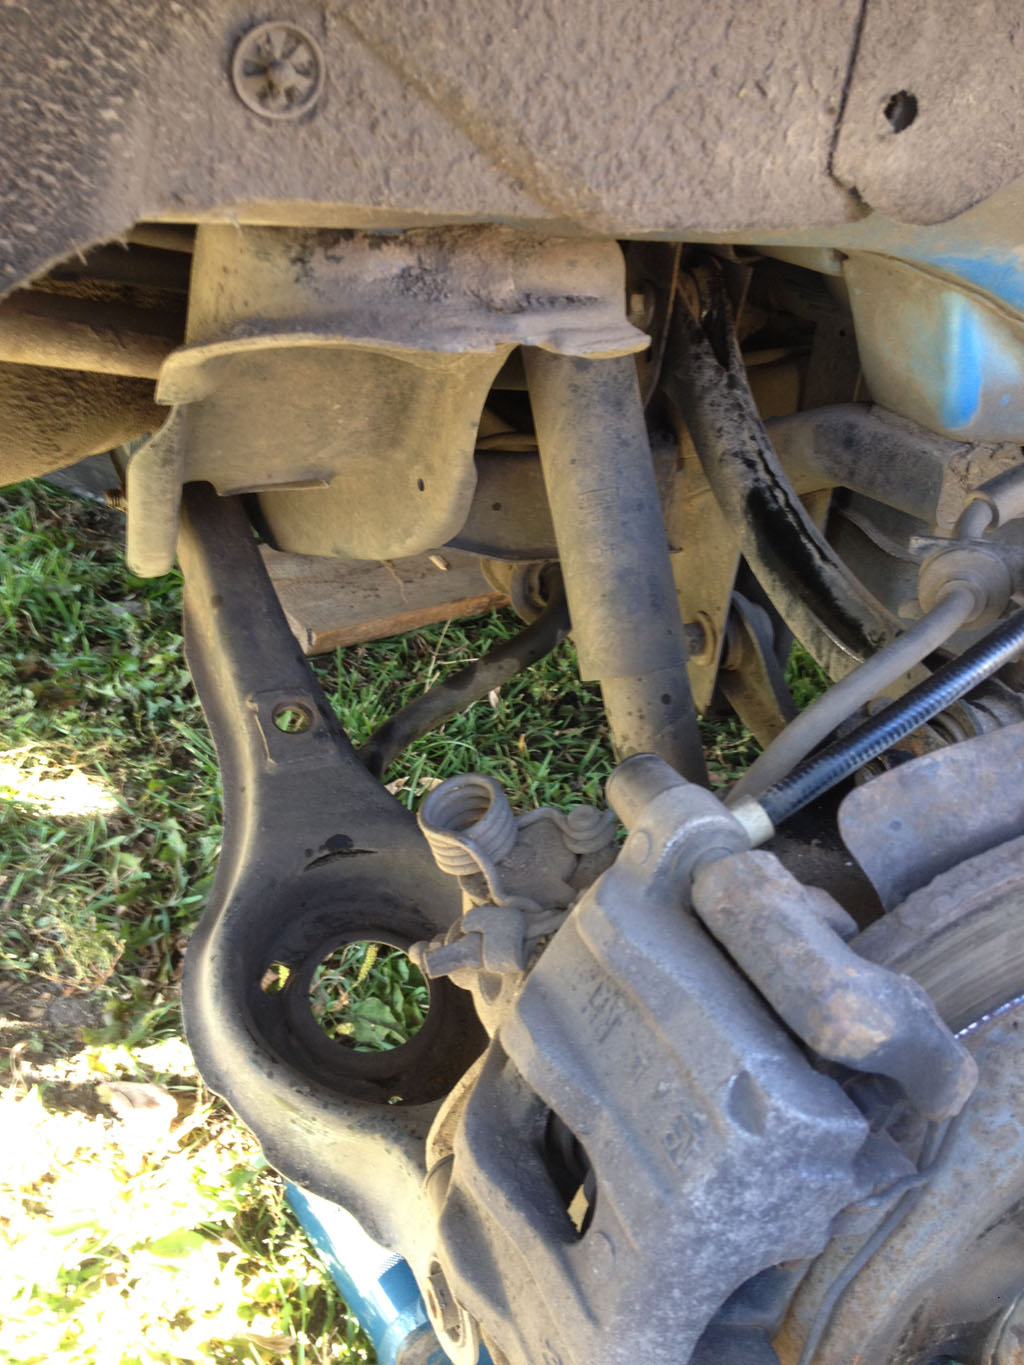
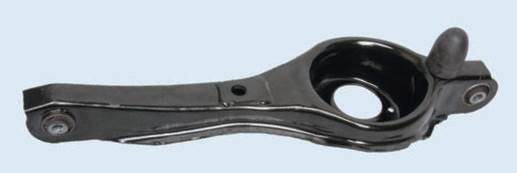
To determine which levers (first or second option) are on your car, you need to approach the car from the side exhaust pipe, look under the bumper and look at under the spring arm on which the spring is installed. If it is straight, then you have the appropriate suspension and stabilizer bar - a hairpin. If the lever is "curved" then the stabilizer strut is L-shaped.
Figure - Rear transverse "bent" arm (original Ford number: 1548460)
Features of replacing the rear suspension arms.
In total, the rear suspension Ford has 6 levers that are replaced during repairs - 2 "bones", 2 "Sickles" and 2 "under spring". Most often they wear out at the same time, backlash appears in each of them. Then they all change together, but there are exceptions, you can change separately "bones" or "sickles" for example.
Ford Focus rear suspension malfunction signs.
Symptoms indicating a malfunction of the rear suspension are firstly extraneous sounds, secondly, this is the yawing of the rear of the car while driving, and of course, when viewed at the service station, you can see the state of the silent blocks and the suspension as a whole.
Non-original parts.
If you find out what you have, then you can purchase a rear suspension kit Focus on reasonable price... If the lever is "bent" then you can purchase such a lever only original (bones and sickles can be bought while not original).
A complete set of rear suspension Ford Focus is produced by several firms. Mapco, Meyle, Ruville, Teknorot and others, which are rarely found in St. Petersburg from suppliers.
Mapco (Chinese Germany, budget option, there are two options - with a set of bolts part number 53612/1 and without a set of bolts 53612).
Drawing - set of levers for Ford Focus, Mapco 53612/1
Picture - .
The second company is Meyle, made in Germany, the quality is good.
There is a Ruville kit (935259S). It is more expensive, but in addition to levers and bolts, it includes two additional silent blocks of the fist ("butterflies"), which also always change.
Drawing - rear suspension kit Ford Ruville 935259S
(please note that the kit includes "butterfly" silent blocks and shock absorber bumpers)
Replacing the rear levers Ford Focus 2 required depending on the mileage and the squalor of the roads on which you move. Of course, if the levers themselves are not deformed, then you can limit yourself. The rear suspension has a sophisticated multi-link and fully independent suspension. Such a scheme allows for excellent handling and comfort in motion, but replacing the complete levers (as prescribed by the manufacturer) can cost a pretty penny.
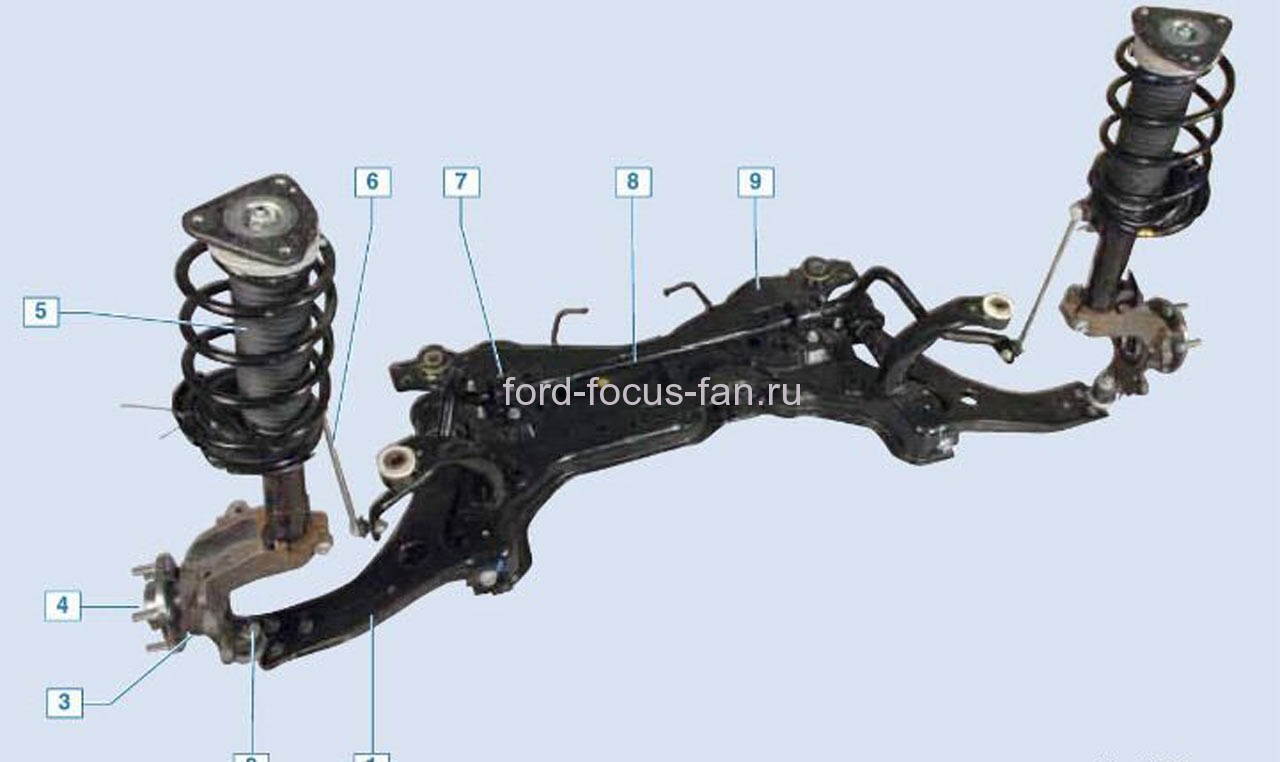
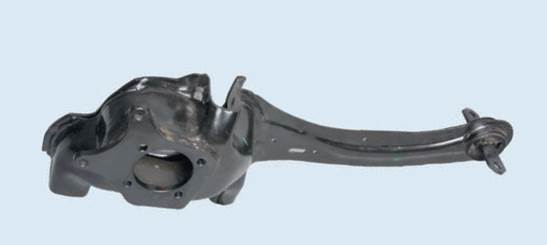
Forged Ford Focus trailing arms are connected to the subframe by three wishbones via silent blocks. Further, a photograph of the entire structure with an indication of specific elements for clarity.
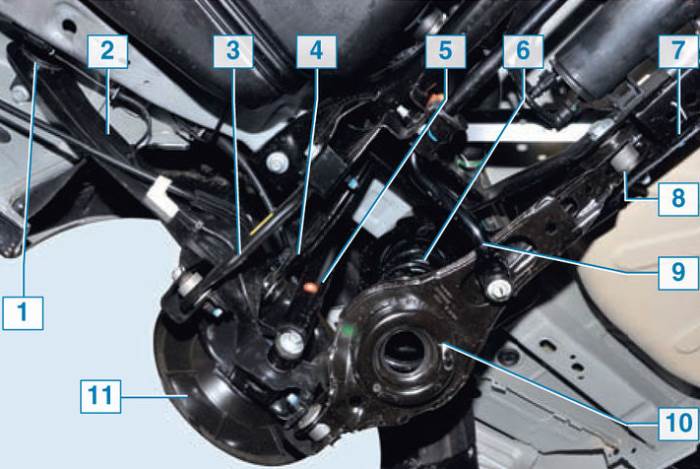
Rear suspension elements Ford Focus 2
- 1 - silent block of the trailing arm
- 2 - longitudinal lever
- 3 - lower front arm
- 4 - upper arm
- 5 - shock absorber
- 6 - spring
- 7 - stretcher
- 8 - adjusting bolt (bolt securing the rear lower arm to the subframe)
- 9 - anti-roll bar
- 10 - lower rear lever
- 11 - brake shield
All rear levers of the Ford Focus 2 are made of stamped steel with bushings pressed into them. There are 4 levers in total, these are the longitudinal, upper, lower front and lower rear levers. Below we will tell you in detail how to remove each lever separately.
Replacing the upper arm Focus
Replacing the upper arm of the rear suspension Ford Focus is carried out when mechanical deformation or wear of silent blocks (cracked rubber, peeling, etc.) To remove the lever, we need a flyover or a pit, ties for removing rear spring and an adjustable stop for the lower arm.
We remove the spring using zip ties, remove the wheel, install an adjustable stop or a hydraulic jack under the lower rear arm at the point where it joins the trailing arm, and with the help of the stop we raise the levers so that the rear suspension takes the “car on wheels” position.

Using the "15" head, unscrew the bolt securing the upper arm to the trailing arm. This bolt also secures the brake hose bracket. Using the "15" head, unscrew the bolt securing the upper arm to the subframe.
Prying off with a screwdriver, remove the ends of the lever from the brackets and remove the lever from the car. Install the new lever in reverse order with a downward bend.
Replacing the lower front arm Focus
As in the case described above, we will need to remove the spring, remove the wheel and substitute an adjustable stop or a hydraulic jack under the lower arm at the point where it is connected to the trailing arm, and with the help of the stop we raise the levers so that the rear suspension takes the "car on wheels" position ... Naturally, we do all this on a pit or overpass.
Then, with a key or head "15", unscrew the bolt securing the lever to the trailing arm and remove the bolt. Similarly, we unscrew the bolt securing the lever to the subframe and take out the bolt. Prying with a screwdriver, remove the ends of the lever from the brackets and remove the lever. Photos for clarity are attached below.
Install the new lever in reverse order. It is worth considering one important point that the inscription "FRONT" on the lever should be directed towards the front of the car.
Replacing the lower rear arm Focus
The lower rear levers of the Ford Focus are made of support spring cups. The upper ends of the springs abut against the subframe cups. The cups are fitted with rubber pads. As in previous cases, we will need to remove the spring, plus unscrew the anti-roll bar. We put a stop under the rear arm (at the junction with the trailing arm).
The rear suspension has wheel alignment adjustment, so we mark the position of the eccentric washer relative to the subframe, so that when assembling and installing a new lever, approximately keep the Ford Focus wheel alignment and camber angles. In this case, the position of the head of the adjusting bolt can be omitted, only the washer relative to the subframe.
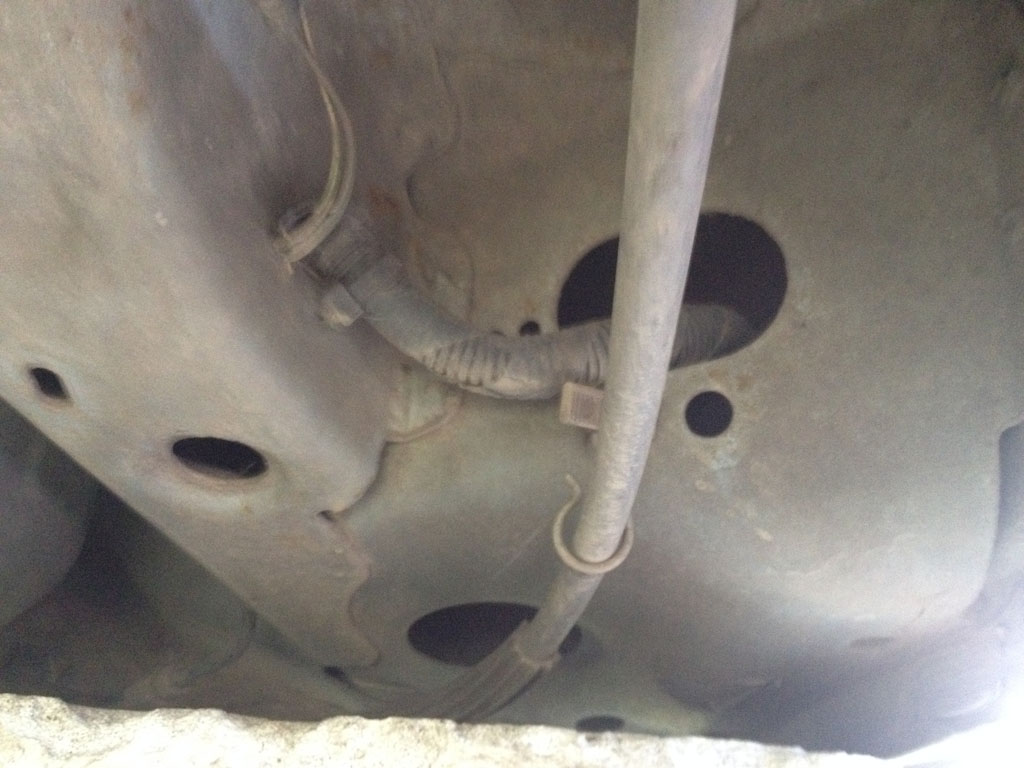
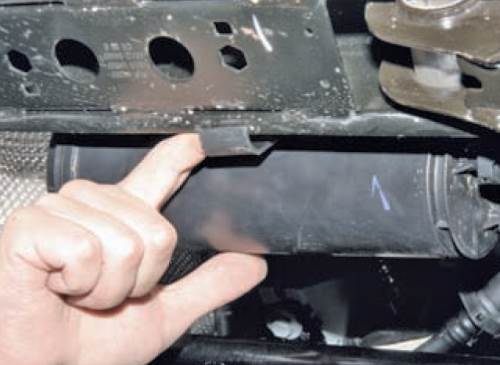
Using the "15" head, unscrew the bolt securing the lower rear arm to the trailing arm and remove the bolt. In order to be able to remove the adjusting bolt after unscrewing the nut, it is necessary to squeeze the latch of the canister of the EVAP system and move the canister away from the subframe.
With a head or a spanner wrench "18", unscrew the nut, keeping the adjusting bolt from turning with a wrench "19". Remove the eccentric washer and take out the adjusting bolt. The bolt has a groove for fixing the washer in a certain position.
We remove the lever from the car. Prying off with a screwdriver, remove the rubber buffer from the lever and install it on the new lever. True, if the buffer is broken or has cracks and tears, it must be naturally replaced.
Install the lever in reverse order, with the head of the bolt attaching the lever to the subframe should be directed towards the front of the car. And the mark made on the eccentric washer must match the mark on the subframe. The bolt securing the lever to the trailing arm and the nut of the eccentric bolt are finally tightened with the prescribed torques only under load, in the "car on wheels" position.
After replacing this lever, it is advisable to adjust the camber of the rear wheels.
Replacing the trailing arm Focus
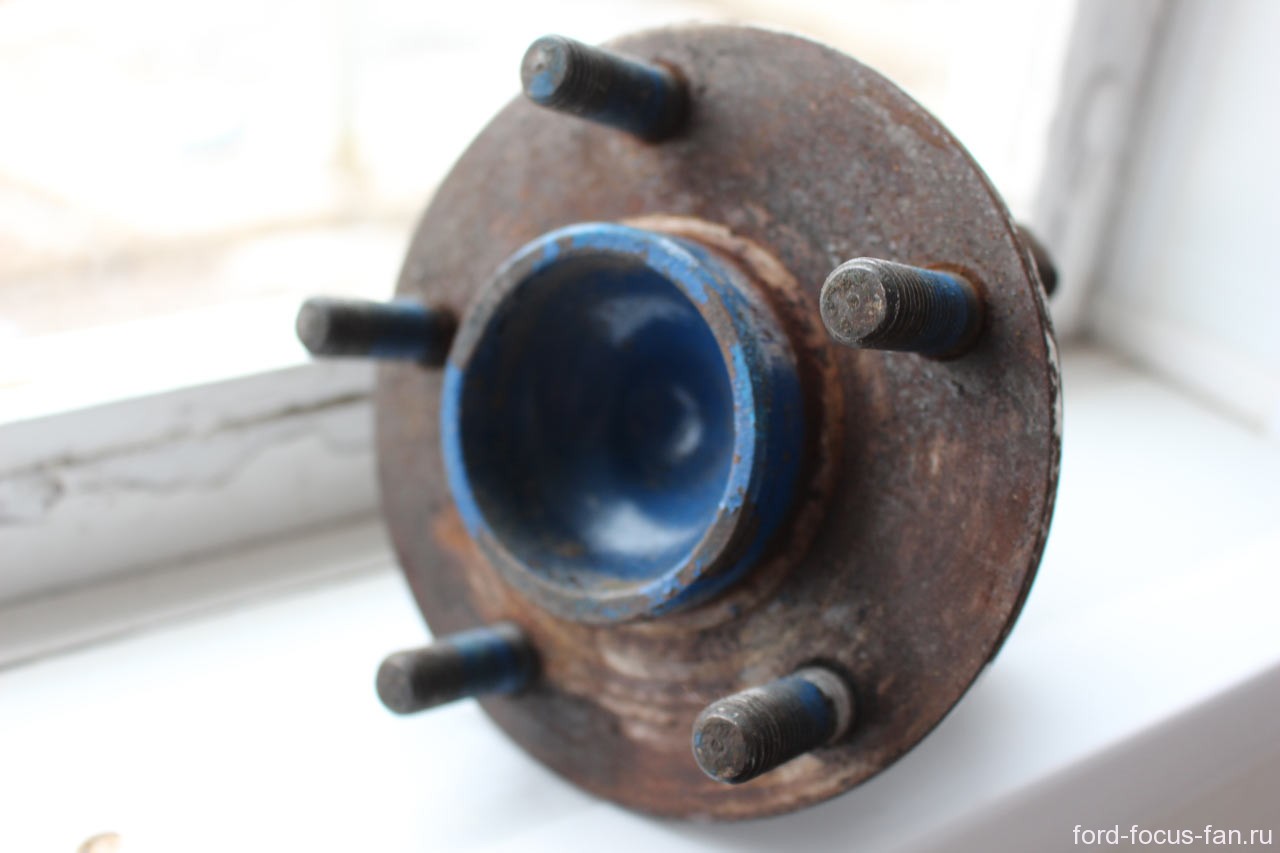
A silent block is installed in the front of the Ford Focus trailing arm, through which the arm is fixed with two bolts to the body. The rear wheel hub assembly is attached to the rear of the arm with four screws. Replacing the lever is required when it is deformed or the silent blocks are worn out.
As with other levers, we carry out replacement work on a pit or overpass (elevator) with the removal of the spring and the wheel. Plus, you need to substitute a stop under the lower arm. Without an adjustable stop, it will be problematic to remove the bolts from the lugs of the silent blocks.
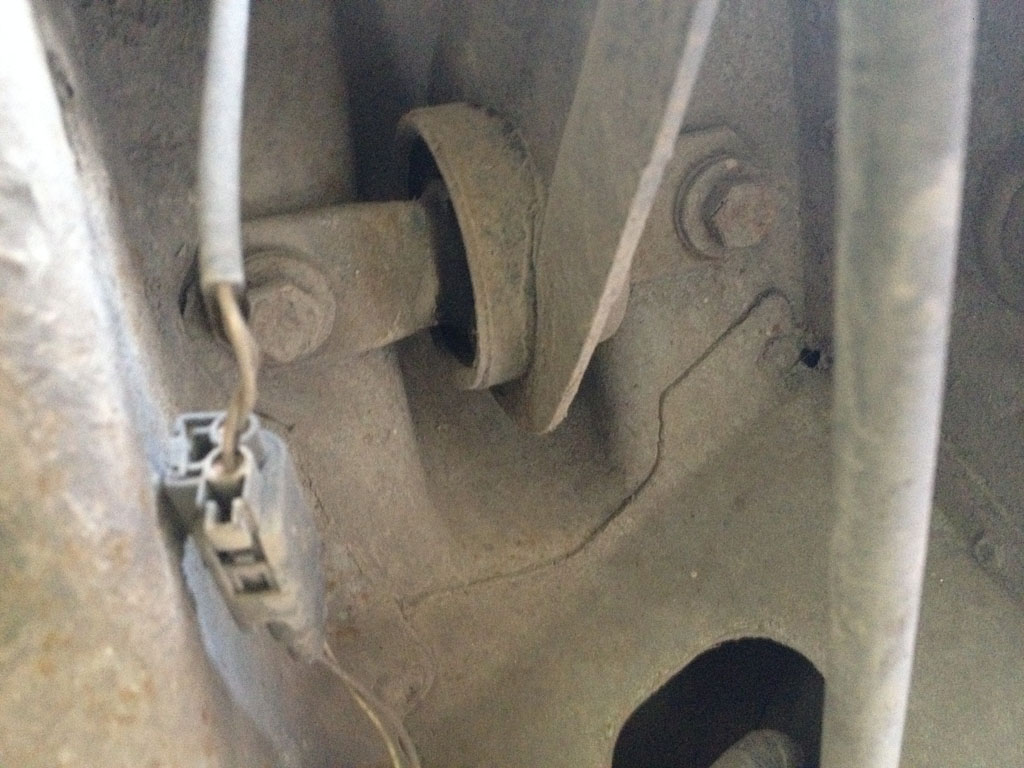
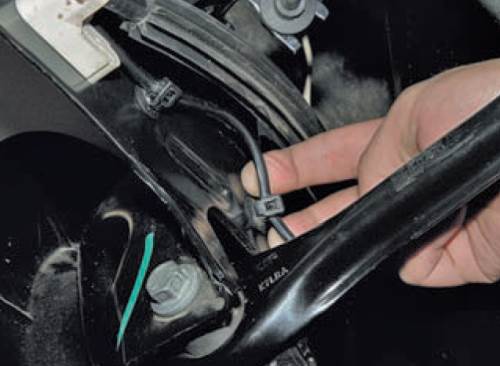
We take out three holders of the wires of the wheel speed sensor from the holes of the trailing arm and disconnect the block of wires from the wheel speed sensor.
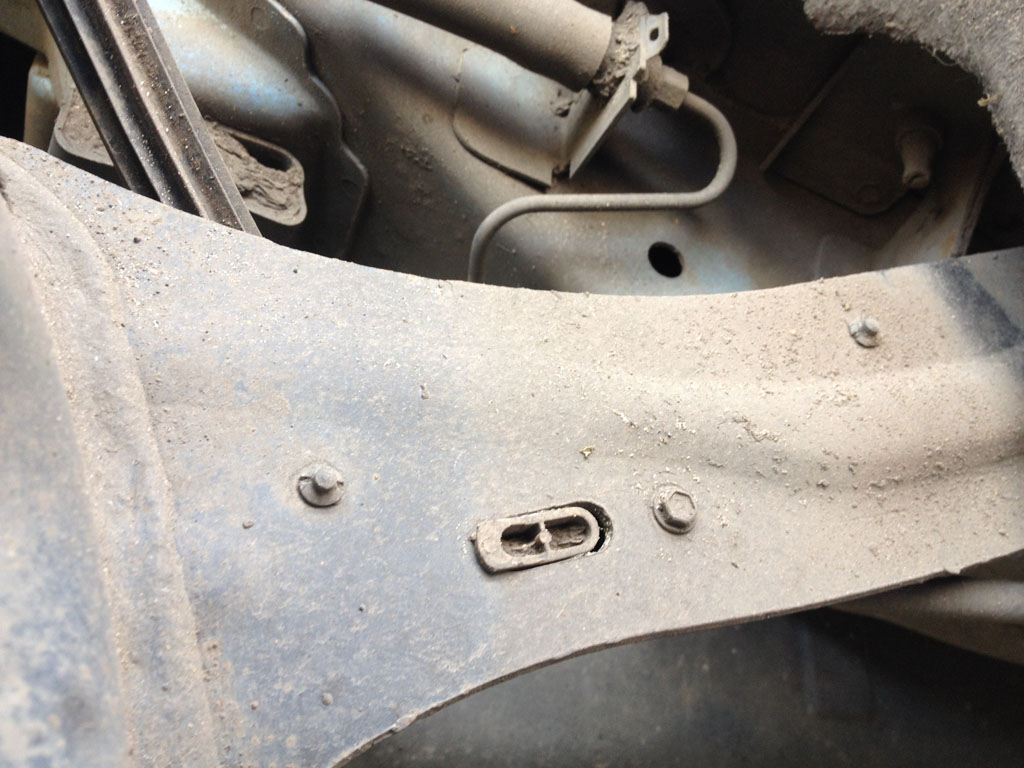
Using the "10" head, turn off the self-tapping screw for the cable sheath stop parking brake and remove the stop from the hole in the lever.
Disconnect the lower end of the shock absorber from the trailing arm and then disconnect the wishbones from the trailing arm.

Remove the hub assembly, then with the head "15" unscrew the two bolts securing the lever to the body and remove the trailing arm.
Install the new trailing arm in reverse order. An important point - finally tightening threaded connections in the "car on wheels" position (under load), this will extend the life of Ford Focus silent blocks.