Recently, the shower cabin is increasingly replacing the usual and familiar to everyone bathroom. After all, using a shower instead of splashing in 150 liters of expensive hot water is much cheaper. This can significantly save the family budget. And in small apartments, the installation of a shower stall also saves usable space, which is constantly in short supply.
One of the main elements of a shower cabin is a shower panel or shower rack. They come in a variety of designs, functionality and installation methods. We will tell you how to install shower racks with your own hands below.
Shower rack advantages
Very often, people who are going to make repairs in the bathroom are faced with a choice of what to install for themselves - a shower rack or limit themselves to a shower set. The latter usually consists of a wall mount to the shower head, an elongated shower hose, and a mill that is attached to the wall under the shower head. In comparison with such simple equipment, the shower rack has a number of undeniable advantages:
- The convenience of use. Thanks to the presence of a stand and a special bracket, the shower can be installed at any height, with any angle of inclination and angle of rotation. This allows you to adjust the direction of the water jet as it is convenient for the user, depending on his height.
- Improved functionality. A large number of pieces can be attached to the shower rack. additional equipment: hooks for washcloths, soap dishes, etc. In this case, you can choose the position of each of them individually, depending on the wishes of the owner.
- Ease of installation. There is nothing difficult in installing a shower rack. As a rule, detailed and understandable instructions for its installation are provided with each factory product. Even a novice master can easily do this.
In addition, shower racks are equipped with very high-tech devices, for example, thermostats, which can dose hot and cold water to reach a given temperature. Often several nozzles are mounted in the racks, thanks to which the effect of a hydromassage is created. It is thanks to all these positive aspects that shower racks are more popular than conventional shower heads. However, it is worth noting that the cost of the former is higher, and it changes depending on the level of functionality.

Types of shower racks
Currently, plumbing manufacturers can offer customers a large number of different models racks that differ not only in their design, but also in functionality. Among them are the following models:
- Stand with mixer. Great option for equipping an ordinary bathroom with a shower rack. It is a mixer into which a stainless steel pipe is handed. A watering can is installed on its tip. Often this pipe acts as a stand for another watering can, which is connected to the mixer through a flexible hose. This option is optimal, since buying all the items in a complex is always much cheaper than one at a time.
- Rack without mixer. It is a simple barbell that fits vertically. A bracket is attached to it to hold the shower head, which is connected to the mixer through a flexible hose.

- Shower column with a tap. This is not a very popular device, which is a rigid pipe with a shut-off valve installed on it. The latter allows you to quickly disconnect the shower head from the water, if necessary. However, there may be problems with connecting such a device to some mixers.
- A rack with an installed thermostat. A very useful thing. It allows you to mix cold and hot water in such proportions to achieve the desired temperature. A standard shower column or mixer can also be equipped with a thermostat, but choosing a thermostat for a specific model so that it works normally can be quite difficult. Therefore, if you plan to buy a mixer with a thermostat, it is better to give preference to the factory model. True, it is worth noting that the cost of devices that are equipped with thermostats is several times more expensive than conventional racks.
- Stand with spout. It is somewhat reminiscent of a shower rack with a mixer. At the beginning, a small spout is installed, thanks to which you can fill the bathroom with water. Such racks are used quite rarely. Few people want to pay for the spout, the use of which is very rare.
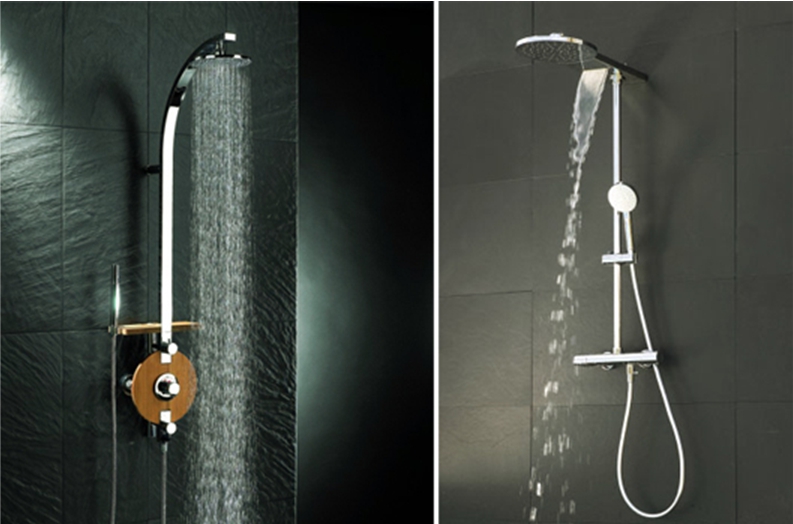
- Stand with overhead shower. Very popular models. The stand is a pipe at the end of which a stationary top watering can is installed. As a rule, it has a large diameter. A watering can on a flexible hose is suspended from such a rack on a bracket. The stationary top shower itself is not very comfortable, as it is not adjustable.
A large selection of different models and configurations allows you to choose a rack for specific operating conditions and personal preferences of the owner. When choosing a shower rack, you need to pay attention to the quality of its elements. It is better to give preference to trusted manufacturers, the quality of whose products there were no complaints. Shower racks aren't cheap, so waste your money on poor quality product, which can leak or lose its original appearance over time, it makes no sense. It is better to overpay a little for a proven product than to buy and install a new model after a short period of time.
How to install a shower rack in the bathroom with your own hands

The installation methods of the shower rack depend on the model configuration and its manufacturability. A simple shower column with bottom mixer is installed in the following order:
- First of all, the mixer connection points are mounted. This should be done in such a way that the cold and hot water holes are on the same axis. Otherwise, it will be difficult to install the mixer along its threads, and if a pipe is welded to it, then it will also be inclined to one side or the other. And the mixer installed crookedly will not look very aesthetically pleasing.
- A special strip is used to mount the mixer connection point. It is designed for standard mixer widths, so its use will greatly facilitate the installation process. The mixer is connected through special corners that are screwed to the bar with screws.
- From the bottom to the corners, pipes for supplying cold and hot water are fed, and from the front side, adapters with external threads are screwed into them, on which the mixer is installed. Each threaded connection must be sealed to prevent leakage. For this, ordinary tow or rubber tape is used. The choice of the seal depends on the owner, because they work equally effectively.

- Important: it is only necessary to wind the seal along the thread. Otherwise, it will simply peel off when twisted. Also, when installing the mixer, do not forget about the gaskets. The mixer is installed very simply; it is screwed to the adapters with the help of union nuts. This work is best done during repairs. Then all connections can be hidden behind a false plasterboard panel, on which ceramic tiles are then laid.
- When the mixer is installed, it is necessary to decide on what level the shower rack is attached. There is no universal mounting height for the shower rack. It depends on the height of the person who will use it. So, the highest point of raising the watering can holder above the floor level should be equal to the height of the person + the height of the bathroom leg (pallet) + 20 cm. In such conditions, the device can be used without any particular difficulties.
- It remains now to decide how to attach the shower rack to the wall. The standard model consists of two brackets and a bar. The fixings are fixed directly to the wall with two dowels. Fasteners are attached to the wall and holes for dowels are marked through the holes in them with a pencil or scribe. You need to install the rack already on the finished wall, on which there is a tile. Dowel holes are drilled with a diamond tipped drill. This must be done carefully, without too much pressure on the drill. Otherwise, the tiles may be damaged (they will just crack).
- When the holes are ready, you can screw the stand itself. This is done on ordinary self-tapping screws. Given that the bathroom high humidity, self-tapping screws must be made of stainless steel. Otherwise, they can rust and ruin the rack itself.
- After the stand is installed, it is necessary to mount a shower holder on it, which by its design resembles a clamp. It has nylon gaskets. They are needed so that the holder can slide on the rack, but with a certain effort. This structural element is tightened using a screw for a screwdriver or a hex wrench. The force should not be too strong so that the holder can move around the rack, but not too small so that it does not do it "on its own". After finishing work, it is necessary to check how the shower rack is connected at the time of the leak.
![]()
Recently, the so-called "hidden" racks have become very popular. In such models, almost all the main elements are behind the wall. From the wall you can only see the mixer valve handles and the switch between the two watering cans. As a rule, they use two watering cans: the first is large and stationary, the second is small on a flexible hose. One of the main features of such models is that they require special reliability of all connections. Otherwise, the neighbors below will be the first to notice the leak.
DIY shower rack installation: video
Wooden posts and racks are the main element of most structures of sheds, gazebos, pergolas, fences and other light structures on the site. We will tell you how to install them correctly so that they serve as long as possible.
Often, a pergola or a fence has to be repaired only because the wooden pillars buried in the ground, on which they are held, have rotted and crooked. To avoid such unpleasant phenomena, it is necessary to put wooden posts on anchors.
This even applies to poles after autoclave impregnation, not to mention those self-treated with bioprotective drugs. In this case, contact of the posts with the ground is excluded, which significantly increases their service life.
But if the pillars themselves are to be buried in the ground (which is much cheaper and less laborious), then the wood should be protected from the effects of moisture contained in the soil. So, after installing the post, it is better to fill the hole with gravel rather than with excavated soil.
For additional protection the lower part of the post in the area of \u200b\u200bthe ground surface can be wrapped with a film or roofing material.
Gate posts subject to high loads should be concreted.
All these protective measures concern only light timber structures - fences, small gazebos or pergolas.
Racks and posts for them can also be installed above the ground - for example, on U-shaped bearing shoes (anchors) made of galvanized steel. Anchor rods made of corrugated steel bars are poured into pits with concrete or cemented in ready-made concrete plinths.
All wooden posts that carry high loads, for example on the roof of semi-open garages, conservatories, should be installed on heavy anchors. The most common among them are H-shaped anchors, designed for posts with a thickness of 70-140 mm. Anchors are placed in the pits and poured with concrete or cemented in the holes of the finished concrete plinths. There are also anchors of other designs.
1. After installing the rack, it is better to fill the hole with gravel rather than with excavated soil.
2. The rack in the part that will be in the ground and slightly above it, before installation, is treated with biosecurity means and wrapped with a film or roofing material. The upper edge of the film is secured with perforated tape, staples or nails.
3. The protruding edges of the film or roofing felt can be covered with pieces of boards for greater reliability. The latter are treated with biosecurity means and screwed to the rack.
4. Wooden gate posts should be concreted in pits with dimensions of at least 30 x 30 x 60 cm. It is advisable to make a small blind area with a slope from the post above the ground level by the width of the concrete pour.
5. Widely used anchors for fastening posts and posts: at the top left - a light anchor with a width of 71 mm, next to it - an anchor with an adjustable width of up to 141 mm, to the right - a heavy anchor with a tubular rod and an anchor with two lintels 600 mm high, at the bottom - two anchors bolted to the base.
6. Ready-made concrete plinths. For the construction of lightweight structures, plinths with a height of 30, 40 or 50 cm are used, for heavy ones - 60 or 80 cm high.
7. When installing the anchor in the base, the base is installed in the ground, and then the anchor rod is inserted into the hole, placing pieces of bars under the anchor as a temporary support. After that, the anchor is poured with mortar.
8. A heavy anchor under a pillar of a pitched roof is suspended on two bars with a section of 35 * 35 mm and a length of 60 cm above the pit, after which it is poured with concrete.
9. Place a rack in the anchor, level it and fix it with a clamp. After that, through holes are drilled and the rack is bolted.
10. On the right - concrete plinths 80 cm high with a cavity for heavy anchors. On the left - ready-made concrete blocks with anchors mounted in them.
11. Galvanized steel anchor with base for fastening with dowels and bolts to a concrete slab.
12. The stand is placed in the anchor, set up using a level, then fastened.
Taking into account wind loads
For the construction of simple wooden structures, lightweight anchors are quite suitable. However, this only applies to racks for garden fences up to 1 m high, free-standing pergola racks and other light structures. When erecting structures subject to high wind loads, for example, screen walls with a height of about 180 cm, only heavy anchors should be used, including those installed in concrete plinths.
Anchors for the installation of wooden posts and poles - photo
Below are other entries on the topic "How to do it yourself - a householder!"
The condition of roads in the post-Soviet space is far from the best. This is confirmed by the need for regular replacement of shock absorbers on cars. If the operation is carried out at the service station, then there are no problems with this. As for those who decided to make repairs on their own, you need to know how to perform this operation correctly. The point is, you can't just take and install a new shock absorber. It must first be pumped over. Let's take a look at how to pump racks and why you need to do it. This information will help those who service their car on their own.
Why pump racks?
To begin with, the pumping process is an integral part of the process of replacing shock absorbers. This operation is necessary for the full and efficient operation of the entire suspension of the machine. If you do not pump the two-tube shock absorbers immediately before installing them, then during operation the operation of the strut piston may be disrupted. The most offensive thing about this is that if the car owner neglected or did not know how to pump the racks with his own hands, then even if there is a guarantee, it will not work to exchange the product. The reason is the violation of the installation rules. In the end, this is money wasted, as well as spoiled mood, which is even worse.
The swinging process of the shock absorber is required to activate this element. So, with the help of this process, the rack is brought to an optimal state for further operation. But that's not all. Bleeding allows you to remove oil or air that accumulates in the inside of the part. If pumping is neglected, then the rack may malfunction.  It should be emphasized that the process of replacing shock absorbers is not always done in this way. You only need to pre-activate the two-pipe stands. In one-pipe working fluid does not mix with air due to the presence of a separating piston in the system. But this is not the case on all cars.
Shock absorber device
This element is a body, which contains a rod, cylinder, seals, valve mechanisms. This device can be called one of the most important parts in the suspension of any car. Without these elements, it is simply impossible to drive a car normally. In the absence of struts, the body is constantly swinging in the vertical direction. The shock absorber acts as a damper that dampens vibrations of springs, springs or torsion bars.
During the pumping process, there is no difference in the type of shock absorber. If you know how to pump oil racks, then you can also work with other types of them.
Operating principle
It doesn't matter how the shock absorber works. All of them, regardless of the type, function on the same principle. This means that, regardless of the type, they need pumping. In the shock absorber chamber, the piston reciprocates. The piston has several holes. As the mechanism moves, the pressure in the chamber increases. By the way, it gets bigger when the car is moving at low speed.  Further, the working substance enters the part of the rack chamber where the pressure is much lower. As a result, the compression force is reduced. As a result, the piston moves along its path. After the oil reaches the end of the chamber, it will begin to flow to the other side. Meanwhile, the piston will begin to move in back side... Due to his work, fluctuations will be canceled.
Shock absorber types
Several types of these devices are used in the world of automobiles. They differ among themselves in the design and type of substances that are contained inside the body. Regardless of the type (oil or gas), shock absorbers have been working for several years. However on domestic roads they wear out more and fail earlier. Therefore, it is necessary to periodically change them. Saving on racks is not worth it. They are responsible for the safety of the car while driving. Due to serviceable racks, it decreases braking distances car. Some of the highest quality products are the Kayaba stands. It is a Japanese manufacturer that has been making shock absorbers for over 70 years. Now average cost one rack is 4800 rubles. Motorists say they are the toughest.
Oil shock absorber
These are the most popular items. They can be found in the suspension of most cars. These devices are affordable. They are as reliable and comfortable as possible.  Use them only on passenger cars, but they are designed for ordinary urban conditions.
Gas-oil systems
These are also quite popular options among motorists. They have differences in performance compared to oil counterparts. So, car owners say they are tougher. However, this disadvantage is easily compensated for. complete absence the risk of oil boiling during operation. Initially, the gas-oil shock absorber was intended for off-road driving. But today, car enthusiasts use them in the city as well.
Gas
These are the most severe types of all existing ones. At the same time, gas struts are the most resistant to any road obstacles. The peculiarity of this type is that during the movement the car will always be stable. Among the disadvantages are low level comfort. This is due to the high rigidity of each element of this structure.
One- and two-pipe mechanism
Before I tell you how to pump shock absorber struts, you need to find out the difference between the types of racks. Two-pipe solutions are considered to be the simplest and most widespread. Gas or oil is used as a working substance. The main drawback in these models is considered to be poor cooling. The oil gets very hot due to the small volume of the chamber. High temperatures lead to foaming. This violates correct work racks. Therefore, you need to know how to pump front struts and back.  Gas-oil racks are partially protected from foaming. Air and oil are pumped into the body of two pipes. The first is pumped under low pressure. Sometimes nitrogen is used as a gas. This solution reduces the risk of foaming.
The design of one-pipe racks does not have a working chamber. The body itself acts as it. The tube is divided into two parts. At the top is oil. At the bottom - gas under pressure. A special valve is installed between the sections. Also, do not forget about the McPherson stands. These are upside-down monotube shock absorber struts.
About installing shock absorbers without bleeding
The pumping process allows the oil to be evenly distributed in the rack cylinder. This normalizes blood pressure. The effect will be in any type of shock absorber. Most car owners ask themselves the question: "Is it possible to complete the installation without performing pumping?" ![]() Yes, you can. But if you do not pump it, the rubber parts on the piston will quickly fail during operation. The reason is critical pressure drops. Bleeding can also diagnose the condition of the rack.
Yes, you can. But if you do not pump it, the rubber parts on the piston will quickly fail during operation. The reason is critical pressure drops. Bleeding can also diagnose the condition of the rack.
How to bleed the racks before installing? Mechanism diagnostics
Before installing collapsible oil elements, you must first disassemble the element. Make sure there is enough liquid inside. Top up with spindle oil if necessary. Naturally, specialty lubricants are also sold. If the shock absorber rod is pulled out, then the oil level should be at the level of the upper retaining nut. Then dismantle the cylinder. If a cartridge is installed in the rack, then it will not be possible to disassemble and diagnose it. Here, if it malfunctions, only a replacement for a new one. Car enthusiasts highly praise the Kayaba stands.  So, when the cylinder is dismantled, the piston and valve are inspected. There should be no distortions here. If there are broken rubber elements and springs, they are replaced. The oil should be free of dirt, dust, air bubbles. Dirty oil must be replaced. It is better to rinse the cylinder body thoroughly with diesel fuel.
Leveling: step by step instructions
Let's take a look at how to bleed the struts before installing them on the vehicle. This procedure may well be done by hand. The stand is installed with its stem pointing up. Further, the shock absorber gently compresses until the surface of the rod approaches the glass. The mechanism then lingers at the level for 2-3 seconds. If it is necessary to exert great effort to compress, then you can use special devices.  Then the rod is pulled out until it returns to its normal state. The main thing in this business is smoothness. It is important to perform the operation, excluding sudden movements. Then this algorithm is repeated. Usually two times are enough. This is about how to upgrade new stances. At the final stage, the rod is pulled up sharply. If the damper is working properly, then the part will run without failures. The stem should point up. The suspension element is then ready for installation and operation. Here's how to level up the racks. As you can see, this procedure is really extremely simple. But, despite its simplicity, a lot depends on it.
Working with other types of shock absorbers
Often, non-bleed shock absorbers are two-tube parts. It is believed that this operation is not necessary at all for a one-pipe device, since there is gas inside it under high pressure... Indeed, experts say that you do not need to pump them. This will not affect road safety and shock absorber life. But if the car enthusiast is confident and knows how to pump this type of racks, then he will not harm the element.
About the rules for pumping shock absorbers
Car service specialists say there are certain rules that must be followed. It is important that the stem always points upwards. Once the process is complete, the device must not be turned over. It is necessary that the element be in this position until it is installed.
Most models are equipped with drainage systems for excess oil. Here events can develop according to two scenarios. How to pump the racks in this case? Do not push the stem all the way down or use a special groove. So, the compression is carried out strictly to the groove.
Conclusion
So, we figured out how to upgrade old racks and new ones. I must say that pumping is important process... Therefore, when buying a new shock absorber, you need to make sure if it is needed for a particular shock absorber model. We hope we have helped you understand this difficult issue.
Stainless steel fences have firmly entered our daily life, where we often do not even notice these familiar details, but a person faced with their installation, purchase, will ask the question: how to fix such fences? With the help of what, where? This article will answer these and other questions. So, we present to your attention the 8th method of fastening stainless steel fences: 4 options for fastening in a step and 4 options for side fastening of fences in the end of the stairs. The choice of fastening will depend on the installation site, the specific situation. The specialists of MetallKovStroy LLC will help you choose the most convenient, simple and economical installation option.
The distance between the posts (vertical guides of the fences), as a rule, is 800-1200 mm, and is due to the load-bearing capacity of the stainless steel fence, when using posts made of d-38.1 x 1.5 mm pipe, and a handrail made of 50.8 x 1.5 mm pipe.
Side attachment of stainless steel guardrail posts: 1st method of attachment:
Perfectly suits in cases where a small overhang of the fence posts from the concrete base is required, which is done using a sleeve with a diameter of 12 mm. The first step is to drill a hole with a puncher with a diameter of 10 mm, so that the expansion anchors, through the sleeves, are fixed in the hole. The optimal length for the anchor is 130 mm. The expansion anchor is perfect for fastening fence posts, the essence of its action is as follows, when you start to tighten the cap nut, the end of the metal rod begins to open and abuts against the concrete, the more the nut is tightened, the more secure the hardware is. The joint between the sleeve and the concrete base is closed � decorative covers from stainless steel � 3mm.
Side attachment of guardrail posts� stainless steel: �2nd method of fastening:
![]()
Fencing post with a diameter of 38.1 mm. it is tightly fixed in the finished side mount made of stainless steel AISI304� (sc98), then 2 holes are drilled with a 10 mm perforator, then with 10 mm expansion anchors, the fence post is attached together with sc98 close to the stairs. You can always purchase the side mount sc98 from Us. The optimal length for the anchor is 130 mm. The expansion anchor is perfect for fastening the rack, the essence of its action is as follows, when you start tightening the cap nut, the end of the metal rod begins to open and abut against the concrete, the more the nut is tightened, the more securely the hardware is attached.
Side attachment of stainless steel guardrail posts: 3rd method of attachment:

Option where the post is firmly attached to the concrete base using 2 expansion anchors. To attach the guardrail post, a hole 120 mm deep must be drilled. The Expansion Anchor is perfect for securing the post. The only problem that you may face in the future is that it is very difficult to remove this structure.
Side attachment of stainless steel guardrail posts: 4th method of attachment:
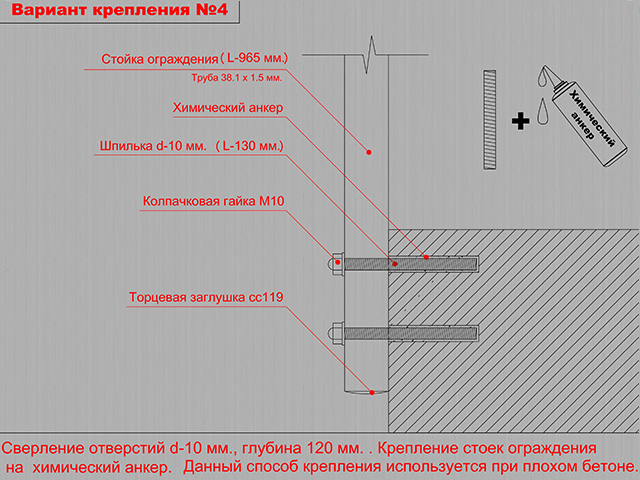
This method of fastening the fence is excellent for poor concrete. Holes with a diameter of 10 mm and a depth of 120 mm are drilled. The holes are thoroughly cleaned, and then a chemical anchor is inserted, the mixture is injected to the bottom of the drilled hole, immediately after that a pin is inserted with rotary movements, which starts working after the solution has hardened.
Fastening the fence posts into the step�stainless steel:� 1st method of fastening:

The most reliable and powerful way to attach stainless steel fences. Our specialists have the opportunity to carry out such work after finishing, without fear of ruining or damaging it. This method requires a drilling rig to make a hole with a diameter of 50 mm. and a depth of 120 mm. The drilling depth can vary, the deeper the pipe is fixed, the tighter the fence will be fixed, the drilling depth is 120 mm. is optimal and sufficient for the depth of the fence post. The stand is fixed on Ceresit CX 5 - frost-resistant, waterproof compound, does not corrode the pipe, the onset of setting occurs within 5 minutes, which makes it possible to install a large volume of the fence in a short time. From above, the joint is closed with a decorative cover (ss97).
Fastening of stainless steel fence posts into the step. 2nd method of fastening:

The fence post is welded to the flange in our production, to a decorative cover (ss97a) with three holes for 3 anchors. 3 holes are drilled, cleaned, and the post is secured with 110 mm long anchor bolts. The process is not difficult, considering that the post will be welded in advance. The expansion anchor is perfect for fastening the rack, the essence of its action is as follows, when you start tightening the cap nut, the end of the metal rod begins to open and abut against the concrete, the more the nut is tightened, the more securely the hardware is attached. In this version of the fence, the stud will fit already with a diameter of 8 mm. and the depth of occurrence will be less because anchors 3 pcs.
Fastening of stainless steel fence posts into the step. 3rd method of fastening: