In a car, the main source of electricity is the generator. If the generator is faulty, the battery is not recharged. As a result, electrical appliances are gradually de-energized, making it impossible for the car to continue. further movement... That is why it is very important to always monitor the performance of this most important automotive unit.
A malfunctioning generator can manifest itself different ways... If suddenly there are extraneous noises in the unit, or the battery is not fully charged or not at all, then all these signs indicate a possible imminent failure of this device.
You need to pay attention to the generator, for example, in this case, if nothing happened when you tried to start the car, and you lit a cigarette from another vehicle... Then they drove a certain distance, and after stopping when trying to start the car engine again, you failed again. In such a situation, it is possible that the generator is out of order and does not charge the battery, or the battery itself has served its purpose. Another reason could be a blown battery charging fuse.
Identifying generator mechanical faults
There is nothing difficult here. If heard extraneous noise, hum, whistle, then this may be a sign of failure of the bearings that are inside the generator. They must be checked for wear and tear. If this is confirmed by visual inspection, then they should be replaced with new ones. Generally, the cost of generator bearings is not very high.
In addition to bearings, noise can occur due to turn-to-turn faults in the windings of the solenoid relay or stator. Shorting the windings to the case can also cause abnormal noise. Generally speaking, with the mechanical interaction of various elements of the generator, during its operation, an unpleasant sound appears. Such malfunctions can be detected by visual inspection of the generator, since such interaction of parts must leave traces. After assessing the severity of the malfunction, it will be possible to conclude about the maintainability of the generator. But the listed defects are not the only ones.
As a result of checking the output voltage of the generator, it is possible to establish the degree of its operability and find out the reasons for the failure. For this procedure, a voltmeter connected to the battery poles is most often used. Sometimes, but less often, a multimeter or ohmmeter is used. The terminal voltage must be within 8 V when starting the engine. It is advisable to make such measurements on a warm engine.
Then it is necessary to increase the engine speed to 3000 in order to activate the battery charging process and again measure the voltage at the battery terminals. If the voltmeter reads below 12.5 V, then charging the battery is not enough, and you should think about repairing the generator.
Before dismantling the faulty generator, disconnect the ground terminal from the battery. Then, with a screwdriver, you need to unscrew the fasteners from the voltage regulator. Further, after dismantling the generator, it is imperative to visually inspect it, before further more thorough diagnostics. During this, it is necessary to clean the slip rings from carbon deposits, if any, and also assess the wear of the generator brushes. One of frequent reasons a generator breakdown is a failure of the voltage regulator. It is recommended to change it periodically, without waiting for the expiration date.

The generator is installed in place at reverse order... After completing the installation of the generator, you need to connect the ground terminal to the battery. When the generator is mounted in its place, you need to start the car engine again and raise the speed to 3000 per minute. If the voltmeter readings are at least 13.5 V, then this means that the generator malfunction has been eliminated.
Further, without turning off the engine, you need to check the voltage stabilization. For this simple procedure, you must enable car lights into mode high beam and measure the voltage again. If the deviations of the voltmeter readings do not exceed 0.4 V from the previously obtained results, then there is nothing to worry about. As can be seen from the above, all these procedures are quite capable of performing any motorist with standard set tools, skills in their use and a voltmeter.

It is possible to check the automotive energy saving circuit using various measuring instruments. In order to check the diode bridge, you need to connect a voltmeter to the "ground" and the terminal of the generator. A voltage indicator exceeding the 0.5 V mark will indicate a malfunction of the diodes. To determine their breakdown, it is necessary to connect a voltmeter to the disconnected wire of the generator and to the "30" terminal. If the current reading does not exceed 5 mA, then everything is in order.
To check the voltage regulator, you must first warm up the engine for 15 minutes with the headlights on. Then, using a voltmeter, you need to measure the voltage at the output "30" and at the "ground". Indications for different cars differ. Additionally, you can check adjustable voltage car. To do this correctly, it is necessary to turn on all devices that consume energy, and raise the engine speed closer to maximum. For each vehicle modification, these results will be individual.
In order to check the resistance in the field winding, a multimeter or ohmmeter is used. First you need to dismantle the brush holder and voltage regulator. Then, after making sure that there is no damage to the winding, it is necessary to clean the slip rings, since the contacts measuring instrument during the test, the resistances are joined to them. Indicators of 5-10 ohms are considered within the normal range.
A multimeter will help check for a short to ground. To do this, one of its probe must be connected to the slip ring, and the second to the stator of the generator. If there is no short circuit, then the resistance on the multimeter will show infinitely high.
As you can see from the above, you can diagnose the generator and eliminate many of its malfunctions with your own hands. For more complex repairs, it is better to contact specialists at certified service stations.
The generator in the car is its "onboard power plant", that is, the main source of electricity.
In the event of a breakdown, the battery can become such a source for a while, but without a generator, the car's electrical equipment cannot work normally.
If signs of malfunction of the generator and the regulator relay appear, they are checked.
Precautions and rules when checking
In order not to damage the generator, rectifier bridge diodes and regulator relay, you need to be careful and follow some rules.
1. Never test the generator's performance using the “spark” method, that is, by short-circuit.
2. Do not connect terminal "30" (it can be designated as "B +") with "mass" or terminal 67 ("D +"). Do not allow the generator to operate with the consumers turned off, this is especially dangerous for the generator if the battery is disconnected.
3. Check the generator's performance using a voltmeter and an ammeter. The generator valves are checked with a voltage of not more than 12 V.
4. When performing welding work on the car body, disconnect the wires from the battery and generator.
5. When replacing the wiring in the generator system, new wires must be selected with the same cross-section and the same length as the "native" wires.
6. Before starting the inspection, make sure all connections are in good condition and tension is correct. When you press the middle of the belt with your thumb, it should push no more than 10-15 mm.
Checking in the car's power supply system
To test the voltage regulator You will need a voltmeter with a scale of 0 to 15 V. Before checking, the car engine should be run for about 15 minutes at medium speed with the headlights on.
Measure the voltage between the terminals "30" ("B +") and the "mass" of the generator. The voltmeter should show normal for this car voltage (for example, for VAZ "eight" and "nine" it is 13.5 - 14.6 V).
If the voltage is abnormal, then the regulator will most likely need to be replaced.
You can also check the regulated voltage by connecting a voltmeter directly to the battery terminals, but the results of such a check can be considered reliable if there is confidence that the wiring is working properly.
In this case, the engine must operate at a speed close to maximum and the headlights and other consumers must be turned on. The voltage value must match the specific value for the given vehicle.
To test a diode bridge connect a multimeter or voltmeter to the terminal "30" ("B +") of the generator and to "mass", in the mode of measuring alternating current. The AC voltage should not be more than 0.5 V. If the voltage is higher, then the diodes are faulty.
To check the breakdown to "ground", you need to disconnect the battery and disconnect from the generator the wire going to the terminal "30" ("B +"). Next, you need to connect the device between the disconnected generator wire and terminal "30" ("B +"). If the device shows a discharge current of more than 0.5 mA, then a breakdown of the insulation of the generator windings or diodes is possible.
Recoil current The generator can be checked using a special probe - this is such an addition to the multimeter, in the form of a clamp or clamp, which covers the wire, and thus measure the current flowing through the wire.

1. To measure the recoil current - cover with the probe the wire going to the “30” (“B +”) terminal. Start the motor - during the measurement, it should run on high revs... Turn on the main electrical consumers one by one, and read the readings of the device separately for each consumer.
2. After that, you need to summarize these readings. Next, you need to turn on all the consumers at the same time and take the readings of the multimeter - this value should not be more than 5 A less than the sum of the readings, when the consumers are switched on alternately.
3. To check the excitation current of the generator, you need to start the engine and let it run on high revs... Next, you need to place the measuring probe around the wire connected to terminal 67 ("D +"). The device will show the magnitude of the excitation current - in a working generator it is equal to 3-7 A.
To check the field windings you will have to remove the voltage regulator and the brush holder.
If necessary, clean the slip rings, and make sure that there are no breaks in the winding and that there is no short to ground. To check, use an ohmmeter, applying its probes to the slip rings, while the resistance should be about 5-10 ohms.
Next, connect one probe of the device to any slip ring, and the other to the stator of the generator. The multimeter should show infinitely high resistance. If this is not the case, then the excitation winding shorts to ground.
Here are some of the simplest measurement principles that can be done with a multimeter:
Video: how to check the diode bridge of the generator.
Checking the generator with a multimeter - video:
How to properly check the generator on the car:
This article was written not only for car enthusiasts who prefer to repair a car with their own hands, but also, this information will be useful to all car owners to keep up with the topic. Good luck!
Before answering the question that brought you to this page: how to check the generator with a multimeter? - I would like to recall the role of this vehicle unit.
A car generator is that technical unit of a car, thanks to which we can not only move from point A to point B, but do it with comfort and safety. It is undeniable that electricity has entered our life very tightly and without it we are sometimes very uncomfortable. And, to be honest, it would hardly be modern car went somewhere without electricity at all. Too many systems won't work without it.
For those who remembered about the battery, I will only answer that in cars with an engine internal combustion, the battery is created primarily for starting the engine, and without constant energy supply from the generator, it will not pull for a long time.
Why did I remember all this? And in order to remind you that such vital elements of the performance of your car should be under the primary control. After all, nothing is eternal.
Well, in order to check the generator's performance, so to speak, to carry out its express testing, you will need a multimeter - a multifunctional device for measuring voltage, current, resistance, etc. In our case, you only need one of its main functions - voltage measurement.
How to check the generator voltage with a multimeter?
So let's get started.
First, we open the hood or another place where you have the battery and measure its voltage when the engine is not running. If it is about 12.6 V and higher, then, most likely, everything is in order with your battery, and if it is less (12.3 V - for example), then this will indicate a discharged battery, which is an indirect sign of problems with the generator.

However, not always only the generator can be to blame for this, sometimes the battery itself needs to be replaced.
Let's move on. We start the engine, warm it up to operating temperature. For those who do not know how to determine this moment, I will note that the radiator fan that has turned on once will inform you about this (provided that it is not winter with very low temperatures).
We measure again the voltage on the battery, under the following conditions: the engine is running on idle, all electrical consumers are turned off, and everything that can be turned off must be de-energized. The reading of the multimeter in this situation should be about 14 V.

Without lowering the engine speed, we first turn on the headlights of the car, controlling the voltage drop, then add other powerful consumers to the headlights, such as heating windows, mirrors, seats, blowing, etc. There is only one condition here: we turn on, only standard systems, so if you yourself equipped the car with a powerful stereo system, then you should not turn it on at the time of diagnosis.
After turning on all basic electrical consumers, the voltage shown by the multimeter should not fall below the 13 V mark.
If everything is normal and when checking with the consumers turned off, the voltage did not greatly exceed 14 V, your generator is in good condition and supplies the required voltage. If not, then there is a malfunction somewhere and it must be identified. How? The topic of a separate material.
Finally, a few words about why, when I talked about turning on consumers, I emphasized that only standard electronics should be turned on. The answer is simple. The fact is that the automaker, when installing a generator on the car, selects such a model of it that will provide regular electrical preparation with a small margin. Therefore, if you have independently installed a powerful stereo system with a separate amplifier and powerful acoustics, then it is far from a fact that even a working generator will draw out all this power. Accordingly, the sagging voltage below 13 V during the operation of electrical consumers installed by someone other than the manufacturer does not mean that the generator is faulty.
Posted April 7, 2015 6:53 pm UTC by Vladimir
We all know and perfectly understand that the generator for any car is an important and responsible unit. His work must be flawless. If there are problems with this element, then you need to know how to check the generator. Of course, you can simply contact the service, of which there are more than enough today. This article is for those who are trying to understand their car and do something with their own hands. Not a single car is insured against breakdowns, even if it is an expensive and prestigious foreign car.
Signs of a generator breakdown - diagnostics
Generator breakdowns can be of a different nature and they also manifest themselves in different ways. First of all, attention should be paid to the generator if there are problems with or extraneous noise is emitted. Mechanical problems are most easily identified. They can be expressed in whistles, squeals, noises, etc. The reason in this case is the bearing. Maybe it will be enough to simply lubricate it, or it may have to be replaced with severe wear. But it is not only the bearings that can be the case if there is noise and howling. The problem may be associated with a short circuit in the windings of both the traction relay and the stator. A short to ground is also possible.
Checking the generator with a multimeter
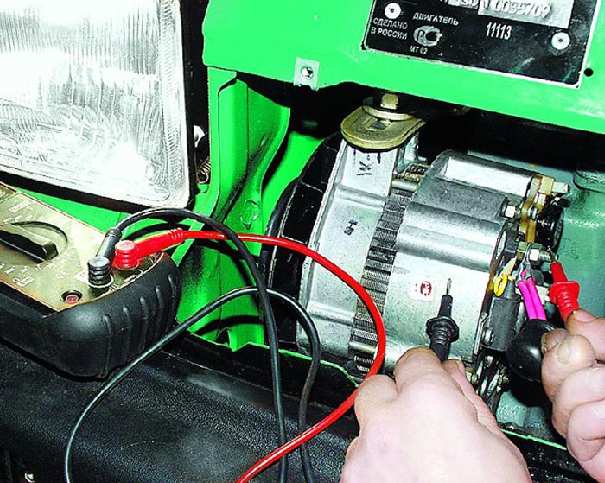
The generator's performance can be checked without removing it from the car using a multimeter by connecting the test leads from the device to the battery. With the engine turned off, the voltage on the battery should be about 12.6 V. If these readings are less, then the battery should be charged. Next, we start the engine. With an increase in speed, the charge voltage should increase and settle within 14.5 V. If there is no battery charge, then the generator requires repair.
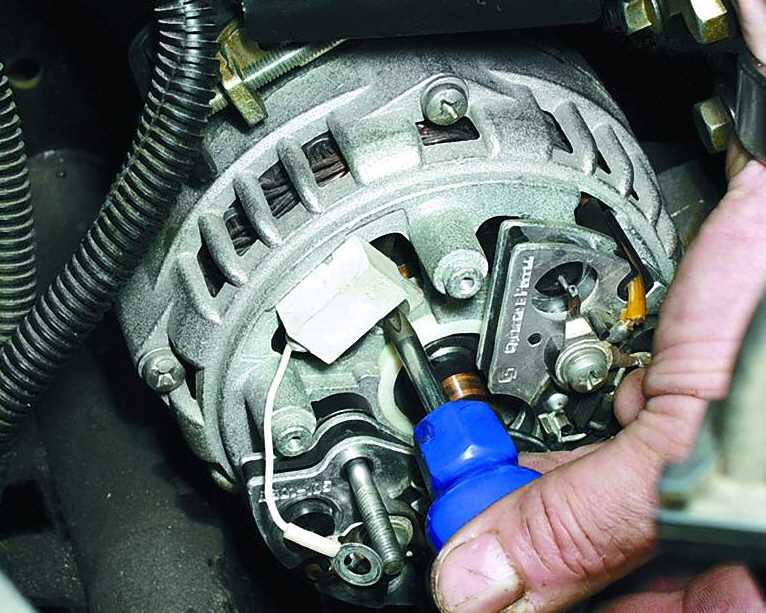
Dismantling the generator
After the generator has been checked on the car, we proceed to dismantle it. To do this, you will need to disconnect the negative terminal of the battery. Next, remove the voltage regulator. Perform a visual inspection before disassembling the generator. This applies to slip rings and brushes. They may have heavy wear or carbon deposits. In the case of carbon deposits, grind the slip rings.

Quite often, problems with the generator are associated with the voltage regulator. It is better to keep this part in stock and carry it with you, it will not take up much space, but it will save time, money and nerves. How to check the voltage regulator is discussed below. If the problem was in it, then we change the part to a new one, and install the generator in its place. By the way, depending on the car brand, you may not need to remove the generator to replace the voltage regulator. After that, we start the engine again and check its performance with a multimeter. As already mentioned, the normal charging voltage should be up to 14.5 V.
Checking the electrical part of the generator
Voltage regulator. It is quite easy to check this element. This requires an external power supply with an adjustable voltage from 12 V to 16 V. To check the relay-regulator, the power supply is connected with a positive wire to the output contact, and a negative wire to ground. A load in the form of a 12 V car bulb with a power of 1-3 watts will be connected directly to the brushes. By gradually increasing the supply voltage, the lamp should go out. As a rule, this should happen when reaching 14.5 V. In this case, the regulator is considered to be in good working order. In the event that the lamp does not go out with increasing voltage, it means that there is an open circuit in the regulator, possibly between the brushes and the regulator terminals.

Diode bridge. In the diode bridge of the generator, diodes can fail, which is usually associated with the ingress of water or in the process "". To check the diode bridge of the generator, a multimeter will come to the rescue again. Remove the diode bridge from the generator. You will have to check each diode separately. Set the multimeter to “ring”, ie. when it is possible to determine k / z. You can also select a position to test diodes or just 1 kΩ. With the probes of the device we touch the terminals of the diode, then we change the probes in places.
When measuring in one direction, the device should show resistance from 400 to 800 Ohm, in the other there should be no readings. In this case, the diode is considered good. If the device does not show resistance in one and the other direction, then this indicates a break in the diode. If the resistance is too small in comparison with the indicated one, or in both directions is the same, then the diode is broken. A defective diode must be replaced. If it is not possible to replace it, then you will have to change the diode bridge.

Excitation windings. When checking the car generator with a multimeter, we determine the resistance of the excitation winding. To do this, touch the slip rings with the probes. A reading of 5-10 ohms is considered normal. To check whether there is a short to ground or not, you can attach the probe of the device to the stator of the generator, the second you need to touch the slip ring. If there is no short circuit, then the readings of the device will be infinite, i.e. for a multimeter it will be “1”.

How to check the excitation current of the generator
To check the excitation current, you will need a multimeter with a clamp and an additional pair of hands (assistant):
- We start the engine and bring the rpm up to 3000 rpm.
- Select the current measurement mode on the device and place the excitation wire (“67” or “D +”) inside the clamp. The multimeter reading is the excitation current. With a working generator, the current should be within 3-7 A.
How to check the recoil current
You will need a clamp meter again. The procedure is similar to the previous one:
- We start the engine and increase the revs.
- With the help of pliers, you need to grasp the wire going to contact “30” or “B +”.
- It is necessary in turn to turn on the energy consumers in the car and record the readings of the device, i.e. turned on the dipped beam - recorded it, turned it off. Then they turned on the distant one - recorded it, turned it off, the heater, etc.
- We count the readings by summing them up.
- Next, you need to turn on all consumers and record the readings of the device.
- We compare the readings - they should not differ by more than 5 A.
How to avoid generator problems
To prevent problems with the generator from catching you by surprise, you must adhere to the following recommendations:

- check the tension of the alternator belt from time to time;
- periodically it is necessary to clean and tighten the contacts in the car wiring. Indeed, moisture, whatever one may say, gets into the engine compartment;
- if the battery indicator lights up, you need to take measures to troubleshoot the malfunction, and as quickly as possible;
- if welding is performed on the car body, it is required to remove the terminals from the generator and battery.
Check car generator at home is not difficult. If repair is required, depending on the breakdown, then you may need special tool... In any case, everyone decides for himself - to repair the car himself or go to the service station.
How to check a car generator with your own hands
The generator plays a very important role in the car, for the engine it is like a mini power plant that supplies the entire on-board network of the car, including the battery (accumulator). A generator malfunction will lead to an inevitable complete discharge of the battery, after which the engine of your car will simply stop working, as will the whole onboard network... As a result, you will have to "light" your car or look for a new source of energy. It is very important to detect a generator malfunction in time in order to prevent the above scenario. In order to diagnose the generator, you need to have certain skills and tools. In this article, I will tell you how to test a generator at home using a multimeter.
First, about the precautions and safety rules during the check
You need to be extremely careful and understand what you are doing in order not to accidentally damage the generator or its parts (relay regulator, rectifier bridge diodes).
Prohibited:
Check the generator's performance by checking it "for a spark", that is, by the short circuit method.
Connect terminal "30" (sometimes referred to as "B +") to terminal 67 ("D +") or ground.
Allow the generator to operate with switched off consumers, for example, when disconnecting it from the battery.
Check generator valves with voltages above 12 V.
You can and should:
Check the generator for serviceability with a voltmeter or ammeter.
When welding on the car body, it is necessary to disconnect the wires from the generator and the battery.
When replacing wiring in the generator system, the wires must have the same cross section and length as the "native" wires.
Before checking the alternator, make sure that the alternator belt is correctly tensioned, as well as that all connections and terminals are in good condition. The belt tension is considered normal, in which pressing the middle of the belt with your thumb, it will bend by no more than 10-15 mm.
Do-it-yourself car generator check
To check the voltage regulator, you need a voltmeter with a scale from 0 to 15 V. Before starting the test, let the motor run at medium speed with the headlights on for about 15 minutes. Check the voltage between the "mass" of the generator and the terminals "30" ("V +"), on the voltmeter you should have a voltage normal for your car (for owners of a "nine", for example, the voltage is considered normal - 13.5 - 14.6 V ). If the voltage is higher or lower than the one set by the manufacturer, you will most likely have to replace the regulator. It will not be superfluous to also check the regulated voltage, for this, connect a voltmeter directly to the battery terminals. True, the results of such a check cannot be considered 100% correct, because there is a possibility of wiring problems. If you are confident that the wiring is correct, then the results can be trusted. The engine must operate at high revs, which are close to maximum, headlights and other electrical consumers of the car must be on. The voltage size should match the parameters of your car.
Diode bridge
The diode bridge test refers to a set of generator tests. In order to check the diode bridge, connect a voltmeter or multimeter to the terminal "30" ("B +") of the generator, as well as to "ground", and turn on the device in the mode of measuring alternating current. Alternating current on the diode bridge should not exceed 0.5 V, if you have more - most likely the diodes are faulty.
Breakdown to ground
Checking the penetration for "mass" will not be superfluous if "the gene composts the brain." To do this, you need to disable battery and a generator wire that goes to terminal "30" ("B +"). Then connect the device between terminal "30" ("B +") and the disconnected wire of the generator. We look at the readings - if the discharge current on the device exceeds 0.5 mA, most likely there is a breakdown of the diodes or insulation of the generator windings.
Recoil current
The generator's recoil current is checked using a special probe (a "lotion" addition to a multimeter in the form of a clamp or clamps), which the wire is covered with, thereby measuring the current flowing through the wire.
To check the recoil current, you need to grasp the wire with a probe that goes to the "30" ("B +") terminal.
Start the engine - during the measurement, it should run at high rpm.
Turn on the power consumers in turn and read the readings of the device separately for each consumer.
At the end of the measurements, you need to calculate the sum of the readings. Next, turn on all consumers (which you turned on one by one) at the same time and measure the readings of the multimeter. The value should not be less than the sum of the readings of the separately measured indicators, the permissible discrepancy is 5 A.
The generator excitation current check is performed by starting the engine and then running it at high rpm. The probe is then placed around the wire leading to terminal 67 ("D +"). A working generator should show the value of the excitation current - equal to 3-7 A.
Checking the winding
To check the field windings, you will need to remove the voltage regulator, as well as the brush holder. If necessary, clean the slip rings and check the winding for breaks and short circuits to ground. It is necessary to check with an ohmmeter, its probes are applied to the slip rings, after which readings are taken. The resistance should be between 5 and 10 ohms. Then connect one electrode of the device to any of the slip rings, and the other to the stator of the generator. The display should show an infinitely high resistance, otherwise - the excitation winding somewhere shorts to ground.