The guys made a cool car. Half Victory, Half Bat Mobile!


August 2008 ...
Crown was taken 93 onwards. 3 liters, automatic. At first, it was planned to make a project Muscovite 401, casts were made from the native body, expanded, lengthened in proportions. As a result, it turned out like a Muscovite, but only of a larger size. After estimating the body, measuring the proportions, and thinking - how will it look ?! - the conclusion that the body of the Muscovite does not channel to the base of the crown, it is necessary to strongly move the motor shield back, and this entails a lot of moments - for which it was not planned to waste time.
… As a result, the body was removed and began to think what to stir up… some kind of sedan with a stylish design was needed…
i remembered that a couple of years ago I came across interesting car... started looking on the Internet, found it, it turned out to be Holden Effiji and in a similar sense Lincoln marshmallow - but he did not like the performance of the front end ... they began to make the body shape according to the Holden concept ... the painstaking work of creating a body layout began ... polyurethane foam, pieces of plastic, cut off crown roof, plaster ... veins, cartilage, horns, hooves ... etc ...
the form was made, evaluated from different angles - proportions, what is missing, what can be added ... something was removed, something was added again ...
... the result of three months of work, pasted over with fiberglass under the rough and from putty under the rough ...


- implementation of the project in 2009-2010.
- Custom car, based on Toyota crown 93 onwards:
Manufactured composite body in the style of the 60s on the theme of the Volga gas 21 in modern processing and installed on load-bearing body and the frame of the Toyota Crown car, as a design, similar foreign projects were taken and processed: Holden Effidzhi, Lincoln Zephyr, etc.,
- compartment, iron doors from hr-v were redone,
- headlights from G-Wagen,
- the rear ones are made on the basis of the LED matrix headlights from the Camaro
- painting in ruby \u200b\u200bcolor,
- installed motor 2jz-gte,
- mechanics r154,
- turbine under 450 hp,
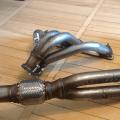
- exhaust manifold,
- wastegate,
- bluoff hks,
- intercooler,
- oil cooler with filter removal,
- pump high blood pressure valbro,
- fuel pressure control,
- oil catcher,
- titanium release by 90,
- polyurethane suspension,
- stiffer gas-a-just shock absorbers,
- lowered springs RS-R,
- front brakes with "tourer-in",
- "torsen" gearbox,
- organic adhesion,
- reinforced basket,
- American wheels ULTRA 15, before 235/60, back 275/60,
… There were plans to completely rewire the interior of leather and alcantara, but so far work on the interior has been suspended for an indefinite period (only the dashboard and front seats have been ready and retightened, a center console with an armrest has been made). sports steering wheel, pedals, gear knobs and handbrake, sensors: boost, oil temperature, oil pressure, coolant temperature. liquids, air / fuel ratio, voltmeter, speedometer, tachometer, front seats from supra 70, car audio installation: pioneer head with DVD, three-way front "signat", 2 amplifiers "genius" "ZP", subwoofer "PG-xenon" 1, 2 kW, helium battery, 1.5 F. capacitor.
Characteristics:
- body length 5 meters,
- the width of the front arches 195 cm,
- width along the rear arches 205 cm,
- height (on the roof) 124 cm,
- krillins (on low springs) 12 cm,
- overhang of the front part from the front axle 65 cm,
- rear overhang from the rear axle 140 cm,
- weight 1750 kg. (complete with gluing and musical equipment)
According to the database
- Engine 3.0 (370 hp)
- 1993 car, purchased in 2007


Nowadays, it's hard to surprise some new model car, but here vehiclehand-made has always attracted attention and excitement. A person who makes a car with his own hands will face two scenarios. The first is admiration for the creation, and the second is the smile of others at the sight of an invention. If you look at it, then there is nothing difficult in assembling a car with your own hands. A self-taught engineer is only required to know the design of the car and the basic properties of its parts.
Historical facts
Certain historical conditions preceded the start of car construction. During the existence of the union, mass production cars. They could not meet the individual needs of the consumer. That is why self-taught inventors began to look for ways out of this situation and did it by designing home-made cars.
In order to make one car with your own hands, three non-working ones were required, from which all the necessary parts were removed. If we take into account the people living in remote villages, then they most often improved various bodies, thereby increasing their capacity. Cars began to appear that had high cross-country ability and could even overcome water. In a word, all efforts were devoted to simplifying life.

A separate category of people attached great importance to the appearance of the car, and not just its technical properties... In addition to beautiful passenger cars, sports cars, which were not much inferior to the factory copies. All these inventions not only surprised others, but also became full-fledged participants in the road traffic.
During the Soviet era, there were no specific restrictions on homemade vehicles. Prohibitions appeared in the 80s. They concerned only certain parameters and technical characteristics of the car. But most people could get around them by registering one vehicle with the relevant authorities under the guise of a completely different one.

What you need to assemble a car
To proceed directly to the assembly process itself, you need to think over everything in detail. You need to clearly understand how to do future carand what technical characteristics he must have. First, you need to determine for what purposes the car will be used, and then implement the idea. If you need a frank workhorse, then in order to make it yourself, you will need special materials and parts. It is also important to make the body and frame of the car as resistant to loads as possible. When a car is made only for driving, the question is only in its appearance.
How to make a car with your own hands for a child, you can learn from the following video:

How to make drawings
You should not trust your head and imagination, it would be better and more correct to think about what exactly the car should be. Then transfer all available considerations to paper. Then it is possible to correct something and as a result, a drawn copy will appear future car... Sometimes for full confidence two drawings are made. The first depicts appearance car, and on the second a more detailed image of the main parts in detail. Before drawing, you need to prepare everything necessary tools, that is, pencil, eraser, drawing paper and ruler.

Nowadays, there is no need to draw a picture for a long time using an ordinary pencil. To facilitate this task, there are special programs with ample opportunities and with their help you can make any drawing.
Advice! If there are no engineering programs, then the usual Word test editor will help in this situation.
With a strong desire, you can make any car with your own hands. If there are no own considerations, then ready-made ideas and drawings can be borrowed. This is possible because most of the people involved in the creation of homemade cars do not hide their ideas, but, on the contrary, present them to the public.

Kit-cars
In the vastness of the countries of Europe and America, the so-called "kit-cars" have reached wide distribution. So what is it? This is a certain number of different parts with which you can make a car with your own hands. Kit cars have become so popular that many options have appeared that allow you to fold any desired car model. The main difficulty is not in the assembly, but in the registration of the car obtained as a result of the assembly.
To fully work with the kit car, you must have a spacious garage. It also requires toolboxes and knowledge. If you do not possess certain skills, then the work will not give the desired result. If the work is done with the help of assistants, the assembly process will be faster and more fruitful.

This kit includes everything from small screws and instructions to large parts. For a full-fledged work, there should be no serious difficulties. It should be noted that the instructions are not in printed form, but presented in a video master class, where everything is considered to the smallest detail.

It is very important to assemble the vehicle correctly. This is necessary in order for the creation to meet all the standards and norms prescribed in the regulations of the traffic police. Since failure to comply with the points leads to problems with the installation of the vehicle on record with the relevant authorities.
Advice! If possible, you can consult with experts in this field.
For more information about what kit cars are and how to make them, see the following video:
Car design using scrap materials
To make your assembly task as easy as possible homemade car, as a basis, you can take the base of any other car that fully functions. It is best to take the budget option, since it is never known which direction the experiments will lead. If there are old worn parts, then they need to be replaced with serviceable ones. If possible, you can make parts with your own hands on lathes, but this is if you have professional skills.

First of all, you need to start assembling the car with the body, instruments and necessary interior parts. Modern inventors use fiberglass for the body, and before that there was no such material, and plywood and tin material were used.
Attention! Fiberglass is a sufficiently elastic material that allows you to implement any idea, even the most unusual and original.

The availability of materials, spare parts and other components makes it possible to design a car that, in terms of external parameters and appearance, will not be inferior to the car models of the most leading car manufacturers in the world. This requires ingenuity, good imagination and some knowledge.
DIY supercar:
Fiberglass car construction
You should start assembling a car made of fiberglass from the moment you select a suitable chassis. After that, the necessary units are selected. Then it is worth moving on to the interior layout and seat mounting. Upon completion of this, the chassis is reinforced. The frame must be very reliable and strong, since all the main parts of the car will be mounted on it. The more accurate the dimensions of the space frame, the better the fit of the parts.

For the manufacture of the body, it is best to use fiberglass. But first you need to make a base, that is, a frame. Foam sheets can be attached to the surface of the frame, as closely as possible to the existing drawings. Then, as needed, holes are cut, and if there is a need, the parameters are adjusted. After that, fiberglass is attached to the surface of the foam, which is putty on top and cleaned. It is not necessary to use foam, any other material with a high level of plasticity will be useful. This material can be a continuous canvas of sculptural plasticine.

It should be noted that fiberglass tends to deform during operation. The reason is exposure to high temperatures. To maintain the shape of the structure, it is necessary with inner side strengthen the frame with pipes. All excess parts of fiberglass must be removed, but this should be done after it is completely dry. If everything is done correctly and there are no other works regarding the design, you can proceed to the interior equipment and electronics fasteners.
If in the future it is planned to re-design, then a special matrix can be made. Thanks to her, the body making process will be faster and easier. The matrix is \u200b\u200bapplicable not only to make a vehicle with your own hands from scratch, but also to improve the state of the existing own car... Paraffin is taken for manufacturing. To get a flat surface, you need to paint it on top. This will increase the convenience of fastening parts for the new car body.

Attention! With the help of a matrix, the entire body is made completely. But there is an exception - the hood and doors.
Conclusion
In order to implement the existing idea and make a car with your own hands, there are a number of suitable options. All sorts of working details will be helpful here.
You can do not only with your own hands a carbut also a larger and more powerful truck. In some countries, craftsmen manage to earn decent money from this. They make cars to order. Cars with various original body parts are in great demand.
How to make a Porsche with your own hands:
I got this from my nephew radio-controlled car toy. The range is only about 15 meters, the weak electronic part, i.e. the front wheels barely toss and turn and the drive pulls very weakly.
Having nothing to do, I decided not to upgrade this radio-controlled car a lot. Digging through the bins, I found a 40MHz receiver and two servos, one HS-311 in working order and one powerful digital MG946R with a burnt out engine. The HS-311 was adapted to the steering wheel to replace the original, frail design, and the MG946R took only the electronic control board. For the place of the engine, the servos connected the traction motor of a radio-controlled car, and in the place of the variable, the servos soldered a 4.7kOhm trimmer resistor.
Setting up a radio-controlled car
When you turn on the transmitter for the first time, the converted radio-controlled toy starts spinning the wheels, to stop them, you need to:
- Connect the gas servo to channel 2 (channel RV)
- Adjust if necessary channel reverse
- Stop the rotation of the wheels with a trimmer


Then we rebuild the expans (we set 100% on the gas), the costs and trim the steering wheel. For power, I used 5 cans of NICD batteries, converted radio-controlled car received powerful and nimble. It was not without problems, the native traction engine turned out to be rather weak, it gets very hot and stinks, I think it won't have to live long. But in general, the alteration was a success, now the machine drives from under the remote control
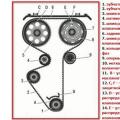
General acquaintance with the sewing machine "Podolsk-2M"
The machine appeared in the USSR around the end of the 50s of the last century and was almost a complete analogue  american typewriter Singer 15th series. This is a common lockstitch machine for that time, extremely simple in design and has unsurpassed reliability. The body is cast from cast iron, all parts are made of durable technical steel, of which an incredible amount remained in the USSR after the war and steel production grew. The machine has only one "critical" setting (the lower overhang of the needle bar - a setting that affects the performance in principle), and two "non-critical" settings - the tension of the upper and lower threads - which only affect the quality of the stitch. It is enough to lubricate the machine only once or twice a year at the control points and continue to work without problems.
Machine drive
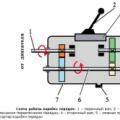
Initially, the car came in two layouts - desktop manual and bedside (foot) versions. Over time, small 100-watt motors with a very simple mount and controlled by a pedal began to be produced for the desktop version (and for the bedside table). The pedal inside has 2 positions - at the initial moment of pressing, the power goes through a nichrome spiral (rheostat), which sharply lowers the speed, but reduces the engine torque, and when the pedal is pressed further, the power goes to the engine directly, bypassing the rheostat, which is achieved maximum speed (6000 rpm) and maximum engine torque.
How to convert to leather sewing?
In its basic configuration the machine is designed for sewing with 60 threads and a needle # 90, i.e. designed to sew cotton fabrics, jeans and the like. And this despite the fact that the machine has a 100-fold safety factor. But this fact was previously of little interest to anyone, because the skin was inaccessible and there was no particular need for such an alteration.
But today the situation has changed. There is a lot of leather, a lot of cheap beautiful soles, i.e. the field for shoe creativity is limitless. The only limitation, oddly enough, was the lack of suitable compact sewing equipment. And although there was talk about the fact that Podolsk and Singer easily sews leather, few people seriously approached this. In the last year or two, videos about the leather superpowers of the machine began to appear on the Internet. Therefore, I decided to try this option too. I sold my industrial typewriter, which occupied half a room, and was on the verge of abandoning this hobby. Expectations were met, and now I have the opportunity to continue. But let's get down to business.
Attention! Read photo captions carefully
If something is not clear, ask in the comments to the video on YouTube. I did not post comments on the site so as not to spam.
I will accompany my story with photographs. (Click on photos to enlarge)
 First change - if your machine is not the very first editions that came with just such huge 9-spoke pulleys, then find such a pulley in spare parts for seamstresses at the flea market and replace it. In manual mode, in any case, you will have to help very often, but on a small pulley it is very dreary. At the same time, the diameter of the groove for the belt is 1 mm larger - a trifle, of course, but the torque will be a drop more. First change - if your machine is not the very first editions that came with just such huge 9-spoke pulleys, then find such a pulley in spare parts for seamstresses at the flea market and replace it. In manual mode, in any case, you will have to help very often, but on a small pulley it is very dreary. At the same time, the diameter of the groove for the belt is 1 mm larger - a trifle, of course, but the torque will be a drop more. |
 Second change - the engine is not conventional motor for household sewing machines (90 W), and the motor for overlockers (250 W). It is sold in the same place, in stores of sewing supplies and in the same place. sewing machines are sold. Chinese, but the masters praise him. Second change - the engine is not conventional motor for household sewing machines (90 W), and the motor for overlockers (250 W). It is sold in the same place, in stores of sewing supplies and in the same place. sewing machines are sold. Chinese, but the masters praise him. |
 These are the characteristics of this engine on the plate above. Attention! If you come across an engine with reverse rotation, do not worry - open the engine, and you will see that a pair of small diodes are soldered to the brushes - take a soldering iron in your hands and turn each diode backwards - and that's all. These are the characteristics of this engine on the plate above. Attention! If you come across an engine with reverse rotation, do not worry - open the engine, and you will see that a pair of small diodes are soldered to the brushes - take a soldering iron in your hands and turn each diode backwards - and that's all. |
 General view of the roller foot, which will allow you to make such smooth and, most importantly, precise, even seams. General view of the roller foot, which will allow you to make such smooth and, most importantly, precise, even seams. |
|
 4th change - firstly, you need to replace the needle holder with such a small one, which went on the Singer prototypes of Podolsk and on the first releases of Podolsk, later they began to put enlarged needle holders on Podolski (see photo below), which prevent the roller from coming close to the needle. But at the end of this article, it dawned on me how it was possible to grind my own and not to steam (read below, near the last photos). Secondly, when planting a reduced needle holder, you will need to remove the needle bar (it can be easily removed with one screw) and grind its tip on an emery or a file so that the reduced needle holder fits on it. 4th change - firstly, you need to replace the needle holder with such a small one, which went on the Singer prototypes of Podolsk and on the first releases of Podolsk, later they began to put enlarged needle holders on Podolski (see photo below), which prevent the roller from coming close to the needle. But at the end of this article, it dawned on me how it was possible to grind my own and not to steam (read below, near the last photos). Secondly, when planting a reduced needle holder, you will need to remove the needle bar (it can be easily removed with one screw) and grind its tip on an emery or a file so that the reduced needle holder fits on it. |
 The roller for changing the needle turns upwards. The roller for changing the needle turns upwards. |
 With this screw, which I am now twisting with a screwdriver, the roller is screwed on. With this screw, which I am now twisting with a screwdriver, the roller is screwed on. |
 The video is filmed - no problem. The video is filmed - no problem. |
 5th change. We put a needle # 130 for leather. In addition to being generally thicker, it also has special grooves for thick threads. 5th change. We put a needle # 130 for leather. In addition to being generally thicker, it also has special grooves for thick threads. |
 This is how the native needle holder and standard foot look. This is how the native needle holder and standard foot look. |
 In front of you are two needle holders - on top of a Singer (small), and on the bottom of a native (large). You need to find either a Singer's one at a flea market (although sometimes they don't want to sell it separately from a whole car), or grind a little native one (see below, near the last photos) In front of you are two needle holders - on top of a Singer (small), and on the bottom of a native (large). You need to find either a Singer's one at a flea market (although sometimes they don't want to sell it separately from a whole car), or grind a little native one (see below, near the last photos) |
 The same in magnification The same in magnification |
 Here's what is important - when you put in the reduced needle holder, you will need to grind the tip of the needle bar exactly from the front side, where there is a groove for the needle. To allow the needle holder to slide to the right without interfering with the roller. Here's what is important - when you put in the reduced needle holder, you will need to grind the tip of the needle bar exactly from the front side, where there is a groove for the needle. To allow the needle holder to slide to the right without interfering with the roller. |
 This is also a trifle that needs to be done. the roller is 2 times larger in size than the foot, then you will need to remove the front chrome cover (attached to the muzzle with one screw), then loosen the screw to which I point with my finger and raise the entire rod up to the desired height (put the roller and see for yourself), then tighten this screw again. This is also a trifle that needs to be done. the roller is 2 times larger in size than the foot, then you will need to remove the front chrome cover (attached to the muzzle with one screw), then loosen the screw to which I point with my finger and raise the entire rod up to the desired height (put the roller and see for yourself), then tighten this screw again. |
 After lifting the rod for the foot, it will stick out from above by a couple of centimeters. After lifting the rod for the foot, it will stick out from above by a couple of centimeters. |
 I already wrote about the needle - I need # 130 I already wrote about the needle - I need # 130 |
 After installing the roller, it remains to adjust the gap between the roller and the needle with this adjusting screw and nut. I believe there should be about 1mm between the bottom edge of the roller and the needle in the lowered position. (But here I am not sure if this is correct, it was just cool and convenient for me to sew with just such a gap.) After installing the roller, it remains to adjust the gap between the roller and the needle with this adjusting screw and nut. I believe there should be about 1mm between the bottom edge of the roller and the needle in the lowered position. (But here I am not sure if this is correct, it was just cool and convenient for me to sew with just such a gap.) |
 And here is how you can do without buying a Singer needle holder. In the picture, I sharpened the lower native needle holder on emery - I removed about 1mm from the front part (which is towards the roller), and secondly, I shortened its "throat" by 2 mm - where the needle shows, there used to be somewhere 4mm, there were about 2 -x. And here is how you can do without buying a Singer needle holder. In the picture, I sharpened the lower native needle holder on emery - I removed about 1mm from the front part (which is towards the roller), and secondly, I shortened its "throat" by 2 mm - where the needle shows, there used to be somewhere 4mm, there were about 2 -x. |
 Top view of the turned native needle holder. Compare in the top photos how it looked before turning. Top view of the turned native needle holder. Compare in the top photos how it looked before turning. |
 And finally, the last 6th change. Modification of the upper thread tensioner. When sewing leather, the standard tension, which is provided by this powerful spring, is not enough, so the master I called when setting up first threw out the small spring altogether - now we will not need it at all, and took the large spring in 2 hands and stretched it where- then 1 cm (clearly visible in the next photo). After that, the tensile force almost doubled. It is this strong tension that we need. And finally, the last 6th change. Modification of the upper thread tensioner. When sewing leather, the standard tension, which is provided by this powerful spring, is not enough, so the master I called when setting up first threw out the small spring altogether - now we will not need it at all, and took the large spring in 2 hands and stretched it where- then 1 cm (clearly visible in the next photo). After that, the tensile force almost doubled. It is this strong tension that we need. |
 This is the size the spring should be after stretching. This is the size the spring should be after stretching. |
 So, the third change - we buy a video and install it. No alterations required. Little things - you will have to on the video itself
 That's all that needs to be done to rebuild a leather sewing machine.
The result of the alteration:
In total, 6 changes were required:
- 1. Install the large pulley
- 2. We put powerful engine 250 W (overlock).
- 3. We put the roller (at the same time we grind the front panel, raise the stock of the foot and grind the seat on the roller itself with a file.)
- 4. We buy a reduced one or we grind down the native needle holder (in both cases, you need to remove the needle bar and grind its tip from the front).
- 5. We put the needle No. 130
- 6. Stretch the thick tensioner spring and discard the small one.
I suggest you watch 2 video reviews of this particular sewing machine after rework. In the first one, I say that it is better to sew leather in manual mode - after all, I was not completely sure of the engine's capabilities - I thought I would burn the engine. But after watching a sufficient number of videos on YouTube how Americans are smartly sewing leather on the same Singer-1591 with engines, I took out my engine, put it on, tested it, calmed down and took a second review. So:
Review of the Podolsk-2M sewing machine for sewing leather in manual mode
And here is the second review, which I took off after having tested the machine with the engine. I remind you once again that this motor is not for a sewing machine, although it is the same in size, but for overlocks it is 250 Watt, in which I had to turn the diodes with a soldering iron so that it turned in the right direction.
Review of the Podolsk-2M sewing machine for sewing leather using a 250 W motor.
This concludes my story about a very successful, in my opinion, technique that will allow us to realize any plans for sewing any footwear, up to tarpaulin boots.