- Despite all the popularity and demand for expeditionary trunks, there are not so many manufacturers of these devices. Most of the companies that sell this car "accessory" are only intermediaries, which significantly increases the cost of goods, limits the complete set, etc. We are not just roof rack sellers, but also their manufacturers.
Complete set of expeditionary roof racks of our production
- By purchasing an expeditionary roof rack in our store, you also acquire all the additional elements necessary for it, including:
gutters;
brackets with which you can install additional lighting;
a welded platform with the installation of the same additional lighting, but already in front of the trunk itself. - Roof mounts deserve special attention. They are made of 3 mm steel and eliminate welded seams. are made by bending method. The kit includes pressure plates, rubber washers, bolts, washers and nuts.
Advantages of Expedition Racks
- Roof racks of our production outperform other manufacturers by many factors:
withstand heavy loads;
have a durable and comfortable design that does not allow the load to move from side to side while the vehicle is moving, which ensures its safety;
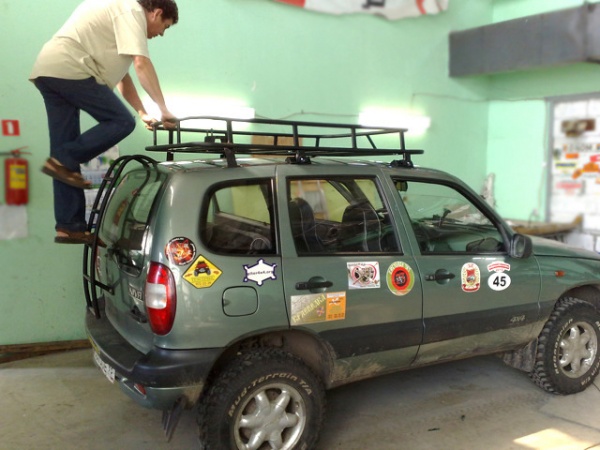
have reliable fasteners that firmly hold the trunk on the car, etc. - One of the advantages of servicing our company is that upon delivery of the device, we provide its compact and most reliable packaging, which eliminates the risk of damage to the trunk. You can order the model of interest even by phone. Rest assured, we produce some of the best expeditionary roof racks for Niva cars.
Convenient to travel
There are many ways to spend your leisure time actively. One of these ways is to travel in low-pass places in off-road vehicles. Some people buy expensive foreign off-road vehicles from famous manufacturers especially for this type of recreation. Those who cannot afford such cars travel by domestic cars, including the VAZ-2121 "Niva".
Often, such trips last a long time and take place far from populated areas. Therefore, a large number of things, fuel, equipment and spare parts for the car are taken on the road. Dimensions are luggage compartment at Niva are limited. Therefore, car owners often install an expeditionary trunk on the Niva. It is installed on the roof of an SUV and allows you to transport all kinds of cargo.
In addition, Niva needs to be prepared for this type of rest. In order for the trip to be successful, a number of design changes are made to the vehicle design, aimed at increasing the cross-country ability and reliability of components and mechanisms.
Trunk from the store
The owners of the Niva 2121 can get such a thing as an expeditionary trunk in two ways. In the first case, the expeditionary roof rack is purchased at an automotive accessories store. The roof rack can be made by yourself, with the material, tools and skillful hands.
When purchasing a roof rack in a store, you should take this matter responsibly. There are a lot of modifications of such a device on the Niva 21214. They differ in the methods of attachment to the VAZ-2121, have different sizes and material of manufacture. Some have optional equipmentsuch as headlights and cargo straps.
First, you should pay attention to how the expedition rack will be attached to the vehicle.
- The most common is gutter fasteners. This type of fastening is simple and convenient. Attaching to gutters does not take much time, and if necessary, it can be quickly removed. However, it should be borne in mind that a load of significant mass cannot be placed, otherwise the gutters will bend.
- You can find a roof rack on the market that is not attached to the gutters, but directly to the body using a bolted connection. Such an expeditionary rack has a large carrying capacity, but to secure it, you will need to make holes in the body. In addition, when installing a trunk with such a mount, it will not be possible to quickly remove it.
The material of manufacture is also of great importance. Most often, the basis of the expedition luggage rack is a welded structure made of pipes. The sides of the trunk are also formed from the pipes. But the bottom can be made of pipes of small diameter, which are placed at a short distance from each other. The tubular bottom can be longitudinally or transversely.
In some cases, the expeditionary trunk on the VAZ-2121 has a bottom made of metal mesh. When choosing a roof rack, all welded joints should be checked, they must be of high quality. You should also pay attention to the weight of the trunk. Too light will indicate that the material of manufacture is too thin, therefore, the trunk will not be reliable, and its deformation is possible under load.
A heavy trunk will indicate that the material is too thick. This will affect the overall load capacity, since when loading a payload onto it, the weight of the trunk itself must also be taken into account.

Easy to transport cargo
This device can be equipped with additional accessoriessuch as headlights attached to it and load securing straps. Here the choice is made for an amateur. Those who want to have more lighting devices on the car should take into account that for the normal functioning of the on-board network, an additional generator of increased power must be installed on the Niva 2121. Otherwise, a heavy load on the standard generator due to the large number of headlights can take it out of service.
The value of an expeditionary trunk for a motorist can hardly be overestimated. It allows you to transport bulky goods that cannot be put into the cabin. Planks are a prime example in this context.
You, perhaps, have seen more than once how drivers transport boards with the help of an expeditionary luggage carrier. Such transport can be seen far away and it is impossible not to notice it. But everything needs to be securely fastened so as not to create during transportation emergency on road.
In fact, you can think of many uses for an expedition rack. It can be used to transport furniture. A medium-sized chest of drawers can be easily attached from the top. Even a sofa can be transported if desired. Although this will be a very risky event. Therefore, it is best to transport such oversized cargo use the services freight company.
An expeditionary roof rack is needed not only to transport heavy loads. It is an indispensable attribute for real travelers. If you like outdoor recreation, then you cannot do without it. Thanks to this design, the vehicle's capacity is increased several times.
Moreover, with the help of the expedition luggage carrier, you can transport bicycles, skis and even canoes. Therefore, if you value leisure and you cannot live without extreme sports - you need this attribute.
But the purchase of an expeditionary trunk is not cheap. It is much more profitable to do it yourself. Plus, it's not that hard. It is enough to follow the instructions and use quality materials.
What material to use
As the main material for construction in in most cases, aluminum or its alloys are used.The main advantage of this solution is the accessory's low weight and relatively high strength.
Attention! Also, the advantages of aluminum include flexibility, high tear resistance, and long service life.
But aluminum isn't the only material out of which expedition racks are made. There are alternatives with no less merit. For example, you can remember the profile pipes. To create a structure, you need to choose only products with thin walls.
If necessary, or for the sake of economy, you can use plain metal. But you must consider that such an expeditionary trunk will add a lot of weight to the car. In addition, do not forget about the phenomenon of corrosion.
Attention! The use of stainless steel allows you to forget about rust. But it is also quite heavy.
Making a trunk - general scheme
Training
When creating an expeditionary rack, you must understand exactly why you are making this structure. Based on your needs, even at the initial stages, you need to calculate the carrying capacity of the accessory and the aerodynamic characteristics. The latter determines how fast the car will move.
The creation of any project, even the smallest, begins with planning. You need to measure the roof carefully. After that, you can decide on a place to install the supports.
After the basic measurements have been made, you can start creating drawing diagrams.Also in the preparatory documentation it is necessary to calculate the weight of the product and its carrying capacity.
You can make correct calculations if you have the following data:
- frame weight,
- measurements,
- the mass of all structural elements.
At the end preparatory work you will have a drawing with all the data obtained by you in the results of the measurements carried out. How well you cope with this depends on the service life of the expedition rack, as well as the loads that it can withstand.
Welding and other works

After the preparation is completed, you can proceed to the most important stage of work - welding. All structural elements are welded together to form a rectangle.
Attention! Ponds need to be fixed along the inner perimeter.
To prevent deflection, it is necessary to add several stiffeners to the structure. They can be made from shaped iron. The result of your work will be a lattice frame. In this case, the jumpers will run parallel to each other.
To strengthen the expeditionary rack, use a profile tube. Its cells should be made in the form of squares. This will create a durable and reliable product.
To improve aerodynamics in the front, it will not hurt to put an arc. The overlap at the edges should be done by 5 cm. A sector in the shape of a triangle is made in the bends. After that, the element is bent. Jumpers are welded to it after installation.
At the end, you will need to make the side mounts. For this you have to use bushings. It is important that the profile is not washed out when tightening. Otherwise, the expeditionary trunk may fly off.
Attention! The sides can be made from the rack.
Special attention should be paid to the mounting stud. To create it, you need two holes with a diameter of 8 cm. It is through them that the hairpin will be threaded. Then you need to brew everything. The excess thread is cut off at the end.
At the final stage of creating an expeditionary rack, the top and rear crossbars are made. They are bent, then the sleeve is welded. A piece of hairpin is attached at the front.
We make an expeditionary rack for UAZ, Niva 2121 and Niva Chevrolet
Trunk for Chevrolet Niva
You need to start creating an expeditionary trunk for Chevrolet Niva with preparation. You need to take care of the availability of materials and tools such as:
- welding machine,
- pipes,
- fasteners.
Attention! For all cars, the set of materials and tools is almost identical.
After all these elements are assembled, you can start creating the structure itself:
- Make a drawing. It is important to take into account the distance between the fasteners.
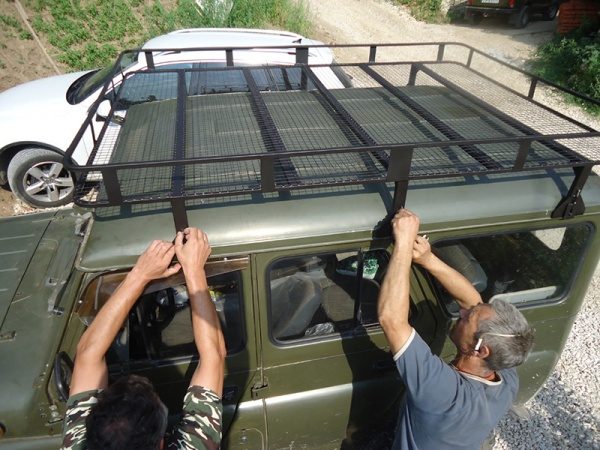
- Make a platform and sides. The structure should include a frame and a bottom.
- Use a metal mesh to make the bottom.
- Prime the structure.
- Paint everything with black metal paint.
- Reinforce the fastening elements with bushings.
- Weld the platform.
Weld the frame from the pipes. A diameter of 20 by 20 is ideal.
After that, the installation of the expeditionary trunk on the Chevrolet Niva can be considered complete. You can supplement the design with headlights. But to do it or not depends solely on your desire.
If you do decide to take this step, then do not forget to use insulated and waterproof wires, and be extremely careful when plugging into on-board network... Particular attention should be paid to drilling holes in the body and insulating them.
Another useful addition can be belts, which allow you to secure the load with greater reliability. Also similar way securing things on the expedition rack is much better than simple ropes.
Expedition rack for Niva 2121
There is an algorithm that will allow you to make an expeditionary trunk for the Niva 2121 with your own hands, it includes the following stages:
- Make a drawing of the future structure. Carefully calculate the measurements and calculate the amount of materials required for the project.
- Weld the frame. First, two base beams are welded. Therefore, it will be necessary to connect them together with rails.
- Weld intermediate beams and profile strips together.
- Make the corners rounded to make the structure aerodynamic.
- Install the sides. To do this, you need to drill holes on the sides of the trunk frame. Then it is necessary to insert bushings into them and scald them. This will strengthen the structure. After that, the sides are made. This uses a cut profile. Additionally, studs and a bushing are welded on which the cross member will be held. Another part of the stud is welded to the back.
- At the end, a primer and painting are done.
After all these steps have been completed expeditionary trunkfor Niva 2121 will serve you for many years, helping to transport heavy loads or camping equipment.
The general algorithm for creating an expeditionary trunk for UAZ is similar to similar processes for the Niva 2121 and Niva Chevrolet. Therefore, you can take any of them as a basis or use the general algorithm. But there are certain nuances that need to be considered:
- Use profiled aluminum pipes 20 * 20, 25 * 25
- With a step of 15 cm, jumpers are welded at the base.
- When manufacturing, you need to use the following elements: two extreme crossbars, a middle support bar, four spacers, two jumpers, two side members.
You can use sheet metal to create the sides. They can be of two types - collapsible or cast. At the end, the welding seams are overwritten and the expedition trunk is fitted.
Outcome
As you can see, making an expeditionary trunk is not so difficult. In addition, algorithms for creating structures for different cars similar. If necessary, you can use a common sequence for any machine. The main thing is to do all the calculations correctly.
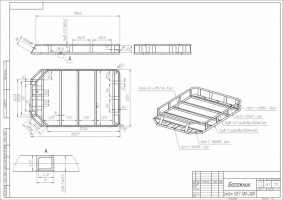
And here is such a construction from a 10x10x1 profile and a mesh d \u003d 2. Dimensions 1600x1100x15 mm.
Frame weight - 5.26 kg, net weight - 3.26 kg. Total 8.51 kg + mount.
Manufacturing
The purpose is to weld the trunk, which would be attached to the usual arches of the trunk “ant”, was removable, and most importantly - weight and strength. By means of cunning (I wanted to write "simple" - but this is not true) strength calculations, a certain structure was developed, which theoretically (not yet tested) should hold about 200 kg of concentrated load (a person weighing 200 kg standing at any point in the trunk), and much more if the entire weight is spread over the entire area. The experience of teammates (niva4x4.ru) shows that the roof racks of the car are strong, people carried 300-400 kg of building materials without any consequences, that is, I am calm for the body ...
The size of the base along the outer contour is 110 cm x 140 cm, a professional pipe 20 mm x 20 mm with a wall thickness of 2 mm is used.
The only thing worth paying attention to is the corners. The pipe is hollow and it must be cooked so that the ends do not remain open, otherwise a wonderful whistle will turn out.
The most simple and fast way To avoid open ends is pipe cutting at 45 degrees and subsequent butt welding. I went the other way, because I do not like to cut at an angle (I am always mistaken by a degree, or even two), so I joined the corners as shown in the picture below:

Cooked with electrodes with a diameter of 2.5 mm for carbon steels with a current of 70 A (inverter apparatus).
The first stage, of course, was the base plate welded:

Stage number 2 - welded the sides - the height of the trunk is 15 cm due to the height of the gate in my garage ...

Stage 3 - inner frame. In this position, as in the photo, the trunk passed the first check - I stood in the middle (my weight is 80 kg) and jumped heartily - everything is holding up, nothing is bent. True, I did not wait until the seams cooled down, as a result I slightly melted the sole of the sneakers ...

Stage 4 - welding of the platform for the chandelier and fitting. In total, the overall dimensions of the trunk came out 110 cm x 160 cm x 15 cm.The size of the platform for the chandelier is 20 cm by 110 cm.It is planned to install four headlights: on the sides of the working light, closer to the middle high beam... The side lights will be able to swivel 90 degrees to illuminate the harsh nightlife to the left and right of the car.

Stage 5 - welding of reinforcing mesh and painting (I used “primer-enamel” for rust, the toad strangled the money to spend on the hammerite). On the recommendation of the manufacturer, I put two layers (there was not enough patience for the third).

There is also a tricky moment about welding the mesh - at first I tried to melt the mesh rod itself. Bad idea - burns out instantly. Then he got used to it - he melted the professional pipe, next to the bar and slowly overtook the metal roll on the mesh bar - it turned out much better.
Fastening and materials
Fastening to the arcs with four M8 bolts, when I get another arc of the "ant" (will be in the middle of the trunk), two more bolts will be added. And when I overcome my laziness, I will put two more bolts in the middle of each arc ... But this later, somehow ...

Now according to materials: professional pipe 20x20x2 22.5 m at a price of 45 r / m, electrodes 2.5 mm for carbon steels, a pack of 100 r, 3 discs for a grinder, two 2 mm thick (for cutting), and one thick 4 mm (for processing seams ), a reinforcing mesh with a cell of 40x40, strips of 2m x 50cm 3 pieces of 115 r each (the thickness of the bar is about 3 mm), a piece of sheet 2 mm thick 20 cm x 110 cm - found for free, primer-enamel for metal 1 l 195 p, brushes 2 pcs, 30 r each, four M8 bolts with washers and nuts - about 50 r. Total for the money came out about 1800 rubles. But the weight went beyond the planned for the sake of strength - about 20-25 kg ... As for the time - it turned out 5 days for 2 hours. If I bought all the materials at once and could afford to work in the garage all day, then I would calmly fit in one working day. And so I had to constantly run back and forth, collect, disassemble the tool, and so on. On the other hand, I now understand why the sellers of factory or similar, home-made trunks take such money. The hassle with work, of course ...
Now about what can be attached to the trunk - it is clear that the very place is there for a hi-jack, a shovel, a canister and a spare wheel. Over time, again, the hardware for all this will be installed in the finished structure. In the meantime, I only inserted branch fenders, because I was tortured to receive windshield branches - annoying.
For the windbreakers, a 4 mm cable, M10 eye-nuts and bolts, tolreps and cable clamps were used for them, the amount for everything is about 700 rubles. General view can be seen in the picture:

Fasteners to the hood (the solution is not obvious, but I don't have a kengurin yet). The bolt goes through the hood (in this place there is reinforcement from the inside of the hood), the length of the bolt is about 40 mm. We bought 50 mm and cut it after fitting to the required length so that the ends do not stick out inside the eye nut. On top of the hood are riveted platforms made of 2 mm steel, for reinforcement (picture above).
That's all!
Source: http://www.niva-faq.msk.ru/ekspluat/vne_asf/podgmash/exp.htm
Many owners of the Niva 2121 car had to deal with the missing space in the trunk. The only alternative in solving this problem is to install an Expedition Roof Rack. Expedition Rack - A basket with a frame structure and several supports that are required to attach the roof rack. Such a trunk is capable of accommodating bulky items that are not convenient for transportation inside the car.
Also, such a transportation scheme allows you to move small-sized cargoes. Expedition roof rack for Niva 2121 is a versatile method of storing things in a car, while such a trunk is light and strong enough to withstand heavy loads. However, the price of branded expeditionary trunks in stores is very high and most Niva car owners try to make such a device with their own hands. It is not difficult to carry out such a process; you just need to prepare all the necessary materials.
What materials are needed for manufacturing?
Usually, the manufacture of expeditionary luggage rack is carried out from aluminum and its alloys. Since such materials have a number of advantages over other metals. First of all, they are lightweight, while having high strength indicators.

These are the factors that are fundamental in the manufacture of boxes. In most cases, this roof rack is based on a welded pipe structure. The sides of the trunk can also be made of such pipes. The bottom is formed from pipes of a smaller diameter. Sometimes, the bottom of the expeditionary trunk on a VAZ 2121 car is based on a metal mesh.
The procedure for making a homemade roof rack
For those car owners who are wondering how to make a roof rack themselves, you should know that such a procedure is not complicated in itself and includes the following stages of work:

Trunk accessories
Depending on the wishes of the car owner, devices can be installed on the trunk that perform at least important functions... It can be an awning or a tent. The awning protects well from the sun and bad weather. The tents, in turn, create a large space to rest and sleep without touching the ground, which creates additional protection.
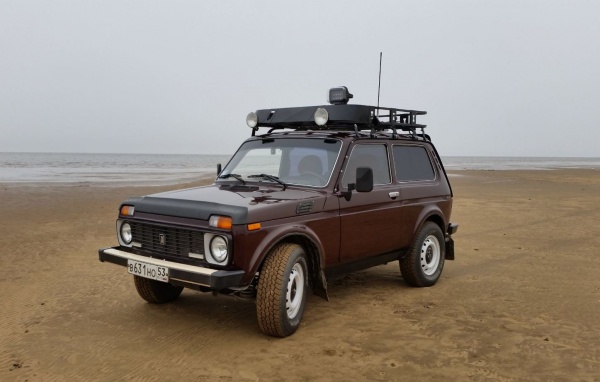
Additional lighting equipment will also be appropriate to install on the expedition rack. The so-called "chandelier" provides a powerful light that will illuminate the road from the front and rear. In this case, it is only necessary to correctly install the headlights.
Thus, with high quality and correct installation, an expeditionary rack can greatly facilitate the journey, making it more comfortable and safer. However, it must be remembered that when making such a rack on your own, all parameters should be strictly observed, otherwise, the trunk may not be fixed well or not be installed at all.