The new one always attracts attention with bright transparent headlights, their unique shape. But time passes and the headlights (glass or plastic) gradually lose their elegance, yellowness appears, the surface becomes cloudy.
Washing with detergents, wiping with a dry cloth does not give the desired effect. Headlights need cleaning. Novice car enthusiasts immediately sin on lamps and rush to replace them. But the expected effect is practically not obtained, because the reason is not in the light bulb, but in the state of the glasses on the headlights. Therefore, before changing the light bulb, direct the headlight to the road. If a shapeless blur of light forms on the roadway, it means that the headlights must be polished, and not replaced with a light bulb.
The automotive services market offers a wide range of at-home headlight care products. However, the technology for performing grinding has its own nuances, ignorance of which will significantly reduce the life of the headlights and again will need to be polished or, in some cases, replaced.
Causes of clouding of protective glasses on car headlights
The main causes of clouded headlights are:
- small stones and sand, gasoline, oil residues, drops of molten asphalt falling on the glass surface from under the wheels of the vehicle in front
- permanent satellites of highways dust and dirt, which cover the surface of the headlights with a dense layer
- chemical effect on the glass of headlights of aggressive detergents at a car wash and other reasons
Shallow scratches, dirt adhering to the "rough" surface of the glass from flying pebbles and sand can be removed on your own without resorting to a service station. In order to properly polish plastic and glass headlight lenses with your own hands, you need to know a few rules and follow them accordingly.
Preparatory work
- Wash the headlights clean with warm water and neutral detergents, special car cleaners, or a vinegar solution and wipe with a clean cloth.
- In order not to damage the parts of the body adjacent to the headlights, glue them with construction tape, having previously lubricated the adhesive side of the tape with oil (necessary to protect the painted surface of the car when removing the tape),
- Be sure to glue the metal part and the headlight sealing rubber to protect it from damage with polishing agents.
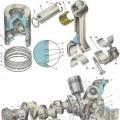
Modern cars have glass or plastic glass on their headlights that can be polished at home.
DIY plastic headlights polishing
Polishing the plastic glass of the headlight with the Abralon abrasive
Polishing of plastic headlights begins with a coarse abrasive with a gradual transition to fine-grained ones: Abralon-600, -1000, -2000, -4000
The Abralon recovery kit is produced in the form of circles of different grain size, glued to a dense fabric, under which there is a foam rubber layer (pillow) and Velcro for attaching to a sander. In the absence of a sander, this work can be done manually. Grinding begins with a coarse abrasive with a gradual transition to fine-grained: Abralon-600, -1000, -2000, -4000.
Each abrasive is constantly moistened during the grinding process. The transition to processing with the next abrasive begins after obtaining a uniform matte surface of the plastic. Grinding with each abrasive ends with glass washing. Consistent use of abrasive discs will help obtain a clear lens surface.
We finally rinse the headlight, dry it and proceed to polishing. Squeeze a little polish onto a soft cloth and in a circular motion polish until a bright shine is obtained. For polishing, you can also use a car wax, special polish or paste. Finishing will return the lenses to their former transparency.
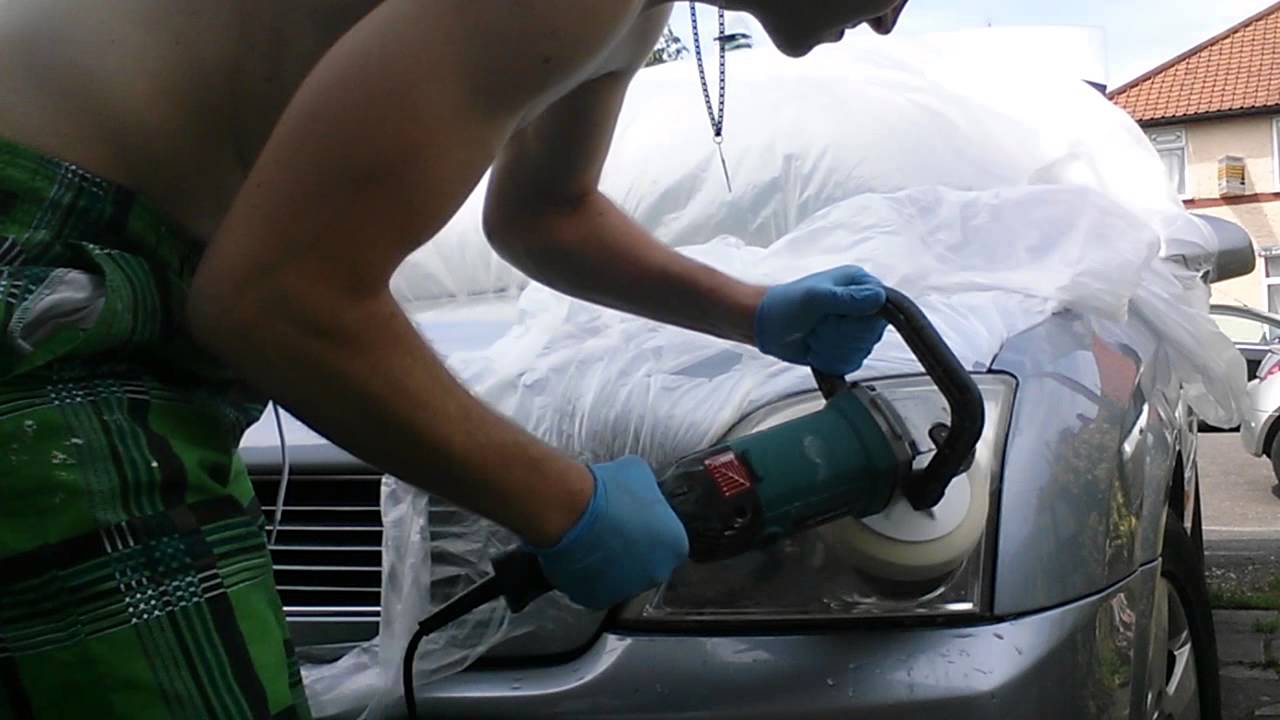
Abrasion with Abralon using a grinder
The whole process repeats the sequence of manual grinding and polishing. Machine grinding with each abrasive lasts no more than 3 minutes. For final polishing, a foam rubber wheel and polish are used. To prevent the glass from cracking during processing, you need to immediately set the grinder to 1500 rpm and do not press hard on the cap.
Using sandpaper
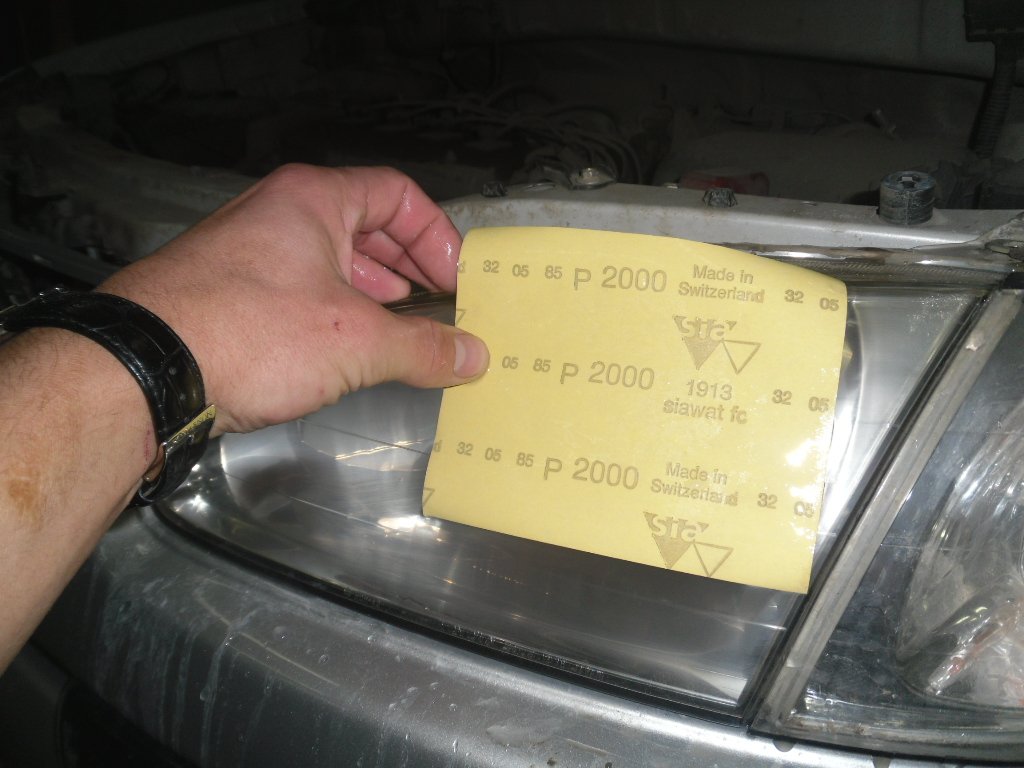
When polishing the headlights with sandpaper, the latter is constantly moistened in soapy water to obtain a uniform matte surface
On the auto service market, you can purchase a simple set of sandpaper with grit sizes from P600, P1200, P2000 and P2500. We protect the space surrounding the headlamp with mounting tape. Thoroughly rinse the headlight with any surface degreasing agent. We constantly moisten the emery paper in soapy water and grind the lens surface with circular movements until a uniform matte surface is obtained. Gradually lower the grit size of the sandpaper. After each replacement of sandpaper, rinse the surface of the lens with water. After finishing sanding, rinse, dry the hood and proceed to polishing with the chosen agent.
Using an abrasive paste
The range of abrasive pastes on the car service market is very extensive. Each brand differs in its composition and technology of use. Therefore, when choosing this method of grinding and polishing, carefully study the features of each brand and the technology for using the paste. The process of performing grinding repeats the previous methods in everything.
In general, sanding and polishing plastic headlights takes up to an hour. It is advisable to carry out the polishing process every 2 years. After polishing, the light transmittance of plastic caps increases by an average of 80%.
DIY glass headlight polishing
Glass headlights in the presence of small chips and general turbidity from the constant blows of grains of sand can be polished with your own hands. To do this, you will need a grinder or grinder (angle grinder), circles with emery grit of different sizes, a soft polishing wheel, glass cleaner, polish, water, protective varnish, and a set of napkins.
Glass is a fragile material, therefore, during grinding, it must be protected from overheating and strong physical impact (pressure). To do this, set the machine to an average operating speed (no more than 1500 rpm) and constantly pour a small stream of water onto the glass during grinding. Emery wheels are gradually being replaced by finer-grained ones. After working out one circle, we leave the glass to cool.
The end of grinding is determined visually - the glass should be uniformly matte or finely rough. After rinsing, it is smooth to the touch without roughness. Thoroughly wash off the abrasive, wipe it off and proceed to polishing. Apply the polishing compound to the felt wheel and polish until the glass becomes transparent.
DIY headlight polishing: video tutorial
Glass fog lights (PTF) are ground and polished in the same way as regular glass. They differ from conventional headlights in thicker glass and a smaller area. To prevent the glass from bursting during processing, abundant moisture is required during the grinding process.
New glass headlights covered on top protective film, which is removed during grinding. After polishing, unprotected glass headlights will quickly fail. Therefore, after processing, they are covered with a protective layer of varnish, which acts as an armor for glass.
For protection, acrylic varnish is used, which is applied in 2 layers. It is applied from top to bottom without drips, fast enough so that it does not dry out. During painting, it is necessary to provide absolute protection against dust and dirt. Applying a protective clear coat of varnish significantly increases the lifespan of glass lenses.
Do-it-yourself headlight polishing with toothpaste at home
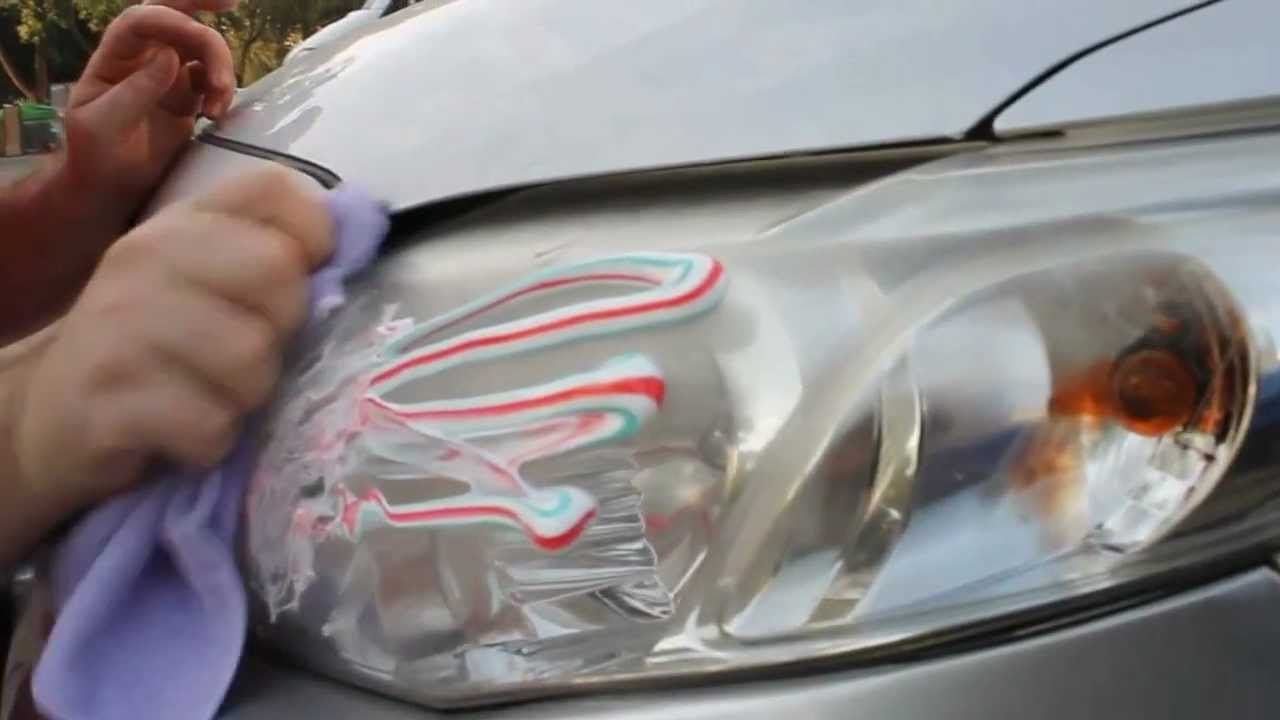
Polishing the headlights with toothpaste gives a tangible effect in the absence of chips and large scratches on them
This type of polishing gives a tangible effect in the absence of chips and large scratches. At its core, toothpaste is a very fine abrasive, which, thanks to additives, has additional properties (smell, whitening, and others). Using the abrasive properties of toothpaste, it is possible to clean glass and plastic protective headlight caps from turbidity, dust and dirt. For this, you need a tube of paste, a few soft towels or rags from rags, water to wash off the resulting gruel.
Clean the headlamp cover, apply the paste to a rag and rub the surface in a circular motion. Wash off the paste. Wipe up. Apply polish and buff. If not deep scratches, the headlights will shine with pleasant cleanliness.
How to polish the inside of your headlights
If after external polishing, dirt and cloudiness are noticeable inside the headlight, then it is necessary to carry out both internal grinding and polishing of the headlights.
To do this, it is necessary to dismantle the headlights and inspect them carefully. If through cracks, large chips are found, it is better to purchase new headlights.
Polishing car headlights from the inside with your own hands without a typewriter is carried out in the same order as the processing of the outer surface of the glasses.
We clean the dismantled headlights from dirt and degrease with detergents. Thoroughly rinse the hood and start the sanding process by hand, changing the abrasives until the surface is smooth to the touch after the abrasive has been washed off. Leaving the glass damp after washing, apply polish on a soft rag and proceed to polishing until a shiny, streak-free surface appears. We mount the headlights in their original place.

You need to polish the headlights systematically, then the headlights will significantly lengthen their service life
The options for polishing the headlights under consideration show that they can be polished and polished by hand at home. If this work is performed systematically, without starting, your car will be constantly well-groomed and elegant, and the headlights will significantly lengthen their service life.
- news
- Workshop
Traffic police fined a Russian who converted Lada into Mustang
The police were attracted by the photos of the unusual "Mustang" on social networks. After the pictures became popular, the traffic police inspectors identified the owner of the vehicle and invited him to talk to the unit, reports the UGIBDD in the Omsk region. During the audit, it was found that the 24-year-old Omsk made the following changes in the car's design: installed ...
The head of Samara, Oleg Fursov, spoke about one of the options for how to quickly repair the roads of the regional capital, according to the Internet portal 63.ru. According to the official, it is necessary to focus on these works maximum amount money from the regional budget, albeit to the detriment of other cities in the region. The mayor was forced to emphasize that this idea ...
Americans have found a replacement for Hummer
With the termination of production of the Hummer H1, there was a shortage of off-road vehicles capable of operating in the North American market. difficult conditions... For example, when liquidating fires in hard-to-reach areas, patrolling reserves and performing a number of tasks in emergency situations. Existing SUVs are not always suitable for such purposes, as few of them can match ...
Ford focus got a 375-strong version
Thanks to a package of improvements, the output of the 2.3-liter EcoBoost engine was raised to 375 hp. (plus 25 hp), and the maximum torque increased to 510 Nm (plus 40 Nm). True, the maximum output is achieved in the "super-turbocharging" mode for ... 12 seconds. To equip the Ford Focus RS with "super-turbocharging", you need to install a larger ...
Chinese Porsche will sell for $ 15,000
The most affordable Zotye SR9 can be bought for 100,000 yuan ($ 15,000), according to Carnewschina. Moreover chinese copy Porsche macan is equipped with a 190-horsepower (!) turbo engine, although the gearbox is mechanical (a preselective robot is available only for an extra charge), and the drive is front-wheel drive. Curious, ...
Appearance Skoda Kodiaq finally disclosed on the network (photo)
Skoda Kodiaq images were published on the Serbian forum Skodaforum.rs a few hours before the official presentation of the model. As you can see from the photographs, the Skoda Kodiaq's exterior is influenced by both the VisionS concept and flagship sedan Superb. It is worth noting the front optics divided into two blocks, the characteristic radiator grille, massive ...
The driver challenged the traffic police fine using the laws of physics
Yuri Goryunov, Candidate of Physical and Mathematical Sciences, was fined for speeding. The camera recorded that the car was moving at a speed of 92 km / h in the 70 km / h section. The driver received a fine of 500 rubles from the traffic police, but, according to Rossiyskaya Gazeta, he was able to get it canceled. As Goryunov said, with a sane ...
Secret traffic police cars: the authorities told about the results
Such a patrol is a traffic police car, but without a special color scheme and special signal. During covert patrols, traffic police inspectors pay attention to the most flagrant violations committed by drivers, and then transmit information to the nearest traffic police crew, which detains the violator. Is this method effective? As it turned out, very much even. ...
When deciding to purchase a car, first of all, many buyers pay attention to the operational and technical properties cars, its design and other paraphernalia. However, not all of them think about the safety of the future car. Of course, this is sad, because often ...
The most expensive cars in the world
Of course, any person at least once wondered what kind of expensive car in the world. And without even receiving an answer, I could only imagine what the most expensive car in the world is. Perhaps some people think it is powerful, ...
2017-2018: rating of CASCO insurance companiesEvery car owner seeks to protect himself from emergenciesassociated with road accidents or other damage to your vehicle. One of the options is the conclusion of a CASCO agreement. However, in conditions when there are dozens of firms providing services in the insurance market ...
Luxury cars starsLuxury cars of the stars
Celebrity cars must match their star status. They simply cannot come in something modest and generally accessible. Their vehicle must match their popularity. The more popular a person is, the more sophisticated the car should be. Globally Popular Stars Let's start this review with ...
Rating of the most expensive carsThroughout the history of the automotive industry, designers from the mass serial models have always liked to highlight a few unique in characteristics and capabilities. At the present time, this approach to the design of cars has been preserved. And to this day, many global auto giants and small companies strive to ...
Reliable cars rating 2017Reliability is by far the most important requirement for a car. Design, tuning, any "bells and whistles" - all these ultra-fashionable tricks in their importance inevitably fade when it comes to the reliability of the vehicle. The car should serve its owner, and not cause him problems with its ...
How to choose new car? In addition to taste preferences and technical characteristics the future car, a list or rating of the best-selling and most popular cars in Russia in 2016-2017 can help you. If the car is in demand, then it deserves your attention. The obvious fact is the Russians ...
Test of four sedans: Skoda Octavia, Opel astra, Peugeot 408 and Kia cerato
Before the test, we can safely say that it will be "Three against one": 3 sedans and 1 liftback; 3 supercharged motors and 1 aspirated. Three cars with a gun and only one with mechanics. Three cars are brands in Europe, and one is ...
I polish my headlights every year. I do this with toothpaste. First, I apply the paste in a thin layer on the glass, let it dry, and then wipe it off with a dry cloth. Repeat the operation until all micro scratches disappear. Usually five times is enough.
During the operation of the car, chips, scratches and other damage appear on the glazing surface of the headlights. Plus, the plastic becomes cloudy over time. All this leads to the fact that the efficiency of the luminous flux decreases and the appearance of the headlights deteriorates, which can be corrected either by polishing, or, as we wrote about earlier.
The reasons for clouded car headlights can be:
- scratching the glazing during poor-quality washing;
- natural aging of plastic;
- damage to the glazing.
Most car owners polish their headlights during pre-sale preparation or for maintenance. Experts recommend polishing your optics at least once every two years. There are no fundamental differences in how to polish headlamp glass or plastic glazing. However, there are still some features. Plastic is more sensitive to overheating, so you should handle this material very carefully and avoid overheating.
How to polish your headlights yourself
The process of polishing car headlights is quite simple. Therefore, do not be afraid of the problem of how to polish plastic headlights with your own hands. Any person can cope with this event with the appropriate tools and materials.

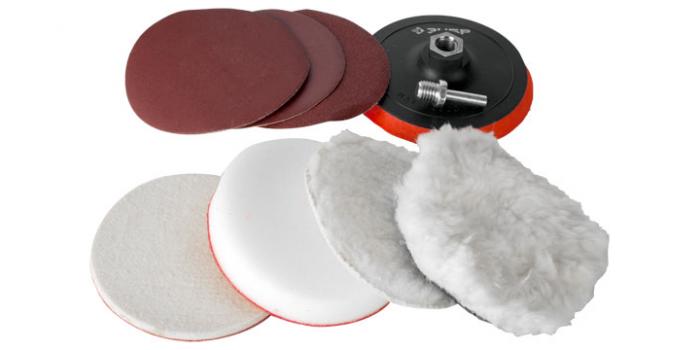
Prepare the following for polishing:
- a sander, if it is not there, you can use a conventional drill with attachments;
- sanding paper gr. 600-2500;
- abralon (propelled abrasive) 600-4000;
- filling abrasive paste "3M" No. 74 and 76, approximate consumption 50 gr. for each headlight;
- felt soft cloth;
- masking tape;
- foam rubber polishing wheel;
- container with water, gloves and goggles.
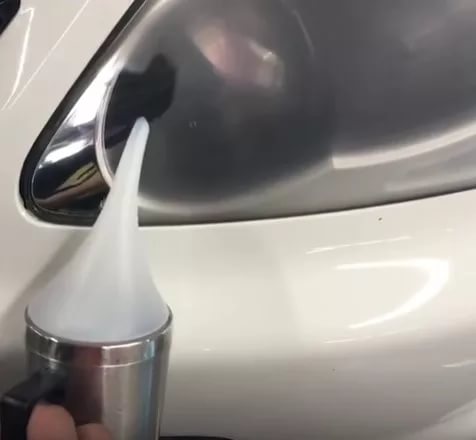
Before polishing the headlights, the first step is to prepare the car, in particular the optics. The glazing of the headlights should be thoroughly washed and dried.
If necessary, remove any residual sealant, resin or other foreign material from the glazing. After that, we glue the adjacent surfaces to the headlights with masking tape to avoid damage during the sanding process. If you decide to polish the headlights after removing them from the car, then this procedure is not necessary.
How is the polishing of plastic headlights
Experts recommend to pre-soak the sanding paper in water for 12-15 minutes before sanding. Also, during the polishing process, you should regularly rinse the skin with water to remove accumulated waste from its surface. Wet sanding will provide an even sanding without damaging the work surface. Deep chips and scratches should be treated in several steps.

High-quality results in polishing can be achieved if you follow a special technique on how to polish the headlights with your own hands. You need to start cleaning with the finest sandpaper and gradually move on to coarser grit. In no case should the order be disturbed, otherwise the surface may become dull and cloudy. After sanding with sandpaper, you can start processing the optics with abralon.
All stages of polishing must also be carried out in strict sequence, first 600, then 1000, and so on up to 4000. It should not be overused. high turnover grinding machine. 1000-1500 rpm will be quite enough. It is periodically necessary to rinse the abralon in water. The wet material acts more gently on the plastic glazing and does not create unwanted deposits during the polishing process. When working with dry material, the wiped off plastic dust heats up and adheres to the surface of the headlight. In the process of polishing with abralon, it is necessary to achieve a smooth matte surface without any damage or scratches.
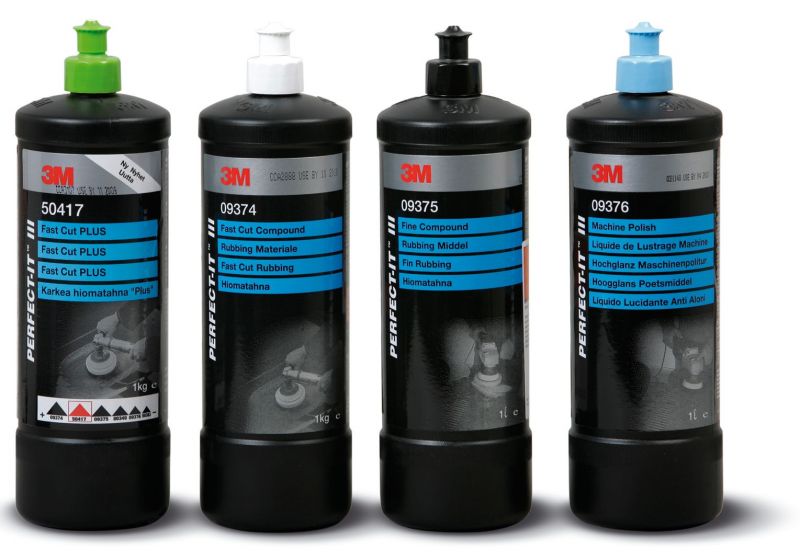
In the next stage of polishing, it is necessary to eliminate the matte and dull effect of the plastic. To do this, apply a layer of abrasive medium-grained paste No. 74 to the glazing surface. With the help of this material, which fills in all microcracks and irregularities, you need to give the plastic a smooth transparent appearance. The paste is rubbed in with a polishing foam rubber wheel at a grinding machine speed of no more than 2000 rpm.
After processing with paste # 74, we carry out a similar polishing to a shine using the same paste, but with fine grain, # 76. After processing the headlight, wipe the glazing with a soft cloth.
You can use a wool pad instead of a foam pad. But sheepskin is less effective and requires more polishing paste. You can also polish your headlights manually without using a grinder or drill. This procedure is performed in a similar manner, but it will take you much more time.

After a successful polishing of the headlights, all the flaws in the glazing inside will be visible. You may need to remove dust or cloudiness. To remove dirt on the glazing with inside you will need a hairdryer, preferably an industrial one. If you don't have such a tool, you can use a regular hair dryer. First, we warm up well the joints of the case with the glazing. As the sealant softens, carefully open the headlamp unit. In doing so, be careful not to damage the heated glass. Once the headlamp is divided into parts, remove all the dirt inside the glazing with a soft cloth or napkin. If necessary, you can polish the glazing of the headlights from the inside. The assembly of the headlamp is then carried out in reverse order... It is better to use the WS-904 series to connect and seal the headlight.
- Before the purchase abrasive paste it is necessary to clarify what types of plastic it can be used for, as each of its types is intended for processing a certain material.
- The best option for polishing headlights on your own are special kits of the "3M" type. They include all the necessary components: a set sanding paper, foam and polishing wheels, a set of special pastes, masking tape, holders for sanding discs and more.
- If there is no special grinder, you can use a drill, but always with a power regulator.
- Avoid overheating of the glazing when treating the surface of the headlamp.
- If there are deep headlights on the glazing, they must first be filled with a special polymer material. After complete hardening of the polymer, grinding and polishing is performed.
- It is recommended to polish the headlights with your own hands if the glazing is cloudy and minor scratches up to 30 microns deep. If the headlamp has deep cracks and chips, it is better to seek professional help.
- Before polishing the headlights, it is recommended to remove them from the car, first disconnecting the battery. Polishing of headlights on a car is undesirable and is performed only in those cases when the removal of the headlamp block is difficult for any reason.
- For each type of paste, you should use a separate nozzle (circle, sponge);
As practice shows, you can use GOI paste or toothpaste to polish the headlights. With due diligence, good results can be achieved.
As you know, only thanks to optics, a driver can safely drive a vehicle at night. If the headlights are damaged or dirty, the safety of the machine is significantly reduced. Therefore, the driver should not only regularly clean the optics of the car, but also polish the headlights. We will discuss this process in more detail below.
Why do you need polishing?
Why polish? The cleaned optics primarily give the vehicle an attractive look, making it more attractive. But no matter how you pay attention to the care of the optics, sooner or later, small scratches and damage will begin to appear on it. They are formed as a result of the impact on the lamp with sand falling on it during the operation of the car.

As a rule, if the driver notices that the optics have begun to work worse, first of all, the thought of replacing the bulbs comes to his mind, but there is no need to rush with this. First, you should assess the condition of the glasses on the headlights in your car. When exposed to the optics of sand and small stones when moving on high speed traces will remain on it in any case.
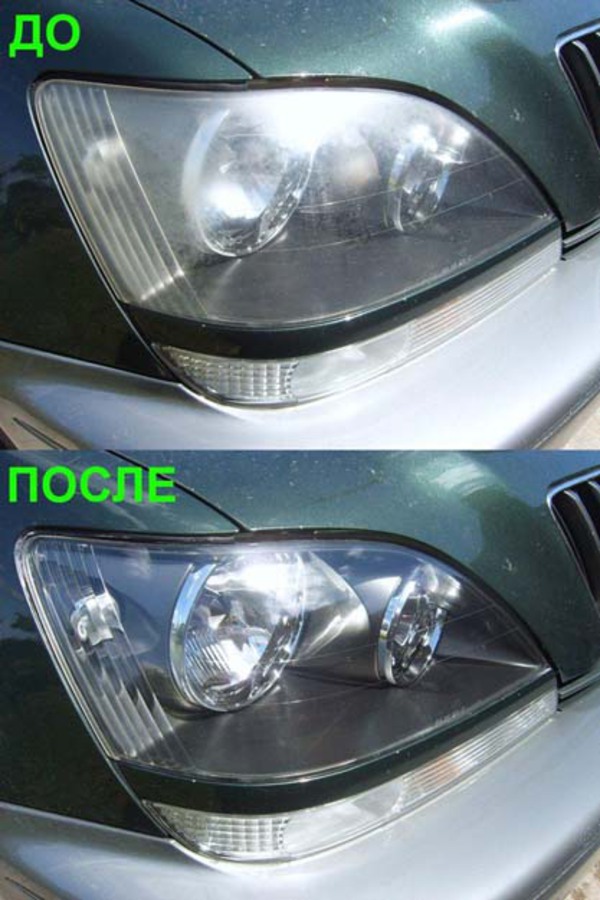
Accordingly, the optics begins to emit not a directed light beam, but a simple spot of light, which, of course, cannot normally illuminate the road. If you are driving at night, then this damage will refract the beam of light and impair the overall view of the road. If we are talking about damage of small depth, then you can get rid of them. Polishing your car headlights will allow the optics to return to their prime appearance.
Polishing Guide
Do-it-yourself polishing of car headlights means dismantling the protective glass or plastic from the optics structure. As you know, the protective layer allows you to increase the service life of the headlight as a whole, thanks to it it does not grow cloudy. So when you can polish and sand the glass layer, it can also be treated with clear varnish for protection. This substance will help protect the layer from the effects of sand and stones.
If we talk about varnish, then for this purpose it is optimal to use transparent acrylic, which must be applied to the lantern with a double layer. It is necessary to dwell on the technology of varnishing, since there are some nuances here - the varnish is applied only with careful movements from top to bottom, while drips cannot be allowed. It is necessary to apply varnish slowly and without stopping so that the substance does not dry out. Ultimately, this approach will increase the service life of the optics as a whole.
Of course, during the application of the varnish, you must adhere to cleanliness, since dust or debris can get on the varnished surface. The varnishing procedure may well be carried out at home.
Preparatory work
Before polishing the optics, first of all, it must be well washed and wiped with a rag. After that, stick the tape on the adjacent parts of the vehicle body to prevent damage paintwork... Polishing rear lights or front optics is carried out without removing the lights from the car. Dismantling is carried out only if it is necessary to carry out the internal processing of the protective layer.
It should be noted that before properly polishing the headlights, it is necessary to protect the sealing gum, as they are susceptible to degradation by abrasives and polishing agents. If there is contamination, it must be removed using special cleaning agents. If you use vinegar, you can simply dissolve it in water. As you know, modern vehicles equipped with plastic glasses on optics.
In this case, you will not need a special and expensive means for polishing headlights with diamond dust; you can also use folk methods for the procedure:
- process with a razor blade;
- use toothpaste or GOI paste;
- try to burn with a flame or treat with oil (video by RomadriverTV).
But such options are outdated, so we will not use them. Today, headlight polishing technology can be completed in a matter of minutes. The procedure will be done by hand using a drill or grinder.
Method 1
Polishing of plastic headlights can be carried out using Abralon - special wheels with an abrasive layer on a dense fabric. These discs, which come in a variety of grit sizes, are designed for use on a sander. After processing with Abralon, you can use any polishing agent identical to 3M. In addition, you will need a soft cloth and tape to protect the elements and parts around the optics themselves.
In total, you will need about 10-20 dollars to complete this task, but this money will be enough to polish dozens of headlights. Using a grinder will greatly speed up and simplify the recovery procedure, but if you do not have such a device, or the grinding area is minimal, then you can use your hands. So, first, coarse grinding with Abralon is performed, while the circles must be moistened before use to increase efficiency. Ultimately, you need to ensure that the surface of the headlamp is even and uniform, after which it is rinsed with water. Then the less grainy circles of Abralon are used for final processing (video author - AutoTOTEMM).
That is, first a grain size of 600 is used, then 1000, then 2000 and 4000 - this technology will allow you to achieve an almost transparent plane. But during the process, you should not press too much on the typewriter, since the protective layer can simply overheat and crack. If the revolutions of the device are medium and you will not press hard on it, this will be most optimal. Remember to moisturize the circles regularly as well. If you don't have a grinder, you can replace it with a drill, which allows you to adjust the speed. For such a drill, you will need to buy a disk nozzle.
Method 2
The second way is to use a special set from 3M. In the kit you can find discs with different grain sizes, special paste, and a wheel mounting device.
The grinding procedure is carried out as follows:
- First, the surface that adjoins the optics must be covered with the supplied tape. This way you can prevent possible damage to the body.
- Then, slowly, you should process the protective layer with paste and discs, which also come in the kit. To do this, you will need a drill or sander, and a regular spray bottle. In general, you can also find instructions in the kit.
- In total, you will need to spend up to one hour. We will not describe this procedure in detail, since it is similar to that described above.
Method 3
The latter method involves the use of abrasive skins of different grain sizes - from 600 to 2000. They must be purchased in advance and put in water for ten minutes. In the presence of deep damage to the optics, the sanding procedure should begin with the 600th sandpaper, while the grain size should decrease. In the absence of deep scratches, the processing procedure can begin with 1000th sandpaper. The optics processing procedure is carried out according to the method described above, only now you have to act manually.
The final step is to use a 2000 grit skin. It should be noted that after you change the skin, safety glass will need to be treated with water. As in other cases, the final sanding is done with a soft cloth and a special polish, as shown in the video. When the procedure is completed, the optics should be rubbed with paste to give them a more shiny appearance.
Glasses of headlights (polycarbonate) become cloudy over time from scratches or minor damage, and this leads to the fact that the headlights begin to shine worse and the driver has difficulty driving. Do you dream that your headlights will shine like new again? This is much easier to do than it might seem at first glance.
Car service
The most common way is to contact a car service specialist who polishes headlights. To perform this operation, they use a polishing paste and a special sander. The polishing process can be roughly divided into three stages. At the first stage, abrasive materials are used, with the help of which minor scratches... During the second stage, the headlight is prepared for polishing; smaller abrasives are used. At the final stage, polishing is performed directly. Special compounds are applied that restore plastic, and wheels are also used for polishing of various hardness. At the end of polishing, the optics surface becomes perfectly flat.
However, there is a nuance. Surely many of you have seen such cars on the roads, the headlights of which had yellowish and even dark glass. The fact is that plastic headlights are afraid of overheating. Some polishers, not observing the technology of polishing the plastic, overheat it, as a result the headlight darkens. Therefore, it is very important to choose proven car services that you know and trust. The price of polishing from specialists is from 1.5 thousand rubles.
Headlight polish
(What we are talking about is described below)
You can also polish the headlight with your own hands using a special polish. This will require a 2000, 1000, 800 and 600 grit sandpaper. Soak the entire material in water for ten minutes. Use the finest grit sandpaper for the first coarse polish. This approach is relevant only in the case of deep scratches. If there are none on the headlights, you can start with 1000 grit sandpaper. Follow the standard procedure and finish with 2000 grit sandpaper if desired. Finishing polishing involves the use of a soft, dry, clean cloth and polish. Rub the headlight and enjoy the brilliant result you achieved yourself. It is worth noting that hand polishing ensures that the glass of the headlight does not darken, as is often the case in car services when the machine is used. The cost of headlight polish varies from 250 to 2.2 thousand rubles.
Toothpaste
It is interesting that some motorists on the pages of Internet forums advise not to spend money on the services of service centers and expensive polishes. It turns out that you can remove scratches and give the headlights their former transparency using ordinary toothpaste. Note that for this method there are certain risks of damaging the plastic.
It is not recommended to use mint or bleach pastes, as they contain abrasive components. They can leave minor scratches on the surface of the headlight.
The paste should be applied to the surface with a soft, dry cloth. Rub in in a circular motion until all dirt is removed from the headlights. After the headlights, rinse in water and wipe thoroughly with a damp cloth. At the end of all procedures, you can apply a little polish to give the headlights a shine. The price of the toothpaste is 50 rubles.
I am glad to welcome all curious motorists again! By popular demand, a material was prepared on the topic of correct and careful and other car lighting devices. We have already touched upon the topic of interior cleaning with automotive cosmetics. Now I would like to dwell in more detail on the question of what is needed to polish the headlights with your own hands.
The new car traditionally attracts with its beautiful, shiny and fresh appearance... This is equally true for headlamps and other light sources. After a certain period of time, the headlights lose their attractiveness, become cloudy and become covered with a yellowish coating. In addition, it directly affects safety when driving in conditions of limited visibility.
The simplest solution is to regularly wash the light sources with detergents and wipe them with clean rags. But even this does not give the desired effect. Replacing bulbs is also a way out of the situation, since it's all about the poor-quality coating of the plastic or glass headlight. Despite the fact that the modern market for car accessories and chemicals offers a large number of different cleaning agents, you need to know more about the technology of headlight polishing in order to achieve the desired result in a short time and at low cost.
So, the main reasons why glass headlights become cloudy and require polishing are as follows:
- dirt and dust from the roadway that cover glass and plastic while driving;
- residues of chemically active substances (tar, oil, gasoline) from other vehicles;
- aggressive reagents that affect the car during washing, etc.
What is the minimum set of tools needed
To polish the headlights yourself, you need a polishing paste, cleaning kit, fine sandpaper, clean cloths, water, detergent, Sander. It needs to be set to medium operation, which allows no more than 1500 rpm, since glass is a rather fragile material. During the grinding process, water must be constantly poured onto the surface of the headlight in a small stream. After that, the glass must be allowed to cool. Please note that a refurbishing cleaning and polishing kit is usually available in the form of several grinding wheels with varying grain sizes.
When sanding is finished, the surface of the headlamp should be matte to the touch or even slightly rough. Now it needs to be thoroughly washed from the remnants of abrasive material, after which it will become smooth again. You can squeeze the polishing material onto the wheel and start polishing the headlight. Fog lights are cleaned and polished in the same way. There is a video on the network where you can learn more about step by step algorithm how it's done. They have thicker glass and require more water wetting.
We clean the headlights with toothpaste
The most simple and in an accessible waythat can be applied even at home is toothpaste polishing. This technology works with success for light sources, both glass and plastic. If there are no large scratches or damage, then you can achieve a good effect without much investment. This is due to the fact that toothpaste itself is a kind of abrasive material, and it is quite possible to use these properties.
Plastic headlights perfectly clean from dirty and muddy deposits. You need to stock up minimally necessary tool and consumables: a tube of any paste, clean towels or rags, a container of clean water. The work itself is performed approximately according to the following algorithm:
- the headlight cover is removed;
- a small amount of paste is applied to a clean rag;
- then, with the help of a rag, circular movements are made;
- the remains of the paste must be washed off with clean water;
- the surface is wiped dry with another towel or napkin;
- a polishing agent is applied;
- it remains to admire how the headlights began to look after the whole procedure.
Cleaning from the inside
Cleaning the inside of the headlights can also be beneficial, as plaque builds up there as well. Therefore, we have already given the external gloss to the light sources, but the lighting itself may still leave much to be desired. For this, the headlights are dismantled. A grinder is not required to work inside the hood - all actions are done by hand. First, the headlamp cover is cleaned of visible dirt and degreased with detergents.
After that, it is rinsed and wiped dry. Plastic or glass is sanded with either a paste or fine sandpaper. The abrasive can be washed off and the inside of the hood can be rinsed again. After drying, apply a small amount of polish and polish with a clean cloth until a shiny surface appears. It remains to install the light sources in their original place.

What gives hot steam and what to cover after polishing
Another effective technology is hot steam polishing. Although it is more correct to call it cleaning. This is a safe method of cleaning, since the steam does not contain chemically aggressive components. It works no less efficiently than various reagents, and the water itself, which is converted into steam, is pure.
The surface load on the material of which the headlamp is made is minimal, while the penetrating power of hot water is maximized. Thus, it is easy to clean the texture, and the procedure itself does not exceed several minutes in duration. This technology is widely used in modern car wash stations.
Steam cleaning has the following benefits:
- differs in environmental safety;
- affordable for most car enthusiasts;
- steam penetrates deeply into the surface and at the same time disinfects it;
- high temperature water effectively dissolves any deposits.
 Finally, we ensured that the lights shine like new and look attractive. It remains to figure out what to cover the headlights after polishing. It is no secret that the cleaned surface requires protection, otherwise the effect of the procedure will be short-lived. One of the popular options is to coat the surface with acrylic varnish. Due to the fact that it successfully fills miniature cracks, the surface becomes smoother and the glass itself becomes even more transparent. Moreover, according to the reviews of car owners, the effect of the procedure lasts for months.