Welcome!
Ball joints are a very serious element of the front suspension, this applies especially to classic VAZ cars. There are twice as many ball joints as in front-wheel drive cars (4 pieces), due to which the car becomes more dangerous. After all, if you do not keep track of and drive a car on which the ball joints are out of order, then the wheel may simply fall on its side. If you drive at this time, the car will immediately lose control and it will be very, very difficult to stop it. We want to show you a vivid example in the video below, where the ball joint fails, and right wheel the car just falls on its side.
Note!
To carry out diagnostics of ball joints, you need a mount or a mounting paddle or scrap; in addition, a very thin stick will need either a metal or just a twig, but, which is very important, the stick should be even, without bends and the like. (It is best to use a metal stick with a length of 5.6 cm). And besides all this, you will need a ruler and a small knife. Or instead of a stick, ruler and knife, take a good caliper that will replace all these tools!
It all depends on the area where the car is used. If you operate it in very large cities (such as Moscow), in the very center of the city, mainly in ideal roads, or in St. Petersburg, where the roads are clearly not inferior, then you may not even bother with the diagnosis of the suspension. Just look there once a year or every 100,000 km, check everything and keep driving. But, basically, Zhiguli cars are used in small towns, villages and similar places where the roads, as they say, leave much to be desired. In this case, the diagnosis of the entire suspension as a whole, as well as the diagnosis of ball joints, should be performed as often as possible, approximately every 20,000 km. Or after a good hitting into a deep hole at speed. Thus, you will always be confident in your car and will not be afraid to operate it, because after a thorough check, you will know with high accuracy that the suspension is fully functional.
Note!
Few adhere to this, because every 20,000 km it is rather expensive to look into the suspension of a car for people who drive almost every day, and these 20,000 km will roll off in a very short period. In this case, the diagnosis of ball joints can be made immediately after the appearance of a dull knock in the front of the car or when driving into a pit. Usually, such a sound appears when one of the supports fails, but until you hear this sound, you will not understand whether the ball joints are working correctly or not. Perhaps these knocks can even be imagined. Therefore, so that this does not happen and you simply do not climb into the car's suspension, take a closer look at the video below, which shows a car with a faulty and noisy ball joint.
How to diagnose ball joints on a VAZ 2101-VAZ 2107?
Note!
Ball joints are diagnosed in several ways, the most correct of which is the last (third) method. If you act according to it, then you will immediately understand whether the support needs to be replaced or not yet. But there is a big disadvantage in this method, because to implement it, you will need to remove the ball joints from the car, and this takes time. Therefore, in this way, few people check the ball joints for serviceability. On the other hand, if you correctly carry out the other two methods of verification, they will also give their result. And if the ball joints are very badly damaged, then by checking them in such ways, it will also be possible to understand that they are faulty and must be replaced.
Method one (hanging the car and loading the front suspension):
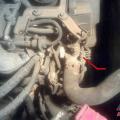
- First, remove all the nuts securing the wheel to the car, and then raise the car with a jack. As soon as it hangs in the air, completely unscrew the nuts and remove the desired wheel from the car (read the article ""). After the performed operation, place planks (indicated by the red arrow) under the lower suspension arm and lower the car on them. After that, you will have to get it so that the car lies completely on the suspension, or more precisely, on the spring. The part on which the wheel is put on (indicated by the blue arrow) will have to hang in the air. That's all, proceed to check.
- To check the ball joints on a car by hanging the car, do the following. First, take a pry bar (as an option, a crowbar or a mounting paddle) in your hands, and then insert it as shown in the photos below. On big photo shows how to fix the mounting vane when checking the upper ball joint, a small photo shows how to fix it when checking the lower ball joint. In the small photo, little is visible and it is difficult to understand where the mounting paddle should be inserted. But when you work with a car live, you will immediately understand everything and, using the spatula as a lever, move it down, up, down, up, etc. During this procedure, do not damage the boot, be careful. In the event that the support is severely damaged, then the suspension will walk strongly and, with a little effort, already move. In this case, the ball joints must be replaced.
Note!
It is best to check only the upper ball joints in this way, because the lower bearings are checked slightly differently. For more information on how to do this, read Method 2 below!
Method two (checking the lower ball bearings using a vernier caliper):
Let's start with the fact that not all motorists have calipers. If you are in this number, then take a knife, a thin wire and rulers and also start checking. First, you will need to use a 7 mm wrench (or ring) and completely unscrew the bottom plug of the ball joint (indicated by the red arrow) with their help. Then insert a caliper into the hole (some calipers have a special thin part) and measure the distance it will enter. If it is not possible to insert a caliper (it rests against the ground, for example, but there is no jack) or if it is not there, then take a thin wire, insert it into the hole until it stops, make an incision with a knife flush with the end of the ball joint and remove it. Then measure the distance from the end of the wire to this notch with a ruler. If this distance is greater than 11.8 mm, then the ball joint must be replaced.
Method three (removal of ball joints and visual inspection):
This is the longest way, but on the other hand, you will know for sure whether the ball joints are in good working order or there is already play in them and they are all broken. In order to implement this method, remove the ball joints you need from the car (How to do this, read the article ""), then carefully inspect the boot of the ball joints. It should not have cracks, tears and similar defects. Then remove the boot completely; make sure that there is grease in the ball joint and that there is no water, dirt, etc. in the ball joint. Next, grab the tip of the ball finger (see photo below) and swing it from side to side. The finger will have to move with the effort of the hand, but hard. If the finger dangles and moves easily, or if you cannot even move it, then such a ball joint is considered faulty and must be replaced.
A ball joint or a ball joint is, without exaggeration, an ingenious invention that has been used for many years in the automotive industry and not only. Balls are on different types suspension: this and how.
The ball joint allows the wheel hub to pivot in a horizontal plane. If it were not for the ball, most likely, turning the steering wheel would be impossible. Before the advent of these hinges, their role was played by pivot joints or simply pivots, which required periodic lubrication, were heavy and imperfect, moreover, they allowed the wheels to turn only along one axis.

Structurally, the ball joint is a ball to which a tapered "pin" with a thread is attached. The ball is located in a seat that allows the ball to move and at the same time holds it securely. The other, threaded part of the hinge is attached to the hub lever.
A ball malfunction manifests itself in the form of a crunch, a thud, and also a backlash in the joint of the hinge. Sometimes a "dead" ball joint has the same signs as and, therefore, before you buy and replace, you need to know exactly what exactly has failed. More severe cases result in complete destruction of the hinge and lead to the fact that during the movement the wheel completely falls off. The consequences in this case can be very different, depending on the speed and road conditions ... In general, it is impossible to delay the repair in any case, and at the first signs it is necessary to take drastic measures.
A bad road, as well as a lack of lubrication, leads to a malfunction of the ball joints. The second most often occurs after damage to the anther of the ball joint. Riding on smooth roads without humps and pits - a guarantee of the serviceability of any chassis, but in our realities this is hardly possible. In this article I will tell you how to check the ball joints in order to understand if the ball joints need to be replaced.
Methods for checking ball joints
How to check the ball joint without a lift?
Checking the ball joint, as a rule, is carried out on a pit, overpass or lift, however, if none of the above is not present, you can try to diagnose, as they say, in field conditions... To do this, you can use or dispense with visual inspection. Your task is to detect damage to the boot (cracks, tears, or its complete absence) or any other abnormality that could indicate a breakdown of the hinge.
Closer check

Before you check the condition of the ball joint in this way, you still need to get hold of something. This will require a pry bar, viewing hole, or an alternative. We hang it out, after which we swing it in different planes, so as to detect backlash. If nothing is found, we take a pry bar and install it in the opening between the lever and the hub. After that, we try to take this connection to rupture, there should be no backlash, as well as knocking.
Checking the ball joint with removal
The most difficult and time-consuming way to check the ball is to dismantle it. To do this, you will have to partially disassemble the hub assembly, then press out the support and make a detailed inspection of the ball. By the way, not only backlash is a sign of a faulty support, light turning of the hinge around the axis is also considered a deviation from the norm and a sign of wear.
What to do if the ball is defective?
If the ball has "died", do not rush to throw it away, its price is often quite high, especially for "business" and "premium" cars. Therefore, it is not surprising that these elements have learned to restore and restore. If restoration is impossible, you cannot avoid complete replacement node. The procedure is not complicated and is quite often performed in a garage, so do not rush to look for a suitable service station and overpay for what you can try to do on your own.
I will end on this, I hope you have received an exhaustive answer to the question of what a ball joint is and what is it for. In addition, now you know how to check the ball joint different ways, and also identify its malfunction. Share this article, if, of course, you liked it, with your friends on social networks, so you will contribute to the development of our project. We appreciate every repost and are grateful to each of you! Let good people read good articles!
How to check the ball joint video
Self-check of ball joints
No suspension designs modern car, is not complete without the use of a ball joint. This hinge is usually used in the suspension of the front axle of the machine, but there are cases of rear application.
The purpose of the ball joint
The ball joint is a pivot element that connects the lower suspension arm to the steering knuckle. Serves for fixing and rotation in all planes of the steering knuckle. It is one of the main rotational elements in the turning of the steered wheels.
What is its design
At the base of the ball joint, there is a finger with a ball at the end, tightly rolled into the support body. Between the ball of the finger and the body, there is a Teflon layer and a special lubricant. On the upper side of the ball joint there is a rolling, which fixes the ball pin in the housing, and on top of it there is a boot that prevents grease leakage and prevents the ingress of abrasive particles.
What usually fails
The main symptoms of malfunctions
1. When the car moves on a straight road, there is a sideways movement, as well as a deterioration in stability and controllability.
2. Increased tire wear is possible, from the side of the faulty hinge. As a rule, the inner part of the wheel begins to grind hard.
3. There may be a knock when driving through irregularities, radiating towards the lower suspension arm.
How to check the condition and serviceability of the ball joints yourself.
In order to independently carry out diagnostics, the state of the rotary bearings of the steering knuckle, it is enough, first of all, to know their structure and principle of operation. Namely, this will allow you to understand all the subtleties of the work.
Diagnostic methods on your own and without a lift
2. Open the hood, put your hand on the rack cup and shake the car vigorously 2-3 times. The appearance of impulse shocks in the cup will be a "wake-up call" about possible malfunctions in the suspension. (principle this method, similar to listening to rails while waiting for a train)

3. Raise the wheel with a jack to a free state, place an additional emphasis under the car for safety reasons. Then take the wheel in the extreme upper and lower parts with your hands and swing it in a horizontal plane (with one hand towards you with the other away from you). If you feel any play or knock in the suspension, the ball joint is most likely faulty.
be careful wheel play in all planes can be the cause of worn hub bearings, but the difference in vibrations in this case should be much less.
4. Remove the wheel with the vehicle jacked up. Using a spudger or wide flat-blade screwdriver, place it where the arm is attached to the steering knuckle. By mechanical impact, very carefully check the backlash condition. If there is no backlash and the boot is in good condition, then the ball joint is in good condition.
Interesting fact
Diagnostics of ball joints, it is convenient to do at the time of off-season tire change, when the car is suspended on jacks, you can check the backlash in the supports without much effort.
Average service life of ball joints
A big difference in the service life of these supports is made by the quality road surface and the driving style of the motorist. Also, the height of the rubber profile plays an important role, which has been repeatedly established. Have cars with low rubber profile, the service life of the ball joints is, on average, 2-3 times shorter than that of cars with a medium and high rubber profile, and this is mainly due to weak damping of wheels, shocks from road irregularities, which in turn are transmitted to parts and suspension units. The resource of ball bearings in 65-90 thousand km., and on the "low" profile, a rare case when you manage to leave 35 thousand km.

A very important argument I would like to point out is the fact that ball joints in the car design are one of the main elements of safety in driving. vehicle... It is strongly recommended to diagnose and repair them in a timely manner, using only trusted and high-quality manufacturers.
The wear of the ball joint can lead to the fact that it will simply jump out of seat... This can happen at any time, and serious irregularities are not necessary at all. Since the condition of our roads is far from ideal, ball joint failures are very common. Probably, you have repeatedly seen the consequences of a ball joint failure in VAZ cars. Very often it all ends rather sadly. IN best case the car is in a ditch, at worst - on oncoming lane... In order to avoid such unpleasant consequences of a breakdown, it is very important to understand how to check the ball joint with your own hands, because you will simply get bored of constantly going to the service.
Sometimes, when the ball joint takes off, it is necessary to restore the vehicle's performance right on the road. This means that you have to look for friends / acquaintances who are ready to take the time to help you. The second option is to leave the car at the scene of the accident and go to the store for new part... If you still do not know how the ball joint is replaced, additional difficulties will arise. Therefore, it is better to clearly understand how the ball joint is diagnosed and check it regularly.

Ball joint wear symptoms:
- The appearance of knocking while driving at minimum speed on a poor-quality coating (if the ball is worn out, the gap between the finger head and the inner surface of the case increases noticeably, which causes a kind of backlash).
- Uneven rubber wear.
- The appearance of a characteristic squeak when turning the steering wheel.
- Wagging during straight motion.
If you plan to check the ball joint on your own, you need to raise the car on a lift (you can do with a jack). You will not be able to determine the wear of the ball joints without raising the machine.
The first stage of ball diagnostics is to check the condition of the anther. Even minor damage that appeared on this protective element, lead to the ingress of particles of dirt, sand and water into the ball joints, as a result of which their service life is significantly reduced.
 After that, you need to grip the top of the wheel with one hand, and the bottom with the other. Make sure there is no play by swinging the car wheel. This method is used to check the radial ball play. It is also necessary to check the axial play of the ball joint. To do this, grab rounded fist and try to rock the suspension up and down with considerable force.
It should be understood that these methods cannot help establish the exact level of wear of the ball joint. For best results, always remove the ball joint when inspecting it. True, if already during the "manual" diagnostics you noticed a significant backlash, and during the movement the aforementioned factors appear, the ball will have to be changed in any case.
In addition, it must be understood that the appearance of a significant backlash makes it almost impossible to repair the ball joint. In such cases, they just need to be changed. If you have no desire to invest extra money in car repairs, we advise you to regularly check the ball and other elements of the car's chassis. This will help eliminate problems in the early stages of development.
When diagnosing suspension elements, you need to know how to check the ball joint. It is a system component that allows the wheel hub to rotate under the action of the forces transmitted through the tie rod ends. Ball joints are installed both on and on front-wheel drive. Only in the design of the first there are more of them, since a two-lever system is used.
The gaps in the upper hinges of the VAZ 2101-2107
To independently diagnose the condition of the ball joints, you need a special tool for measuring the backlash and a torque wrench.
The diagnostic procedure looks like this:
- Before checking the ball joint, you need to place the car on a level surface and raise the side on which the diagnostics are carried out.
- Loosen the bolts on the wheel in advance, and after lifting, unscrew them.
- Remove the wheel and place it under the engine.
- A wooden beam must be installed under the lower ball joint. Its height should be 19 cm.
- Lower the car onto a block. The surface on which it is installed must be solid. Work cannot be done on the ground.
- Install the device bushing on the upper ball nut, which is closer to the protective casing brake disc.
- Put the device on the sleeve and fix it with a bolt.
- Move the fixture to set the arm upright. Its lower edge should rest against the brake disc cover. Then tighten the bolt.
- Install the indicator in the base stand until it stops. The tension should be no more than 2-3 mm.
- Fasten the bracket to the wheel hub with two wheel bolts.
- Install the torque wrench on the hex head.
- Turn the key with a torque of 196 N * m (or 20 kgf / m) in one and the other direction.
- Add up the readings that will be on the indicator.
The sum of the readings should not exceed 0.8 mm. If it differs from this value, then it is required to change the ball joint. Riding a broken one is not only uncomfortable, but also dangerous - at any time it can pull a finger out of the clip. And if it happens on high speed, a fatal outcome cannot be avoided.

The second diagnostic method
But such a tool for measuring backlash is not always available. It is much easier to carry out all the work with the assembly blade. This will require an assistant who needs to be driven. Diagnostics is as follows:
- The partner must press the brake pedal to hold the hub. This will eliminate the possibility of bearing play during diagnostics.
- Raise the side of the vehicle to be diagnosed.
- Rock the wheel sharply, holding it by the top.
- A mounting paddle can be used by placing it between the upper arm and the hub. Move the lever up and down, assessing the play between the support ring and the finger.
In the event that you find play in the upper ball joint, be sure to replace the element.

Diagnostics of the lower ball
And now about how to check the ball joint located on the lower arm at the VAZ. To do this, you will need to perform several actions:
- If there is dirt on the bottom of the ball joint, it is imperative to remove it.
- Using the "7" key, unscrew the plug, which is located on the bottom of the clip.
- It is convenient to carry out diagnostics on an overpass or inspection pit... To do this, install a vernier caliper in the hole and measure the distance from the ball of the ball pin to the bottom edge of the body.
- In the event that it is not possible to install a caliper depth gauge, you can use a thin wire or even a match. Install it in the hole, then measure the distance with a ruler.
- The maximum distance from the finger should be 11.8 mm. If less, then the ball joint can continue to be used. But if this value is greater, the hinge will need to be replaced.
If diagnostics have shown that replacing the ball joint is not required, drive a little grease inside. For this, you can even use a simple syringe installed in the hole in the lower part of the holder. It is advisable to use Litol-24 grease. It can also be hammered under the boot.

Preparing for replacement
After checking the ball joints on the VAZ, revealing their breakdowns, be sure to replace them. During the preparation phase, you will need to do the following:
- Place a jack under the side of the vehicle to be repaired.
- Under rear wheels Install chocks.
- Loosen the bolts on the wheels, then lift the side of the car. Remove the wheel and place it under the engine floor.
That's all, preparation is over. Now it is necessary to dismantle the old ball joints and install new ones.
Replacing the upper supports
To remove the upper support, you will need to perform the following manipulations:
- Using a wrench on "22" it is necessary to unscrew the nut, which is located on the hinge pin.
- Then you need to press out the hinge pin using a special puller consisting of two levers. One edge rests on the lower ball finger, the second on the top. You can do this job without a puller, but you have to hit very hard with a hammer. As a result, you will easily break the suspension arm.
- After the ball pin comes out of its place, it is necessary to unscrew the nuts, which fasten the clip to the lever, using keys on "13".

Replacing the lower supports
After checking the ball 2107 and making sure it is broken, you need to unscrew the bolt from the finger. But you won't be able to completely unscrew it; first, make a few turns. Further actions:
- Install the puller and remove the ball joint and hub pin. After that, you can completely unscrew the nut.
- Using keys on "13" it is necessary to unscrew the three nuts that secure the ball joint housing to the suspension arm.
Before installing new elements, it is necessary to fill a sufficient amount of grease under the boot. Be sure to check the integrity of the rubber boots.