A halogen lamp differs from an ordinary light bulb only in that the light in it appears as a result of the incandescence of a thin tungsten filament. In fact, "halogens" are just a more perfect model of an ordinary incandescent light bulb.
Features of halogen light sources
There is, however, a specific feature that draws the line between a simple lamp and its halogen counterpart. The latter is filled with gas, which contains small amounts of bromine, chlorine, iodine (so-called halogens) or combinations thereof. Thanks to the presence of these chemical additives and the temperature set in a certain mode, the specialists managed to almost completely eliminate the darkening of the bulb and, accordingly, ensure a stable light output by the lamp. That is why it is permissible for the “halogen” flask to be small: in this way it is possible to increase the pressure in the filler gas, while using small volumes of expensive inert gases as a filling substance.
How incandescent halogen bulbs work
Light sources of this kind operate on a mechanism called the halogen cycle. Atoms evaporate from the surface of the incandescent tungsten spiral and, without reaching the walls of the flask, return back. The glass of the bulb does not turn black due to the lack of direct contact with them.
Halogen technology seems to be flawless, however, the lamp will not work forever. Tungsten atoms, separated from one place on the spiral, are deposited on other parts of it. So, gradually, processes begin in a halogen lamp, as a result of which certain parts of the lamp become thinner: there the temperature rises and the flow of separated atoms increases. Increased evaporation of halogens leads to inevitable burnout of the lamp.
All modern halogen lamps are small in size, since it is the miniature volume of the bulb that provides a relatively uniform distribution of atoms over the spiral surface, which determines the high efficiency of the halogen mechanism.
Advantages of a halogen lamp
- Thanks to its high luminous efficacy, it shines brightly during the entire service life.
- Among all modern light sources, it is the halogen lamp that has the highest quality color rendering and directional radiation. The light spectrum reproduced by it is considered the most comfortable for the eye.
- Compact handy size.
- Lasts twice as long as a conventional incandescent lamp, while consuming much less electricity.
Disadvantages of a halogen lamp
- The surface of the light bulb should not be touched with unprotected fingers - greasy prints remain on the bulb, which provoke the glass melting in this place. The lamp is taken with a hand wrapped in a piece of dry clean cloth, and the stained glass is wiped with medical alcohol. Replacement of halogen bulbs is done only with special gloves.
- When heated, the bulb of a halogen lamp can withstand temperatures up to 500 ° C This means that when installing such a light source, you must first of all remember and observe fire safety standards (for example, make sure that the distance between the ceiling and the false ceiling is sufficient for safe lamp operation).
- A luminaire with a halogen lamp is very sensitive to voltage fluctuations in the mains. To avoid this, voltage stabilizers are used, and low-voltage lamps are connected through a transformer.
- Some models of halogen bulbs require special placement during combustion (for example, the entire declared service life of the lamp will burn with high quality only in a horizontal position).
The main types of halogen lamps
Halogen light sources are of low voltage (up to 24 V) and mains voltage (220 V). Also "halogens" are distinguished depending on the design and purpose.
Linear lamps
The world first saw "halogens" of the linear type in the 60s of the XX century. However, since that time their appearance remained the same - it is a quartz tube, equipped with leads on both sides. The lamp filament is attached to special wire brackets.
Lamps of rather modest size can boast of good power - from 1 to 20 kW. High brightness and high power consumption make it not very convenient to use linear "halogen" in the room, but they are very convenient as a source of floodlighting. Most of the halogen lamps of this type work normally only if they are horizontal in space.
Today, so-called linear halogen flood lamps are used for indoor lighting. These bulbs are highly impact resistant.
Outer bulb
This type of lamp is referred to as mains voltage light sources. They, as a rule, directly replace ordinary incandescent lamps. "Halogens" with an external glass envelope are equipped with standard E14 and E27 bases. For such lamps, special lamps are not needed.
The outer glass bulb reliably protects the inner quartz bulb of the halogen lamp from dust and accidental touch. "Halogens" of this type can be completed different kinds flasks with a milky, transparent or frosted surface. It is convenient to use halogen lamps with an external bulb in small neat lamps, especially since decorative mains voltage lamps (hexagonal, candle-shaped) are on sale.
Directional lamps (with reflector)
The standard sizes of such lamps are MR8, MR11 and MR16, the most popular of which is MR16 with a bulb diameter of 50 mm. "Halogens" with reflectors have different angles radiation.
The miniature bulb is equipped with a special reflector (reflector), which redistributes the flow of light in space. The lamp itself is attached to the center of the reflector. The most common today are halogen bulbs with aluminum reflectors that direct heat exclusively forward. In cases where this is unacceptable, halogen lamps are produced, equipped with interference reflectors, which only transfer heat back.
There are so-called IRC halogen lamps, a special coating of which can reflect infrared radiation. They are called the most economical ones, because the bulb of such a lamp reflects infrared rays back onto the spiral, as a result of which the temperature of the spiral increases and the heat loss decreases. Thus, compared to conventional halogen lamps, IRC halogen lamps consume half the energy and last twice as long.
Halogen reflector lamps are usually used in the organization of directional spot lighting.
Capsule (finger) lamps
These are miniature capsules with "antennae", which are distinguished depending on what kind of heating body they are equipped with - transverse or longitudinal type. Finger light sources are used to equip open lamps without protective glasses... Most often they are used in decorative fixtures embedded in furniture or ceilings.
Why the lamp deteriorates prematurely
The developers of halogen lamps claim that a light source of this type can perform its function without significant loss of quality for 4,000 hours, while a slight decrease in its efficiency cannot be detected by the naked eye. Among the primary factors causing premature breakdown of a halogen-type lamp are power outages, as well as too frequent switching on and off of the lamp.
How do you know if a halogen lamp is about to stop working? With prolonged use of "halogen", it is rather difficult to notice changes in the intensity of their glow. However, there are other signals indicating that the lamp needs to be replaced: flashing, interruptions in operation. And if you find it difficult to name the year of installation of the light bulb, do not doubt that it is time to install a new one in its place.
Replacing a halogen lamp in a chandelier
Please note that handling the bulb of a halogen lamp must be very delicate - it is very easy to damage it!
- First of all, turn off the electricity using the key switch (the machines do not need to be touched).
- Carefully remove all fragile and glass elements from the chandelier (lamp) that can be easily damaged or broken by accident.
- Remove the old lamp from the chandelier by pulling it out of the holder.
- Insert a new light bulbafter putting on gloves on your hands. Let us remind once again that the surface of human skin is never perfectly clean, and therefore prints will certainly remain on the glass of the flask. These traces under the influence of high temperature blacken and contaminate the glass, as a result of which the thermal regime changes, and the lamp bulb heats up more. Thus, the operational resources of the light source are reduced, respectively, it will fail faster.
Recently, there has been an active debate about whether it is possible to independently replace the "halogen" with an LED lamp. In practice, replacing halogen lamps with LED ones without a complete reconstruction of the entire lighting system is not possible. The catch is that halogen supply transformers cannot be considered devices alternating current... This means that the LED bulb, instead of giving light evenly, will flicker (complete non-compliance with technical and sanitary standards).
Numerous modifications and compact sizes have made halogen lamps more popular today than ever. They are often used in false ceilings to provide the necessary accents in the interior. Often, "halogens" can be found in the design of shop windows, because they very favorably emphasize glass, metal and crystal products.
__________________________________________________
Conventional incandescent lamps are significantly inferior to halogen lamps in terms of a variety of assortments. Halogen lamps find their application in a wide variety of areas of human activity.
They are equally widely used for providing lighting in public buildings as well as for work in the home. The products of individual companies are even subdivided into categories depending on one or another purpose.
For example, the cost of professional equipment is much more expensive than household equipment. In addition, the presence design features different halogen lamps determines their belonging to one type or another:
- - linear;
- - capsule;
- - lamps with a reflector;
- - lamps with a household socket.
In order to save and improve the safety of electricity operation, they often turn to the use of lighting schemes that use much lower voltage indicators in comparison with traditional 220V.
Halogen lamp connection diagram
Connecting halogen lamps low voltage is carried out through special power supplies for 6, 12 and 24V.
It is noteworthy that low-voltage halogen lamps in practice turn out to be as bright as conventional ones, while energy consumption is reduced by an order of magnitude. In addition, low voltage acts as an additional guarantee of human safety.
Often these lamps are installed in bathrooms for safety reasons. However, low-voltage halogen lamps are also used in recessed luminaires for suspended ceilings, due to the fact that the small size of modern electronic transformers allows them to be mounted directly on the frame of such ceilings.
The only limitation for the operation of such lamps is the need to install a special step-down transformer.
Fig 1. Connecting halogen lamps through a transformer
Thus, when low voltage is used for lighting halogen lamp, the connection diagram to the network implies the presence of a 12V step-down transformer.
How are halogen lamps connected in the diagram
The actual connection of the luminaires turns out to be extremely simple: for this it is enough to connect the halogen lamps in parallel with each other and connect them to the transformer.
Let us consider in more detail how all the elements are connected to each other (transformer, and management).
The figure below shows a block diagram consisting of two step-down transformers and six halogen lights. The neutral wire is blue, and the phase wire is brown.
Connection on the 220 V side... The connection of the wires in the junction box is carried out in such a way that the phase of the supply wire (the one that comes into the box) goes to the switch.
Lighting control (on / off) is carried out by a conventional switch. It is connected to the transformers on the 220V side.
The zero core can be immediately connected to the zero cores of the wires that go to the transformers. After that, the phase wire that "came" from the switch is connected to the phase wires of the transformers.
To connect the wires in the transformer, special terminals L and N are provided.
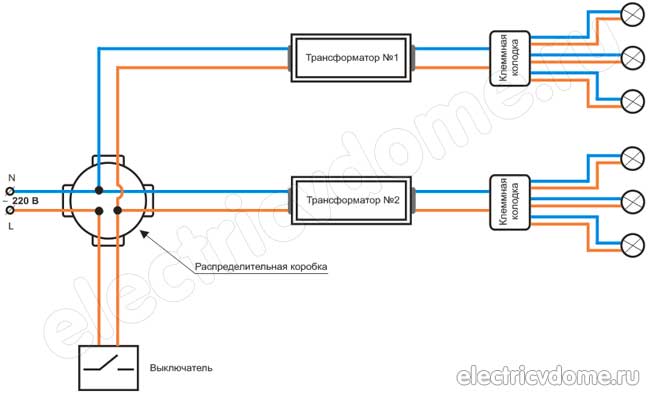
Fig 2. Block diagram for connecting halogen lamps
It does not matter how many transformers are connected in the circuit. It is important that each transformer is connected with a separate wire and they are all connected only in the junction box. If you connect the wires not in a box, but somewhere under the ceiling, then if contact is lost, it will be impossible to get to the junction.
Connection on the 12V side... The main part of the work is done, there is only a little left, connect halogen lamp in circuit nutrition. The only thing to consider is that the halogen lamps in the circuit are connected in parallel with each other.
To connect a large number of lamps at the same time, it is worth using special terminal connectors. (The illustration uses six-track terminal blocks.)
From the terminals of the low voltage of the transformer (12 V) there is a wire to the terminal block, and then from the terminal block a separate wire for each lamp.
Things to consider when connecting halogen lamps
The length of the 12 V output wire should not exceed 2 m. With a longer length, current losses may occur, which will make the brightness of the lamps noticeably lower.
Simple incandescent bulbs are starting to give way to halogen bulbs. The latter last much longer than ordinary ones, four times, which is how their popularity is manifested. They are designed for connection from a 220 volt network and for a low voltage of 6, 12, 24 volts. Each type of lamp has both positive and negative sides, which we will consider, as well as the connection process.
Let's explore what a halogen lamp is. In these lamps, the bulb is filled with halogen vapors - iodine or bromine. Such sources shine twice as brightly, and the bulb is made not of ordinary glass, but of quartz. This material can withstand much higher temperatures than ordinary glass. With the connection of halogen lamps with a voltage of 220 V, no questions arise. They are connected in parallel like conventional incandescent lamps. The disadvantage of this type of lamp is the increased temperature regime, therefore, it is recommended to install them on non-flammable surfaces, ensuring heat dissipation. It is better to use low voltage lamps when working with material that can melt.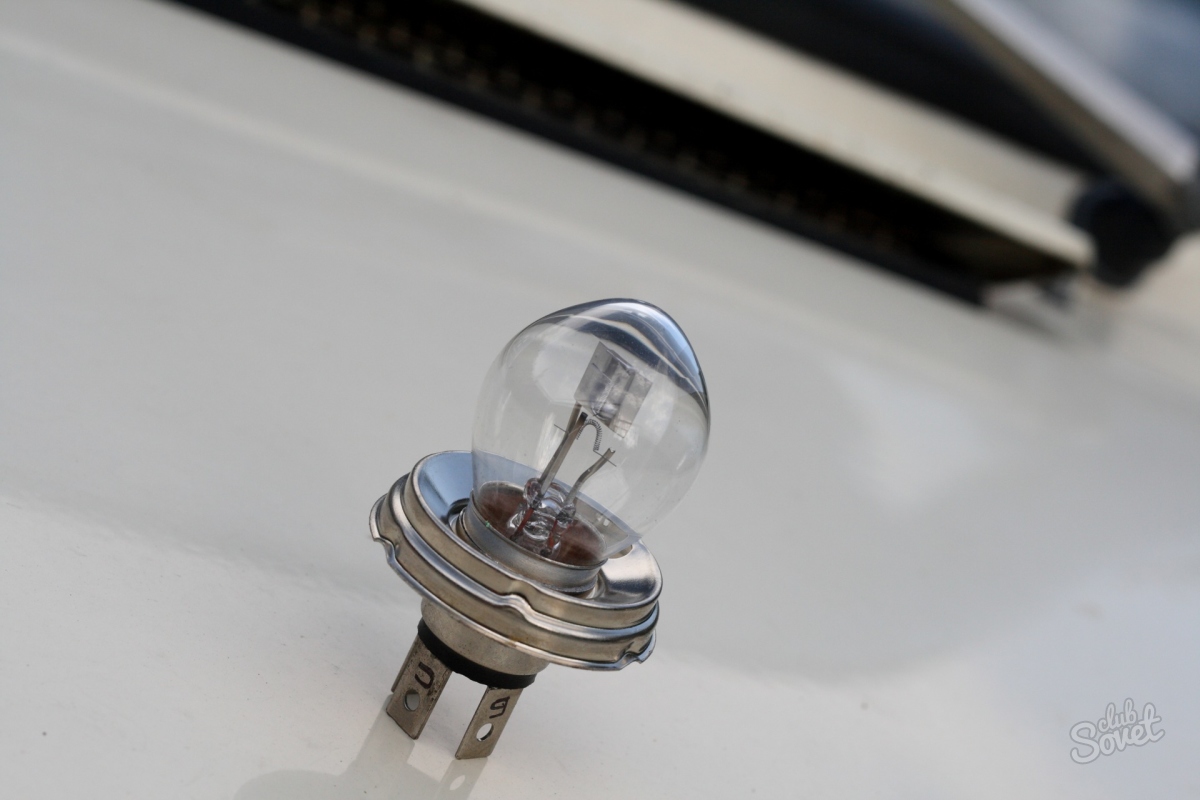


Thus, the installation of halogen lamps is not a very difficult procedure, if everything is properly understood.
Halogen headlights are automotive optics, in which lamps filled with a special gas mixture are used to form the luminous flux. Most often, the bulb is filled with a buffer inert gas with vapors of one of the halogens of chlorine, bromine, fluorine or iodine. To create a glow, a filament is placed inside the glass bulb, which ensures the temperature of the coil in the range of 3000 K.
Benefits of gas-filled lenses
- luminous efficiency 15-22 lm / W;
- service life 2000-4000 hours;
- high intensity of light flux;
- smaller size compared to conventional lamps of similar wattage;
- uniform illumination ensures higher reliability of recognition of the surrounding space;
- resistance to voltage surges.
Most car models are equipped with optics based on halogen lamps and parabolic reflectors. The special glass used to make the bulb provides long term service and high luminous flux brightness.
The first gas-filled lamps were produced with a single filament. They were used in headlights or additional light... In 1970 Philips introduced a light bulb with two filaments for near and high beam... If the early models of halogen headlights distributed light with special diffusers, then modern devices are equipped with lenses or reflectors, however, like everything that can be chosen and inexpensively bought today.
They provide minimal dazzle for drivers at a sufficiently large illumination distance. The dipped beam of modern halogen headlights is asymmetrical, which creates good conditions to illuminate the right (left) side of the road and part of the curb.
Types of halogen lamps
 Gas-filled bulbs are divided into several types:
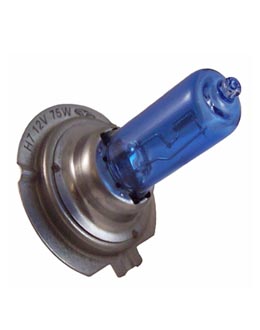
- Pseudoxenon halogen bulbs create a brighter bluish glow compared to standard lamps due to the coating of the bulb with special bluish dyes. The power consumption of such devices is higher. In good dry weather, the efficiency of such lamps is quite good. However, in bad weather, the illumination is significantly reduced. Also, if moisture gets in, the lamp may burst due to high heat. Installation of pseudo-xenon lamps significantly knocks down the luminous flux, therefore correct adjustment headlights are almost impossible.
Standard halogen bulbs are usually installed in the headlights at the factory. The power of the devices for the high beam is 60 W, and for the low beam - 55 W.
Halogen bulbs with enhanced luminous flux differ from standard devices in higher brightness within 30%. A brighter glow is created by the overcoil of the spiral. This, in turn, leads to a decrease in the resource, therefore such bulbs burn out much more often compared to conventional bulbs.
Weatherproof halogen bulbs designed for use in inclement weather. The glow of all-weather headlights has a yellow tint, which ensures good illumination in fog and slush.
High power halogen lamps are characterized by a longer and thicker spiral. They consume more energy and get hotter. Installation of such bulbs in standard optics is not recommended due to the fact that the headlights can deform at high temperatures. Wiring may also burn out. Due to the distinctive geometric parameters of the spiral, the adjustment of headlights with high power halogen bulbs has its own characteristics. Therefore, it is better to entrust this event to specialists.
Installing halogen lenses
In cases where standard head optics do not provide high-quality road illumination, it is recommended to install additional halogen light sources. To do this, you will need headlights, a block and fuses, wires, a power button, an on relay, a heat shrink tube, electrical tape, clip pads, as well as a set of screwdrivers and keys.
First, you should decide on the choice of additional headlights. The best option there may be standard devices for which there are mounts in the bumper of your model. If this is not provided by the manufacturer, you can buy any halogen headlights, if you have the appropriate certificates. It is better to buy optics complete with wiring and fuses. For standard low beam lamps with a power of 55 W, 10 A fuses and 25-30 A relays are sufficient.
Remember, the best scheme is to connect halogen headlights through the contact of the low beam relay or to the ignition switch. In this case, when the ignition is turned off additional headlights turn off automatically.
Thus, it is possible to avoid battery discharge if for some reason - or the reason, you suddenly forgot to turn off the headlights forcibly. It is imperative to connect additional headlights through a relay with fuses.
All work on the installation of additional optics should be done after disconnecting one of the battery terminals. All wires and connectors must be carefully insulated, and the relay and contact buttons must be placed in heat-shrinkable tubes.
Installation of halogen headlights is carried out at regular points on the bumper, if any. If such places are not provided, then optics should be mounted in accordance with the requirements Technical regulations... After installing the headlights, we mount the wiring. One of the headlight wires should be connected to ground in any convenient place by screwing it to the body. The other two wires fit into a corrugated plastic tube and are attached to the standard car wiring with plastic clamps. Then the wires are brought into the salon. Try to arrange the wiring around the relay and fuse box.
Wiring diagram for halogen headlights
After the completion of the wiring arrangement, the halogen headlights are connected. In the fuse box, as a rule, there should be free spaces for relays and fuses. If no free connectors are provided, then the relay with fuses should be mounted in a separate block, which is then fixed close to the fuse box.
The wiring diagram for halogen headlights is as follows. The wires are connected through separate fuses to the relay (connector # 86). Output # 85 connects to battery positive. This can be done in three different ways:
- ignition lock contact;
- separate battery cable;
- output of the dipped beam relay No. 85.
Relay output # 87 is connected to ground in any convenient place.
After that, we mount the power button. If your car has special places for buttons, then we remove one of the plugs and install the key. For convenient connection of wires, you must first remove the decorative trim of the dashboard.
Typically, standard power buttons are equipped with indicator lights. In this case, the indication connection leads are connected in parallel with the wiring of other keys. Similarly, we connect the positive contact in parallel. The second control wire of the button is connected to the output of the headlight relay No. 30.
We check the correctness of connecting additional headlights.
If, when the ignition is turned on and the halogen headlights on button is pressed, a click is heard (the relay turned on) and the additional optics are lit, you can proceed to the completion of the installation work.