Cold has come, and most of the owners of the VAZ 2109 once again collided with the problem: from the nozzles of the stoves of the stove at the operating temperature of the coolant (about 90 degrees) in the cabin blowing barely warm, and often in general cold airIn short
The cold came, and most of the owners of the VAZ 2109 once again collided with the problem: from the nozzles of the stove nozzles at the working temperature of the coolant (about 90 degrees) in the salon blowing barely warm, and in general, both cold air, in short, heats the stove badly
With this position in strong frost Even Zainyevishov side glass In the cabin "do not depart."The simplest solution of this problem is as follows. You must tighten the cutter control cable. To do this, you can make one or two turns of this cable on the flap control lever.
This lever is located on the housing of the VAZ 2109 stove, next to the gas pedal (see photo).
Location lever flap stove VAZ 2109
All junctions of the air ducts and the edges of the stove flap are saved by foam rubber, which this lever of the damper control is squeezed to the end hard. As a result, there is a gap of several millimeters
At the same time, the damper, the air flow or from the street directly, or through the heater radiator is not closed until the end.It closes "upstairs", while the air goes through the heater radiator, and in the upper and side - from the street, through the very millimeters. When the stove fan works, and even the car moves, these millimeters are quite enough.
You can even get to this lever of the driver from the driver and try to tighten this lever when the stove fan is turned on. At the same time, the left ear will be located in the area of \u200b\u200bthe air duct nozzle, and you can hear how the sound and the temperature of the emerging from the air nozzle changes.
Also, the cause of ineffective operation of the SAMARA saloon heating system can be subject to the reasons below.
Incomplete opening of the heater crane
This problem is found in most front-wheel drive cars VAZ. You can check this by comparing the temperature of the leading and removing stove radiator nozzles, if it is different, most likely the valve is not fully open
The solution will be the tension of the control cable of this valve and the adjustment of the valve control lever to the maximum open position. It is possible that now the valve will not be closed until the end, but as they say, the heat of the bones will not lie. But here the other problem lies.It is known that this valve at the "Samar" - weakness, and after a certain number of operations "open - close" the valve at the site of the passage of the axis connecting the control lever and the damper itself inside the valve loses hermeticity and begins to leak
Some owners simply set the heat-cold lever into a certain position and do not touch it from sin away in this case, an attempt to move the stove crane valve will most likely lead to its leakage.If it happened, you can wind the place of leakage of a strip of fabric impregnated in sealant and fix all this "cold welding", it can be done in field conditions In the presence of necessary materials.
Lady Samara
A fundamental solution to the problem with the leaps of the heater of the VAZ 2109 will be full of its removal from the system, or the insertion of the tap ball valve. True, in the first case, the possibility of adjusting the volume of coolant coming into the stove radiator, and in the second case this adjustment You can make only looking under the hood
But, getting rid of the knowingly unreliable node, get rid of possible problems In the future, and the remaining adjustment of the temperature of the flaps entering the interior is enough for the eyes.By the way, in the "dozens" this ill-fated valve manufacturer removed.
Leakage of air ducts
The air injected with the stove fan partially goes into the slit in the paths of the air, while the air flow loosens and cools. The solution will be the sealing and sizing of all connections on the way of following the air from the stove to the outlet nozzles. True, this operation is very laborious, as it will have to disassemble the entire front panel, but the result will be a tangible strengthening of the air flow from the heating system deflectors.
Air traffic jams in heater radiator
This problem shows the cold air from the cooling system deflectors when the stove is opened at the operating temperature of the coolant. In this case, you need to install the car with the front wheels on the hill, as high as possible, open the fully tap of the stove and market.
It's no secret that such unpleasant moments, like car repair, are not uncommon. One thing pleases that large nodes and parts are susceptible to breakage not so often.
And here small repair Could not avoid any car owner.
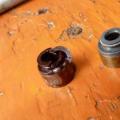
Sometimes there is a problem of the heating stove crane. When the moment came, the owner of the VAZ 2109 will understand immediately. The refrigeration fluid leak will not remain unnoticed. The car's salon will be filled with an unpleasant smell, the flooding of the floor is worst. Another crane breakdown is connected, with the inability to switch the air supply. It is clear that the replacement is inevitable.
VAZ 2109 stove
Device automotive stove It's not as difficult as it may seem at first glance. The base is two plastic covers connected by brackets. They have a heating radiator. The air through the radiator is supplied to the interior of the car due to the fan.
The electric motor is attached to the fan covers. The coolant passes through the heater radiator thanks to the pump. Cranic is connected to the cooling system. Its connection occurs through rubber hoses. There are two more pairs of nozzles in the housing. In the crane valve there is a hole, through which the coolant passes. Special valve lever manages air heating. Three handles on the instrument panel control the oven. With their help, it opens or closes the crane and the flap of the stove. If the crane is open, the heating system circulates the heated coolant. Closed - blows cold air.
What breaks?
The heating is usually remembered with the first cooling. And when the heating lever is given in the "Red" position under his feet may happen damp. This flowed coolant. The reason is the gap of the tranquer's diaphragm.
Naturally, repairing there is no point. Easier - change. Replacing the old element to a new heater element is not time-consuming and quickly performing work.
Independent replacement
Like most repair activities, this procedure It is conducted on the overpass.
Replacement provides for the presence of the following tools:
- Capacity for draining coolant;
- Classic set of keys and screwdrivers;
- Sealant;
- WD - 40;
- New crane with a set of rubber gaskets.
Operating procedure:
- 1. Establish the car VAZ 2109;
- 2. Substitute the prepared empty container under the motor and, opening the drain hole, give a stroke of the cooling substance;
- 3. Next, you need to unscrew the nozzles passing from the engine to the heater. To do this, it is enough to loosen the bonding clamps. It happens that they are not amenable to, then there is a sense to apply a "grank", and clean the thread of the crane bolts;
- 4. Remove the nozzles, and drain the residues of the toosol;
- 5. Remove the side lining of the torpedoes in the car cabin. Here, too, unscrew the nozzles;
- 6. Then, working the key "on 10", weaken and unscrew the fastening nuts of the crane. It is under the car. To continue working in the car and from the passenger seat side to tighten the crawl. Then remove the retainer. Disconnect the control cable;
- 7. The next step is to install a new crane. First of all, it must be connected to the control cable. Now put a spring retainer. Tighten fastenings. Installing nozzles use sealant.
Having finished the installation new Detail The heater should be pouring the cooling fluid into the system and check how the replacement has passed as a whole.
Modernization of the heater VAZ 2109
Lovers "tinker" with cars and experimenting can be carried out a small modernization of the crane with the old "grandfather" way. This requires a ball tap with an angular handle. The sequence of actions will be as follows:
- 1. merge coolant;
- 2. Unscrew the plug in the crane and pull out the valve. It is no longer useful.
- 3. The 3-pointed coin of the USSR is suitable as a new plug. It will have to be inserted into the "glass";
- 4. Turn the plug;
- 5. Under the hood, trim the heater pipe and install a water tap;
- 6. On both sides, wrap the clamps;
- 7. Pour Tosol;
- 8. Check the system.
 Every motorist himself has the right to decide what it fits more. Experienced owners of VAZ 2109 are recommended for replacing the ceramic faucet of the company "Yavva". Full set It is directly the part itself, fasteners, sealing gum. Situations of leakage or "sticking" after installation and in the process does not happen. It makes sense to acquire new pipes. It is likely that during operation they lost elasticity and crackled. And this is one of the reasons for the leakage of the coolant.
Highest and low panel
 As practice indicates, usually crane heater It is necessary to change if it started to flow either I bought it so that his regulator stops moving. It is not likely to repair old to repaired, but it is not subject to recovery. Meanwhile, without this element, heating the cabin is normally not capable.
As specifically, the substitution of the spoiled crane of the stove on the VAZ-2109 car is made - it is told in the true article.
Malfunction - characteristic features
The fact that the crane gave to flow, follow the following signs:
- on the floor in the cabin, traces of water are detected;
- the car appeared the corresponding smell of toosol.
Having found one of the above symptoms, you must certainly look forward to the failed node. It is fundamentally aware that if you don't remove the breakdown in time, then the repair will cost more huge funds, and do it yourself, most likely, will not succeed.
How to inspect? It is useful to climb under the hood by the motor side. It must be emphasized that the leakage can occur in different places of the cooling system, so it is useful to explore it all. More convenient to do it with a flashlight. Co., namely, often dripping from:
- radiator;
- places of compounds of hoses and pipes.
When it turns out that the culprit of the malfunction specifically a crane, the owner need to proceed to its substitution as soon as possible.
This requirement that wonder the burning, if in the yard it is winter, because without heating in the car it will move very uncomfortable and also unsafe, if a long journey through the incompaired area is to be.
What better to choose
 From the properties of the new crane, almost everything depends on the duration of its operation, and the reliability of the entire system.
In total, there are three types of this node in the Russian market. Mean:
- standard, in other words native used by the manufacturer;
- sharovy crane;
- clay.
The 1st is very cheap, but with all this usually serves a fairly small period of time. For this reason, it is worth stopping on it only when the car owner has no excessive means or if it failed to purchase anything else.
The clay model is more expensive and quite high strength, but its defects - comparable low bandwidth. If you live in the southern regions, then feel free to take this option. In the unpleasant case, the ball valve is completely suitable. This type of locking reinforcement is different:
How to replace crane stoves. Simply and easily.
 Only after that you can completely promote the clamps and remove the nozzles. Please note that sometimes there is some Tosol. You should be ready for this ready and have advocate. In order not to stain your hands, it is also worth putting on gloves.
After completing work from the hood, you need to go to the salon. Without removing the torpedoes, or rather, its side panel, it will not be possible to do. Opening access to the rest of the nozzles, they are dismantled. In those situations where it turns out that they completely saved their properties and do not need to be replaced, they will need to be disconnected only from the crane. And from these tubes is also often flowing, be ready for this.
After the crane was delivered from the tubes, again moved under the bottom vehicle. Here, with a key on 10, unscrew the nuts holding the above-mentioned element. Then, returning to the salon, pull the crane itself, removing the retainer. Only after that it is allowed to dismantle the cable leading to the regulator.
By installing a new mechanism, do not forget to return the craving into place.
It is built in the reverse order.
As practice shows, quite often the car owners leave old gaskets, changing the crane itself. This should not be done in any way. Even if the seals look good, they still have a very limited resource and can quickly come into disrepair. New supplied in the kit and is experiencing additionally on them.
Returning to the crane the nozzles, the places of compounds should be treated with silicone sealant, this will allow you to forget about the ducts for a long time.
Before filling out the system to Tosol, return drain plug in place.
On our site acts special offer. You can get a free consultation of our corporate lawyer, just asking your question in the form below.
Most often, the replacement of the stove crane is caused by the appearance of the leakage or the cracking of the crane. Both cases require immediate action to eliminate the problem.
Signs of malfunction
To flow, one of the reasons for which it can be a faulty heater crane, is determined by two characteristic features:
- There were wet traces on the floor;
- In the salon, the characteristic smell of coolant - antifreeze or antifreeze is heard.
Each of the specified signs indicates the need to inspect the state of the node for the detection of leaks in it. If you do not repaired the stove on time, there may soon be serious problems that are transfusing to expensive repairs.
To discover who exactly guilty in the leaks of the coolant, lift the hood, arm yourself with a flashlight and carefully pass through all sorts of places. Since we are talking specifically about the crastle, in our situation it will be the culprit.
In addition to the crane, hoses, nozzles, radiator can perform a source of leaks.
Select crane
Before proceeding to replace, it is important to choose a new, high-quality crane that can safely serve for the benefit of the heating system of your VAZ 2109.

|
Type of crane |
Features |
|
This is a standard type of crane, which is equipped with VAZ 2109 from the factory. His main plus is affordable price. As for the reliability and frequency of the jamming, then here we are talking about the obvious disadvantages. Take such a crane for replacement only if others could not find |
|
|
Ceramic |
It is more expensive than the factory device, has high strength, but its throughput is lower compared with the third option. Low bandwidth indicators can lead to the fact that the performance of the stove in winter Leaves to wish the best |
|
Excellent throughput, high reliability indicators, strength. Alas, even such craners zakuat, although their prices are higher than that of the analogues |
Given the features of the cranes represented, the optimal solution will be a ball or ceramic. The second option is more suitable for those who live in regions with not very harsh winter.

Replacement
Having found that the problem is precisely in faulty, failed crane, it will have to be replaced.
Crane stove is located on the front passenger side under the console.
To replace you, you will need the following set of tools and materials:
- New crane. Suitable ball or ceramic, but at worst you can put the factory;
- Set of gaskets and seals. He must go along with a new crane;
- Almighty WD40;
- Metal brush;
- Caid and end keys for 10 and 13;
- A set of screwdrivers (crosses and flat);
- Silicone-based sealant;
- Tara for draining coolant;
- Fresh toosol or antifreeze;
- Lift, pit or estacade.
When everything is ready, you can start work.
Dismantling works
- Talk the car to the pit, put supports under the wheels, wait for the engine cooling, turn on hand brake And skip the minus terminal with the battery.
- Take the Capacity for Plum Co., unscrew the drain plug from the radiator and drain Tosol or antifreeze from the system.
- Drain all the cooling fluid, go to the nozzles that go from the engine to the stove crane. Loosen the tension of the clamps on the nozzles, clean the threaded compound pair of studs. They hold the heater crane.
- With the help of a WD40 penetrating agent and metal brushes, you can effectively clean the compounds. Practice shows that without this procedure, problems may occur when dismantling the stove crane.
- Unscrew the clamp with a screwdriver.
- Alternately remove the nozzles. Here, be careful because they can continue to flow out the coolant. This is due to the imperfection of the Plum System. It is better to work in gloves and keep the container at the ready.
- Go to the car salon. Here remove the lateral overlay of the torpedo, dismantle the nozzles if required.
- If the nozzles are not needed and the substitute is not needed, it is not necessary to completely dismantle them. Again, there are tosol residues in the nozzles, therefore keep dry rags at hand.
- We return to the pit under the car, the end key to 10 removes the fastening nuts of the crane.
- We go back to the salon, where I pull the crane and remove the spring lock. Now from the crane you can disconnect the control cable.
- In this way, you can easily remove the old crane, replacing a worn, damaged item to a new crane.
- Before put it in your place, connect the cable. Only now it is allowed to spin the crane on the body.
- The assembly is performed in the reverse order.
- But then many make a mistake, leaving old gaskets and seals between the body and a crane along with the new crane. Do not do that. Moreover, gaskets and seals always come complete with a new detail.
- When connecting nozzles, it is advisable to use a sealant on silicone basis. So you can minimize the likelihood of leakage through the connection points in the future.
- Be sure to tighten the drain plug, then boldly fill in the system with a new coolant.
Most frequent reasons The emergence of the need to replace the tap of the heater on VAZ cars are the leakage of the crane and its "bipigation". In both cases, with the replacement of the tap of the heater, it is not worth pulling, but it gives any more trouble, yet, to flow the crane.
Of course, replace the crane of the stove on the VAZ 2109 can be on a hundred, but is it worth spending superfluous time and money if the problem is completely solved and without the help of specialists? That is why we decided to dedicate the current article to how to replace the heater's crane, not referring to the help of a hundred.

What features can you determine the presence of the heater crane?
Wet traces;
The characteristic smell of antifreeze (toosol) in the car.
Any of these features is a sufficient reason to immediately inspect the car for the presence of a cooling fluid leakage, for the measures undertaken on time can lead to irreversible consequences and the need for a more complex and expensive repair of your car. After all, the cause of the leakage of the coolant may be not only the malfunction of the heater crane, but also cracks on the nozzles, as well as in the radiator itself.
The coolant leakage source is uncomplicated - you just need to look at the lantern under the hood and check all possible places. In our case, the cause of the leakage of the coach was the crane of the stove, therefore his replacement and will be discussed.

So, how is it vAZ-2109 Stove Crane Replacement do it yourself?
You will need:
- new heater crane for VAZ - we recommend purchasing a ceramic crane with a set of seals and gaskets;
- penetrating fluid of the WD-40 brand;
- caid and end keys №10 and No. 13;
- screwdrivers: flat and cross;
- free cooling fluid container;
- silicone sealant.
Replacing the heater crane must be drunk or on watching pit (Overpass), or on the lift.

Instructions for replace Crane VAZ-2109 stove
1. We heat the car on the pit, we take the tosol (antifreeze) tank (antifreeze), unscrew the drain plug of the radiator and completely drain Tosol (antifreeze).
2. As soon as the entire antifreeze is drained, go to the pipes, which comes from the engine to the stove crane, weaken the clamps of the nozzles and determine threaded connections Two spills, with which the stove crane is mounted, for which we use the WD-40 liquid and a special metal brush (without this treatment with the removal of the crane, problems may arise). We unscrew the clamps with a screwdriver.
3. Remove the nozzles in turn (it should be extremely neat, since it is possible to leap the coolant - prepare a pre-tank for coolant).
4. Next, we move to the car's salon, where, if necessary, you will need to dismantle the nozzles, after removing the lateral overlay of the torpedoes. If there is no need to replace the connections, then unscrew them completely optionally. During this procedure, it is necessary to have a vehicle with them, since antifreeze remains may be in the nozzles.
5. We return to the car, and with the asset key number 10, we unscrew the nuts fastening the stove crane.
6. Then, already from the cabin of the car should pull on the crane, and remove the spring lock, and then disconnect the control cable from the crane.
Cable crane stove
7. Now that no longer interferes with us, proceed to the installation of the new tap of the heater. Before screwing the crane, the cable should be connected, and only after that the crane can be screwed to the body.
8. Further assembly perform in reverse sequence, not forgetting to install new seals and gaskets between the stove crane and car body. Also, you should not forget about sealants: We recommend adding it when connecting nozzles to minimize the possibility of leakage of coolant in the future.
Before pouring toosol (antifreeze) into the radiator, make sure that you did not forget to spin the drain plug.