When replacing antifreeze with a VAZ 2110, you must adhere to several rules. The engine must be cold, antifreeze is a toxic liquid, contact with eyes, mouth and prolonged contact with skin must be avoided when working with it.
Antifreeze, coolant (antifreeze) - a special composition of automotive fluid based on ethylene glycol. Used in engine cooling system internal combustion (ICE) for low temperature operation environment... There may be several reasons for replacing antifreeze:
- vehicle mileage, 75,000 - 100,000 km. mileage;
- time interval 3 - 5 years (recommended every year before starting winter season check the condition of the liquid at a car service with a special device);
- replacing one of the nodes of the cooling system, water pump, pipes, radiator, stove, etc., with such replacements, antifreeze is still drained from the cooling system and it makes sense to fill in a new one.
Operating procedure
Draining old coolant
If the replacement is done on a lift or inspection pit, it is necessary to remove the engine protection, if any. When replacing without a pit, the protection can not be removed, but then old antifreeze will fall to the defense. There is nothing dangerous in this, but a few days after replacement, an antifreeze smell may appear until it evaporates. We substitute the container for draining under the lower right side of the radiator, if conditions permit.
If you do not change it in an equipped place and you do not need the old antifreeze, you can simply pour it onto the ground. Many people advise to initially open the expansion tank cap, then unscrew the plug at the bottom of the radiator to drain, but in such cases, the old antifreeze under high pressure, especially if the engine is not completely cooled down, will pour out of the radiator. It is safer and more convenient to first unscrew the plug (plastic wing) of the radiator, the old antifreeze will flow in a thin stream, then carefully unscrew the cap of the expansion tank, thereby, due to the tightness in the cooling system, you will be able to adjust the antifreeze drain pressure.
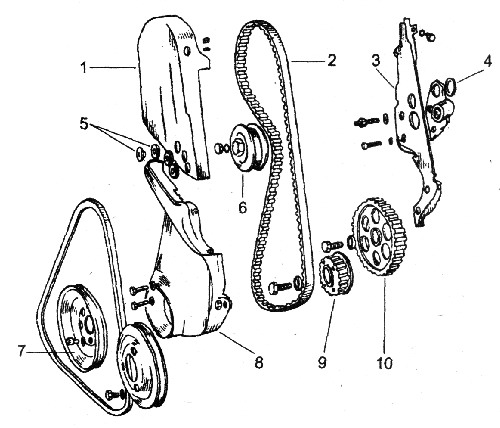
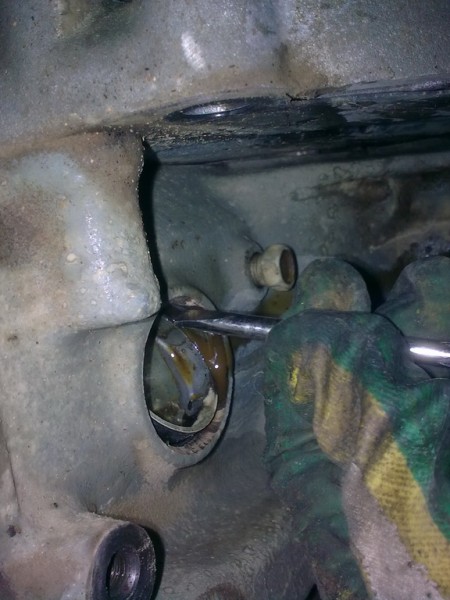
After draining the antifreeze from the radiator, we need to drain the fluid from the engine block. The peculiarity of draining antifreeze on a VAZ 2110 from the cylinder block is that the plug on the block is closed by the ignition coil (on a 16-valve injection engine). To do this, we need to dismantle it, unscrew the lower bolt of the coil bracket with a 17 key, unscrew the side and central bolt of the bracket with a 13 key, and move the coil to the side. Using a 13 key, unscrew the drain plug from the cylinder block. For a more complete removal of the old antifreeze, you can connect an air compressor and apply air pressure through the filler neck of the expansion tank.
We tighten the plug of the cylinder block and the plug on the radiator (the plug on the radiator is plastic with a rubber gasket, tightened by hand without unnecessary effort, for reliability, you can smear the plug thread with a sealant). We put back the ignition coil.
Filling new coolant
Before pouring new antifreeze on the VAZ 2110, it is necessary to disconnect the heating hose to the throttle valve (for injection engine), or a hose from the carburetor heating fitting (on carburetor engine) to allow excess air to escape from the cooling system. Fill in new antifreeze to the level of the upper part of the expansion tank rubber belt mount. We connect the hoses to the throttle body or carburetor, depending on the model. Close the expansion tank cap tightly. We open the faucet of the stove in the cabin to the hot position.
We start the engine. Immediately after starting the engine on the VAZ 2110, you need to pay attention to the level of antifreeze in the expansion tank, it may immediately fall, this may mean that the water pump has pumped coolant into the system. We turn off the engine, add to the level and start again. We warm up the car. During warming up, we check the absence of leaks in the engine compartment, in the places where the hoses and plugs were removed. We monitor the temperature of the engine.
When the operating temperature is set within 90 degrees, we turn on the stove, if it warms up with warm air, turn it off, and wait for the engine cooling fan to turn on. When the fan is turned on, we wait for it to turn off, turn off the engine, wait 10 minutes for the engine to cool down a little, unscrew the expansion tank cap, check the coolant level, top up if necessary.
Replacement features
If there are small leaks in the engine cooling system and the car owner periodically refills with water or antifreeze different manufacturers, old coolant may turn rusty. Foreign bodies in the form of small chips and rust may appear, which, by the way, can lead to failure of the main elements of the cooling system, water pump, thermostat, stove tap, etc.
In this regard, when replacing the old antifreeze in this state, it is necessary to flush the system. This can be done using various additives, which is not always beneficial for the cooling system. Cleaning additives low quality, not only can not help, but also disable the components of the cooling system. Therefore, it is necessary to use high-quality additives and not save.
You can also flush the system naturally with distilled water. After the procedure for draining the old antifreeze, water is poured. The car runs on idling 10-15 minutes, then it is again drained and new antifreeze is poured. Repeat the procedure for severe rust.
There is a cheaper and easier way, you can simply spill the system with plain water by sequentially opening the radiator and engine plugs. Those. the engine plug is unscrewed and water is spilled through expansion tank... Then the engine plug is closed and the radiator drain plug is opened. Do only in this sequence, since the radiator is at the lowest point and all the water will pour out.
Find out how to properly change the coolant on a VAZ 2110 car. Step-by-step instruction and photo accompaniment.
- Getting started self-replacement liquid in the engine cooling system, you need to know that it can only be drained from a cooled engine.
- Any coolant is a chemical that can harm the human body, so you should never drink it, inhale its vapor, or allow it to splash into the eyes, or even on the skin. It is better to do everything with gloves and slowly.
- If antifreeze was topped up, then you can start the car only after the expansion tank cap is screwed back into place.
How many liters of coolant do you need in a VAZ 2110? It will take about 8-9 liters. According to the regulations, the coolant must be changed every 5 years of vehicle operation or every 70 thousand km. mileage, but as practice shows, many drivers on the VAZ 2110 make a replacement every two years.
Replacing the coolant on a VAZ car
Replacing the coolant in the engine of a VAZ 2110 or 2111 car is actually quite simple. You just need to adhere to the order of performing this operation:
1. Try to put the car as evenly as possible. If there is no horizontally located platform nearby, then the front of the car should be positioned higher than its rear.
2. Before starting work, the machine must be de-energized. To do this, simply disconnect the negative wire from the battery.
3. As is often the case with the "creations" of AvtoVAZ, in order to get to one part, you have to remove another. In our case, in order to drain the fluid from the cylinder block, it will be necessary to dismantle the ignition module with the bracket.
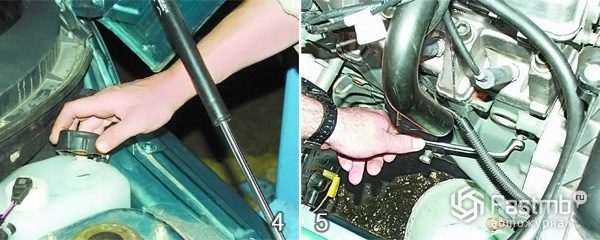
4. To create pressure in the cooling system, which will accelerate the outflow of the drained liquid, you need to open the expansion tank by removing the plug.
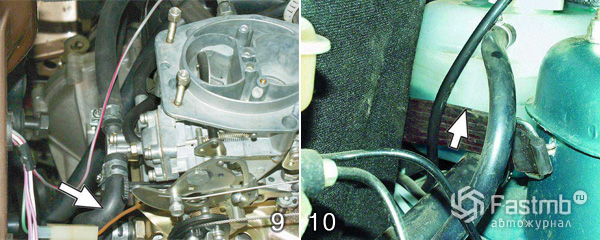
5. Having gained access to the drain plug of the fluid from the motor block, unscrew it, having previously placed a certain container under the engine. Draining the coolant should be done carefully in order to prevent spillage of this chemical composition around the vehicle. After completing the operation, wipe the plug and drain hole with a clean cloth.

6. The next step is to drain the liquid from the radiator, so the container needs to be moved under the radiator. The procedure is similar to draining the liquid from the block: you need to remove the plug and allow the liquid to drain into the container.
7. After the cooling system of the car is empty, the plugs of the block and radiator must be screwed to their rightful place.
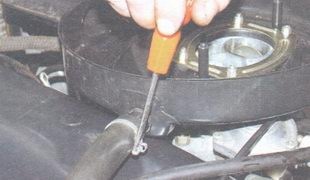
8. If we are talking about an engine with a fuel injection system, then it will be necessary to disconnect the clamp and dismantle the hose that supplies the antifreeze at the point of its connection with the heating fitting of the throttle pipe.
9. If the coolant is drained from carburetor motor, then unscrew the hose from the place of its connection with the carburetor heating fitting. These actions will avoid the formation of the notorious air congestion, which will further prevent the liquid from filling the system evenly. It is through the hole formed as a result of disconnecting the hose from the heating fitting that the air displaced by the liquid poured into the system will come out.
10. Then the system itself is filled with coolant. It must be poured into the expansion tank until its level is level with the upper limit of the fastening strap that holds this tank. After that, the expansion tank plug is screwed into place.
11. The hose, which we unscrewed before pouring the liquid, is returned to its place, screwing it to the heating fitting.
12. After that, you need to return to the place removed to gain access to the drain plug
fluid from the cylinder block ignition module.
13. We connect the "mass" to the battery.
14. After that, you can start the engine and warm it up to operating temperature. Sometimes warming up helps to push through the formed air locks, after which the liquid leaves the tank. If this happens, you need to turn off the machine and add coolant to the desired level.
Very often inexperienced drivers "boil" the engine, allowing the engine to overheat. This happens if the cooling fan activation system does not work when driving in low gear. If the driver monitors the engine temperature gauge while driving, he will notice that the arrow of this device has gone into the red zone. This signals danger, which means that you need to take emergency measures.
Despite the possible heat outside and in the cabin itself, you must immediately turn on the "stove". If it blows hot from the heater, it means that the fan is out of order, and if it is cold, then the cause of overheating lies in the airlock mentioned above. In the first case, it is impossible to turn off the engine until the steam until, thanks to the operation of the “stove”, the engine temperature drops. In the second case, you can turn off, while it is necessary, after waiting for the engine to cool, open the plug on the expansion tank. Then you need to disconnect the same hose again, which was discussed in paragraphs 8 and 9 of our instructions and, adding liquid, achieve an air outlet.
Video about replacing coolant with Renault Logan:
Motorists often have to face a problem when fluid leaks from the cooling system. The reason may be worn-out plugs, engine block of a car.
Usually this is the appearance of holes from rust. Eliminating the problem is not difficult - just remove them and replace them with new ones.
Eliminating oil leak in the cylinder block of a VAZ car
Most often, "old" VAZ cars have problems with the leakage of coolant from the engine block. The best way to fix the problem is to buy new plugs and replace them.
The set of cup plugs for the engine block includes five large diameter plugs measuring forty millimeters and one small diameter twenty five millimeters. Replacing the plugs in the cylinder block of the VAZ is performed in a specific sequence.
Tools and materials for work
Required:
- Chisel.
- A hammer.
- Screwdriver.
- Pliers.
- Emery cloth.
- Sealant.
- A set of plugs.
FROM battery the negative terminal is unscrewed and removed. Coolant is drained from the cylinder block and radiator.
The possibility of access is determined so that the plug of the cylinder block of the vases is replaced. If it is difficult to remove the head of the block.
Work order
In order to free access to the plugs, it is necessary to remove the units that interfere with their replacement.
How to make the plug replacement area accessible
So:
- The muffler pipe is disconnected from the exhaust manifold;
- The bracket is removed, on which the pump pipe for the coolant supply is attached;
- Hoses are disconnected from the carburetor and the engine block head cover, through which the system is ventilated. The carburetor must be closed with a special cover.
- The air filter is removed.
- Wires are disconnected from the carburetor, ignition distributor, spark plugs and other sensors.
- The ignition distributor sensor is removed.
- Hoses are disconnected:
- from fuel pump - fuel supply hose;
- from the carburetor - a hose through which the fuel is drained;
- from the outlet pipe installed on the engine cooling jacket;
- from the vacuum brake booster.
- The cables for the drive of the air and throttle valves carburetor.
- The protective cover of the toothed belt is removed. The nut that secures the tension roller is unscrewed, the roller is removed along with the distance ring and the axle, and then the belt is removed from the camshaft pulley.
- The bolt is unscrewed and the pulley with the key is removed.
- The bolts are unscrewed, and the head of the engine block is removed.
- With the help of a chisel or barb in one hand and a hammer in the other, gently tapping on the edge of the plug, it turns in the engine block.
Replacing the plugs
- Then, with the pliers, the part is pushed on and pulled out of the nest. If the plug is badly rusted and there is no way to turn it, then a hole is drilled in it, a knob is screwed into it and the plug is removed.
- If the plug falls inside, you can pull it out with a magnetic pointer. After the part is pulled to the hole, it is pulled out with pliers.
Tip: To replace the plugs with your own hands or to perform other car repair work, the tool kit should include a pointer with a magnet, which can be purchased at a car dealership.
- Using an emery cloth, the edges of the hole on the cylinder block are cleaned of rust. For better tightness, the edges of the new plug can be lubricated with sealant before installing into the socket.
The difference between the new and old plug is clearly visible in the photo.
- The plug is installed in place.
- Using a mandrel and a hammer, the part is carefully pressed into the hole in the engine block.
- The block head is installed in place.
Installation procedure
So:
- Diesel fuel or kerosene is used to clean the head of dirt and deposits.
- Residual cooling fluid and oil are removed from the threaded holes.
- The bonding surfaces of the block and the head are cleaned of the old gasket, degreased with a solvent.
Tip: Always use a new gasket before installing the cylinder head. Contact with oil on the gasket is inadmissible.
- The head is installed on the cylinder block.
- The bolts for fastening are dipped with the threaded part into engine oil, let them drain for about 30 minutes and secure the head.
- The belt is being installed.
Work order
We carry out:
- The belt is put on a pulley mounted on the crankshaft.
- It is pulled counterclockwise.
- The protective cover of the belt drive is installed, the fastening bolts are not tightened. Cranking crankshaft smoothly by two turns, while the belt should be in constant voltage, do not loosen even when the shaft stops.
It is necessary to check the coincidence of the marks for installation on the camshaft pulley and the cylinder head cover, and also the long mark on the middle cover with the mark on the pulley crankshaft... After they match, the bolts that secure the bracket are tightened tension roller: right, then left.
If the labels do not match, the operations are repeated.
- The cables for the drive of the air and throttle valves of the carburetor are installed.
- The previously disconnected hoses will join.
- The ignition distribution sensor is installed.
- The ignition moment is set. If the ignition timing is incorrectly set at the VAZ, engine interruptions are observed, more fuel is consumed, and the engine overheats.
How to install the ignition
So:
- There are marks on the flywheel and the scale of the crankcase hatch, along which the top dead center is set. The rubber plug installed on the crankcase hatch is removed.
In the direction of rotation, the crankshaft turns until the marks on the flywheel coincide with the middle mark on the hatch body. In this case, the pistons of the fourth and first cylinders are in the position of the top dead center. - Wires are connected to the carburetor, ignition distributor, spark plugs and other sensors.
- An air filter is installed.
- The cooling system is filled with antifreeze or water.
- The wire with "minus" is connected to the battery.
- The operation of the car engine is checked.
it short instruction how to replace the plug yourself.
Tip: In order to replace the small plug or the large one on the flywheel side on the cylinder block, you need to disassemble the car engine.
Manufacturing of plugs
There are times when it is not possible to purchase new parts, or when the price of a new one exceeds its production. Typically, at the factory, the plug is made in large batches by cold stamping by extrusion from a metal sheet of appropriate thickness, followed by cutting along the contour.
For individual execution, it is better to use round bars of the appropriate diameter, cut a disc five millimeters thick from it. Carefully adjust it to the bore diameter, coat with glue and insert into the hole, which must be thoroughly cleaned and degreased before.
How to replace the plugs is clearly visible in the video. According to statistics, a fluid leak from the engine block or a faulty cooling system creates the most mechanical breakdowns on the roads on the roads.
High temperature in the cooling system leads to contamination of the inner walls of the system from the formation of scale, which clogs the channels of the cylinder block and the cooling radiator, which contributes to overheating of the engine. As a result, the engine breaks down.
It often happens when more than 80-100 thousand kilometers are driven by car and, at the same time, they have never replaced antifreeze / antifreeze. Every owner of a VAZ 2110 car should know that it is necessary to replace the coolant every 45 thousand kilometers or every two years, whichever comes first.
If you do not change the coolant in a timely manner, then corrosion may appear in the channels of the block and the cylinder head ahead of time and the engine resource will, of course, be reduced. This is especially true for the cylinder head. Quite often I had to disassemble the motors, and look at the cooling channels in the cylinder head eaten by corrosion. After such a picture, it becomes scary for your car and you will definitely not forget to change the antifreeze on time.
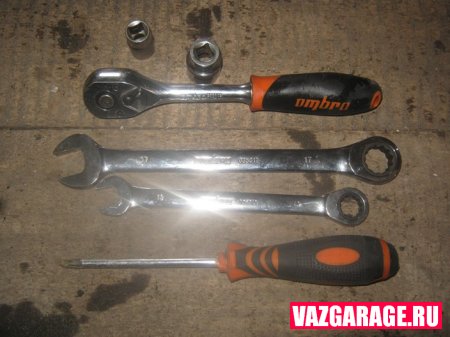
We need:
- head for 10 and 13;
- ratchet;
- Phillips screwdriver;
- keys for 13 and 17 (provided that you have a 2111 engine and you have to remove the ignition module).
Recall that in the previous article we considered one of the most important procedures in the car - it is regular with your own hands. Our editorial team advises to replace every 7-8 thousand kilometers, and not 15,000 km - as the manufacturer recommends.
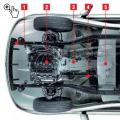
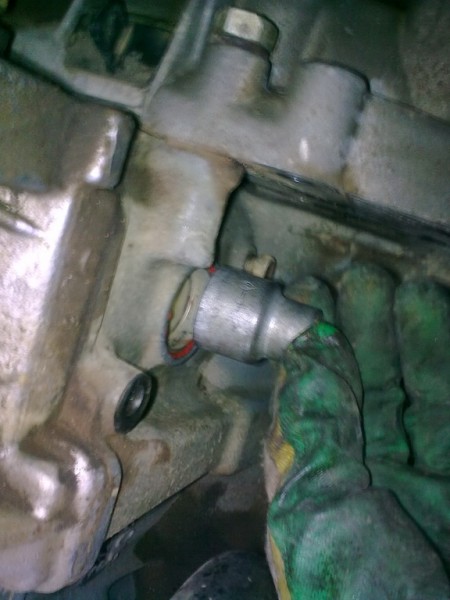
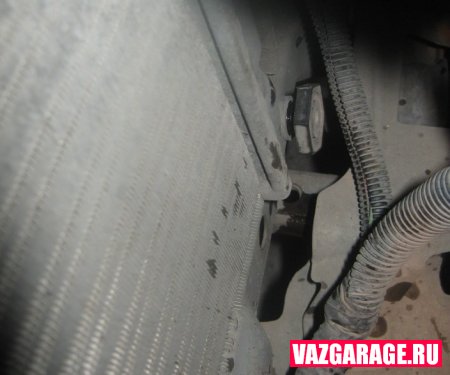
I have already said above, but it is better to repeat myself. If you have a 2110-2112 engine, then the antifreeze drain plug, which is in the block, is free and can be done without any problems. If the engine model is 2111, then an ignition module is installed there, respectively, it will have to be removed first. Here is its location (below the 4th cylinder).
After it is removed and set aside, in order to avoid flooding with antifreeze, you can proceed to further work. We unscrew the front part of the engine crankcase so that you can substitute the container under the radiator drain hole.
Now we unscrew the plug of the expansion tank, then the plug in the engine block and the radiator, of course, you first need to substitute a container of the required volume under each drain hole.
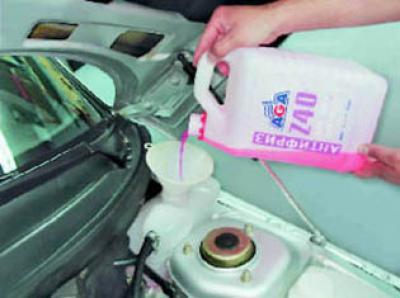
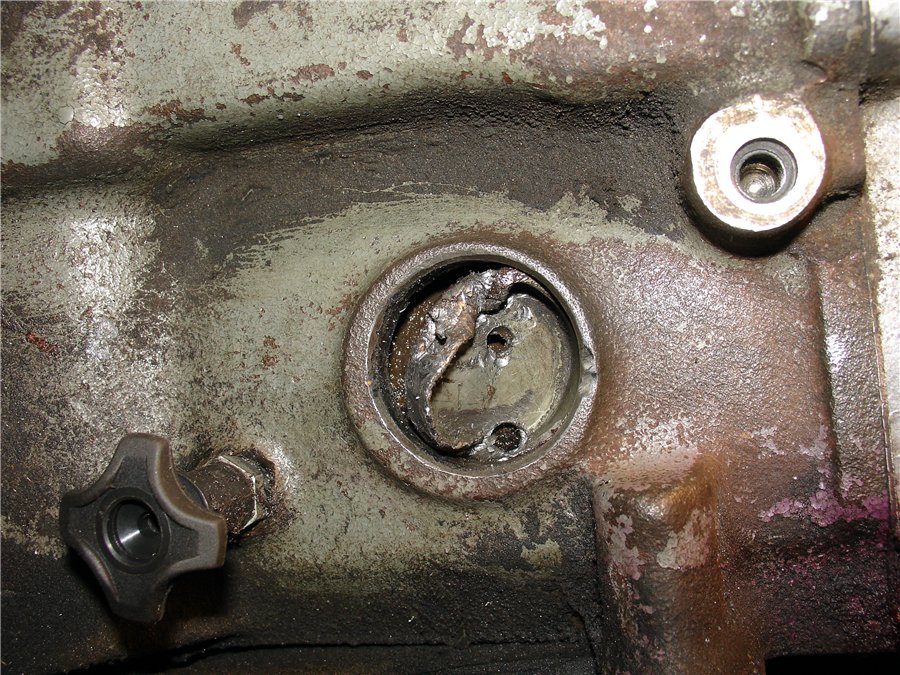
Here is the plug in the block after unscrewing it.
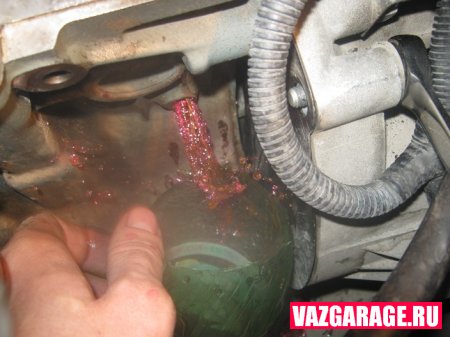
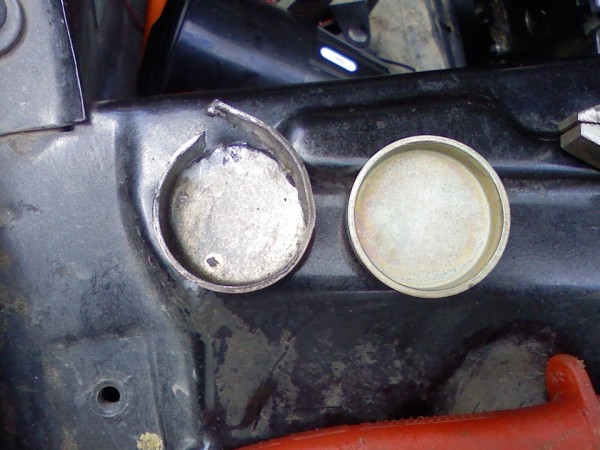
But on the radiator.
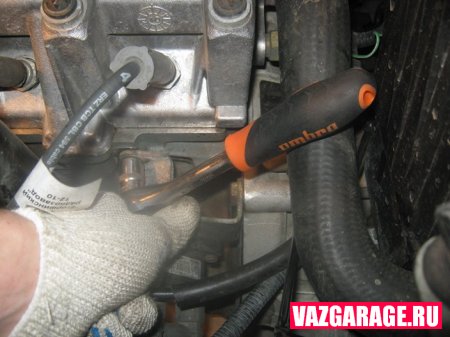
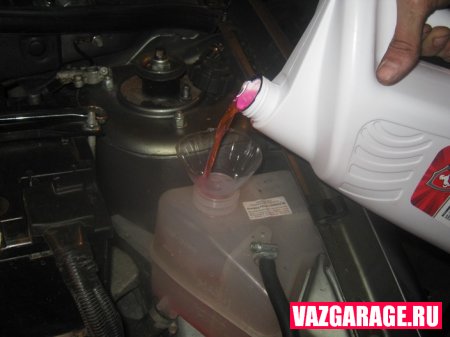
It is worth noting that when draining the coolant on the VAZ 2110, the car must be on a flat, flat surface. After all the antifreeze has drained off, you can screw the plug into the cylinder block and radiator into place. Then you can start replacing the coolant. To avoid the occurrence airlock in the cooling system, first disconnect the fluid supply hose to the throttle assembly, which is shown in the photo below.
![]()
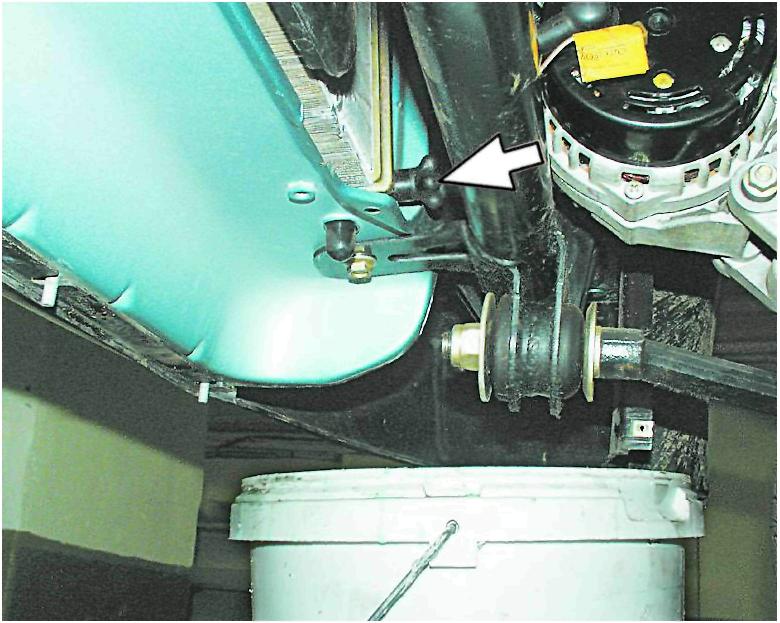
And pouring antifreeze into the expansion tank, you need to pour it until it pours from this disconnected hose. Then we put it on the output and tighten the clamp. Then add to required level, and twist the tank cap.
We start the engine and let it warm up until the radiator cooling fan works. We are waiting for the car to completely cool down (the morning after the replacement) and look at the liquid level in the expander.
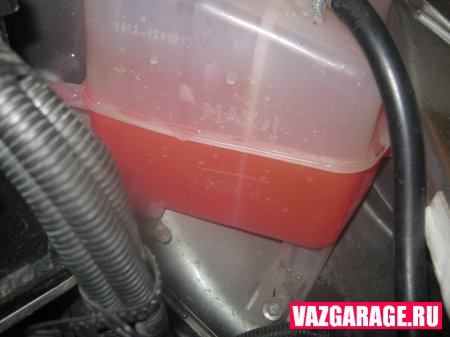
If it is below the norm, then it is necessary to add the required amount. Do-it-yourself replacement of antifreeze / antifreeze on a VAZ 2110 was successfully completed, the work time took only 1.5 hours.