Many drivers are interested in how much oil to pour into the Oka. Of course, this question is mainly of concern to those who use a VAZ-1111 car and its other modifications. Or those whose relatives (for example, someone from the older generation) bought such a car.
The Oka car manufacturer recommends the use of certain types of oils.
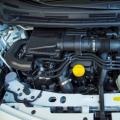
Oka's car has a lot of modifications. AT mass production not all were gone, but several hundred samples were sold. Depending on which one you are dealing with, you can accurately determine the volume of the engine. For example, the first Oka cars (VAZ-1111 and the like) have a crankcase filling volume of 2.5 liters. What is a crankcase? This is the name of the part of the car, with the help of which its most important parts are protected. This is a gearbox, various parts of the engine in motion, etc. The crankcase not only protects, but also lubricates those parts of the machine that are in motion.
Invented relatively recently (in 2007), Oka trucks need to be filled with more oil, of course. About 4 liters. It is equally important to do it the right way. Consider the rules for pouring oil into a car... According to the manufacturer's recommendations, you need to use this liquid of certain types. Consider, for example, how to change it for a VAZ-1111 car.
LUKOIL-LUX and Novoil-sint oils are suitable for lubricating the Oka car engine, for the gearbox housing - transmission oils "Rolst", "TM5-9P".
The Oka car manufacturer recommends the use of certain types of oils. For example, for fuel tank - AI-91 and 95 gasoline; to fill the engine lubrication system - "Lukoil-Lux", "Novoil-sint" and the like. For the gearbox housing - transmission oils "Rolst", "TM5-9P" and others of the same type.
The procedure for changing the oil (if we talk specifically about the engine) should be as follows:
- Unscrew the plug of the hole called the filler. It is located on the cover, which in turn protects the cylinder head.
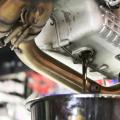
- As carefully as possible ( motor fluid very hot), unscrew the drain plug located on the crankcase. It is important before that to put some container under it and drain there the liquid that has already been worked out.
- Then you need to unscrew the oil filter using a special wrench. What if such a key is not available and it is impossible to borrow it from anyone or receive it in any other way, and it does not work to unscrew the filter by hand? A good option is to try unscrewing the filter with a screwdriver if you use it as a lever. The filter should be pierced as close to the bottom as possible. Then the drain plug must be wrapped in the crankcase.
- Pour new engine oil into the oil filter approximately half the capacity. This must be done before installing oil filter.
- After that, it is necessary to lubricate the O-ring of the new filter (that is, the oil filter) with engine oil, preferably the correct brand. Then screw the new oil filter onto the engine union. You need to do this with your hands, without the help of any tools.
- Then you should fill in as much of this oil as necessary. It has already been said that the exact size of the required amount depends on the Oka modification used. You can control how much of it was placed in the engine using the pointer. Then you need to wrap the plug in the cap that protects the head.
- The last step is to start the engine and let it idle for a short amount of time. Ideally, the lamp indicating that the oil pressure is abnormal should go out a couple of minutes after the engine has been started. Then you need to stop the engine, then check if the oil level is sufficient. If it is not enough, top up until there is as much of it as needed.
And if you need to change the oil in the gearbox, the algorithm is shown below.
Back to the table of contents
To change the oil in the gearbox, you will need the oil itself, a screwdriver, a funnel, a 17 key.
If a replacement is needed engine oil in the gearbox, you will need the following: the oil itself, a screwdriver, a funnel, a key for 17. The algorithm is as follows:
- Before changing the oil, it is necessary to remove it from the breather (this is the name of the device with which the container communicates with the atmosphere in order to maintain required level pressure) rubber cap and rinse it.
- Using a screwdriver or a wire, you need to clean the breather hole cap, and then reinstall it.
- Unscrew the oil drain plug after placing a container under it. Wait until it has completely drained, then screw the cap back on.
- Remove the oil level indicator from the hole in the rear cover located in the gearbox.
- Then new oil must be poured into the hole under the pointer. It is important to insert the funnel first.
- Check oil level. If necessary, top up to the required mark.
Back to the table of contents
There are important details to keep in mind when adding oil to your car.
It is necessary to drain this fluid after the trip, and the sooner the better - while the engine has not yet had time to cool down.
What if the engine has already become cold? It needs to be started and warmed up to a temperature of approximately 80 ° C. Do not rush to drain the oily liquid. This procedure should take at least 15 minutes. This should not be expected to happen faster.
VseAvtomasla.ru
Some domestic motorists are interested in what is the optimal volume of oil in the Oka engine. Of course, first of all, drivers who drive the VAZ-11113 and its other variations want to know the answer to this question. There are many modifications of the Oka. Two and a half liters of engine oil must be poured into the crankcase of the VAZ-1111 and similar models. The crankcase is the part of the car that protects critical engine parts.
The procedure for changing the oil for the transmission, for the motor
Changing the engine oil
The automaker determines which oil to pour into the engine. The engine can be filled with "Lukoil-lux", "Novoil-synth". For transmission good option is an oil liquid "Rolst".
The algorithm by which you can change the consumable is as follows:

Replacing the gear lubricant
You need to change the oil in the gearbox like this:

The grease must be drained immediately after the engine is turned off, while it is still hot. If the engine is cold, start it, warm up to eighty degrees. Usually, the drain lasts no longer than a quarter of an hour.
Key words: Oil changeOld engine
MotorOill.ru
automn.ru
The filling volume of the engine crankcase is 2.5 liters.
Drain the oil after driving while the engine is still warm. If the engine is cold, start up and warm it up to a temperature of about 80 ° C according to the coolant temperature gauge. It takes at least 15 minutes to completely drain the oil.
It is recommended to fill in the same grade of oil as was in the engine. If you nevertheless decide to change the brand of oil, then flush the engine lubrication system flushing oil or oil of the brand that will be filled into the engine. To do this, after draining the old oil, fill in new oil up to the lower mark of the oil level indicator. Start up the engine and let it run for idling 10 minutes. Drain the oil and only then replace the oil filter. Now you can add new oil to the required level (upper mark on the dipstick).
1. Description of the vehicle 1.0 Description of the vehicle 1.1 Exterior view 1.2 Hood space 1.3 General data 1.4 Specifications 1.5 Passport data 1.6 Doors 1.7 Bonnet lock 1.8 Luggage compartment 1.9 Increasing the volume of the luggage compartment
2. Safety requirements 2.0 Safety requirements 2.1 Safety requirements 2.2 Preparing the car for operation 2.3 What you need to have in the car 2.4 Operation of the car during the warranty period 2.5 Car break-in 2.6 Preparing the car for departure 2.7 Checking the wheels 2.8 Checking the coolant level 2.9 Checking the oil level in the engine crankcase
3. Maintenance 3.0 Maintenance 3.1 Checking the tightness of the cooling system 3.2 Checking the tightness of the cooling system 3.3 Checking the tightness of the power system 3.4 Checking the tightness brake system 3.5 Changing the coolant 3.6 Checking the thermostat for proper operation 3.7 Changing the engine oil and oil filter 3.8 Changing the filter element air filter 3.9 Removing and installing air filter
4. Car storage 4.0 Car storage 4.1 Maintenance during storage 4.2 Removal from storage
5. Chassis 5.0 Running gear 5.1. Forward suspension bracket 5.2. Rear suspension
6. Steering 6.0 Steering 6.1 Removing and installing steering wheel 6.2 Replacing intermediate shaft 6.3 Replacing the steering shaft bearings 6.4 Replacing the tie rod end and protective cover ball joint 6.5 Removing and installing the steering gear 6.6 Replacing the steering rod
7. Brake system 7.0 Brake system 7.1. Front brake mechanism 7.2. Back brake mechanism 7.3. Brake system drive 7.4. Parking brake
8. Electrical equipment 8.0 Electrical equipment 8.1. Fuse and relay block 8.2. Generator 8.3. Ignition system 8.4. Lighting and signaling 8.5. A combination of devices 8.6. Switches and switches 8.7. Windscreen wipers and washers 8.8 Replacing the cooling fan motor
9. Body 9.0 Body 9.1 Removal and installation of the front buffer 9.2 Removal and installation of the rear buffer 9.3 Replacement of the front wing 9.4 Removal and installation of the radiator lining 9.5. The hood 9.6. Side door 9.7. Backdoor 9.8. Rear-view mirrors 9.9. Seats 9.11. Heater
10. The engine and its systems 10.0 The engine and its systems 10.1 Installation of the piston of the first cylinder in the TDC position of the compression stroke 10.2 Adjusting the backlashes in the valve drive 10.3. Drive belt camshaft 10.4. Replacement of engine seal parts 10.5. The head of the block of cylinders 10.6. Removal and installation of the power unit 10.7. Repair of the engine 10.8. Lubrication system 10.9. Cooling system 10.10. Power system 10.11. Exhaust system
11. Transmission 11.0 Transmission 11.1. A transmission 11.2. Coupling 11.3. Front wheel drives
12. Appendices 12.0 Appendices 12.1 Appendix: Tightening torques threaded connections 12.2 Appendix: Fuels and lubricants and operating fluids 12.3 Appendix: Basic data for adjustments and control 12.4 Appendix: Filling volumes 12.5 Appendix: Lamps used in the car 12.6 Appendix: Scheme of rolling bearings 12.7 Appendix: Oil seals 12.8 Appendix: Service book 12.9 Appendix: Vehicle electrical wiring diagram
automend.ru
You will need: a key "17", a screwdriver, a container for draining the oil, engine oil, a special wrench for removing the oil filter.

This is the location of the oil filter on the engine.


AvtoVAZ spoke about the launch of new versions of LADA Priora, which differ in a different set of options. First of all, the presence of side airbags is noted. Already in April 2013, about 300 of the first vehicles equipped with this option were produced. They entered the starting batch.
A large-scale modernization is planned for the spring of 2013 in preparation for the launch of production of new car models at AvtoVAZ factories. Among the presented models:
- New LADA Kalina;
- LADA Priora (constant modernization and improvement of the car);
- LADA Largus and Nissan Almera production;
- LADA 4 × 4 in new configuration and coloring.
A friend asked to help him move from the apartment. Having loaded the main things into a pair of Gazelles, we began to collect the remains and put them in his Lada Largus. Folded rear seats, leaving two in front, and I was surprised at the amount of things that fit in the car. Yes, it's quite long, with a large base, but the pile of items we unloaded made an impression. You can't see this when loading, as the process is gradual.
Lada Granta - new budget sedan, built on the basis of Lada Kalina. Low cost and attractive appearance combined with comfortable and spacious salon provided the car with great success.
In May 2013, the serial production of the 2nd generation Lada Kalina started. Available with a station wagon and hatchback. For budget car new Lada Kalina has an excellent design, a large set modern options and decent ride quality.
www.Vaz-Autos.ru
Some domestic motorists are interested in what is the optimal volume of oil in the Oka engine. Of course, first of all, drivers who drive the VAZ-11113 and its other variations want to know the answer to this question. There are many modifications of the Oka. Two and a half liters of engine oil must be poured into the crankcase of the VAZ-1111 and similar models. The crankcase is the part of the car that protects critical engine parts.
In engines produced not so long ago trucks "Oka" it is necessary to pour a larger amount of car oil (about four liters). Change the lubricant correctly. Next, the procedure for replacing an oil product in a VAZ-1111 car will be considered.
The procedure for changing the oil for the transmission, for the motor
Changing the engine oil
The automaker determines which oil to pour into the engine. The engine can be filled with "Lukoil-lux", "Novoil-synth". A good option for a transmission is Rolst oil.
The algorithm by which you can change the consumable is as follows:

Replacing the gear lubricant
You need to change the oil in the gearbox like this:

The grease must be drained immediately after the engine is turned off, while it is still hot.If the engine is cold, start it, warm up to eighty degrees. Usually, the drain lasts no longer than a quarter of an hour.
The engine oil must always be of good quality. If this is not the case, then expect problems associated with scratches, scuffs and chips of the mechanical parts of the engine, since it is the oil that allows them to move freely without harming each other. For a VAZ 1111 car, not so much oil is needed, always two and a half liters. You need to change it according to the regulations, or at your own request.
Like all manufacturers, VAZ took care and made a list of oil suitable for the Oka engine. But many years have passed and it is rare when it is possible to get the fuel and lubricants specified in the regulations. It is much easier to find an analogue, which, moreover, will be an order of magnitude better. Recall that in the previous article we talked with our own hands.
Preparing for replacement
Before changing the oil and oil filter in the Oka engine, you need to warm up the car to a temperature of 80 degrees. If you operated it before replacing, then you can change the oil immediately.

In case of switching to another brand of oil, you must first flush special oil... You can also use the oil that will subsequently be poured. This is not a complicated procedure:
Drain off the old oil.
Fill in new to the minimum mark.
Start the engine and let it run for a while.
After that, drain the newly filled oil and replace the oil filter.
The car is now ready for a full lubricant change.
Oil change in the VAZ 1111 engine (Oka)
1. Unscrew the plug where the oil will be filled.
2. Unscrew the oil drain plug.
3. Remove the oil filter.

4. Fill with oil and lubricate.
5. Fill with 2.5 liters of new oil.
6. Start the engine for a couple of minutes.
7. Muffle and check the level with the dipstick.
Add oil if necessary, but if 2.5 liters were immediately filled in, then you do not need to top up.
The VAZ "Oka" car was designed a long time ago, therefore, the device of this small car is relatively simple, which allows car owners to independently carry out all maintenance and repair work.
One of the most important types of Oka power plant maintenance is oil change, especially in winter. Technologically, this operation is easy and does not require any special skills or knowledge. It is only important to observe the frequency of work and to clarify which lubricant should be poured.
When to change, what and how much to fill
Oil change in the Oka engine versions 1111 and 11113, according to the manufacturer's recommendations, must be performed at each scheduled maintenance. The frequency between services is 10 thousand kilometers. But it is not worth observing the frequency exactly, and the lubricant change should be performed a little earlier, after about 8-9 thousand km of run.
Car enthusiasts may find that replacement should be done frequently. But here it is worth understanding that power plants for "Oka" they have been developed for a long time, so one should not expect high performance from them.
The exception is the "Oka" modification 11116, equipped with a Chinese power unit. This engine has a more familiar lubrication change frequency - 15 thousand kilometers.
The next important criterion for this operation is the type of oil. In this matter, the motors of a small car are not particularly "whimsical", and they can be filled with mineral and semi-synthetic oils viscosity 5W-40, 10W-40,15-W40, that is, the most common options. As for the manufacturers, it is already a matter of taste and the engine can be filled with either Lukoil or Rosneft, or Mobil, Mannol, ZIC.
As for the Chinese installation, oils of the same viscosity are used for it, but it is better to fill the engine with "semi-synthetics" of foreign manufacturers.
"Oka" is good because it has minimalism everywhere, including volumes filling liquids... Only 2.5 liters of lubricant is required to service the motor. Moreover, such a volume of oil is poured into all types of Oka engines, both domestic and Chinese.
Together with the lubricant, the filter element must also be replaced. For versions 1111 and 11113, a filter is suitable for almost any VAZ. But for a Chinese installation, you need an element from a foreign car. Filters manufactured by MAN, FILTRON, SCT, used on Toyota KIA Mazda Nissan.
Required equipment
We figured out the frequency and the materials used, we turn to the practical part, that is, the technology for performing the replacement.
To carry out the work, in general, you will need:
- New oil and filter element;
- Standard set of keys;
- Filter remover;
- Inspection pit;
- Capacity for draining mining;
- Rags;
Having prepared everything, you can start replacing.
Work stages
The operation is performed on a warm motor, therefore the best option - do everything after the trip, giving time for the engine to cool down a little.
- We open the hood;
- We twist the oil filler cap (it is located on valve cover Cylinder head);
- We take away under the car (for this and the necessary pit);
- We find a drain plug on the pallet;
- We tear off the cork and turn it out slowly (in the second hand we hold the prepared container). If the pallet is still hot, it is better to wait until it cools down;
- Having completely unscrewed the cork, quickly substitute the container. We wait for the time for the grease to drain to the maximum (10-15 minutes);
- We wrap the plug in place and tighten;
- We dismantle the filter element with a puller (if there is no device, then we simply punch the body with a screwdriver and using it as a lever, we tear off the part);
- Before installing a new filtering component, fill it with grease and be sure to coat the seal (rubber ring);
- Mount the filter in place and tighten by hand;
- We fill the motor with new lubricant (we do this in stages - first we fill in 2 liters, wait until the oil drains, bring it to the desired level, focusing on the dipstick);
- We put in place the oil filler cap;
After a short period of time (1-2 hours), we re-check the level to make sure that it is within the normal range, if necessary, we correct it.

Replacement with flushing
The replacement sequence is described above if the same oil is poured into the motor as was used earlier.
But some owners, for various reasons, have to switch to another brand of grease. In this case, it is recommended to perform a pre-flush replacement. This operation is simply a two-step change in lubricant.
Its essence is as follows - after draining the grease, we fill the motor flushing fluid (but better oil, which will be filled in) and change the filter. Next, run power unit, give it time to work (15-20 minutes), drain everything and pour new lubricant into the motor, and also change the filter element.
Therefore, if a change with flushing is planned, you should stock up on double the amount of oil (5 liters) and two filters. In this case, one filter can be taken the cheapest, since it will work for only 20 minutes.