The brake caliper can deservedly be called one of the most important and important elements vehicle... The suitability and controllability of the entire car, as well as the safety of the driver and passengers, directly depends on its performance. The brake caliper is considered one of the most advanced and common parts in the automotive industry. There is a lot of competition among brake caliper manufacturers and every manufacturer strives to make this part as reliable as possible.
You usually don't need to hold it as most pillows come with safety shoes. These small iron rods allow their good behavior when you pedal. Remove old gaskets: they should be removed without problems. This will prevent further contamination after replacing the pads.
Collect new pads
Start by cleaning up the disk and then brake mechanismwhen old brake pads removed. Therefore, we can start 😉. Avoid touching the inner surface of the spacers whenever possible. Then, assemble the two spacers on a small metal clip called a pillow spring.
In our time, there are two most relevant, advanced and common brake caliper systems:
1.Has a fixed design.
2. With a floating head.
Fixed calipers were created long before the birth of the floating head caliper. Such a mechanism is characterized by the presence of a metal body and cylinders that are opposite each other and are located near the brake disc. As a result of the attachment of the body to the suspension, it is immovable. When the driver presses the pedal, the pads, for their part, influence the disc. When not in use, they are held in place by a specialized spring at the optimum distance. For instant action of the pads, by means of special system, the brake fluid comes to the cylinders.
Insert the set instead of the old pads without forcing, then put the brush back on. Remember to close it with a pair of pliers. Turn the wheel back into place and do a little check by turning the wheel. If the brake disc rubs against the brake pads, loosen the 2 screws on the rear of the brake, squeeze the brake lever and tighten.
Attention, depending on the type of brake pads chosen, it will be necessary to break the brakes by braking gently dozens of times. Then your brakes will be able to reach their full potential again! Cycling is my main vehicle because I do not have a car, I also enjoy playing sports and also cycling. Brake Caliper: The brake caliper is the metal part around the brake disc that holds the brake pads and pistons.
As a result of the use of multiple cylinders, brake calipers have become widespread. They were distinguished by high reliability disc brakes and were used most often on high-speed and heavy vehicles.
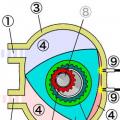
The floating calipers are characterized by a fixed position of one of the pads. The support includes a bracket. The body is directly mounted on inside wheels. There is a piston in the body. When the motorist presses the pedal, using the piston, the shoe is pressed against the brake disc. The second block begins to follow and passes through special fingers.
When to Change: A damaged piston, gripped, is often involved in a stirrup change. The car tends to always brake slightly, even imperceptibly, and the brake disc is always hot due to constant friction. Automotive brake calipers are mechanical partswhose function is to maintain and control the braking system, consisting of brake pads and pistons. The brake caliper receives pressure from the hydraulic circuit, which it converts into mechanical force by the piston.
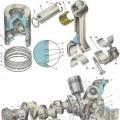
Thus, the piston presses the pads on the brake disc. They must not under any circumstances deform in order to provide a controlled escalation of the braking intensity. Brake caliper view of the piston. The caliper consists mainly of a metal body called the brake caliper body. One or more pistons that push the plate against the disc. The protective cap of the piston and its sealing washer. Guide pins and damping bushings. The last part is the brake line connections.
This type of brake caliper costs relatively little. In addition, it is quite easy to maintain or repair. A floating head or caliper is small in size and is used on inexpensive and small cars.
Brake Caliper Care and Maintenance
To avoid malfunctions and subsequent repairs, the motorist must regularly inspect and adjust stopping supportand also, constantly maintain the braking system in good condition. It is very important to know how and how often the caliper should be adjusted and inspected.
It is very rare that a brake caliper needs to be replaced. When driving, it is very difficult to know whether the brake caliper should be changed or not. Basically, by visually observing the wear of parts and on the stand, you can diagnose a defective caliper. - If the brake pedal is still braking, it means that the piston is seized. This can be measured at the stand. - If the brake disc has a consistently high temperature, this indicates a constant pad pressure on the brake disc. - If severe piston corrosion is visually observed. - If the pads are no longer mobile. - If the protective cap or sealing washer is damaged. - If the complete mechanism is defective on the combined calipers.
1. Visually inspect the entire system at least once a month. Particular attention must be paid to fluid leaks. If you find a leak at the contact point, you should immediately eliminate it. With timely prevention of malfunctions, you will protect yourself on the road and can avoid the failure of the entire system.
Sometimes according to the caliper models it is sometimes possible to repair the piston with repair kit... These are Brake Caliper Seal Kits, Slide Sleeve Kits, Guide Pin Kits, mounting kits and indicators of platelet wear.
It is important to have brake calipers good quality, be aware that the price to be supplied is between 70 and 170 euros per stirrup. The quality of the calipers is a guarantee of passenger safety. Often you will have a choice between multiple brake calipers different brands... Indeed, there are several models of rims for the same car. It is highly recommended to test the compatibility with your vehicle before purchasing. There are various mounting brackets. If in doubt, do not hesitate to call a professional.
2. With regular and constant operation of the car, it is necessary to completely drain and replace it with a new one every two years brake fluid... Over time, the brake fluid attracts from environment extraneous moisture, which is bad for the braking system and brakes can lose their effectiveness.
3. In the manufacture of brake pads, manufacturers try to make them as high quality and safe as possible, as well as to create them in such a way that the buyer would receive a signal that the pads are worn out. If a motorist wants to replace the pads himself, he must look at how much they are worn out. In case of partial wear, it is necessary to adjust the bushing and replace the brake fluid.
There are two types of brake calipers, fixed calipers and floating calipers. The floating arrow is the most common. There is only one side of the stirrup, which is fitted with a piston. When braking, only the inner cushion presses on the brake disc. Fixed brackets have multiple pistons located on either side of the disc. Thus, the pads press the disc optimally. More expensive, but more efficient, this system is equipped with high-end car models and sports models.
To repair a brake caliper, you will need a piston plunger, various piston rotary tools, a piston pressure gauge, and brake pad extractors. Calipers are supplied ready-to-use and are often filled and installed. New calipers are usually guaranteed, 24 months of production.
How to remove the brake caliper, work in stages
It is advisable to remove the brake caliper on a lift. To remove it correctly, you must adhere to a number of specific actions. We will give an example of removing the caliper on domestic car models.
A few tips will help you get the most out of your parts and learn more about brake calipers. All braking elements are subject to high stresses and vibrations. Don't forget to put threaded connection where it is needed. The thread lock prevents the parts from loosening by themselves. Stepladders are recyclable and produce pieces of the same quality as new metal. If you've taken the opportunity to change your discs and pads, for the first few kilometers, slow down more slowly than usual until all the remaining wax from your discs has dissipated and the pads are completely worn out against microbends. your entries.
1.Before carrying out such work, it is necessary to raise the vehicle using a lift. If, for various reasons, it is not possible to raise the car completely, you can use a jack.
2. Then, you need to take a wrench and unscrew the bolt that secures the brake hose bracket with the brake device. After the end of this process, it is advisable to remove the bracket, so that it would be more convenient to work.
It can happen that the brake calipers are colored, red or even gold. It's just a stylish effect, you can also paint them with high temperature paint. The brakes keep us safe while we travel. It is very dangerous for them to work, but in most cases we only get a warning on our dashboard that some parts need to be replaced. At every brake great pressure on the braking system: inevitably you have to replace or repair some parts after a certain time.
3. When the bracket is removed, you will see the bolt that holds the brake hose. This bolt should be unscrewed and the hose removed.
4. Immediately after removing the brake hose, fluid will begin to flow out of the recess. To prevent leakage, cover the hole with a bolt that is suitable in diameter and size.
6. Now, you need to unscrew the bolts in the mount braking device... After that, bend back the locking plates.
Gaskets, discs and brake calipers
Most cars are equipped with disc brakes. In this braking system, the wheels are connected to metal discs that rotate the tires and wheel hubs. The brake caliper slows down the wheels by creating friction on the discs. This is a kind of clamp that puts pressure on the disc.
Brake pads are friction-generating parts on both sides of the caliper. When the brake pedal is depressed, the pressure retained by the brake fluid will push the piston against the caliper. The latter will tighten the brake pads with the brake disc, which will slow down the speed of rotation of the wheel, which will reduce its ability to move freely.
7. Do not forget that these same bolts are very different from each other and they must be screwed exactly into the hole from which they were taken.
8. And finally, remove the brake caliper itself.

Assistant tools
1.Jack.
When this process occurs simultaneously at 4 wheels, the car slows down and comes to a complete stop. The brake calipers are made of a softer material than metal brake discs, so they are the fastest. You will find that you will need to replace your calipers more often than your brake discs: it's easy to see why once you know how it works brake system.
Each time you press the brake pedal, the rotation of the discs makes the calipers a little thinner. Over time, the brake calipers erode due to the action of the metal discs and begin to wear out. Brake calipers are made up of metal tabs that squeak when they come into contact with rotating brake discs... Metal tabs in the stirrup friction generator indicate that they have become too thin. As soon as you hear this noise, you must restore your brakes. You can check the condition of your discs and calipers at any time.
2. Socket wrenches.
3. Special liquid for lubrication.
4. Wrenches.
Front brake caliper, DIY repair, work progress in stages
If a malfunction occurs in the front brake caliper, it must be repaired. You need to act in this order:
1. After the above process has been performed and the brake caliper is removed, it is required to remove the housing from it.
To do this, simply lift the car up with the jack and pull out one for each wheel to gain access to the braking system. Discs should not have ribs, warp or rust. If you do not feel comfortable lifting your vehicle with the jack, or if you don’t have time or space, do it, take your vehicle to a professional.
If you decide to check the condition of your stirrups yourself and realize that they are more worn on one side than the other, this means that something is wrong with the pillows or discs. If so, you should take your car to your mechanic to he could diagnose the problem and fix it.
2. Completely drain the brake fluid from the caliper.
3. After draining the fluid, you need to get the old cuff and clean the surface and groove of its location.
4. It is very important to install a new cuff with clean hands.
6. The piston, which is available, must also be treated with a specialized fluid.
Checking the health of your brakes is no easy task. With clear instructions and, if necessary, with the help of special tools, you can change your own brake calipers. However, it is a long and messy process, and it will be much easier to entrust this job to a professional if you do not like this type of activity.
If you have any doubts about your braking system, do not hesitate to seek professional advice. Driving with broken brakes puts you and your passengers and other vehicles at risk. Don't compromise your safety and the safety of others: When in doubt, go to the garage.
7. Then, it is required to mount the piston back. To do this, it must be gently rocked and inserted without much effort.
8. When the piston has entered partially, it is necessary to put on a special cover, which is called a boot.
9. After the boot is on, make sure that it is seated correctly on top.
10. Then, sink the piston completely and begin to assemble the front caliper.
Start getting necessary equipment with the vehicle on the ground, loosen the wheel bolts with an appropriate wrench without removing them. Raise the car with the jack Make sure the jack is properly positioned under the car, you can also secure it with ramps, refer to your owner's manual for lifting points.
Remove the bolts and remove the wheels. Turn the wheels around so you can easily reach the brake calipers. Compress the pliers with the plunger using a clamp. Keep a container for collecting oil spills at your fingertips. Remove the bolts holding the brake hose locked. This will allow you to work with the clamp.
11. The surface on which the pads move is cleaned from corrosion, dust and various dirt.
12. It is important not to damage the threads of any of the connections.
14. Also, during assembly, it is necessary to clean each element of the mechanism from rust.
15. In addition, it is advisable to wash off the brake fluid from the caliper surface.
- Some vehicles may have pins instead of bolts.
- To open them use phillips screwdriver or a slotted screwdriver.
- Insert old brass or copper washers and replace them.
- Never use old ones.
Loosen and remove the grip seams with an appropriate wrench. These special joints are called "Banjo" joints. Remove the pliers mounting bolts with a suitable wrench and set them aside, you will have to reassemble them later. On some vehicles, pliers have two mounting bolts, while others have only one.
After the caliper is assembled, the motorist should test how the brake system works. Add brake fluid if necessary. At the end of the process, the professionals advise you to take a test ride and determine the brake response. For an accurate determination, reassemble and repair the caliper on both sides. Repairs rear caliper carried out using the same technology.
Rear caliper, DIY repair, work progress in stages
When purchasing a new caliper, it is advisable to trust the original manufacturer. However, if finances do not allow buying the original, you can purchase inexpensive analogs. It is necessary to replace the rear caliper using socket wrenches.
1.First, we lift the desired wheel or the entire car with a jack.
2. Then, it is necessary to remove the entire wheel.
4. The next step is to remove the broken caliper.
5. Now, we clean and process all contacts and fasteners on which we mount the new support.
6. After that, it is necessary to twist and assemble the brake system.
7. Then, you should add brake fluid.
8. Testing the brakes. If everything works, then the replacement was made correctly.
If, when the vehicle is moving, a characteristic grinding, squealing or whistling of the brakes is heard, this indicates the required repair.
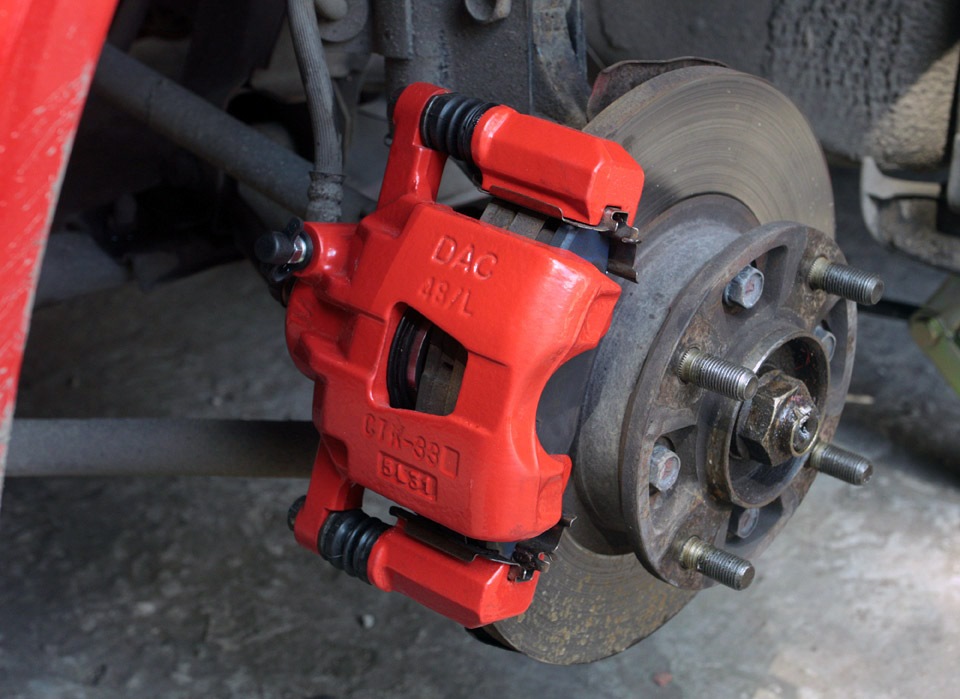
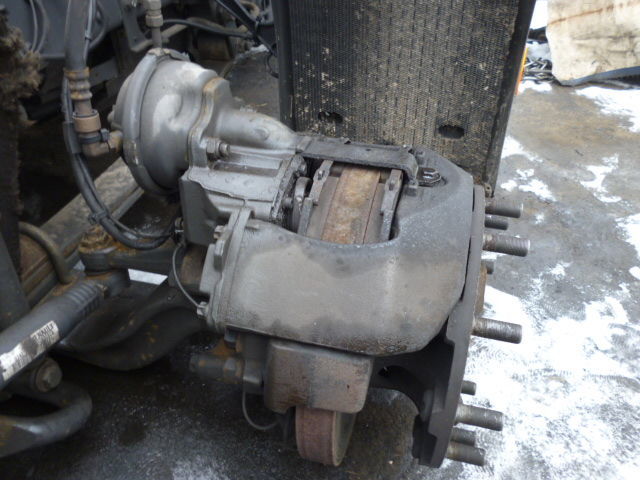
Good afternoon. It's time to sort out the rear calipers. The cause of the overhaul is a seized piston (on one). What led to overheating of the disk and the suport. Sorry for the quality of the photo. Fotik forgot at home. Photographed with a mobile.
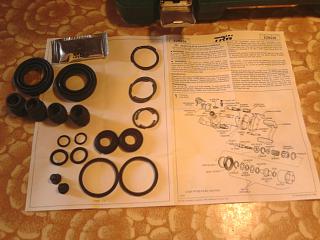
Repair kits for the rear support were purchased ..One caliper repair kit containing all rubber bands, cuffs, anthers and circlips. 44120-6J025 or 44120-71J25
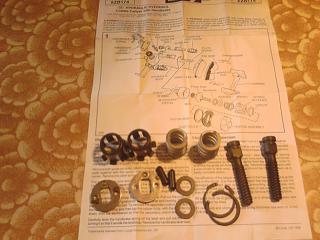
Second drive repair kit hand brake
Since the repair kits contain two calipers. It was decided to sort out both calipers. We remove the wheel.
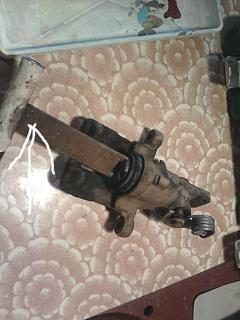
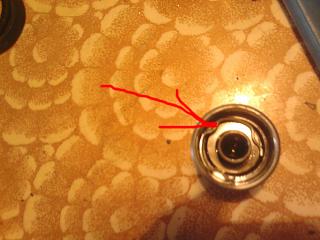
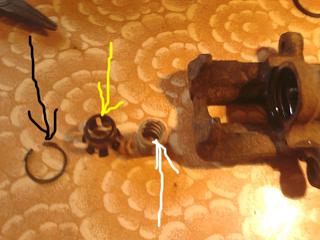
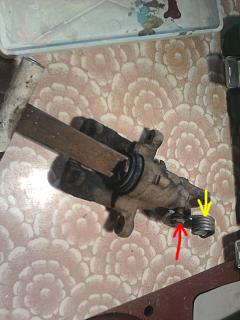
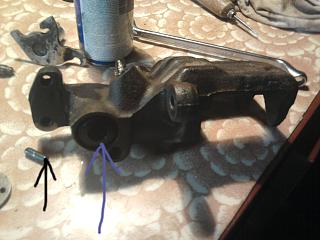
1) Unscrew the brake pipe bolt (black arrow). It is better to lower the tube into a jar where the brake fluid will drain (it is still useful for washing the parts of the caliper).
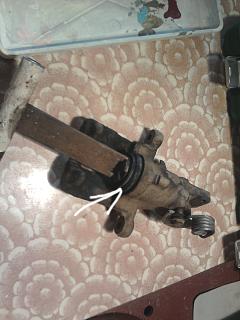
2) Unscrew the bolt securing the parking brake cable (blue arrow)Now you can unscrew the two bolts from the rails (yellow arrow). And now the support is in our hands. The caliper guides (red arrow) can be removed immediately. Check if they have acidified. Lubricate replace anthers (they are in the caliper repair kit) Lubricate the guides with graphite grease, it will not sour longer.
Message from VOVANych
i advise you to lubricate only with a special grease for the guides of white high-temperature, the graphite dries out over time and the brakes wedge
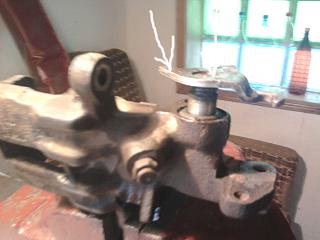
Then he continued in the garage at the workbench. It is more convenient on it and you won't lose anything. Before disassembling the caliper, we clean it with a metal brush from dirt and rust. You can then rinse it in diesel fuel or an old brake. Let's start parsing
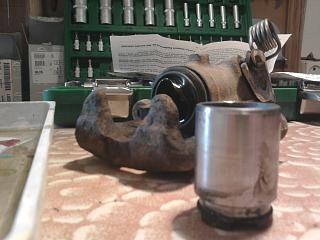
With such a key (white arrow) made of a 4mm thick plate and cutting the tube. Unscrew the caliper piston counterclockwise
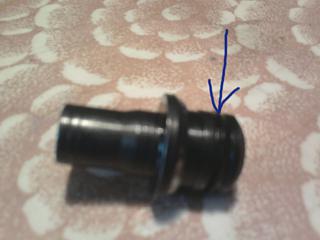
Caliper piston in front of us
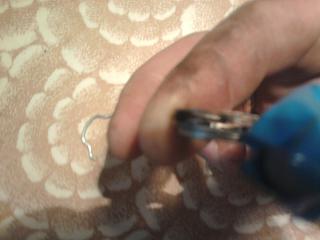
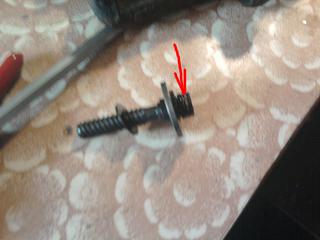
We clean the piston, wash it. To disassemble the caliper piston, you must remove the retaining ring (marked with a red arrow)
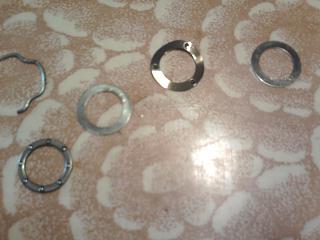
Next, we extract neatly without confusing the order
From top to bottom 1) washer
2) spring washer
3) washer
4) thrust bearing
In the photo, this is the order from right to left (bearing is the lowest)
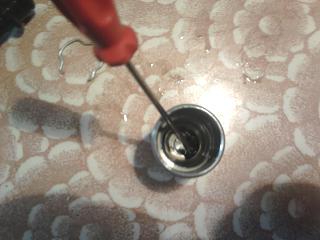
To get the small piston (yellow arrow), screw in the push rod from the repair kit (black arrow). And slowly pull out the small cylinder
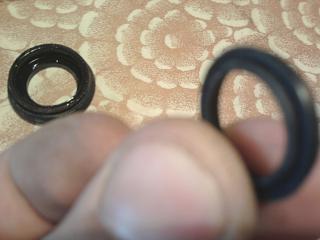
The small cylinder has a cuff (blue arrow). We change it to a new one, keeping the direction of the cuff
At the bottom of the large cylinder, dirt accumulated and was safely washed away. After we assemble the large piston in reverse order.
The first part of the Marlison ballet is over, you can have a smoke or a tea.
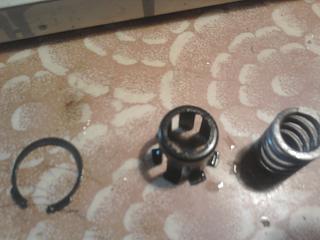
We proceed to the second part. Bulkhead of the hand brake drive. To do this, pliers are needed to remove and install the retaining rings. The jaws of the ring pliers should be straight, the thinner and longer the better. Since the retaining ring (black arrow) is located at a depth of 25-30mm. And the distance between the spring clip (yellow arrow) and the caliper body is 5-8mm. On the first support I took off probably half an hour. After removing the retaining ring, we take out the spring clip and the spring itself (in the photo, the order is from left to right)
Next, we take out the screw rod-pusher. When the screw rod is removed, the pusher will fall out. By the way, he stayed behind the scenes. The second repair kit contains it, it is a small black cylinder with rounded edges. There are two washers on the screw rod-pusher. The washers are positioned as in the photo. With a screwed pusher rod, change the O-ring (paint arrow)
Next, remove the spring (yellow arrow) of the parking brake wings. However, I do not recommend unscrewing the stop bolt (red arrow) of the spring, it breaks off very easily.
we get the wings (white arrow)
Yoke axis and seat we clean it from corrosion, lubricate it with lithol.
Change the backstage oil seal (blue arrow)
Putting it up in reverse order.
We put the curtain in place. Aligning the recess on the link axis with the hole (screw rod-pusher seat) in the caliper body. We put the pusher there (black arrow, photo above). The pusher must fit into the recess on the yoke axis.
We put in place the screw rod-pusher (yellow arrow)
We put the washers in place. The first to be inserted is a rectangular washer. When nesting it, it is necessary to combine the bulge on her body (white arrow). With a recess in the caliper body (blue arrow)
after it we put the second washer, then the spring and the spring clip. Locking ring encloses the composition
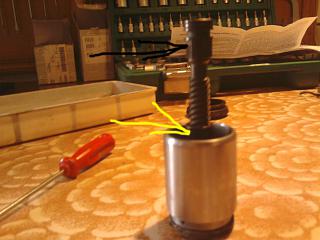
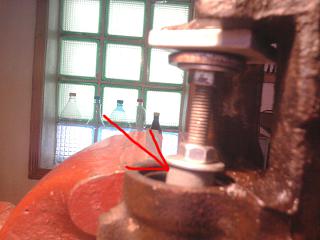
When installing the retaining ring, the fun begins. The spring must be compressed to fit the retaining ring. The spring is hard, hands are useless. I composed a mini screw press from the scrap of iron (pictured below). Only use it through a cylinder (red arrow) of a suitable diameter. Since we remember that inside the spring we have a screw rod-pusher
Compress the spring until the spring holder touches the washer. If we overdo it, we deform the spring clip and the retaining ring will no longer be in place
We put the retaining ring. Here, too, you have to suffer. Space and view are extremely limited. By putting the locking ring you can smoke or Tchaikovsky.
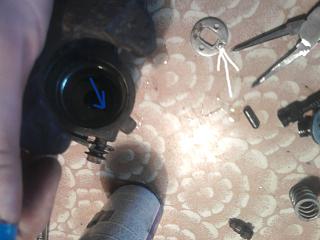
We put in place the new caliper piston boot (white arrow). First, into the caliper body, then pull it over the piston (after having lubricated it with a brake). Finally, screw the piston clockwise into the caliper body.