Garage lifts abound in retail chains. And perhaps all car owners think how to install a lift in the garage. It's pretty convenient.
You just need to first of all decide on the type of lift, because they are quite different and the price is significantly different. And it is not always more profitable to make car lifts for a garage with your own hands than to buy.
When choosing a lift, you should study their technical characteristics and their capabilities. From the right choice the quality of the work performed and the operability of the point will depend maintenance.
For help, you can contact the company that supplies this equipment directly. They can orient themselves and choose the lift that will meet all the requirements.
Attention: When designing a garage, it is better to design a garage with a lift. Then you can take into account the dimensions of the lift and correctly determine the area of \u200b\u200bthe room.
When making a garage lift with your own hands or purchasing immediately, we pay attention:
- The lift in the garage with your own hands or with a purchased one must correspond to the dimensions of the room.
- Do-it-yourself car lifts for a garage should also be selected by the weight of the vehicle.
Attention: For the first point, you need to add space for free movement. And according to the second, the fate follows that in terms of carrying capacity it is necessary to select upwards permissible weight 20% minimum.
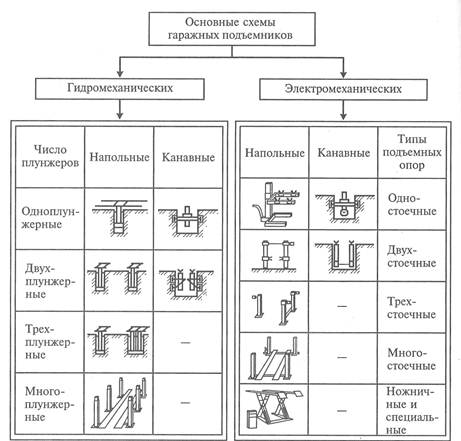
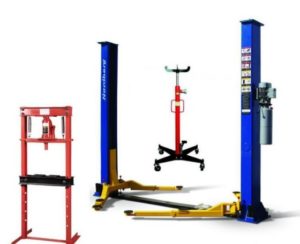
Car lifts are divided into several types:
| Single post lifts
|
Such lifts are mainly produced in mobile versions and are designed to facilitate the work of locksmiths in certain areas of the service point, and have the status of an additional lifting mechanism. The design of such lifts is such that they take up little space, which is very important, since the useful space of the service station is saved. |
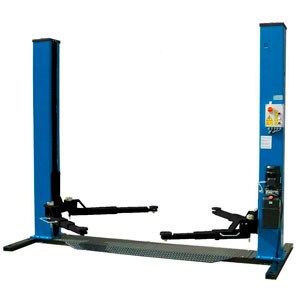
| Two post lifts
|
Such lifts have basic technical specificationswhich you need to pay attention to: the height to the crossbar, the gap between the columns, the lowest lowering height of the legs, the reach of the legs, as well as the safety mode and how they work. Two-post lifts are the main ones in technical service systems and allow you to perform all types of locksmith work. As a rule, lifts with a carrying capacity of no more than 4.5 tons are used to maintain vehicles. |

So:
- In turn, there are lifts with top or bottom synchronization, as well as lifts with symmetrical or asymmetrical leg designs that open 180 degrees. Lifts with an asymmetrical arrangement of legs are more versatile and allow you to service any type of vehicle, while not forgetting about the convenience of maintenance.
- They also differ in the systems of interlocking, which are manual and electrical. Mechanical or manual are also of two types: with symmetrical blocking of racks or with separate blocking. Both methods have their advantages and disadvantages. It should be noted separately that electromechanical lifters do not have stoppers.
Attention: The most popular are electro-hydraulic lifts, which are safer, more durable and simple in design, which does not require special maintenance.
At service stations, two-post lifts with a carrying capacity from 3 to 4.5 tons are installed.
Lift drives: pros and cons
A do-it-yourself car lift for the garage must be selected according to the drive. Their price is quite different, it all depends on the configuration.
Electromechanical lifts have more low cost and more simple design... Maintenance of such a lift consists in the maintenance of the "screw-nut" system, since it is the basis of the lift drive system and tends to wear out.
So:
- Timely inspection and maintenance (lubrication) prolongs the life of the system, and therefore prevents the possibility of a breakdown of the serviced vehicle. It is advisable to use for this lubricantsrecommended by the manufacturer.
- Elevators with an electromechanical drive do not have special stoppers that ensure the safety of carrying out full diagnostics (see) and renovation works, which speaks about the convenience of their use: there is no need to constantly check whether the stoppers are installed, which really saves working time.
- These lifts can be equipped with either one or two motors. In a lift with one engine, the force is transmitted to the second column using a belt or chain drive, which require additional maintenance and reduce the reliability of the structure. Such lifts, over time, began to be designed with a transmission shaft, which transmits the force to the second column. This design is more reliable and does not require special maintenance.
- In twin-motor lifts, the motors are synchronized electronically. As a rule, the main attention is paid to the work of this system, which determines the quality indicators of the work of these types of lifts. Poor performance of such a system can lead to skewed lifting, which will entail unpredictable consequences.
- Elevators with electro hydraulic drive have many positive characteristics that are fundamental to working with car maintenance. They are safe, have high speeds lifting and lowering, significantly save electricity, quietness and smooth operation.
- They are equipped with one electric motor and a hydraulic pump that drives two hydraulic cylinders. Broadcast working fluid to the cylinders using hoses high pressure... The lifting height is controlled using steel cables. The cables can be located at the bottom (bottom sync) or above, in the crossbar (top sync). Preference can be given to lifts with lower synchronization, as it allows servicing any type of vehicle. As a rule, the cable and hoses of the lift are below the floor level, which does not interfere with the work and vehicles entering the lift, and the absence of a crossbar removes height restrictions.
For service stations, you can offer Bend Pak lifts made in the USA, as well as Chinese lifts for a private garage AE&T, NORDRERG and others with a hydraulic drive and a perfect security system.
Such lifts are installed in many service stations and have established themselves as safe and reliable devices. Such a lift in a private garage greatly facilitates the work of a private entrepreneur in the garage.
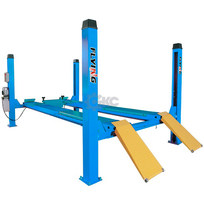
| Four-post lifts
|
This garage lift is used for capital repairs cars, as well as work on the collapse-convergence.
|
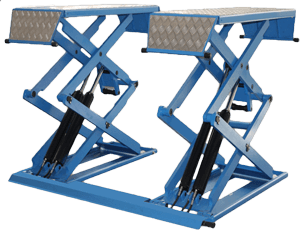
| Scissor lifts
|
The scissor lift for the garage is used as a mobile lifting device, which is very often used at the points of camber-convergence.
|
| Plunger lifters
|
Such a lift in a garage has a very simple design and consists of legs fixed on plungers (hydraulic cylinders), which, as a rule, are embedded in the floor, which makes it possible to save working space.
|
- Most often, they use 2-post lifts, which are structurally simple, not more expensive and are able to save working space. Many, especially recently, use scissor lifts with a traverse for maintenance. And yet, the choice remains with those who decided to start their own business, namely, a service station in their garage.
- Highly a good idea, when there is a garage, and there is nothing to store in it, although other options for using an empty garage are possible: you can simply rent it out or open it point of saleif the location of the garage is very promising.
- If you decide to repair cars, then you should, first of all, pay attention to the size of the garage, and as a result, its ability to install a lift. Garages, as a rule, do not have high ceilings, which makes its own adjustments: in such a garage it will be possible to repair only passenger cars, and a lift that can be installed is the most elementary and simplest, which would make it possible to raise a car, and then a small one. height.
- If you wish, you can solve this problem by digging a hole to make it easier to access the vehicle. As an option, it is to remove the roof and finish building the garage in height, which is realistic and optimal, since there will be no special costs, and the result will be significant.
- And yet, first you should stock up on information and have a complete understanding of technical characteristics hoists: their carrying capacity, height and lifting speed, its design features and the manufacturer.
Lifting capacity
The installation of the lift in the garage must be suitable for the weight of the vehicle. Moreover, the carrying capacity should be greater than the weight of the car itself.
- Mini garage lift for cars weighing in the range of 1.2-4.0 tons, you can use a lift with a lifting capacity of 4.0-4.5 tons, which will be enough for servicing cars, SUVs and small trucks. There are also lifts with a lifting capacity of 4.5 to 20 tons, but they are not suitable for service stations in the garage, since they require more space for their installation.
- The ascent rate does not really matter. In this case, the device different types have practically identical indicators in terms of the speed of lifting and lowering, which lie within one or two minutes.
- The lifting height of electromechanical lifts is within 2 meters, but the maximum height is determined by the value of about 3.5 meters and is determined by the type of lift and its design features.
- When organizing a service station in a garage, a lift with a lifting height of more than 3.5 meters is hardly needed. This applies primarily to standard-sized garages, of which we have a large variety.
- In the garage, you can purchase mobile lifts that could organize maintenance of vehicles with tire fitting (see) or the alignment procedure. It is unlikely that a full-fledged service station could be organized in the garage, where a full range of services could be produced. Most likely, it will be a mini-service station with minimal set operations that do not require the use of special lifting equipment.
The minimum height of lowering of the shares
A private garage with a lift should also be selected according to the lower lowering point. There should be a flat plane.
Attention: Each manufacturer produces structures with their own dimensions of the minimum lowering height of the legs, but at the same time it cannot be lower than 95 and higher than 110 mm.
So:
- A lift for a private garage with a lower lowering height of the legs, the manufacturer produces special lifts for cars with very low ground clearance. These cars include sports cars and sports options for low-slung passenger cars, which are contraindicated in our car roads... Nevertheless, more and more such cars appear on our roads.
- An electromechanical garage lift requires daily inspection and control of the safety nut clearance. when a gap appears less than required, the mechanism should be repaired, with the replacement of worn parts. Lubrication of the main rubbing parts can be done both manually (for cheaper copies) and in automatic mode.
- In daily human activities are involved different types vehicles that require preventive inspections, maintenance and different types repair. The range is so large that it requires a very wide range of auto-lifting mechanisms: from lifting mechanisms for motorcycles to lifting mechanisms for armored vehicles and vehicles with an extended base.
- Based on this, each type of lift is designed to lift certain types of transport. For passenger cars, the manufacturer produces certain types of lifts. Trucks have their own types, especially since not every freight car you can drive into a box and carry out repairs or technical inspection.
- There are specially designed lifts for large motor depots that have large-tonnage vehicles for transportation. It makes no sense to drive such cars into special boxes for inspection or minor repairs, especially since the presence of such boxes is an extra cost of funds and useful space. These vehicles are usually repaired in specialized workshops if major repairs are required.
- When choosing a lift for a garage, you can opt for the electro-hydraulic version of the lift, as it is more reliable and convenient to use. The advantage of such a lift is that in the absence of electricity, it can be lowered manually and returned to the customer. Moreover, this will be done very quickly, unlike other types of lifts, where you have to turn the handle of the mechanism for about half an hour.
Conclusion
A homemade garage lift can be made without a doubt. But it is better to do mechanical in this version. If you use pneumatics.
Then you have to make calculations and then buy it, and this is not a cheap pleasure. If you are doing mechanics, then first look at the photos and videos and select the option you want. And after that, you can already do the assembly yourself.
To work with the bottom of the car, you must either drive the car into a hole or lift it on a lift. But what if there is no such possibility, but you need to fix it?
The lift works on the principle of a book, lifting the car by 45 degrees. It is lifted from a simple standard jack. 15-20 minutes and you can work in peace.
Description of homemade car lift
1.
Shoe. The material for the manufacture of metal 3-4 mm and a metal bar with a diameter of 12 mm is welded in so that there is a fixation of the jack. It is important to maintain the inner size not to narrow. This is necessary to move the shoe on the rack.
2. Rear beam.
Material 32 angle 1500 mm long 4-piece They are assembled into a square; when assembling, it is necessary to use clamps. A metal rod-square 26x21 350-360 mm long is inserted into one of the finished squares, electric rivets are made into the pre-drilled holes after they are cleaned. The unit is collapsible.
3. Site. Material sheet metal 3-4 mm. A 350x150 platform is assembled, the sides are bent or a 20mm wide strip with drilled holes for fastening the inserted board is welded onto the tacks. A strip of rubber is attached to the board. Stiffeners and guides are welded under the bottom of the platform, do not forget to weld the jumper. The size of the site is not critical. It is important to maintain the size between the guides, the platform is put on the upper beam, on which it should walk freely.
4. Rear connector assembly.
Material sheet metal 3-4mm. It is assembled from two halves, between which a strip of metal 3-4 mm thick is welded along the perimeter of the parts. Leave the front part open. Don't forget to weld in the jumper at the bottom of the assembly.
5. Rack. Material 32 corner 1540mm long. - 4 things. 36mm-4pcs. The corner is also assembled into a square welding seams with tacks of 30-40mm, use clamps when assembling. After connecting the corner, it is necessary to drill: in the lower part of the hole with a diameter of 26mm, stepping back from the edge of 31mm, that is, 5mm remains for welding the metal rod in the inner part of the structure. Then we drill holes with a diameter of 13mm, the first at a distance of 100mm, then 80mm and the next 190mm. Size 80 and 190mm are repeated respectively. Holes are required for the metal pins to secure the shoe and top beam. After we have assembled a square profile and drilled it, we connect it together with pieces of corners also assembled into a square profile. With this assembly, it is necessary to insert spacers of the same size between the profiles, that is, 36 mm or a finished upper beam. After welding, without removing the spacers, allow the parts to cool. Check that the top beam runs freely between the two square profiles.
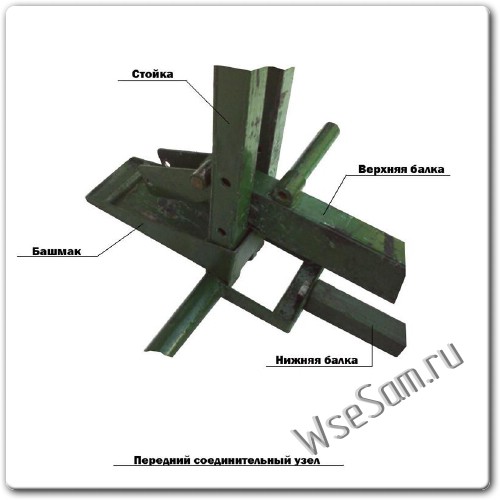
6. Front connector assembly.
The material is two lengths of an inch pipe of 300 mm each, an angle of 32 mm long about 330 mm and a rod from a bar with a diameter of 26 mm and a length of 420 mm. Take a corner and mark it. from the center, 60mm in each direction, at this distance we save the corner shelf, and from these marks to the edges we cut off the shelves with a cutter or hacksaw. A hole with a diameter of 16 mm is drilled in the center of the corner, which is necessary to connect the lower beam, taking into account the size of the bolt head. Then we bend the corner into a U-shaped figure. It is better to connect the prepared parts assembled with the RACK. Follow. so that the pipe is not burnt during welding. The entire front connector is movable. That is, the U-shaped corner along the edges with pipes must rotate on a metal rod.
7. Upper beam.
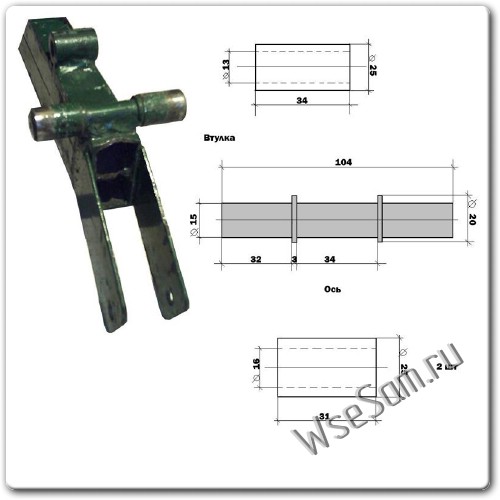
Corner material 32mm long 1710mm-2pcs. sheet metal strip 64mm wide. And a few bushings, which I will describe below.
The corner is assembled into a U-shaped profile, a simpler channel. From one edge in the middle, a 3-4mm metal insert with a length of 160mm is welded, it is necessary for different omkras. Then a plate is welded on top with tacks, everything is sewn into one piece and a rectangular profile is obtained. The insert must also be welded to this plate. On the opposite side, our profile is jammed with a 4-5mm metal plate, everything is scalded around the perimeter and cleaned. A sleeve is also welded to this end in the center: an inner diameter of 20mm, an outer diameter of 35mm and a length of 35mm, for connection to the rear assembly. On the front side of the upper beam, two rails for the jack are welded, they have holes for the jack stopper, an 8mm bolt with a nut is inserted into them (MANDATORY). Also on the upper part a bushing with rollers and a bushing for the safety pin are welded.
8. Fingers. The material is a metal bar with a diameter of 12mm. Cut to size and fold, pre-heating the fold. Quantity 3 pcs.
9. Lower beam.
Material 32 angle, nut M16. The corners are also assembled into a square profile by welding - tacks. An M16 nut is welded from one end (tighten the bolt before welding so as not to clog the thread). For connection to the front node. Drill a hole at the other end, departing from the edge 20mm in the center, a hole with a diameter of 12mm for the bolt. For connection to the rear assembly.


Often, a garage owner decides to get a do-it-yourself car crane for high-quality vehicle repair. It is best to build a lift in the garage during the construction of the motorhome, so that the dimensions of the structure match the area of \u200b\u200bthe room.
What are car lifts?
- single-column
can be purchased in specialized mobile stores. A compact crane is an additional lifting mechanism, does not take up much space, which is important for a garage;
- two-post
thanks to this car lift, you can perform any locksmith work. When designing with your own hands, the height to the crossbars, the gaps between the posts are taken into account;
- hydraulic
the most common type of truck crane. The unit is most often used by vehicle owners, has a large carrying capacity. In this case, the owner monitors the outflow of fluid from the oil seals;
- rack
the rack and the ratchet mechanism interact, a support-lever system is provided. The body rises and goes along the rail. The metal casing will protect the part from mechanical contamination;
- pneumatic
if you decide to build a crane with your own hands in the garage of this type, when it works, you will definitely need a pump. If desired, small wheels are attached to the bottom of the jack so that the system is rolling;
- screw
the lift in the garage characterized by compactness, stability and efficiency. However, among the disadvantages are low lifting capacity, low lift height and constant thread control.
Homemade lift in the garage is made for the weight of the car. DIY a fixture in garage profitable, as money is saved, and the design is obtained on an individual basis. The invention is relevant among car owners: it is not possible to independently remove the engine, for example, from a vehicle, so it will help to do the job crane .
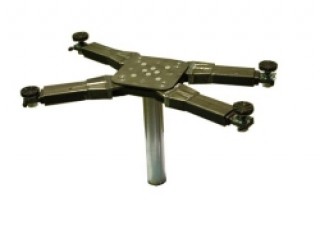
How to make a reliable car lift for your garage?
The design is as follows: a cantilever boom rotating on a vertical shaft, on which the trolley is mounted with the possibility of longitudinal movement. A cargo winch is bolted to the trolley. The shaft is welded to the base, the steel plate is rigidly bolted to the ceiling piece.
The arrow is cooked from steel corners, glass, brace. A bronze bushing is pressed into the glass as a sliding bearing.
The hand winch is the main part car lift to the garage. It is advisable to buy a finished product.
Another smart invention
You can make a rack and pinion crane from available tools.
Two ends in the side walls garage steel corners are embedded at a certain height. A steel plate with a worm gear is attached to the corner shelves, which is not connected. The relative mobility of the plate allows you to adjust its position above the vehicle engine.
The reducer is capable of moving large loads. The sprocket is put on and connected to the worm shaft with a key. A sprocket with a smaller diameter is also put on the output shaft of the gearbox and is mated with a key. A chain is freely thrown onto it (holes in the plate are drilled in the plate) onto an asterisk.
How to operate a lift in a garage. For example, under a car engine do it yourself loops are brought in, the ends of which are thrown onto the hook. Then the gearbox shaft rotates, and power point the car rises.
Modernization
Garage lift equipment electric motors with reduction gears.
Homemade "tipper" car.
For the manufacture of a lift, an algorithm of actions is required.
- Shoe.
To fix the unit, a steel bar is welded to the metal. Subject to internal dimensions the shoe will move unhindered on the rack.
- Rear beam.
Corners (15cm) are collected in squares using clamps. A rod is inserted into one of the squares. The structure is fixed with electric rivets. The nodes are of a collapsible type.
- Site creation.
The form is assembled from sheet material, the sides of which are bent, or a two-centimeter strip is welded onto tacks for fastening a rubberized board. From the bottom of the platform, guides are attached (the distance is maintained) and a stiffener. A platform is attached to the upper beam, which should have an easy move.
- Rear connecting node.
A steel strip is welded along the perimeter between two sheets of metal. The anterior fragment remains open.
- Rack.
With the help of clamps, a square is assembled and corners are formed, holes are planned throughout the structure in such a way as to firmly mark the metal fingers under the upper beam and shoe. After assembling the square profile, all square modules are connected (spacers must be inserted between the profiles). As a result, the upper beam must walk freely between the profiles.
- Front connecting node
Marks are made on the corner in the center and along the edges, then the material is bent into a U-shape, which will rotate on a metal rod.
- Upper beam.
A metal insert is welded in the center from one edge, a plate is attached on top to end up with a rectangular profile. The prepared insert must be protected from all sides. On the front of the beam, rails for the jack and a bushing with rollers are welded.
- Fingers.
A metal bar with a diameter of 1 cm is bent during preheating.
- Lower beam.
The corners are assembled into a square profile. On one side, an M16 nut is attached, which is welded in, on the other side, a hole is made for a millimeter bolt.
DIY winch
A car starter can be the basis for creating a homemade winch. The landing is created from standard sheet metal to which all the nodes are attached. On the formed platform is welded seat for mounting the drum shaft.
Then a gearbox should be made, the part is welded in such a way that input shaft ended up at the top. The starter adapter is attached to the upper compartment of the gearbox. The module, teeth and gears are attached to the input shaft. The wiring is connected as soon as the starter is fixed.
The easiest lift in the garage
A crowbar, a sturdy stick, or a pry bar forms an axis. The part is driven into the ground. A part of the pipe is attached to the resulting axis, which performs the function of a drum. The result is a simple lift. A do-it-yourself cable is fixed on the pipe section, under which a lever is inserted. The other end of the cable is attached to vehicle... It can be stated that a mechanism has appeared in the garage that can raise a car... And most importantly, it is handmade. This is a crane of our own design. And making a lifting device is not difficult.
Outcome
There are many opportunities to make a lifting device in a garage building to use when needed. And such a need always appears before technical inspection... Homemade lifting device is necessary for inspecting the underside of the car, repairing areas brake system, cardan, other units and parts of the transmission.
Convenient to inspect steering, its attachment to the front wheels, lubrication and other operations. When creating a lifting unit, the user receives a full-fledged mechanism at a minimum cost.