The multimeters are equipped with two probes, with red (plus) and black (minus) wires, which measure voltage. The black lead probe connects to the socket marked COM, and the red lead probe connects to the socket on the right side. There is another socket on the left side of the multimeter panel for measuring direct current up to 10 amperes, so you need to be careful not to burn the device by mixing up the sockets.
How to find an open circuit in a wire
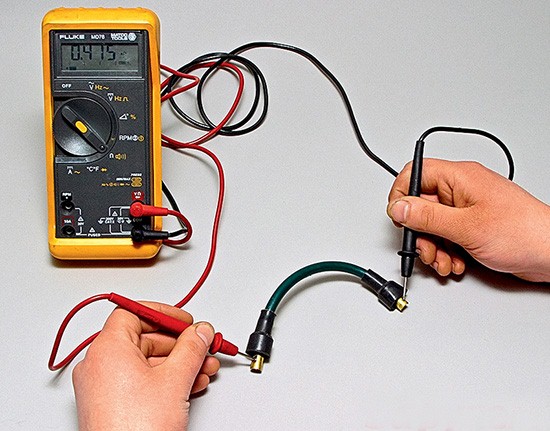
If you have inspected a wire and there is no clear sign of damage in it, but it still does not function, it should be checked with a multitester. Let's consider how the wires are called with a multimeter using the example of a computer power cable and a VGA cable to the monitor.
We take the computer's power cable, and with one of the probes touch the output on the plug, and insert the other into the connector. If there is no wire break, a characteristic sound will be heard, indicating that the line is closed. A damaged wire will not short circuit, and naturally the multimeter will not beep.
To check the wire for an open in the VGA cable, take both connectors and apply one probe to the pin on the first connector, and the other probe to the symmetrically located pin of the second connector. The touching must be careful so that the probe does not come into contact with the connector housing, otherwise the signal will be heard regardless of which pin the probe is attached to on the opposite connector.

Determining that the cable is damaged is half the battle; you still need to establish where the break is. To do this, the probes should be fixed at both ends of the cable, and with your hands, gently deform the wire along its entire length, from one end to the other. When the damaged core connects inside the shell, a multimeter signal will be heard - this means that there is damage in this place. It is more convenient to do this procedure together: one person holds the contact probes, and his assistant bends the wire.
There is another way to find a cliff. Instead of a probe, a thin steel needle is soldered, and, gradually piercing the insulation of the wire until it comes into contact with the core, we ring the entire wire section by section. In the place where there will be no signal, there is a break.
Short circuit test
To check a wire for a short circuit, you need to put a multimeter to measure the resistance and connect one probe to one wiring, and the other to the other. If the resistance is zero, there is no short circuit, and if the resistance is above zero, then there is a short circuit. But you need to know that this device has a low voltage, and it is not always possible for them to detect a short circuit, and if it is possible to do this, then only on a small piece of wiring.
With a multimeter, you can check the high-voltage ignition wires in the car.
To do this, you need to disconnect the wire from the spark plug and from the ignition coil, the circular switch measuring instrument set in ohmmeter mode at least 10 kOhm, and connect the probes to the ends of the wire. Depending on the type of wires, the resistance will show 3.5-10 kΩ. After checking all the wires, determine the spread of their resistance, it should not be more than 4 units.
One method of finding a short circuit is to remove the fuse and connect a probe lamp or voltmeter instead. There must be no voltage in the circuit. Tug the wiring while observing the probe lamp. If the lamp starts blinking, there is a short to ground somewhere in this wiring harness, possibly caused by rubbing the wire insulation. A similar check can be made for each of the components of the electrical circuit by closing the corresponding switches.
Checking the grounding
This check is carried out in order to determine the reliability of the grounding of the circuit element. Disconnect the battery and connect one of the wires from the self-powered probe lamp to a known good grounded point. Connect the other lamp wire to the wiring harness or electrical terminal under test. If the lamp lights up, the ground is good (and vice versa).
Open-circuit checks
The check is carried out in order to identify openings in the electrical circuit
After disconnecting power to the loop, test it with a self-powered probe lamp. Connect the probe wires to both ends of the circuit, if the test lamp lights up, there is no open circuit in the circuit. If the lamp does not light up, then this indicates an open circuit in the circuit. In the same way, you can check the serviceability of the switch by connecting the probe to its terminals. When the switch is turned on, the probe lamp should light up.
Localization of the cliff
When diagnosing a suspect for an open section of an electrical circuit, it is quite difficult to visually detect the cause of a malfunction, since inspecting the terminals for corrosion or a violation of the quality of their contacts is difficult, due to the limited access to them (usually the terminals are covered with the electrical connector housing). A sharp twitching of the connector housing on the sensor or its wiring harness in many cases leads to the restoration of contact. Do not forget about this when trying to locate the cause of the suspect's failure for an open circuit. Unstable failures can cause oxidized terminals or poor contact quality. Diagnostics of faults in electrical circuits is not an intractable task, provided there is a clear understanding that electric current is supplied to all consumers (lamp, electric motor, etc.) from battery through wires through switches, relays, fuses, fuses, and then returns to the battery through the mass of the car body. Any problems associated with the failure of electrical equipment can only be caused by the termination of the supply to them electric current from the battery or returning it to it.
Wires, fuses and relays
Figure: 1. Fuse box in the passenger compartment of the Passat
Protection of the electrical circuits of the vehicle from short circuits is ensured by the use of a combination of fuses, circuit breakers and fuse-links... A blown fuse can be easily distinguished from a serviceable one by inspecting its transparent plastic housing. Examine the fuse carefully to determine if it has blown. If the fuse looks normal on the outside, but suspicions of its malfunction persist, check the conductivity between the blade terminals protruding from its body.
When replacing fuses, be sure to match the new fuse with the old one. Fuses designed for different amperage may look the same; therefore, special attention should be paid to labeling. Replacing a blown fuse with a lower - and especially higher - amperage is undesirable. Each electrical circuit needs a different degree of protection. Make sure that the markings on the fuse body correspond to the amperage for the respective circuit. If the replaced fuse blows immediately, it is unwise to keep replacing it. First of all, you should identify and eliminate the cause of its burnout. In most cases, this is a short circuit in an electrical circuit caused by an open or damaged wire insulation.
Fusible links
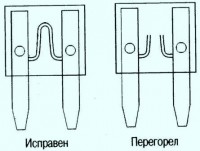 Fig: 2. Serviceable and burnt out fuse-link
Some electrical circuits are protected by the inclusion of fuse-links in them. Inserts are commonly used to protect non-fused circuits, such as the ignition circuit.
Fuse-links are similar to fuses in the sense that failure (reflow) is easily identifiable visually.
To replace the fuse, disconnect the negative cable from the battery. Remove the burned-out insert and replace it with a new one. Before replacing the insert, be sure to try to determine the cause of the overload that caused the failure of the insert.
Circuit breakers (thermal relays)
Thermal relays are used to protect components such as power windows, door locks and headlight adjustment (electrocorrectors).
Some of the circuit breakers are installed in mounting block... The return of thermal relays to its original state on some models is carried out automatically, i.e. when an overload occurs in the circuit, the thermal relay instantly opens, then, after cooling, returns to its original state. If the loop returns to working position does not occur, you should immediately check it. Normal functioning thermal relay confirms the serviceability of the circuit. Some of the breakers are equipped with buttons for manual forced reset.
Replacing fuses
To prevent short circuits and overloads of electrical consumers, the individual circuits are protected by fuses. Hyundai vehicles use fuses corresponding to the latest technical advances, these fuses have blade contacts.
Before replacing a fuse, be sure to disconnect the relevant consumer first.
Pry off the fuse box cover with a narrow screwdriver and remove it.
A blown fuse is recognized by a molten metal strip.
The location of the fuses is shown in inside fuse box covers.
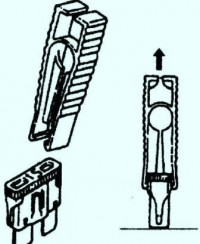 Figure: 3. Tweezers to replace fuses
Remove the defective fuse with the plastic tweezers located in the fuse box cover (fig. 3).
Insert a new fuse of the same rating (amperage).
If the newly inserted fuse blows after a short time, the corresponding electrical circuit should be checked.
Never replace the fuse with wire or similar accessories, as this could cause serious damage to the vehicle's electrical system.
The fuse rating is marked on back side fuse case. In addition, the housing is color-coded to indicate the rated amperage.
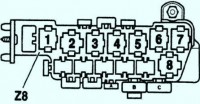 Figure: 4. Relay
Relays are used to supply electric current to some elements of the vehicle's electrical equipment. Violation of the serviceability of the functioning of the relay leads to the failure of the element it serves. In the event of a suspicion of a malfunction of any of the relay, it must be removed and tested at the station. maintenance or in a specialized auto repair shop. Replacement of a failed relay is made assembled.
Have you noticed that, for example, lamps do not work side light the left side. Looking into the fuse box, we saw that one of them burned out. With the hope that this happened by accident, you put on the second fuse and ... it also blows. The third is no longer worth putting, it will burn out in the same way as the first and second, tk. there is a short circuit in the circuit.
The troubleshooting method for such faults is very simple:
- Instead of a blown fuse, connect a 20-40W lamp or an ammeter.
- Turn on the ignition, the lamp will light up (the ammeter will show the leakage current).
- Determine what other circuits this fuse protects.
- Turn off the sections of the tested circuits one by one, starting from the consumer, until the lamp goes out (the ammeter will show the value "0"). This means that the short circuit is in the area just disconnected and you need to look for a fault here.
Now let's see how to apply this method in practice. Let's take a specific example.
For 4 hours of car parking, the battery "dropped" to zero so that the interior lighting did not even light up. The diagnosis is clear, somewhere there is a short circuit (short circuit). The first thing to do is check the battery leakage current. Disconnect the negative terminal and connect the ammeter in series. Leakage current is more than 9A!
Decent Goat! To facilitate the search, you need to "split" the wiring into two parts, i.e. disconnect the engine compartment harness from the salon, thereby narrowing the search circle and quickly achieving the desired result. We shoot instrument cluster and disconnect all the connectors behind it.
We connect the ammeter to the battery. The leakage current remains the same, so the fault is in engine compartment... We leave the ammeter connected to the battery. We turn off all the connectors in turn, looking at the ammeter. All connectors are disconnected and the leakage current is still 9A.
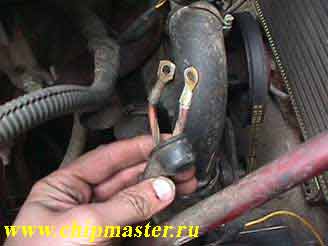
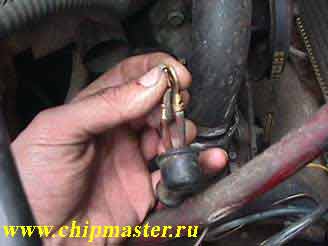
The last consumer left is the generator. We disconnect two pink wires from the 30th terminal of the generator and the short circuit disappears.
![]()
Now you need to determine exactly where the short circuit is, in the wiring or in the generator. We connect two pink wires together and look at the ammeter, the leakage current remains at 0A.
![]()
Means short circuit in the generator. We remove it and disassemble it. An exploded rectifier diode immediately catches the eye. The entire horseshoe is covered with a white powder formed from corrosion. The stator terminal pads are thickly rusty.
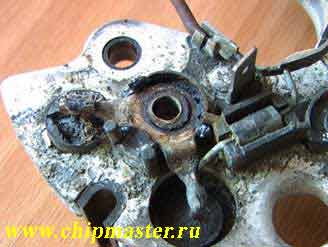
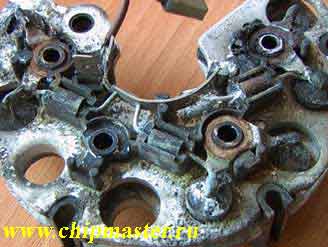
I call the rest of the additional and rectifier diodes - in two breakdowns in both directions. This is where there was a malfunction due to which the battery "sat down" so quickly.
Here is another case from practice.
On the injection 2109, the main relay fuse - Y (circled) has blown. In the a / service the gas pump was changed for the client! The malfunction remained, which, in fact, should have happened, because the diagnosis was made thoughtlessly and prematurely. First, you need to check all the chains and be fully convinced of the verdict. Only then can the components and assemblies be changed.
We carry out the search using the above method. We look at the diagram which circuits are protected by this fuse and turn off the consumers one by one, i.e. remove the block from the mass air flow sensor, radiator cooling fan relay, injector harness, fuel pump, speed sensor (DS).
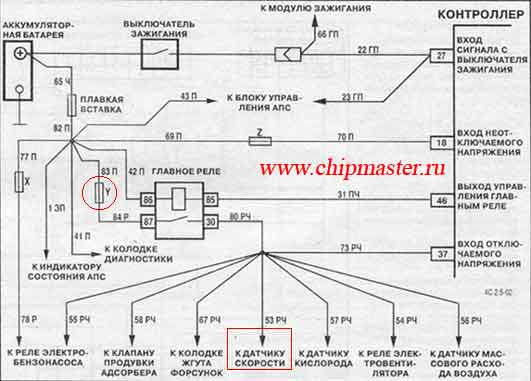
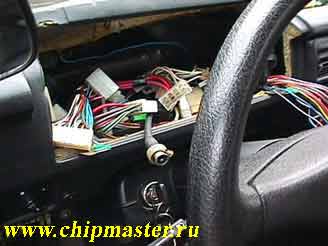
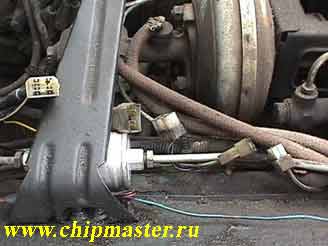
In my case, I closed the positive wire of the speed sensor to ground (circled by a rectangle). This was a manufacturing defect. The harness to the recreation center was not laid correctly, it turned out to be pressed with a cable throttle to the vacuum brake booster. Red - a positive wire, eventually rubbed off and began to short to ground, touching the body of the vacuum amplifier. As soon as I disconnected the DC connector, the short circuit was gone!
The client calls:
Volodya, last summer you installed on my car VAZ-21213 a dual additional fan from 21214. Recently a fuse has blown and its block has melted. What to do?
Come and see what's the matter.
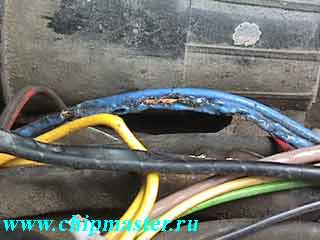
Arrives. The pad and fuse melted into a single, inseparable lump. At first glance, it is difficult to understand what it was. A burnt wire under the spare wheel.
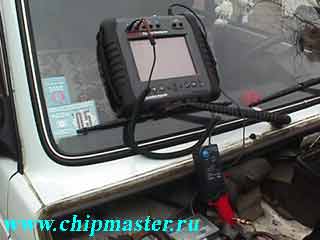
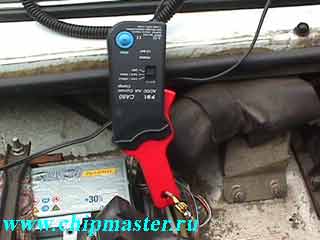
The current in the fan switching circuit is large and therefore I did not connect a multimeter, I used the MTS-5100 motor tester in the current measurement mode using a low-current clamp.
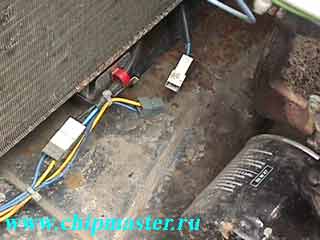
The fans on this machine are connected in parallel. To find out which one is faulty, I turn off one of them.
On a working fan, the current, at the moment of switching on, reaches 21.55A and then drops to 13.8A.
On the faulty current, the current rises to 21.55A and remains at this value until the load is turned off.
Reasons: it is possible that an interturn short circuit in the motor or a fan jammed due to mechanical damage... I turn the blade with my hand. It wedges in one position. I draw your attention to the turned away bolt of the motor, which rotates at the moment the blade wedges.
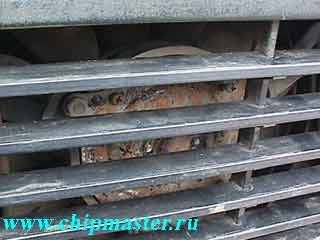
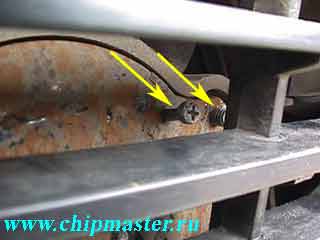
The picture has cleared up! The screwed out bolt became an internal mechanical cause of the rotor wedging. At some point, it stopped, the current increased, the fuse and the wire burned out and melted.
In the new 2111, the fuse F9 for the rear wiper motor has blown. This case is interesting and rather rare.
Unfortunately, the scheme did not correspond to reality and a lot of time was spent on the search. I had to walk along the wire and gut all the wiring. KZ was between back seat and a rear left lamp. I could not find the exact place and therefore made an insert at this gap. Once again I checked the circuit for short circuit, it is not! Collected everything back and checked the performance. After turning on the rear wiper, the fuse blown again. I was a little confused. How is it that the malfunction is found and eliminated, and the fuse is on ?! I go through the wiring again. The malfunction again indicates the rear harness going to the wiper motor, but on a different wire. This time, I carefully look through all the wiring and find a short circuit on the left rear wheel arch. On both wires, in the first case, yellow, and in the second - white, the insulation is damaged. This place they touched the body, which caused a stable short circuit.
The illumination of the dashboard, cigarette lighter and stove control knobs does not work on the Chevrolet Niva.
I assumed that the problem was simple and I would fix it within an hour. Most likely, the dashboard backlight brightness control or the size enable button is out of order, but it didn't work! The regulator and button worked fine and their contacts, as expected, had a corresponding voltage - 12V. But only on the middle contact it did not change and was always 0V. This means there is a short circuit in this circuit.
A short circuit is not a pleasant phenomenon in itself, and when it touches your car's wiring, it can be a disaster. The reasons for its occurrence, as a rule, lie in the old age of the wiring, when over time the braid becomes fragile and loses its elasticity. The bends of the wiring, its contact with the rubbing surfaces, as a result of which the conductive part is exposed and in contact with each other.
Almost all electrical circuits of the vehicle are protected fuses... Which perform the function weak point, which, in the event of a short circuit, burns out, thereby stopping the current in this section of the circuit. The problem will not be solved, but you will have the opportunity to get to the garage or to the repair shop.
Let us now understand in more detail the causes of a short circuit, determine the thinnest and most vulnerable places in the car, where the occurrence of a short circuit is most likely to occur, and consider the method of eliminating and searching for these faults.
Short circuit, what is it and how to deal with it? Onboard system The car's power supply is powered by a storage battery with a nominal voltage of 12 volts. The capacity is determined by the value expressed in Ah, which means - if we connect a device to our battery that will consume a current of 1A, then until it is fully discharged this device will work (Battery capacity) / (Current consumption) \u003d ... hours, usually for passenger cars a 55Ah battery is installed. the car should be carried out only taking into account the accumulated knowledge.
The more current flows, the faster the battery will discharge and the more heat the conductors through which the current flows. Short circuit is a lightning-fast discharge of the battery, accompanied by heating of the wires to the melting temperature. you need to select so that their total power is within the normal range.
I specifically began the article with a small physical background so that you would understand the discharge mechanism and the moment that more current flows in the conductor, the more it heats up. And what does the magnitude of the current depend on? From resistance. From the physics course I \u003d U / R. A short circuit is a meeting of a “bare plus” with a “bare minus”, of course, this is an exaggerated name, but the meaning is just that. Any conductor has its own resistance, albeit very small, but it has, but it is not so significant compared to the resistance of even the smallest light bulb in a car that we conventionally consider the resistance of the conductor to be zero.
Electrical circuits are specially protected by fuses that have a special carrying current, above which they melt, thereby protecting the circuit, preventing a short circuit.
Unfortunately, not all parts of the power supply chain are insured. but there are reasons for this. When installing by yourself anti-theft systems and many other electrical accessories can be tricky.
The engine starting system, the ignition system, the ignition switch connection, the power supply to the generator from the storage battery and to the starter, occurs through unprotected circuits! These are the most dangerous sections of the circuit, the isolation of which must be given special attention. The most dangerous sections of the circuits are the places where the power is connected to the starter retractor relay, to the generator contact bolt and to the ignition switch contacts.
If you smell burning in your car, see smoke, immediately stop and shut off the car and disconnect the battery. In no case, in this state, do not try to drive to your garage or service station on your own. The wiring has such an ability to flare up with lightning speed.
Short circuit, methods of finding it
Consider a case where your fuse blows. There are several types of short circuit, in the first case, your fuse blows out instantly, immediately after it is installed in the fuse box or within a short period, in a matter of moments after installation, but not instantly. This means that in the first case, the conductor along which goes "Plus" has direct direct contact with the "mass" of the car body, this option is a little easier in troubleshooting. It is always more difficult to identify the cause of a malfunction when it is weak or has a spontaneous nature, a tendency to appear and then to disappear.
When looking for a short circuit, the most important thing is to determine where the short circuit occurs. When searching, I recommend that you arm yourself with a control light, a long piece of wire, a book or electrical circuit with the electrical equipment of your car. If your fuse blows, then the short circuit is located in the section of the circuit from the fuse box to the device that is powered by this fuse.
As a rule, the short circuit itself occurs either on the way to this device in the wiring, in the places where the wiring is connected to this device, or in the device itself. Thus, having determined the fuse number, look for which circuits this fuse is responsible and, if possible, turn off all electricity consumers in places where the wiring comes to them.
I wrote "whenever possible" because not all consumers of electricity are easily accessible, and many are located in places where only a specialist or a person who has already encountered this can perform this procedure. For example: if you determine that you have a short circuit in the direction indicator circuit or alarm car VAZ 2105, it will be necessary to disconnect the plug block from the alarm switch, which is located on the right of the steering column, if when it is turned off and the fuse is installed, the short circuit disappears, you need to go further along the wiring, and the turn signal and alarm relay is located under dashboard, which I do not advise you to remove alone if you have not had such experience.
Above, I advised you to use a control light and a piece of wire when searching, now I will explain why. As we defined a short circuit - this is when the wiring or some part of the device connects or has contact with the ground of the car, we make a circuit connecting a long wire with the "plus" of the battery and a control lamp, however it can be just a control lamp with a long one part. When searching for a short circuit, your battery must be disconnected, but in this case, you will need to completely disconnect everything from the "plus", and the ground "minus" must be connected to the car.
We connect the second output of our control lamp to the fuse box, we connect it to the place from which this very formed minus comes out, since when the fuse is inserted, it immediately burns out, which means that a minus is formed at one output, and a positive voltage is suitable for the second as it should be. When a light bulb is connected to this output, in case of a short circuit, it will immediately light up brightly, now we will disconnect all electricity consumers that are powered by this fuse according to the scheme. And we will observe the behavior of the light bulb, how it is on, as soon as we disconnect the device giving a short circuit, the light should either go out or dim, which will correspond to the fact that we have found the cause of the short circuit.
Finding a short circuit is a very much attention, the problems that this malfunction can cause can be global in the literal sense of the word! Trust in the solution to this issue better for specialists... A burned-out car will not pay off your ambitions, or the very opinion that I will fix everything myself!