Before any trouble happens and you have to peer at the dashboard to view the manual or our article, we hasten to warn you that some indicators on certain trim levels toyota models are quite rare. Therefore, we publish a list of the most common designations from the most popular cars.
Don't be afraid of the warning symbols on the dashboard
At the end of my introductory remarks, I would like to say that the warning signs on the dashboard light up every time the ignition is turned on. It is normal practice that the vehicle computer starts checking the vehicle's sensors and systems. You should only panic if these icons do not go out.
Finally, also remember that some warning icons can alert you to common vehicle ailments without naming a specific problem. When such an indicator appears on the dashboard, it is necessary immediately.

1. Airbag warning indicator - indicates a problem with the airbag system, which must be checked immediately by a certified service center. The icon may also appear when one or more airbags are manually deactivated.
2. Anti-lock braking system malfunction warning - says that in anti-lock braking system ABS (which prevents the wheels from locking during heavy braking and helps the driver maintain control of the vehicle) an error has been detected or the sensor needs to be replaced. The icon may also appear if too much dirt has adhered to one of the sensors, or if you have used the car in sport mode, with fast acceleration and hard braking, which could "trick" the system. The same effect will give a car stuck in mud or snow, on which one or more wheels will slip.
3. Engine malfunction indicator is probably the scariest dashboard indicator of all. Many people, seeing it, immediately think that the engine has occurred. However, things may not be so sad. The appearance of this icon on the "tidy" may inform you that the sensor is out of order or the engine has failed and it has stopped working in optimal mode and the engine is emitting more into the atmosphere because of it harmful substances than it should be.
You should really be afraid if, at the same time, when the indication appears, the motor begins to emit extraneous sounds or the thrust is gone. But in any case, a visit to the STO is MANDATORY!
4. Oil pressure icon - in simple terms, if this icon lights up, it will mean that it is too low or too high, so you need to check its level before further driving. The indicator can also warn of a malfunction oil pump damaged or a plug in the oil line. Incorrect oil viscosity can be another reason for the pictogram to appear.
5. Low temperature engine coolant indicates that the engine coolant is too cold for this motor... If the indicator does not disappear after the car has driven several kilometers, something went wrong, contact a mechanic. A thermostat (a valve that allows coolant to pass through the radiator) or electric fan may by mistake run continuously with maximum engine cooling.
The problem cannot be called serious, but an engine running at a sub-optimal temperature will consume more fuel and emit more into the atmosphere. exhaust gases than it should be.
6. Low beam indicator- informs you that the low beam or daytime running / side lights are on. If the indicator has exclamation point, you should check the headlights as one or more bulbs have burned out.
7. Need for maintenance - informs you that the oil and the corresponding filters must be changed within the current maintenance... A message on the multi-information display (if you have one) can alert you hundreds of kilometers away of an impending maintenance schedule before the main indicator comes on.
8. Warning sign low level fluid in the washer reservoir - informs you about what you need.
9. Warning about the need to refuel - if the last bar on the indicator lights up or flashes, you need to drive into and refill the tank.
10. Electric power steering system warning - indicates a problem with the electric booster. In the neglected version, you will feel the presence of a problem with your own hands, when the steering wheel of Toyota becomes heavy as on KamAZ. Not dangerous, but not pleasant either. Visit the service.
11. Warning about open doors - means that one or more doors are open or not completely closed.
12. Parking brake indicator - informs you about the raised parking brake. If you release the parking brake and the sign is still there, there is probably a problem and you should check the brakes on your vehicle. Brake discs or the pads may need to be replaced.
13. Warning about high coolant temperature - means that the engine is too hot and irreversible consequences will come soon. Stop the engine and call a mechanic or tow the machine to the nearest service. If the indication is triggered during a cold start, the warning may be triggered by a short circuit, faulty sensor or a computer error. In any case, take the car to a mechanic.
14. Indicator fog lights - informs you that the foglights are on.
15. Side light indicator - informs that the parking lights (daytime running lights / side lights) are ON.
16. Pictogram high beam - informs you that the high beam is on. Make sure that at night you do not blind oncoming and passing motorists.
17. Arrows indicating turn signals work - warn you about the included turn signals or working alarm.
18. Emergency light battery warnings - basically, it will tell you that the battery is not charging correctly or not charging at all. Mainly displayed when the engine is off and the light or radio is on.
19. Seat belt icon - you or the passenger (s) must wear your seat belt.
20. Transmission indicator - indicates a malfunction in the transmission. Usually appears on cars with automatic transmission, when the box, for some reason, ceases to properly fulfill its direct duties. We do not recommend driving the car on your own if the indicator turns on.
21. Warning symbol fuel filter - if it stays on, it indicates that water has been detected in the fuel filter. Do not panic if at the moment when the warning appeared on the dashboard you were driving you have enough time to visit the service and get rid of the water.
22. Glow plug indicator (glow plugs) - it will appear when it is cold outside and will inform you that the combustion chamber has begun to warm up inside the engine (in diesel engines). Do not start the engine until the indicator turns off. If it does not disappear for too long, the car has a problem with the glow plugs or is too cold.
23. The same indicator as in point 13, but in a different color. Stop the engine because it is too hot.
24. STOP icon - it is normal if it appears when starting the car, but if it continues like this, while you are driving with No. 13 or 5, it really means that you have to stop.
25. Cruise control indicator - indicates that it is on. Typically, you can turn it off by pressing the brake.
26. Gear position indicator - shows which gear you are in.
27. The same indicator that was in point No. 8. Add fluid to the washer.
28. The same indicator as in point # 9. Refueling required.
29. Vehicle stability control or signal lamp Traction Control - if the indication does not go out, thus it warns that there is a problem with one of these systems.
30. Tire pressure indicator - means that the pressure in one or more tires is low or too high. A very convenient warning system that will warn you about a puncture.
31. Traction control off indicator - this warns you that you have disabled the traction control.
32. Slip indicator vehicle
- it will turn on when driving on snow, ice, mud or very wet roads and will indicate that the vehicle is stalling and the traction control system is working to ensure maximum traction.
33. Overdrive OFF indicator- informs you that the overdrive system is off.
34. Warning about oil temperature in an automatic transmission - the temperature of the oil in the transmission is too high, you must slow down or even stop to let it cool down. Wrong transmission oil can lead to overheating of the gearbox components. Take the car to the service if the problem persists.
35. Lane Keeping Assist - problems with the system that keeps your car in the lane. Keep your hands on the wheel.
36. Adaptive Front Lighting - the automatic system that switches between the headlights of the low and high beam does not work correctly.
37. The same indicator as in No. 10
38. Pre Collision System - warns you that the system that helps to prevent a frontal collision is not working. Drive carefully and contact the service to solve the problem.
39. Parking brake indication - informs you that the parking brake is on.
40. Eco / Eco Indicator - informs you that you are driving in ECO mode to save fuel.
To thoroughly study the mat. part of your Toyota, be sure to read the operating instructions supplied with your vehicle. specially designed for your model.
The instrument panel on the Toyota Corolla is the space on which the control and measuring sensors are located, as well as levers, car control buttons. To make it more convenient for the owner to use the car, the manufacturer tried to put a corresponding pattern on each button and lever, that is, the symbolism of what this tool is responsible for.
There are so-called nozzles in front, which help to ventilate the interior, as well as heat it through the stove. It is through them that not only hot, but also cold air... You can adjust the air flow as you wish using the deflectors. There is a special lever on the bottom of them that helps to adjust the amount of air supplied. If you turn the handle all the way, then the air will stop flowing into the cabin altogether.
The instrument panel on the left has a front light switch as well as a vehicle direction indicator. This lever on the Toyota Corolla works in several modes, including when turning. When you turn the steering wheel in a straightforward motion, the lever itself returns to its place. It should be noted that the lever can only show rotation if the ignition system is on.
The second mode of this element is headlights and dimming. The driver can either turn off all the headlights, or activate the high or low beam, dimensions. Also, a downshift switch was installed on the dashboard.
There are many keys on the steering wheel, not only here sound signalbut also Bluetooth, the ability to activate the speed limit. When the phone is connected to the car, you can turn on the speakerphone from this panel and answer calls as usual.
On the left side of the steering wheel, there are keys that are responsible for the functions of the audio system. You can adjust the volume, exercise quick search required file, navigate between radio stations, turn on the power.
The ignition switch is located on the right under the steering column. The driver can place the key in the lock in any of four possible positions.

The LOCK mode on Toyota Corolla indicates that the ignition system is off, if the key is not in the lock, the alarm is activated. To accurately lock the steering shaft, simply turn the steering wheel to the right until you hear a click. To turn off the anti-theft equipment, just insert the key into the lock and turn it to the ACC position with the steering wheel. You cannot remove the key while driving along the highway, otherwise the steering wheel will lock and the Toyota Corolla will be uncontrollable.
The ACC position means that the steering wheel is unlocked, the power supply, lighting and radio equipment are activated. In the ON mode, the key is on, when the ignition is turned on, the electrical circuits in the car are connected to work. As an option, the Toyota Corolla can be supplied with an intelligent start system power unit... On this car, you can start the engine only by pressing the brake if the transmission is automated or the clutch if it is mechanical.
The overdrive and washer shift levers were very useful to drivers. The electrical circuits come into action only when the ignition system is on, here it is worth remembering that 0 means complete shutdown wiper, 1 - intermittent operation, 2 - slow, 3 - fast, 4 - short-term.

It is important to know that the wiper can only work if the hood is closed and the ignition is on. During the first minutes of operation, the mechanism will try to cope with the presence of a foreign body on the glass, if this fails, it will stop.
The hazard warning switch is very important in the operation of Toyota Corolla, which can come in handy in an unexpected situation right on the track. To activate, just press the button, as well as to disable it. This function works regardless of the position of the key in the ignition lock.
The dashboard also contains a master audio unit, vehicle heating controls, storage boxes, seat heating, transmission control, parking brake. There is also an area where the airbag is installed, which will not work when the ignition is off, a slight collision, a collision or a rollover of the car.
The handle for adjusting the steering wheel is very useful for Toyota Corolla drivers. Before riding, you can easily set the desired steering position depending on the required tilt and reach. This makes driving even more comfortable.

Professionals recommend adjusting the steering wheel only after the seat has been properly tuned so that there is more good overview roads, but also combinations and instruments on the steering wheel. All manipulations are carried out exclusively only on a stationary car, if you do this while driving on the track, you can temporarily lose control of the car. To set the desired position of the steering wheel, simply lower the lever, select it and move it to lock in the same place.
For technical inspection the machine on the front panel has a connector for connecting diagnostic devices. There is also a rear-view mirror drive outside, a hood lock switch, with which the front edge rises. Thanks to a small gap, the driver is able to push back the safety hook and look inside the engine compartment.
Some people will definitely need a box for small items, which can be actively used to store documents, trifles, and a phone.
The manufacturer also took care of the headlight washer switch and the headlight range control. To activate the washer, you just need to light the lights and press A. letter B activates the light corrector, which allows you to adjust the angle of inclination of the front lighting. Thanks to this function, drivers driving on oncoming lanewill not be blinded by the light at night.
The headlights can be adjusted in six available positions and only with active dipped lighting. Position 0 means that the driver is alone in the car, position 1 - front passenger and driver, 2 - all seats are occupied, but the trunk is empty, 3 - the trunk is full, only the front seats are occupied, position 5 - the trunk is full, all seats are occupied.
As we can see, the manufacturer did a good job on the capabilities of the front panel of the Toyota Corolla. Its design provides all possible and most useful functionswhich the driver can activate without getting up. Thanks to such capabilities, not only the control has become more convenient, but the car itself has reached a new level of internal comfort. Each instrument button and lever has a graphical representation, so even a beginner will have no problems understanding the functions of one or another switch.
1 - nozzles of the ventilation and interior heating system. Designed to regulate the air flow from a heater, air conditioner or ventilation system.
The direction of the air flow is adjusted by turning the deflectors in the appropriate direction. A knob is installed at the bottom of the nozzles to adjust the amount of air supplied through them. By turning the handle all the way to the right, the damper opens completely (maximum air flow). When the handle is turned all the way to the left, the damper closes completely, blocking the air flow. By setting the handle to intermediate positions, adjust the amount of air flow.
2 - the lever of the switch for outdoor lighting and direction indicators.
The lever switches the following switch modes:
Direction indicator activation mode. Move the lever up or down until the direction indicators turn on. When the lever is moved up or down in the instrument cluster, the indicator starts flashing, respectively 10 or 7. When returning the steering wheel to the straight motion the lever is automatically returned to its original position. When changing lanes, to turn on the direction indicator, it is enough to press the lever in the up or down direction only until there is tangible resistance, without fixing the lever. When released, the lever will return to its original position; - mode of turning on headlights. To turn on the headlights, turn the handle A of the switch lever around its axis. In the mode of turning on the headlights, the switch can take two positions:
All inclusive
Side lights in the front and taillights, as well as illumination of the instrument cluster;
Low beam included.
In order to switch the headlights from low to high, move the lever away from you. When the high beam headlights are turned on, the indicator 8 lights up in the instrument cluster
For signaling high beam headlights, move the switch lever one position towards the steering wheel
To enable fog lights turn switch B and align with the pictogram
To turn off the fog lights, turn switch B to the "OFF" position.
3 - lever for manual engagement of the lower gear in the gearbox
4 - steering wheel... The steering wheel contains the following switches and buttons:
Horn switch. In order to turn on the sound signal, press on any place of the steering wheel pad;
Bluetooth system keys with phone control and speed limiter activation button:
A - button for answering incoming phone calls;
B - loudspeaker switch;
B - speed limiter key;
Audio control keys from the steering wheel. Using the buttons on the left side of the steering wheel, you can operate some of the audio functions:
A - volume control key;
B - file selection key, search for radio stations or fast forward and backward;
B - audio system power on key.
5 - instrument cluster
6 - ignition switch (lock), combined with an anti-theft device, is located on the right side of the steering column. The key in the lock can take one of four positions:
LOCK - the ignition is turned off, with the key removed, the anti-theft device is turned on. Turn the steering wheel to securely lock the steering shaft
Right or left until it clicks. To turn off anti-theft device insert the key into the ignition switch and, slightly turning the steering wheel to the right and left, turn the key to the "ACC" position;
ACC - the ignition is off, the key cannot be removed, steering unlocked. The power circuits of the sound signal, outdoor lighting, high-beam headlights, radio equipment are switched on;
ON - the ignition is on, the key cannot be removed, the steering is unlocked. The ignition, instruments and all electrical circuits are on;
START - the ignition and the starter are on, the key cannot be removed, the steering is unlocked. This key position is not fixed, when released, the key returns to the "ON" position under the action of the spring force.
As an option, the vehicle can be equipped with an intelligent engine start system Push Start.
On toyota vehicles Corolla can only be started by pressing the brake pedal (models with robotic and automatic transmission gears) or on the clutch pedal (models with mechanical box gear).
7 - manual overdrive lever in the gearbox
8 - the lever of the switch of the cleaner and washer with a button for switching display modes on-board computer... The switch turns on the electrical circuits when the ignition is on. The lever can take the following positions:
0 - the wiper is off;
1 - intermittent mode. To turn it on, move the steering column switch up to the first fixed position. To change the length of the pause, turn switch A clockwise (long pauses) or counterclockwise (short pauses). Switch A is used to set the four modes of intermittent operation of the wiper.
II - slow mode. To turn it on, move the steering column switch up to the second fixed position;
III - fast mode. To turn it on, move the steering column switch up to the third detent position.
IV - short-term mode. To turn it on, move the steering column switch down.
By moving the steering column switch towards themselves, they turn on the windshield washer (non-fixed position). When you press the steering column switch simultaneously with the washer, the wiper will automatically turn on, the brushes of which will make two working cycles
9 - alarm switch. When the switch button is pressed, all direction indicators and warning lamps installed in the instrument cluster light up with a flashing light. Pressing the button again will turn off the alarm.
10 - the head unit of the audio system
11 - control unit for heating, air conditioning and interior ventilation
12 - upper storage box
13 - the area of \u200b\u200bthe front passenger airbag installation. Combined with a seat belt, the airbag protects the passenger's head and chest in a severe frontal collision.
14 - lower glove box
15 - front seat heating switches.
16 - ashtray with cigarette lighter
17 - the gearbox control lever is transferred
18 - parking brake lever. To brake the car parking brake, lift the lever all the way up - the indicator in the instrument cluster will light up red
To release the vehicle, pull the lever up slightly, press the button at the end of the lever handle and lower it all the way down. The indicator should go out.
19 - accelerator pedal.
20 - brake pedal.
21 - handle for adjusting the position of the steering wheel. The car is equipped with a steering column that is adjustable in tilt and reach. Before driving, adjust the position of the steering wheel so that it is convenient to control the car and at the same time the instruments in combination are clearly visible.
Push the lever down to select the optimal steering wheel position.
Set the steering wheel to the desired position.
22 - diagnostic connector.
23 - drive of external rear-view mirrors
24 - hood lock drive lever. By turning the lever towards you, the hood lock is unlocked. At the same time, the front edge of the bonnet rises, creating a gap to access the bonnet safety hook handle
25 - a box for small items.
26 - block of switches for headlight range control and headlight washer. To turn on the headlight washer, turn on the headlights and press the switch A.
The headlight beam adjuster B is equipped with an electric drive and allows you to smoothly change the angle of inclination of the headlights in accordance with the load of the car, which prevents the dazzling of oncoming vehicle drivers. At the same time correct adjustment headlights provide visibility for the driver.
Headlamp tilt adjustment provides six positions (0, 1,2,3, 4, 5) and is possible only when the dipped beam is on.
The controller positions correspond approximately to the following loading states:
0 - one driver;
1 - driver and passenger on front seat;
2 - all seats are occupied, the trunk is empty;
3 - only the driver's seat is occupied, the trunk is fully loaded;
4 - the driver and passenger in the front seat, the trunk is fully loaded;
5 - all seats are occupied, the trunk is fully loaded
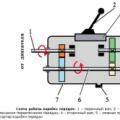
The arrangement of instruments and signaling devices in the instrument cluster is shown in Fig.
1 - fuel filter condition indicator (for diesel engines).
2 - indicator of turning on the vehicle speed limiting system
3 - indicator "Check engine" (with orange filter). Lights up when the ignition is turned on and lights up when the engine is started. The indicator should go out immediately after starting the engine. If the warning light comes on when the engine is running, this indicates a malfunction in the engine management system. In this case, the control unit switches to the backup program, which allows you to continue driving. When the indicator lights up, it is necessary to check the control system and eliminate the malfunction.
If the indicator flashes, it means that there is no stable growth in the ignition system. Reduce the engine speed until the indicator goes out. At the first opportunity, contact a service station or fix the malfunction.
4 - indicator of switching on the front fog lamps.
5 - tachometer electronic type shows the speed crankshaft engine. The scale is graduated from 0 to 8, graduation is 0.2. To find out the crankshaft speed in min4, you need to multiply the tachometer readings by 1000.
6 - left information display.
When the ignition is switched on, the left information display shows the following information:
A - fuel level;
B - liquid temperature in the engine cooling system;
B - position of the gear lever.
7 - the left turn signal indicator (in the form of an arrow with a green filter) lights up
A flashing light when the left turn signal is turned on (in sync with it). Blinking of the indicator with a doubled frequency indicates a burnout of the lamp in any left turn indicator. If the indicator does not light up or is on constantly, then there is a malfunction in the electrical circuits of the direction indicators.
8 - signaling device for turning on the high beam headlights (with a light filter of blue color) lights up when the main beam headlights are turned on.
9 - the outdoor lighting indicator (with a green filter) lights up when the side lights in the headlights and taillights are turned on.
10 - the signaling device for turning on the right direction indicator (in the form of an arrow with a green filter) lights up with a flashing light when the right direction indicator is turned on (synchronously with it). Blinking of the indicator with a double frequency indicates a burnout of the lamp in any indicator of the right turn. If the indicator does not light up or is on constantly, then there is a malfunction in the electrical circuits of the direction indicators
11 - the speedometer shows the speed at which the car is currently moving. The scale is graduated from 0 to 240, the graduation is 5 km / h.
12 - right information display.
When the ignition is switched on, the right information display shows the following information:
Outside air temperature:
Trip information (distance traveled, fuel consumption, etc.);
Warning messages (in the event of a malfunction in one of the vehicle systems):
Average vehicle speed;
The actual length of time since the engine was started.
13 - the rear fog lamp activation indicator comes on when the light in the rear fog lamp is turned on.
14 - signaling device of the state of the anti-lock braking system and the system emergency braking... The indicator lights up orange when the ignition is turned on, after starting the engine it goes out (the warning indicator flashing with the engine running indicates a malfunction of the anti-lock braking system.
15 - status indicator automatic system headlight range adjustment (on vehicles equipped with discharge headlights).
16 - indicator of the state of the anti-slip system. When the ignition is turned on, the indicator lights up and "- goes out after a few seconds.
17 - malfunction indicator additional system passive safety... The signaling device (with a red filter) lights up when the ignition is turned on, lights up for about 6 seconds and goes out if the system is working properly, and does not go out (or lights up while driving) if there is a malfunction in the airbag system.
18 - status indicator pre-heater engine (for diesel engines).
19 - signaling device unfastened seat belt security. Lights up in red when the ignition is turned on, if the driver's and front passenger's seat belts are not fastened. Simultaneously with the illumination of the warning light, an intermittent buzzer signal sounds.
20 - indicator of the inclusion of the speed limit system
21 - dimmer switch and button for switching modes right information display (mileage counter, daily mileage reset).
22 - indicator of the included gear
(for vehicles with mechanical and robotic gearboxes).
23 - signaling device of the emergency state of vehicle systems. Lights up with a flashing light when a malfunction is detected in the vehicle's systems, which are displayed on the right information display.
24 - button for switching the modes of the right information display (outdoor temperature, date, fuel consumption, average speed).
25 - parking brake and status indicator brake system (with a red filter) lights up when the ignition is turned on in case of an excessive decrease in the level brake fluid in the tank of the main brake cylinder or with the parking brake lever raised.
26 - malfunction indicator robotic box gear.
27 - malfunction indicator in the electric steering wheel.
28 - discharge signaling device battery (with red filter) lights up when the ignition is switched on. The indicator should go out immediately after starting the engine. Burning of the indicator or its burning at full speed with the engine running indicates the absence of charging currentcaused by a faulty generator or voltage regulator, as well as a weak tension (or both) of the accessory drive belt.

The ventilation, heating and air conditioning system installed on the vehicle works effectively when closed windows and is a single complex that provides the most comfortable conditions in the car, regardless of weather conditions and temperature environment... The temperature in the passenger compartment is regulated by mixing cold and hot air. The cooling unit of the air conditioning system reduces the temperature and humidity of the air, cleans it from dust. The heater increases the air temperature in all operating modes of the system.
The complex provides low-inertia air temperature control, which is practically independent of the vehicle speed. The amount of air entering the passenger compartment is mainly determined by the operating mode of the fan, so it must be turned on even when driving at high speed.
Outside air can enter the passenger compartment through the door windows when the windows are lowered and the air blower located in front of the windshield. Air from the air blower can enter the vehicle interior through the windscreen blowing nozzles, side and center nozzles, through the front door glass blowing channels and through the lower nozzles of the heater body.
The amount, temperature, direction and intensity of air flows are controlled by switches installed in the control unit for the heating, air conditioning and ventilation system.
Depending on the configuration, the vehicle is equipped with automatic and manual control of the heating (air conditioning) and interior ventilation system.
The automatic system is functionally similar to the manual system. The differences lie in the ability to automatically maintain the set temperature in the car.
Block automatic control the heating, air conditioning and ventilation system of the passenger compartment includes the following controls
1 - temperature regulator key;
2 - key for turning on the recirculation mode;
3 - display of temperature settings;
4 - automatic mode key;
5 - air conditioner switch. To cool the air entering the car, press the air conditioner button - the yellow indicator will light up in it. To turn off the air conditioner, press the button again;
6 - air flow control display;
7 - fan speed display;
8 - heated windshield;
9 - fan speed regulator key;
10 - heating activation key rear window and exterior mirrors. To turn on the heating of the rear window and rear-view mirrors, press the power button - the yellow indicator will light up in it. To turn off the heating, press the button again;
In a variant version of the car, the heating of the rear window and rear-view mirrors can be equipped with an automatic timer, which turns off automatically after 15 minutes.
11 - air flow control key;
12 - fan switch.

Block manual control heating, air conditioning and ventilation system
1 - regulator of distribution of flows of air supplied to the passenger compartment. To change the direction of air flow, use the control knob to select one of five options (clockwise):
Air supply to the upper part of the cabin;
Air supply to the upper and lower parts of the passenger compartment;
Air supply to the lower part of the passenger compartment;
Air supply to the lower part of the passenger compartment and to the windshield;
Air supply to the windshield.
2 - fan operating mode switch. To increase the intensity of air supply to the passenger compartment while driving and to provide air supply when the vehicle is stationary, use the switch knob to set one of the four operation modes of the air blower fan.
3 - temperature regulator for air supplied to the passenger compartment. To change the temperature of the air entering the passenger compartment, turn the temperature control knob. The blue part of the scale corresponds to the supply of the most cooled air, the red - to the supply of the most heated air. With the handle in the middle position, air is supplied to the passenger compartment at ambient temperature
4 - air conditioner switch. To cool the air entering the car interior, press the air conditioner start button - the yellow control lamp will light up in it. Press the button again to turn off the air conditioner.
When the air conditioner is turned on, especially in the hot season, the moisture contained in the air supplied to the heat exchanger condenses on it, drains from the evaporator and is removed from the heater block through a special hole.
The air conditioner will not turn on if the air blower fan operating mode switch is set to the "O" position (the fan is off) or the ambient temperature is below 0 "C. This is not a malfunction, but is provided by the design.
Turning on the air conditioner while the engine is running difficult conditions (long climbs, intense city \u200b\u200btraffic etc.) can cause the engine to overheat. Watch the indication of the coolant temperature gauge: if the temperature exceeds the permissible value, turn off the air conditioner.
When long trips in city traffic, the efficiency of the air conditioner may decrease due to the intense thermal conditions of the engine. This is not a malfunction when driving in normal road conditions the air conditioner will work efficiently.
5 - key for heating the rear window and outside rear-view mirrors. To turn on the heating of the rear window and rear-view mirrors, press the power button - the yellow indicator will light up in it. To turn off the heating, press the button again.
6 - key for turning on the recirculation mode. To turn on the recirculation mode, press the power button - the yellow indicator will light up in it. Press the button again to turn off the recirculation mode. When the recirculation mode is on, the outside air does not enter the passenger compartment, and the air blower fan circulates the air inside the passenger compartment. This mode is used for quick warm-up interior in the cold season, as well as when the surrounding air is dusty and gassed.
Depending on the various combinations of switching on the switches of the control unit, the heating and ventilation system operates in the following basic modes:
The maximum cooling mode is used in hot weather and after prolonged exposure to the sun to quickly cool the air in the passenger compartment. In this case, before turning on the air conditioner, it is recommended to open the windows for a short time in order to remove the heated air from the passenger compartment. Air conditioning and recirculation air switches must be on;
Normal cooling mode is used when traveling in and out of town in moderately warm weather. The air conditioner switch must be on, the recirculation switch
The maximum heating mode is used at very low ambient temperatures and to quickly warm up the air in the passenger compartment after a long stay. The air conditioner switch must be off, the recirculation switch must be on;
Normal heating mode is used during the cold season to keep optimal temperature air in the passenger compartment after intensive heating in the maximum heating mode. The air conditioning and recirculation air switches must be off;
The blowing mode of the windshield and glass of the front doors is set to quickly eliminate fogging of the windows when high humidity air. The air conditioner switch can be in any position depending on the ambient temperature, and the recirculation switch must be turned off.

Head device audio systems Toyota Corolla
1 - handle for power on and volume control; 2 - CD eject key; 3 - opening for loading a CD-ROM; 4 - CD installation (only for an audio system with a changer); 5 - change sound quality modes; 6 - file selection key, search for radio stations or fast forward or backward; 7 - screen; 8 - key for the automatic reception of traffic information; 9 - key for listening to radio stations of the same network; 10 - key for automatic search for radio stations; 11 - button for playing a random CD or selecting radio stations; 12 - button for replaying or selecting radio stations; 13 - selection of a CD (only for an audio system with a changer) or selection of radio stations; 14 - selection of a CD (only for an audio system with a changer) or selection of radio stations; 15 - choice of stick or choice of radio stations; 16 - select a folder or select radio stations; 17 - key for changing the type of programs; 18 - key for displaying a text message; 19 - key for selecting AM radio stations; 20 - key for selecting radio stations in the FM range; 21 - CD play key
Audio systemToyota Corolla turns on when the key in the ignition switch (lock) is turned to the "ACC" or "ON" position. Audio control techniques are described in detail in the operating instructions supplied with the vehicle.
DASHBOARD
The dashboard contains the following. For ease of use on handles, buttons and control devices, located on the instrument panel, are marked with symbols of their functional purpose.


To brake the car with the parking brake, lift the lever all the way up - in the instrument cluster.

To release the vehicle, pull the lever up slightly, press the button at the end of the lever handle and lower it all the way down. The indicator should go out.


(see "Rearview Mirrors").


and headlight washer. To turn on the headlight washer, turn on the headlights and press switch A.
The headlight beam adjuster B is equipped with an electric drive and allows you to smoothly change the angle of inclination of the headlights in accordance with the load of the car, which prevents the dazzling of oncoming vehicle drivers. At the same time, the correct adjustment of the headlights ensures the driver's visibility.
Headlamp tilt adjustment provides six positions (0, 1, 2, 3, 4, 5) and is possible only when the dipped beam is on. The controller positions correspond approximately to the following loading states:
0 - one driver;
1 - driver and passenger in the front seat;
2 - all seats are occupied, the trunk is empty;
3 - only the driver's seat is occupied, the trunk is fully loaded;
4 - the driver and passenger in the front seat, the trunk is fully loaded;
5 - all seats are occupied, the trunk is fully loaded.
Complexity
No toolsNot indicated
DASHBOARD
The instrument panel contains the following controls and instrumentation: For ease of use, the handles, buttons and control devices located on the instrument panel are marked with their functional symbols.

1 - nozzles of the interior ventilation and heating system are designed to regulate the air flow from the heater, air conditioner or ventilation system. The direction of the air flow is adjusted by turning the deflectors in the appropriate direction.

A knob is installed at the bottom of the nozzles to adjust the amount of air supplied through them.

By turning the handle all the way to the right, the damper opens completely (maximum air flow). When the handle is turned all the way to the left, the damper closes completely, blocking the air flow. By setting the handle to intermediate positions, adjust the amount of air flow.

2 - the lever of the switch for outdoor lighting and direction indicators. The lever switches the following switch modes:

Direction indicators activation mode.
Move the lever up or down until the direction indicators turn on. When the lever is moved up or down in the instrument cluster, the indicator starts flashing, respectively, 10 or 7. When the steering wheel is returned to the straight-ahead position, the lever is automatically set to its original position. When changing lanes, to turn on the direction indicator, it is enough to press the lever in the up or down direction only until the moment of tangible resistance, without fixing the lever. When released, the lever will return to its original position;
NOTE
The direction indicator works only when the ignition is on.
Headlight switching mode.
To turn on the headlights, turn the handle A of the switch lever around its axis. In the mode of turning on the headlights, the switch can take two positions:

Everything is off;

Side lights in front and rear lights, as well as illumination of the instrument cluster are on;

Low beam included. In order to switch the headlights from low to high, move the lever away from you. When turning on the high beam headlights in the instrument cluster the indicator lights up.
To signal the high beam headlights, move the switch lever one position towards the steering wheel (the handle of the exterior light switch should be in the position) and release.

To turn on the fog lights, turn the switch B and align with the icon.
To turn off the fog lights, turn switch B to the "OFF" position.

3 - lever for manual engagement of the lower gear in the transmission (see "Transmission control").

4 - steering wheel. The steering wheel contains the following switches and buttons:

Horn switch. To turn on the sound signal, press any place on the steering wheel pad;

Bluetooth system keys with phone control and speed limiter activation button:
A - button for answering incoming phone calls;
B - loudspeaker switch;
B - speed limiter key;

Audio control keys from the steering wheel.
The keys on the left side of the steering wheel can be used to operate some of the audio functions.
A - volume control key;
B - file selection key, search for radio stations or fast forward and backward;
B - audio system power on key.
5 - instrument cluster (see "Instrument cluster").

6 - ignition switch (lock), combined with an anti-theft device, is located on the right side of the steering column. The key in the lock can take one of four positions:

LOCK - the ignition is turned off, with the key removed, the anti-theft device is turned on. To securely lock the steering shaft, turn the steering wheel to the right or left until it clicks. To deactivate the anti-theft device, insert the key into the ignition switch and, slightly turning the steering wheel to the right and left, turn the key to the "ACC" position;
WARNING
Do not turn off the ignition or remove the key from the lock while driving: the steering will be locked and the car will become uncontrollable.

ACC - ignition off, key cannot be removed, steering unlocked. The power circuits of the sound signal, outdoor lighting, high-beam headlights, radio equipment are switched on;

ON - the ignition is on, the key cannot be removed, the steering is unlocked. The ignition, instruments and all electrical circuits are on; START - the ignition and the starter are on, the key cannot be removed, the steering is unlocked. This position of the key is not fixed; when released, the key returns to the "ON" position under the action of the spring force.
NOTE

As an option, the vehicle can be equipped with an intelligent engine start system Push Start.
WARNING
On Toyota Corolla vehicles, the engine can only be started by pressing the brake pedal (models with robotic and automatic transmissions) or the clutch pedal (models with manual transmissions).
7 - lever for manual engagement of an overdrive in the transmission (see "Transmission control").

8 - lever of the switch of the cleaner and washer with the button for switching the display modes of the on-board computer
The switch turns on the electrical circuits when the ignition is on.
The lever can take the following positions:
0 - the wiper is off;
I - intermittent mode. To activate it, move the steering column switch up to the first detent position. To change the length of the pause, turn switch A clockwise (long pauses) or counterclockwise (short pauses). Switch A is used to set the four modes of intermittent operation of the wiper.
II - slow mode. To turn it on, move the steering column switch up to the second fixed position;
III - fast mode. To turn it on, move the steering column switch up to the third detent position.
IV - short-term mode. To turn it on, move the steering column switch down.
By moving the steering column switch towards themselves, turn on the windshield washer (non-fixed position). When you press the steering column switch simultaneously with the washer, the wiper will automatically turn on, the brushes of which will make two working cycles.
NOTE
The wipers work only when the ignition is on and the hood is closed. If there is a foreign object on windshield the wiper is trying to remove this item. If an obstacle continues to block the wiper, it stops working. Remove the obstacle and turn on the wiper again.

9 - alarm switch. When the switch button is pressed, all direction indicators and warning lamps installed in the instrument cluster light up with a flashing light. Pressing the button again will turn off the alarm.
NOTE
The alarm works in any position of the key in the ignition switch (lock).

10 - audio system head unit (see "Audio system head unit").

11 - control unit for the heating, air conditioning and interior ventilation system (see "Heating, air conditioning and interior ventilation").

12 - the upper storage box (see "Storage boxes of the salon").
13 - the area of \u200b\u200bthe front passenger airbag installation. Combined with a seat belt, the airbag protects the passenger's head and chest in a severe frontal collision.
WARNING
The airbags do not deploy: - with the ignition off; - with light frontal collisions; - with light side impacts; - with collisions; - with overturning.

14 - lower glove box (see "Interior storage boxes").
15 - front seat heating switches.

16 - an ashtray with a cigarette lighter (see "Ashtrays").
17 - transmission control lever (see "Transmission control").

18 - parking brake lever.

To brake the car with the parking brake, lift the lever up to the stop - the indicator 25 in the instrument cluster will light up red.

To release the vehicle, pull the lever up slightly, press the button at the end of the lever handle and lower it all the way down. The indicator should go out.
19 - accelerator pedal.
20 - brake pedal.

21 - handle for adjusting the position of the steering wheel. The car is equipped with a steering column, adjustable in tilt and reach. Before driving, adjust the position of the steering wheel so that it is comfortable to drive and at the same time the instruments in combination are clearly visible.
WARNING
Adjust the steering wheel position only when the vehicle is stationary. If, when trying to adjust in motion, you do not clearly fix steering column and it moves unexpectedly, you might lose control of your vehicle.

Pull the lever down to find the best position for the steering wheel.

Set the steering wheel to the desired position.

Lock the steering column by moving the lever to the uppermost (original) position.

22 - diagnostic connector.

23 - drive of outside rear-view mirrors (see "Rear-view mirrors").

24 - hood lock drive lever. By turning the lever towards you, the hood lock is unlocked. At the same time, the front edge of the bonnet is raised, creating a gap for access to the bonnet safety hook handle.

25 - box for small items.

26 - block of switches for headlight range control and headlight washer. To turn on the headlight washer, turn on the headlights and press the switch A.
The headlight beam adjuster B is equipped with an electric drive and allows you to smoothly change the angle of inclination of the headlights in accordance with the load of the car, which prevents the dazzling of oncoming vehicle drivers. At the same time, the correct adjustment of the headlights ensures the driver's visibility.
Headlamp tilt adjustment provides six positions (0, 1, 2, 3, 4, 5) and is possible only when the dipped beam is on. The controller positions correspond approximately to the following loading states:
0 - one driver;
1 - driver and passenger in the front seat;
2 - all seats are occupied, the trunk is empty;
3 - only the driver's seat is occupied, the trunk is fully loaded;
4 - the driver and passenger in the front seat, the trunk is fully loaded;
5 - all seats are occupied, the trunk is fully loaded.