As you know, with a malfunction of any light instruments, the car operation is prohibited. And here there are two options: go to the nearest service station and pay there a lot of money or try to eliminate the malfunction yourself. In this article we will analyze the reasons for the "hang" of the reverse light bulb on the VAZ 2110 and try to eliminate the problem yourself.
Where is the reverse sensor VAZ 2110
One of the main reasons for the reverse lamp failure is the sensor responsible for their inclusion. In the people, it is often called a "frog". It is located on the left side of the gearbox, if you look at the car. If you have an observation pit, you don't beat her VAZ, and you will easily find it.
Sensor location on VAZ 2110If you wish, it can be seen on the vase from above, from the engine compartment, but for this you have to remove the air cleaner.
Device and principle of operation
What is this sensor for VAZ 2110? In essence, this is a regular switch that is screwed into a special hole in the gearbox. In this case, in the box itself it turns out working surface switch, and outside - normally open contacts. When you turn on rear transmissionThe specifically provided rod presses the working part of the sensor, and it triggers - the contacts are closed.
Contacts, in turn, feed meals on the lamps of the reverse lights. The only difference between this sensor from the conventional switch is a special design. It is sealed and can withstand quite large mechanical loads and temperatures. It is attached to the gearbox using a thread and turns into a wrench.
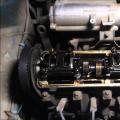
 Appearance Sensor for VAZ 2110
 Diagnostics troubled
As I said above, the lanterns may not be lit if the reverse sensor is broken. But there are other faults that cause the same effect, and they are not less common to break the sensor. Their list:
- overwhelmed the reverse lamp light;
- the wires of the power of the lanterns broke;
- the contacts of the pads were oxidized;
- fuses failed;
- there is no mass on the board of the lanterns.
And now we will work as a fault, and begin with the reasons that diagnose the easiest way. But before you start, a little distract and take a look at the electric circuit of the VAZ 2110 light instruments. She will come in handy.
 Electrical circuit of car light instruments VAZ 2110
 In this scheme, we are interested in the following positions:
- 4 - Ignition Castle;
- 2 – mounting block;
- 10 - Sensor (switch) of the reverse;
- 13 - reverse lamps.
How it works? You include the ignition of the vase, and the battery or the generator is powered by the mounting unit (shoe sh2, contact 16). In this block, we are interested in F19 fuse through which the reverse lights feed on. Passing the fuse, the voltage leaves the mounting block through contact 17 shoes sh4. Next, it enters the reverse sensor and eating both lamp (green wire) through it. The second contact of the lanterns is connected to the body of the car VAZ, which is a minus wire. As you can see, the scheme is very simple, but it is necessary to know it. Now you can start troubleshooting.
Reversing sensor
To check it, sufficiently observation pit and the usual clips or a piece of wire. If there are no pits, then as I said above, you can do everything from above, through the hood. True, for this you will have to remove the air cleaner.
 On the VAZ 2110 to the reverse sensor (marked with an arrow) can be reached through motor compartment
 Find the reverse sensor, remind, in the VAZ 2110 it is located on the left side of the power take-off box, if you stand along the car. Put from it the connector (block) with two wires. To do this, it is enough to pull for the connectors' housing.
 Removing wires from the reverse sensor on the VAZ 2110
 In some cases, to get to the reverse sensor, it is necessary to remove the protective cover with the bottom, which closes the gearbox.
Now your task is to close the contacts on the block, which I just pulled out (look into it and see these contacts). You can do it with a closet or a piece of stripped wire. Rear lanterns caught fire? So, the sensor is defective, and you can start a replacement that I described in the last section (step-by-step sensor replacement instructions for VAZ 2110). If the lanterns do not burn, then we will continue to search.
Fuse
So, we are interested in F19 fuse, located in the mounting block. The mounting block itself on the VAZ 2110 is under the steering column on the left.
 Location of the mounting unit on the VAZ 2110
 Remove the block and find the F19 fuse. If the fuses on your mounting block are not labeled or are marked with low-touch pictograms, then focus on the photo that I cite below.
 Numbering fuses in the Mounting unit VAZ 2110
 Remove the F19 from the holder and look at the light: if the fuse blocked, it can be seen with the naked eye.
 Distinctly visible blurred jumper - fuse burned
 If everything is in order on the eye, do not be lazy to ring it with a tester, so that after a week of finding a fault in all possible places Then it was not painfully hurt for useless time spent. So, the fuse is intact? You can go to the next item. If he burned down, then loss on it.
Many owners of VAZ cars in such cases simply felt instead of the burnt serviceable and, as a rule, get another burnt. If you have a lot of extra fuses with a par value of 10 A, then you can experiment. But it is better to think about why it happened.
The burned fuse is the cause of the malfunction only in one case: it is defective. Then simple replacement The burnt to the new will be successful, and everything will work. But it may be (and most often it happens) that the burned fuse is not the reason, but a consequence of a malfunction. There was an overload for the current chain, for which it responds, and the device, saving this chain, burned. Why can overload on VAZ 2110? Reasons for a bit:
- In the lanterns of the reverse VAZ 2110 installed lamps greater than provided by the design of the vase, power.
- There was a closure of the reverse flashlight power circuit (see the electrical circuit above) on the car body.
If it is known that more powerful lamps are installed in the reversing lamps on your vase (it is often done to facilitate parking in the dark), it is quite possible, although it is not necessary that the problem is in this. If you are very weakly dismantled in the electrician, then, of course, ask why the fuse burned not immediately after installing powerful lamps, but, say, in a month. There is nothing strange here. Typically, the fuse rating is selected by 20-30% higher than the rated current.
Putting some more powerful lamps, you increased the current consumed, but not so much to exit this threshold. The fuse "held", but worked at the limit of his capabilities. The slightest voltage jump in on-board network (Say, bad contact on the battery terminal) - and the patience of the fuse ended, it burned down. And instantly it would be out of order only if you set very powerful lamps.
If you know that there are more powerful lamps on your vase in the rear lamps, you can try to risk and put a new fuse of the same nominal that stood. All that threatens such an experiment is the loss of the fuse.
If the experiment succeeds, then simply replaced the experimental fuse to another with a nominal 50% higher than the regular one. In this case, we can assume that the problem is solved.
If the new immediately burned down, then the problem is in a short circuit. It could happen when the nutrition wires and the closure of them on the body. We will search for this simultaneous by an exception using a tester in resistance measurement mode.
 Tester in resistance measurement mode
 First of all, turn off the ignition and take off the plus terminal from the vase battery. Turn off the transmission by putting a neutral gear shift lever. Connect one tester probe to contact 17 pads sh4 mounting unit, and the second connection with the car body. Pads you can find on the side of the mounting block opposite to the fuses. All of them, like their terminals, are marked.
 Pads in VAZ 2110 are located on back side mounting block
 If the device showed "0" (low resistance), then the problem in the wire connecting the mounting block of the vase with the reverse sensor. Explore this wire (it can be in harness, but has its own coloring) along the entire length, find the closure and eliminate it.
If the device shows "Infinity", then with a chain to the reverse sensor, everything is in order, go further. Turn on the rear transmission and repeat the measurement. Now the chain resistance should fall (the reverse lamps connected to it), but still at regular lamps for the VAZ 2110 it should not be below 2-3 ohms. If the resistance is lower, look for a closure in the wires from the reverse sensor to the lanterns (green wire in electrical schemeshown above).
If the resistance cannot be measured (the device shows "infinity"), then the problem is either in the lamps, or in the poor contact of the connecting pads, or in the breaking of the power wires. Establish a new fuse instead of the burnt and go to the next diagnostic item.
Are the resistance all in order (several Ohm)? You can install a new fuse instead of the burnt with the same denomination and to finish it - the problem was in a defective device.
Blocked light bulb
In the VAZ 2110 the reverse lamps two, and therefore two lamps. It is unlikely that two burned at once, and no longer burned out anything from the lighting equipment, but it happens. Take the lamp check. For this, alas, you will have to beat your VAZ slightly a little, because you can get to the reverse lamps, only disassembled blocks of the rear lights.
Open the trunk and, if necessary, free it. Remove the trim and unscrew the plastic protective cover. It remains to remove the rear panel, and you will get access to lanterns and control board.
 Open blocks of lamps on VAZ 2110: Access to lamps and power blocks open
 Arming the tester and ring the lamp lamps of the reverse. If they are faulty, replace, and, most likely, the question can be closed. If the lamps are good, then the problem is different. Install the lamp in place, but the vase lights do not yet collect: perhaps they still have to climb.
Contacts in pads
Next possible reason Faults: Contacts oxidized in one of the pads supplying the reverse lights. There are 5 such pads 5, I marked their blue arrows.
 Pads responsible for the operation of the reverse lights in VAZ 2110
 Each of these blocks should be disconnected, to examine and, if necessary, clean. At the same time slightly twitch the wires included in them, - any of them could easily be contrary and hanging on one insulation, creating the impression of a good. Do not work anyway? Last variant remained: breaking the reverse lamp of the reverse wire.
Wireless wires broken
Wires that could break (pull out, to burn, etc.), just three:
- From the mounting unit (pin 17 shirt pads) to the reverse sensor.
- From the reverse sensor to each of the lanterns.
- From the lanterns on the body of the car VAZ (missing "mass" on the board of the lantern)
Turn off the ignition again, throw off the terminal from the battery and, armed with a piece of long wire and a tester, nonya them all. The one that is not nicknamed, of course, have to be visited to find a place of damage. If the damaged wire recovery is not subject to, then as an option, you can stretch on the same harness, and the old turn off and just leave in its place.
For these purposes, use a special automobile wire with reinforced wear-resistant insulation and a cross section of a minimum of 1.5 square meters. mm.
 PGWA car wire 1.5 perfectly suitable for vase lanterns
 How to replace the reverse sensor in the VAZ - step by step instruction
If you read this section, then it looks like your sensor, or rather, the reverse switch has been worked out. If you have already bought a new one, then you can proceed. This work is simple and for anyone who is able to keep a wrench with one hand. To replace the switch you will need:
- A new sensor with a new sealing ring (comes in the kit).
- Small capacity.
- Wrench.
Call VAZ on the overpass or the observation pit and put it on hand brakeBy moving the gear shift knob to neutral transmission. Remove the covering casing closing the gearbox if it is. Find the reverse sensor and turn off the connector from it with wires.
 Turning off the reverse sensor in VAZ 2110
 Put an empty container under the sensor - transmission oil will be flushed into it during the sensor replacement. Prepare a new sensor and check for a new sealing ring on it.
 Complete with the sensor to the VAZ 2110 must go sealing ring
 Important! Disposable sealing ring, it is impossible to use it. If included with the ring sensor, it turned out that at our level of private trading and your possible inattention probably will have to buy it separately.
Take a wrench, recall old sensor And quickly scrape a new one. The faster you do it, the less transmission Oil It will time to pour out the box. Tighten the new sensor with a key with an effort, but without fanaticism.
 Replacement of the reverse sensor on the VAZ 2110
 Install a connector with feeds to a new sensor and put the protective cover into place. Be sure to check the level of transmission oil in the box (do not confuse with the motor in the crankcase!) And if necessary.
Important! Do not use that oil that flowed during replacement! Stacking along the dirty outer surface of the checkpoint, it has become unusable!
It remains to start the vase engine and turn on the rear gear, the reverse lights must be lit.
If you carefully read this article, then I am sure, you will definitely find and remove the reason for the "sticking" the reverse lamps on the VAZ 2110 on your own and without unnecessary expenses for the service specialist services.
VAZ 2110 reverse sensor is a reverse lamp mechanism that informs the signal white color About the intention (or already about accomplishing actions) of the driver and car move back.
Where is the VAZ 2110 reverse sensor?
This sensor is located on the left side below the gearbox. In his search you will not be mistaken, because this is the only element in the checkpoint with the suspended wires.

Device and principle of operation.
The principle of operation of the sensor is quite simple: when the rear transmission is turned on to the flashlight, the voltage is received, which is why it lights up. This is due to the special ball of the switch, which when the reverse transmission is turned on, comes out of the rod and closes the contacts. At the time of turning off the "rear" contacts under the action of the return spring, they open, and everything returns to its original position.
Often you have to hear (or even see on the road) that the signal does not work, the light is not lit with reverse movement. Such a fault by and large will not affect the course of the vehicle on the road, but it may well cause discomfort in driving or even create emergency situation on the road. The reason for such a non-compliance with the normal state of the car can act a number of options, find out the only correct of which follows observation pit or overpass. The most common ones are rightfully taken as follows.
Test sensor problems and diagnostics.
1. Light bulb burned.
Solving the issue: the replacement of the bulb is new. To do this, you will have to dismantle the upholstery, located behind the lantern, then turning out the external light devices, open the trunk and disconnect the harness of the wires. After that, remove the panel, compressing the side locks, unscrew the lamp, pressing on it. Then put new light bulb And return everything in source places.
2. The contacts were oxidized, the fuses were out of order, there is no "mass" on the board.
Resolving the issue: Clean the contacts, if necessary, replace the non-working wires and fuses failed. To do this, you just need to remove the headlight.
3. Wires broke off.
Solving the issue: checking the integrity of the wires and their replacement as needed.
4. Broken rear view sensor.
Solving the issue: Diagnostics and replacement of the sensor if necessary.
How to check the reversing sensor VAZ 2110?
In order to diagnose this problem, you will need: multimeter, insulation, hammer and chisel, Carter for draining oil, knife, Passatia, keys to "22" and "24", head to "22" enlarged. Now about the check itself:
- Disconnect and remove the wires, connect the tester by setting the "transk" or resistance function on it.
- Turn on the rear gear, then ignition, do not forget to monitor the resistance indicators on the tester. If the device shows "0", it means everything is fine. Other values \u200b\u200bsuggest the need to replace the device. Do the same actions with the tag light bulbs in the case of not the reverse gear.
If you have determined that reverse sensor replacement you need, the instructions below.
Replacing the reverse sensor VAZ 2110: Step-by-step instructions.
- Remove the protection on the "engine" when it is presented, putting some container under the location of the sensor, in order to avoid "leakage" of oil to nowhere.
- Out off the wire attached to the parts. For this you need to lie down under the car.

- Lost faulty sensor The key to "21".
 If the problem causes a spoiled fuse, it will also be necessary to find it in a special unit under the wheel of the car, after which it is carefully removed from the broken item and install a new one.
A more challenging task is to replace the sensor, which stopped responding to switching gear and ensure the inclusion of lights. To perform this operation, it will be necessary:
- drive the car on the flight and put it on the handbrake;
- remove the protective cover;
- substitute any container for transmission oil;
- remove the sensor and turn it off from the electrical circuit;
- install a good part. After that, it is necessary to check the oil level and fill it if the lubricants in the gearbox is not enough;
- the last step is the assembly of the node performed in the reverse order.
The safety of the car operation is directly dependent on the performance of the reverse lamps. That is why it is necessary to identify any faults described above and efficiently eliminate them either on their own or with the involvement of experienced car service specialists.
Any car intended for public use has rear transmission. It allows you to move on the car rear. To other participants to road Learned about your intentions, the corresponding signals should be triggered on the back optics - reverse Lights.
It is in this case that the reverse sensor on the VAZ 2110 is activated. It transmits information, turns on the lanterns, thereby the drivers around you see that you are going to take back. For safety reasons, the presence of a workable reverse sensor is incredibly important.
Principle of operation

It works this regulator more than just:
- You switch the handle of the gearbox to the reverse position;
- Simultaneously with the inclusion of the rear velocity, the inclusion plug is pressed to the sensor;
- Circuits the wires for mass;
- The light is turned on, which signals the beginning of the machine's movement by reverse.
Symptomatics of faults
Of course, it is very easy to see about the non-working reverse sensor - when the rear transmission is turned on, the lanterns are not ignited.

In such a situation, there are only three options for the development of the event:
- The light bulb burned, because the element itself can be integer.
- The feed fuse stopped working. It's not rare, he just burns out.
- The sensor itself does not work. It happens not so often, but it will have to check its condition.
Cause in the sensor?

Indeed, how to determine what it is he who failed, and did not overcome the fuse or light bulb? Everything is simple enough.
- You will have to remove the fuse, check it on integrity. For the car VAZ 2110, the installation of a fuse at number 19, the rated current of which is 7,5A. It is located in the mounting block, and the mounting unit is under the dashboard.
- Check the status of the lamp. If everything is fine with it, then the option remains one - the reverse sensor broke.
Where he is and how to check it
To proceed to replace the reverse sensor by car VAZ 2110, first should be located.

But indeed, where is he? There is nothing difficult in search of this item.
- You will need an overpack or pit. Anyway, you should be under the car.
- Now look aside rear wheels Machines and raise your eyes to the gearbox. To the left of it is your desired sensor.
- Is it possible to confuse it with other devices? Hardly. Only for this item provides for a wire liner from the gearbox. Therefore, other similar devices next to you will definitely not find.
We start checking. We need to make sure that the sensor has failed, and that its replacement will really give the result.
To check the following manipulations:
- Turn off the terminal from the meter;
- Connect the multi-meter to the connectors and turn it on to the resistance measurement mode;
- Turn on the gearbox to the rear speed mode;
- Get the engine;
- See what gives the device;
- If the device shows the resistance equal to 0 ohms, plus the scene sounds, then everything is fine, the sensor is working;
- Bad if infinity is shown on the meter. This suggests that the sensor served his own and needs urgent replacement.
Replacement
Should I hurry with reversing the reverse sensor? And how. After all, this device ensures traffic safety on the road. If other motorists won't know about your intentions to rent back, then accidents and collisions cannot be avoided. You need to think not only about yourself, but also about others.

The procedure for replacing the reverse sensor on the VAZ 2110 machine does not provide anything complicated. Even the car owner will be able to cope with it without much experience and skills.
Follow step by step instructionsYou will be able to quickly and qualitatively change the meter and continue moving around at a fully feeble car.
- Clean the device from the accumulated mud, because when dismantling all this garbage can get into the oil of your gearbox. Nothing good will not come out of this, because think about the safety of the checkpoint.
- The car is put on a pit or aleacade. Again, you need access to the bottom.
- Remove the crankcase protection. This is done by unscrewing several fasteners.
- Take a small container into which the lubricant will pour. The fact is that when you dismantle the sensor, a small amount of oil is poured with it. It is unlikely that you want it to be on the floor, you have under your feet.
- Turn off the wiring from the reverse sensor.
- Remove the meter from your landing place.
- Clean a little nest to new aggregate Good stood on my new place.
- Put the acquired high-quality reverse sensor to the place of the old one who served your own.
- Follow the required amount of oil. Just look how much lubricating fluid flowed, and pour the same amount back. Although the oil level may also be lower as a result of operation. Make appropriate measurements, which will determine the missing amount of transmission lubricant.
- Return all the wires into place. If there are problems with searching for connections, while turning off the wires, mark them. Although confused there is actually difficult.
- Check the performance of the new reverse sensor.
If all manipulations were performed correctly, you made sure the safety of the fuse and light bulb, then simple procedure By replacing the reverse sensor, the gearbox can be returned to the previous level.
With a careful approach, even a new time, this repair will take a maximum of 30 minutes. You do not have to spend a lot of time, and even more so you can do the minimal financial costs compared to the appeal to the car service.
Let's hope that the sensor will now work for a long time and efficiently, and your maneuvers on the road will always be safe and understandable to those surrounding road members. Plus, I wish the same motorists and pedestrians around you.
Hello friends, glad to see you on the site repair of cars with your own hands. The VAZ 2110 reverse sensor is triggered when the rear velocity is turned on and transmits a voltage to the light bulb (lamp), signaling about the movement back.
VAZ 2110 reverse sensor
How does the sensor work? After translating the handle to the corresponding position, the rear speed turns on. At the same time, the inclusion plug presses the sensor and closes one of its wires to the ground. Outcome - the reverse lamp lights up.
Symptoms and faults of the reverse sensor
You turn on the rear gear, but lights rear light Do not work. Here there are three options, the reverse light bulb has served, overwhelmed the fuse or has failed the sensor itself. But how to check the reverse sensor and make sure that it is defective?
Make a few simple steps:
1. Remove the fuse and check its integrity. In the VAZ 2110, it has a number 19 (rated current - 7.5 A). The mounting unit itself is located under the instrument panel.
2. Make sure the integrity of the lamp. If there are also no complaints about it, you can go directly to the sensor check.
Location and fineness of sensor check
Many novice car enthusiasts do not know where the reverse sensor is located. In fact, everything is simple here. It is necessary to drive the car on the overpass (pit) and go down to it.
On the left side of the PPC (if you look in the direction of the rear wheels of the car) the sensor will be installed.
It is very difficult to confuse it with any other node, because only this element of the gearbox is suitable for wires. Now go directly to check.
The sequence of actions is as follows:
- Return terminal from the sensor;
- connect the multimeter to the connectors and put the switch to measure the resistance;
- translate the PPC knob to the position of the rear velocity;
- turn on the ignition;
- see the multimeter readings.
If the tablo shows the resistance of 0 Ohm and the "cofaking" rings, then everything is normal. In the case when the multimeter shows infinity, it is required to replace the waz reverse sensor 2110.
Nuances replacement of the reversing sensor VAZ 2110
Now consider how to reverse the reverse sensor. Everything is simple here:
Attention! Before it is surrounded by a sensor, clean it from dirt and dust, so that there is nothing to turn it into dismands in the gearbox oil.
That's all. For 10-15 minutes you checked, replaced the reverse sensor and saved money. Good luck on the roads and of course without breakdowns.