Any work car engine depends not only on the state of mechanisms and assemblies, but also on the correctly set ignition angle (hereinafter - US) Naturally, domestic cars, in particular, we will talk about the legendary "Sixes" are no exception. This material will allow you to find out how to set the ignition on a VAZ 2106 and what nuances should be taken into account in order to avoid mistakes.
Step-by-step guide to tuning ignition
As you know, in the operation of electronic or contactless ignition there are no drawbacks typical for contact systems. For example, a motorist is not faced with adjusting and setting the gap in contact group... If you do not know how to correctly adjust the advance angle by the light bulb and by the marks, then below is presented detailed instructions for setting on the first cylinder.
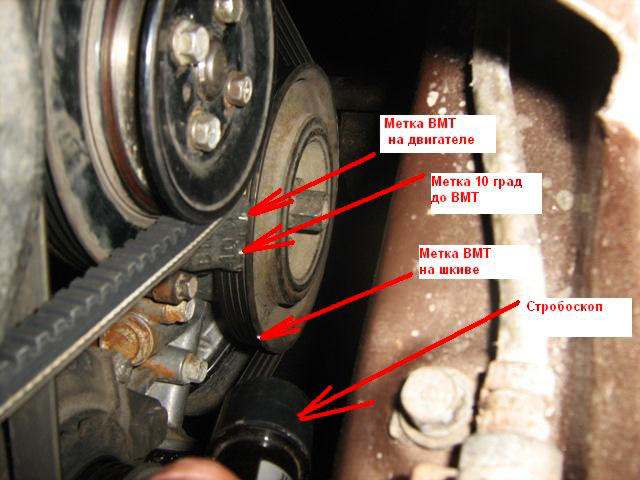
Before we explain how posting is done, check out what the labels mean:
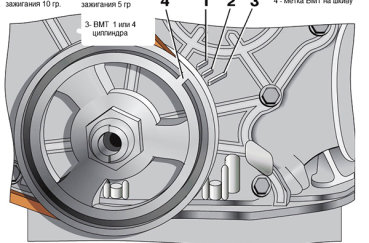
- the first mark is located clockwise, it means that the ultrasound is 10 degrees;
- the second, that is, the middle mark is used to adjust the ultrasound by five degrees;
- as for the last mark, in accordance with it, an ultrasound equal to zero degrees is set; with this setting, the combustible mixture will ignite at the moment when the piston enters TDC.
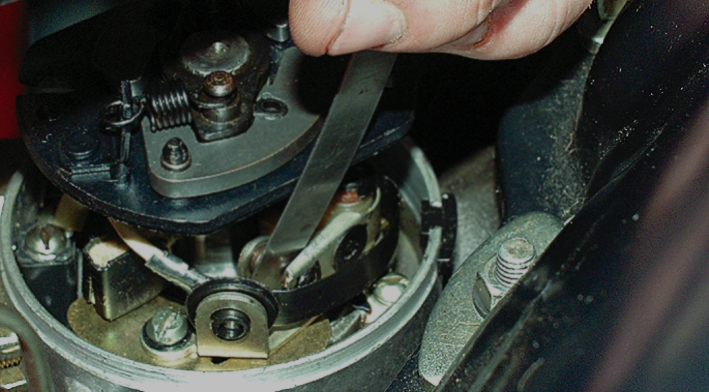
The marks themselves are aligned by rotating the crankshaft or by acting on the ratchet. Alternatively, you can use a special wrench to adjust the nut.
Tools and materials
So, before setting up KM, you need the following:
- a key for extracting candles;
- special key for turning crankshaft;
- wrench 13;
- a special device for controlling the settings, for example, it can be a voltmeter, a 12 volt control light or a stroboscope (video by Nail Poroshin) is also suitable.
Stages
So, how to regulate ultrasound with your own hands:
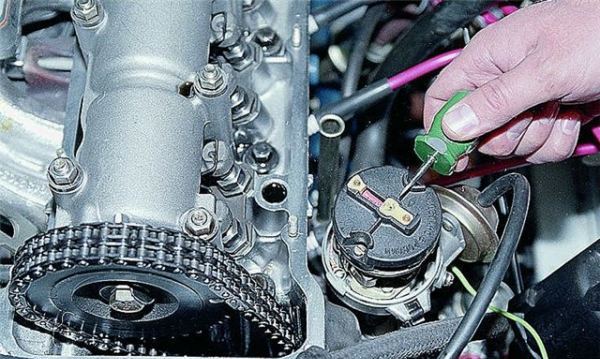
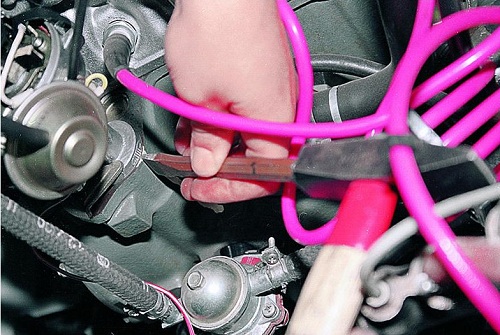
- First you need to turn off the ignition, then open the hood and reset the terminal c. Using a key, you will need to unscrew the spark plug from the first cylinder. Having done this, the technological hole to the cylinder block will need to be covered with a finger or with a rubber stopper.
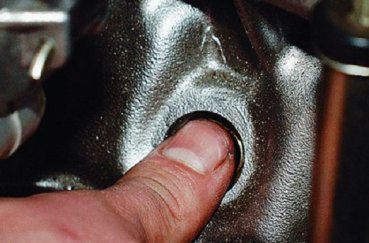
- Having done this, it is necessary to turn the shaft to the right with a wrench for the crankshaft until pressure begins to flow from the hole for the spark plug. This will indicate the start of the compression stroke. When this happens, the plug should pop out, but if you closed the hole with your finger, you will definitely feel that the air will squeeze it out.
- The crankshaft should be turned until the marks on its pulley and the timing cover match. There is still one point to consider regarding the fuel used. For example, if you are filling the car with 92 or 95 fuel, then the risk on the pulley should be located opposite the middle mark. If the fuel is 80 or lower, then the mark should be aligned with the long mark, which, as mentioned above, means zero degrees. Then you will need to unfasten the latches, as well as dismantle the distributor cover.
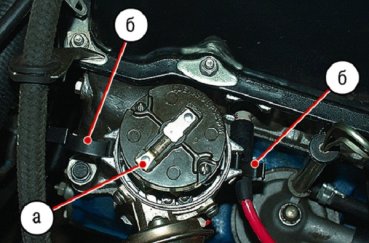
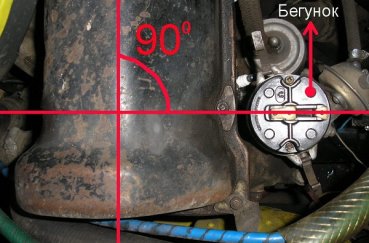
- After the crankshaft stops, the distributor should be turned with an external contact to the cylinder number 1, in which you unscrewed the spark plug. When the risks are aligned and this is done correctly, you will need to mentally draw a segment from the distribution unit latch - it should run parallel to the engine axis. If this is not the case, the fixing nut will need to be slightly unscrewed, then turn the device upwards. The nut itself should be aligned parallel to the motor axis, for this you will need to turn the rotor.
- After completing these steps, you will need to set the moment itself. To complete this task, you will need to connect the power, that is, throw the previously disconnected terminal onto the battery. Next, using a 13 wrench, loosen the nut with which the distribution unit is fixed.
- Now you need control lamp with wires connected to it - one of the contacts should be connected to ground, and the other is connected to the low-voltage contact on the coil. Then the key in the lock must be turned to position I and the ignition is activated, the light will turn on. After that, carefully start turning the distributor from left to right until the lamp goes out. In the event that the light source did not initially burn, then this indicates that nothing needs to be done.
- After that, the distribution unit will need to be turned to the left, that is, in back side... When the control starts to burn, the fixing nut will need to be tightened, this will allow the distributor itself to be fixed in place.
- Having done this, it will be necessary to turn off the ignition and reinstall the switchgear cover. In fact, this completes the adjustment procedure, now you know how to set the ultrasound, but this is not the end of the operation. An obligatory step will be to diagnose the work performed.
Photo gallery "Self-adjustment of ultrasound"
The check is done as follows:
- Get behind the wheel and start the power unit, you will need to warm it up to operating temperature. Start moving, you need to accelerate to about 40-50 km / h. When the car accelerates to such a speed, you need to turn on the fourth gear and continue driving on it, while not accelerating.
- Hit the gas sharply. A few seconds after that, detonation, the knock of metal on metal, should be heard from under the hood. Note that the detonation should ideally stop after the car has reached about 5 km of speed. If so, then the check can be completed.
- In the event that detonation remains, then it is necessary to adjust the position of the distribution mechanism, since the reason for this, most likely, lies in the too early exposed ultrasound. If there was no knock of metal at all, then the reason, most likely, lies in the late ultrasound. In the first case, the distributor must be scrolled to the right by literally 1 degree, in the second - to the left, by the same amount. This operation is performed until the detonation lasts more than one and a half seconds.
- When the setting is completed, on the distributor, a risk should be noted, which demonstrates the position of the middle mark in accordance with the BC. If the detonation appears on time and also disappears on time, then the switchgear housing can be put in place. The adjustment procedure can be considered complete (video by Evgeny Alexandrovich).
Good to know
The following symptoms may indicate the need to adjust the timing:
- At work power unit noises appeared. Strong knock and improper engine operation may indicate the need for ultrasonic adjustment. With such iCE operation the engine piston is only up, and the ignition occurs towards it. In this case, the work of the power unit will be more rigid.
- AT exhaust pipe pops appear. The cotton itself is likely to follow, and the gases take longer to expand. The moment the piston hits the lowest point, the next stroke in the cylinder will correspond to the exhaust stroke. It should be noted that part of the fuel explosion will fall into the muffler, resulting in a pop.
- Increased gas mileage may also indicate the need for adjustment. If the moment of advance is set too late, then the dynamics vehicle will generally decrease. And to accelerate, the motor will need more combustible mixture, which affects fuel consumption.
Video "A visual aid for adjusting the UT for 2106"
How to do everything correctly when setting the ignition on the "Six" and avoid mistakes - a visual aid for this task is given in the video below (the author of the video is the Do-it-yourself car repair channel).
During the operation of a VAZ 2106 car, the car owner may encounter a difficult engine start and the appearance of interruptions in the operation of the power unit. The cause of such malfunctions is an incorrectly set ignition timing, which requires timely adjustment. Such work is not particularly difficult, so even those car owners who have a distant idea of \u200b\u200brepairing their car can handle it. In this article, we will tell you how to set the ignition on a VAZ 2106.
Malfunction symptoms
Determining the incorrectly exposed ignition will not be difficult. If your car has problems with starting, the engine runs unevenly, there is a pronounced detonation, all this may indicate improper ignition.
Also, ignition problems can also be determined in the folk way:
The car is accelerated to a speed of approximately 45 kilometers. They turn on the fourth speed, and sharply press the gas pedal.
After such a sharp acceleration, pronounced detonation and ringing of the so-called fingers appear, which passes as the car accelerates, this may indicate a lost ignition.
Required tool
Performing such an engine repair yourself is not difficult. To independently set the ignition of the VAZ 2106, you will need the following tools:
- Voltmeter or control lamp operating from 12 volts.
- Box wrench No. 13.
- Candle wrench.
Step-by-step instructions for performing repair work
You can set the ignition on the VAZ 2106 engine for 4 and 1 cylinders. The algorithm of work is slightly different depending on the cylinder with which the work is performed. Also in this article we will tell you how to set electronic ignition on the VAZ 2106.
First of all, you need to determine by which marks the ignition will be exposed. The ignition is set according to the timing marks. The long mark corresponds to zero ignition, the middle one - to five degrees of the angle, the short one - to ten degrees of the lead angle.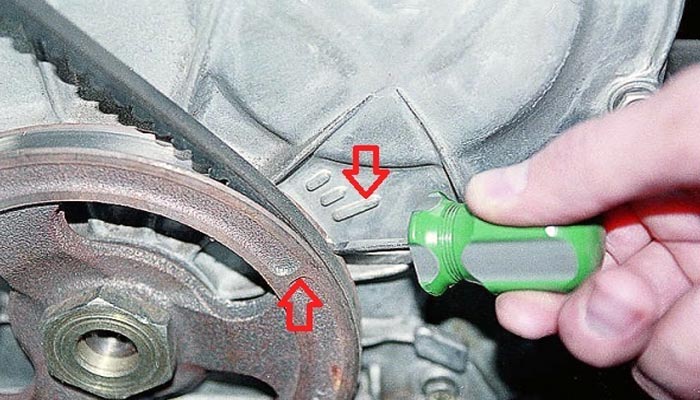
You can also find the top dead center mark on the pulley rim, and there is a small nodule on the pulley located opposite the top dead center mark. It is for these marks that you should set contactless ignition on the VAZ 2106.
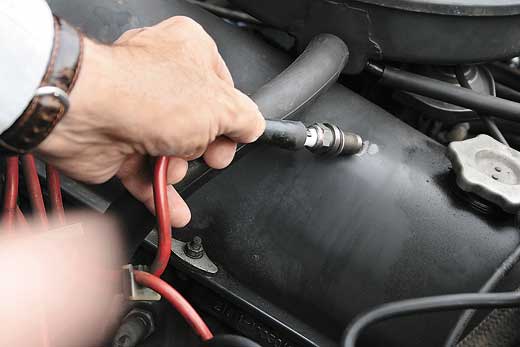
It is necessary to unscrew the candle from the 1st cylinder with a candle wrench, close the spark plug hole that appears with a plug or finger.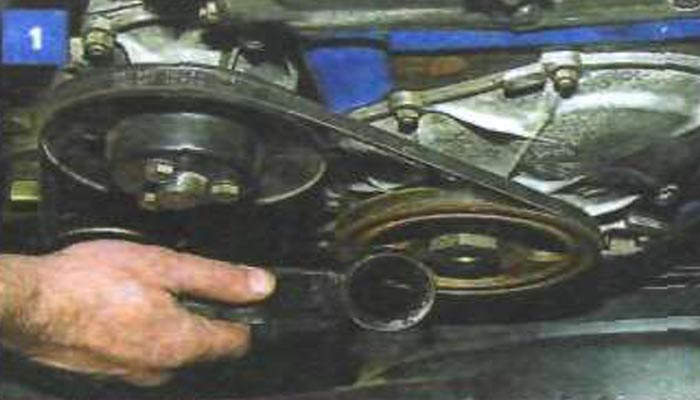
With a special key you need to turn crankshaft before the start of the compression stroke. This compression stroke begins as soon as the piston begins to move upward. Compression can be determined by the pressure in the plug hole.
You need to turn the crankshaft until the mark on the cover located on the timing belt matches. In the event that you are using low-octane fuel, then it is necessary to combine the mark on the crankshaft pulley with a long mark, which is equal to the zero advance angle. If you are pouring 92 gasoline into the engine, then you need to combine the mark with an average risk.
Next, unfasten the latches and dismantle the distributor cover.
After turning the crankshaft, the rotor will be in a position where the rotor contact in the distributor is directed towards the first cylinder.
Aligning the marks, draw a line from the distributor that passes through the cover latches and runs parallel to the motor axis. In the event that such an imaginary line does not cross the lid latches, it is imperative to make the appropriate adjustment:
We unscrew the nut that fixes the distributor, and then pull the distributor up. When the rotor axis rotates, it should be set parallel to the motor axis.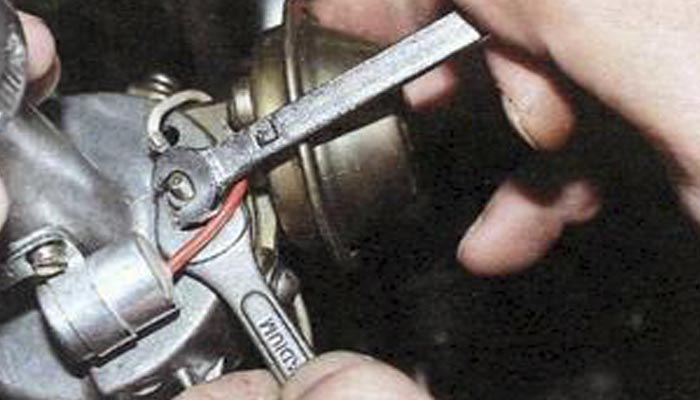
We install the distributor in place, fix it with a fastening nut, but not completely tighten it.
Next, you need a test lamp or voltmeter. This device must be connected at one end to the output of the ignition coil, while the second wire from the lamp is connected to ground or to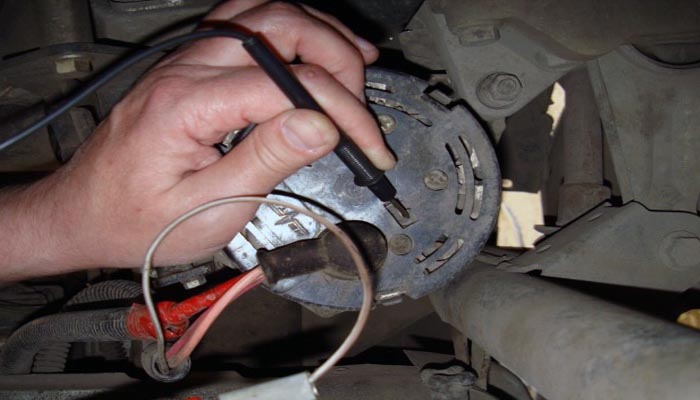 Turn on the ignition and smoothly turn the distributor. It is necessary to turn until the control lamp goes out. If the lamp is initially off, no adjustment is required.
After that, we begin to turn the distributor counterclockwise. As soon as the control lamp lights up, fix the distributor by tightening the nut.
Turn on the ignition and install the distributor in place.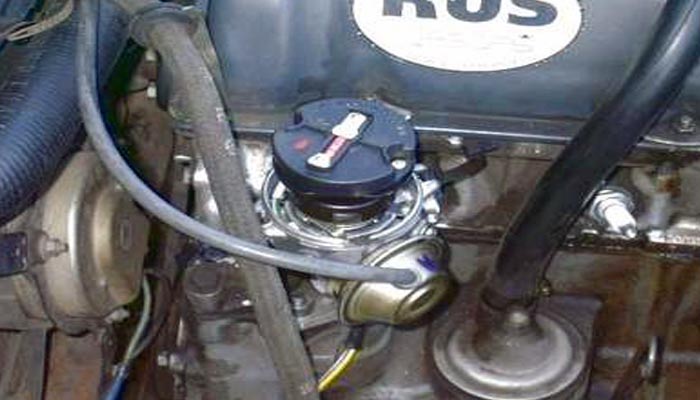
Checking the correctness of the work done is not difficult. We accelerate the car to a speed of 40 kilometers and sharply press on the gas in fourth gear. If during such manipulations detonation occurs, which does not disappear when the car accelerates, early ignition is set. The absence of detonation indicates late ignition. With the set early ignition, the distributor should be turned approximately one division. If the ignition is set late, then on the contrary, it is turned counterclockwise by one division.
Conclusion
As you can see, self-adjustment and setting the ignition on a VAZ 2106 car is not particularly difficult. Every car owner will cope with such work, in order to correctly set the ignition in the car, you will not need to use any special tools... If you have any difficulties with this work, then below we have prepared a video that clearly describes how to set the ignition on the VAZ 2106. It is recommended to carry out such an adjustment every 15 thousand kilometers or as characteristic signs of an ignition problem appear.
Video
Because how competently and skillfully the ignition setting of the VAZ-2106 is performed, not only the power and dynamics of the power unit, but also the consumption, depends. Incorrect operation of the ignition can be identified by the following points:
difficult start;
insufficient engine power;
overestimated consumption;
unstable XX mode;
high temperature;
detonation after shutdown;
at hard pressing a characteristic knock of fingers appears on the "gas".
Ignition setting for VAZ
Depending on what type of ignition is installed on your model, the system setting has some features. At the same time, the principle of this operation is the same for all modifications. The ignition of the VAZ-2106 is carried out in 3 stages:
UZSK - calibration of the contact angle in the closed position.
UOZ - advance angle adjustment.
Performance monitoring in motion.
Ignition contact angle adjustment
For work we need:
a set of probes for the VAZ-2106;
electronic tachometer.
a set of keys, including a special key for the crankshaft;
If your model uses a classic or transistor-type ignition system, we perform ignition tuning in the following order.
with a stroboscope;
using a light bulb;
by spark;
We dismantle the cover from the distributor and clean the contacts with a file so that they are tightly closed with each other. If necessary, bend the fixed element.
Turning the crankshaft with a special key, we set the maximum clearance. In the absence of a key, you can perform this procedure by pushing the car, having previously engaged the 4th gear.
After the maximum clearance is set, unscrew the bearing plate screw.
Then it calibrates the gaps with a 0.4 mm plate, and then fix the position by screwing in the screw.
We control the distance between the electrodes of the plates by 0.35 and 0.4 mm. In this case, the thin stylus should pass easily, but the thick instrument should not. We put in place the cover of the distributor.
We start the engine and check it using the UZSK tachometer. It should be 55 ° ± 3 °. Calibrates it if necessary.
Adjust the ignition timing
There are several options for performing this procedure, the following are optimal:
- the fastest and most accurate calibration method, subject to availability this device... First you need to connect the device to the machine's network. Then it is necessary to remove from the distributor and plug the octane pipeline of the corrector. Following this, we warm up the engine to the recommended temperature. After that, we loosen the mounting bolt of the distributor and direct the strobe beam to the pulley area. At stable revolutions XX, rotating the distributor body, we set the first pulley mark against the second division, which is located on the gas distributor cover. Having adjusted the desired position, we fix the distributor body by tightening the mounting bolt.
Setting with a light bulb performed in the absence of a strobe. The adjustment is carried out using a twelve-volt bulb, to which 2 wires are pre-connected and a special key for the crankshaft.
First, rotating the crankshaft, set its mark opposite the zero division on the gas distributor cover.
Connect one wire of the light bulb to the coil through the cable coming from the distributor, and the other to the body ground.
Remove the central cable of the distributor and connect to ground.
Unscrew the fastening bolt of the distributor body a little.
Turn on the ignition system, the lamp should be on.
By rotating clockwise the distributor housing, set the position at which the control lamp goes out.
Following this, move the body back until the lamp lights up again.
Fix the distributor with the bolt.
If your model provides a thyristor or transistor circuit of the VAZ-2106 ignition lock, this adjustment it will not work with a light bulb due to the fact that the voltage that is available at the contacts of the distributor may not be enough to turn on the lamp. In this case, the adjustment should be made using a diode probe or voltmeter.
Spark adjustment produced on the basis that a spark appears when the contacts open. Pre-install the crankshaft in a position in which its mark coincides with the first division on the gas distributor cover. In this case, the distributor slider will be opposite the power cable of the 1st cylinder. Pull out the central cable of the distributor and place it at a distance from the ground within 5 mm. Unscrew the distributor mounting bolt and turn on the ignition. Rotate the case clockwise 25-30 degrees. After that, slowly move the body back and at the moment a spark appears, fix the distributor.
Adjustable by ear should be carried out only in exceptional cases when the above options for one reason or another could not be implemented. First, turn on the engine, and then loosen the fastening of the distributor body. Rotate the body to install maximum speed motor. After that, turn the distributor slightly clockwise and fix the body with a bolt. At the same time, a big mistake is quite likely, however, this will be enough to get to the nearest service station or your garage, where you can perform a more accurate setting.
Video - Installation of ignition by light bulb
Ignition performance monitoring
The ignition tuning results must be tested while the car is moving. Before that, pre-warm the engine and after accelerating 45-50 km / h, having engaged the 4th gear, energetically press the gas pedal. When correct adjustment ignition at this moment should appear for a short time (1-2 seconds) and immediately disappear characteristic pops as a result of detonation, followed by an energetic set of speed. If this does not happen, turn the distributor body 1 position counterclockwise. When detonation lasts more than 2 seconds, the housing must be rotated clockwise 1 division.
The ignition system plays a very important role in the operation of the engine internal combustion... A large number of parameters depend on it, which greatly affect the overall behavior of the car. Therefore, every driver of the Russian car industry should know how to set the ignition on a VAZ 2106.
The ignition system is needed to create an electrical impulse that ignites air-fuel mixture inside the cylinder. Depending on the vehicle modification, it can be contact and non-contact. Recently, it is widespread on a non-contact basis and operates using a transistor circuit.
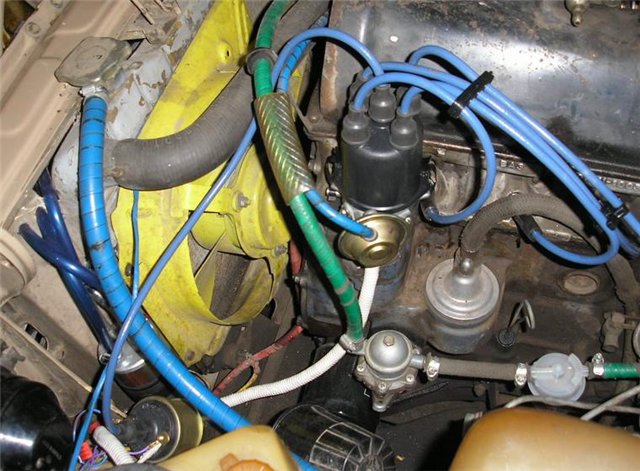
The central part of the system is a distributor, inside which there is a movable contact that transmits an electrical impulse to high-voltage cables.
The latter are connected to the spark plugs. A Hall sensor is installed in the middle of the distributor, which determines the angular position of the distributor and transmits this information to the switch. He sends a signal to the ignition coil, which converts 12 volts into 25 kilovolts. The distributor itself operates from the crankshaft, so its work is clearly synchronized. Injection engines an ignition module is used, which itself adjusts the required timing of the advance.
Job contact system has a similar principle of operation, but the layout lacks a switch and a Hall sensor. The very essence of the action must comply with the order of sparking, which must occur at the very moment when the piston is at top dead center. Moreover, this process should take place with some advance, because the mixture does not start burning immediately, but after a short period of time. Thus, at the moment when the cylinder appears maximum pressure, the piston reaches the highest point and goes down.
The result of this interaction was the emergence of two terms that imply early and late ignition. In fact, the ignition should be a little early, and this angle should not exceed 5 percent. If it is too large, then the mixture will ignite too early, which is typical for the appearance of detonation, when the mixture burns too early and the engine starts to heat up more than in normal mode.
This is a very dangerous mode and can lead to serious damage.
Another problem is late ignition... In this case, the gasoline burns out too late and the cylinders move more by inertia than by the combustion of fuel. Because of this, there are power losses, shots in the muffler, and increased consumption fuel. If these signs are detected, as well as when the engine overheats, it is necessary to adjust the ignition timing.
The process of adjusting the ignition VAZ 2106
In fact, there is nothing complicated here, and drivers have invented many ways, the main of which is the use of a strobe. Of course, this is a very accurate method that allows you to adjust the ignition as correctly as possible on any carburetor car... However, the stroboscope itself costs about 600 rubles, when the ignition adjustment for a VAZ 2106 in a car service will cost 300. This suggests that it makes sense to use standard set tools and save that amount of money.
You will need a ratchet (it can be replaced with a jack), as well as a 13 key, a spark plug wrench and a plug corresponding to the plug hole. Now you will learn how to set the ignition completely from scratch. To do this, first you need to find the top dead center of the first cylinder in the compression stroke. Unscrew the plugs and insert the plug into the first cylinder.
Use a ratchet to rotate the crankshaft until the plug comes out. This moment is considered the point of maximum compression of air in the cylinder. The mark on the crankshaft pulley and the long mark on the bearing cover should align. To create the desired lead, it is recommended to set it to the second mark, which will correspond to an angle of 5 degrees. After that, you no longer need to rotate the crankshaft.
If you do not have a ratchet, you can rotate the motor using rear wheel... To do this, the gearbox must be set to fourth speed, and the wheel must be jacked up. To avoid accidental falls, it is recommended to install wheel chocks and a support under the machine.
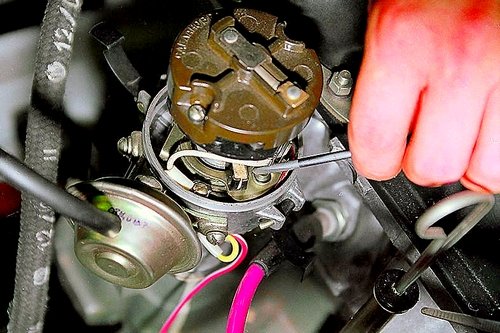
Now take the key 13 and unscrew the bolt retainer of the distributor of your VAZ 2106... After removing the retainer, pull out the distributor and install it so that its slider is opposite contact 1 of the cylinder on the distributor cover. You can then reassemble it, but do not tighten the bolt. Lower the machine and prepare it to start.
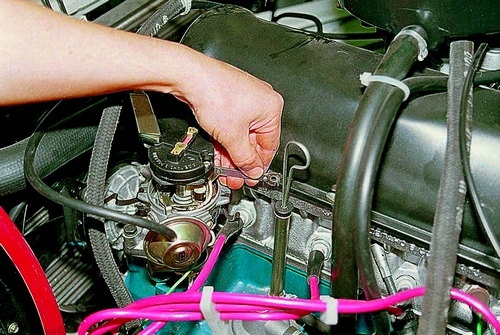
Now you need two people: the first will rotate the starter, and the second will set the lead angle. Grasp the octane corrector with your hand and ask your partner to start the starter. It is possible that it will not start, at this point you must slowly move the distributor until the engine starts. This will be the point at which you set the correct ignition timing. When the engine starts, it will be necessary to continue rotating the distributor until the most stable engine operation of your VAZ 2106.
That's all. This is how the process of adjusting the ignition on a VAZ 2106 car looks like. Thus, this can be done without the participation of car service specialists, as well as save some amount of money. We wish you good luck on the road!