The modification range of the VAZ 2106 family includes:
- VAZ 2106, 21065-00 - equipped with a 2106 engine;
- 21061, 21065-01 - were completed with a motor model 2103;
- 21063 - there was an engine from 21011.
- The car of the 21065 brand is a luxury variant of this family. It has the following differences from the 2106 model: five-speed gearbox gear and main gear from gear ratio 3.9. Some cars were equipped with a Solex carburetor and a contactless ignition system. The electrical equipment of the car is complemented by an electrically heated rear window, halogen headlights and fog taillight... The body has been modified: the upholstery and head restraints have been updated; the car is supplemented with bumpers of model 2105. Spare parts for the presented vehicles are available everywhere. In addition, a kind of "novelty" is, so to speak, the trends of the 21st century make themselves felt. Thereby, maintenance the car and its repair are not a big problem.
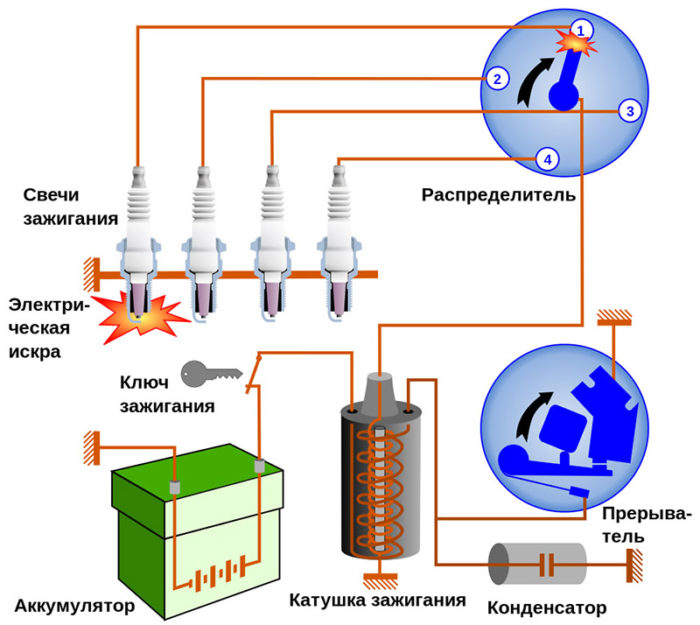
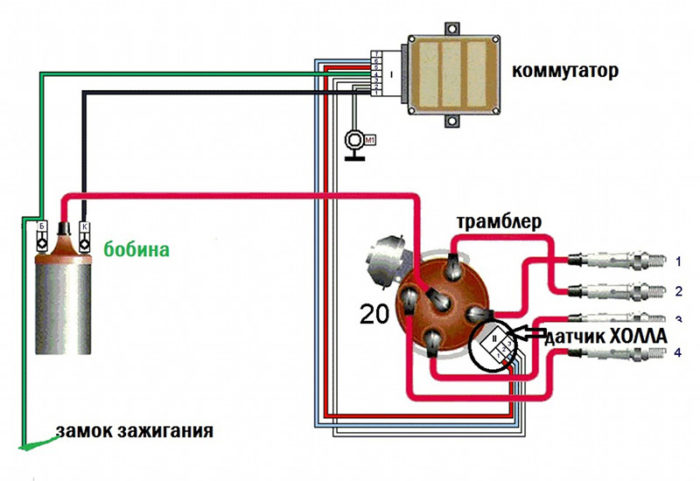
Ignition scheme VAZ 2106
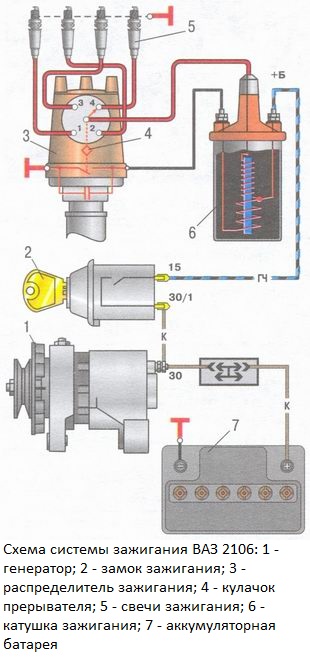
Includes ignition distributor, coil, spark plugs, lock, and low and high voltage wires. The connection diagram of the VAZ 2106 of this car system is shown in the photo.
- Until 1980, machines of this brand were equipped with an R-125B distributor. It was installed in conjunction with type 2103 carburetors. This distributor had a mechanical octane corrector, with which it was possible to slightly change the ignition timing, however, at the same time, there was no special vacuum regulator. After 1980, when the engines were equipped with 2107-1107010-20 carburetors ("Ozone"), they began to use the 30.3706 distributor, which had a vacuum ignition timing controller.
- The coil used was of the B117-A type. An open magnetic circuit was present. The device is oil-filled, sealed.
- Used candles type A17DV or similar, but foreign production.
- Cars were equipped with a VK347 lock, which had an anti-theft device. It works as follows: when the key is removed (from position III "Parking"), a locking rod is pulled out of the switch body in a special way. It enters the groove of the rudder shaft and thus the shaft is locked.
It is recommended to constantly carry with you, if you are the owner of a 2106 car, an ignition distributor capacitor and an ignition coil. The probability of their failure is quite high, it is impossible to replace or repair them with the help of some other devices.
If the coil or capacitor is damaged, it will be impossible to start the engine, but it is very simple to replace the failed devices. For example, the ignition lock (shown in the video). If an emergency arises, they can be replaced with similar devices from other car models.
Wiring diagram VAZ 2106
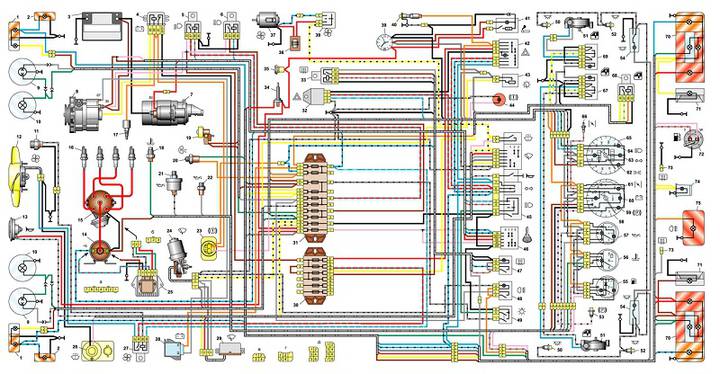
The electrical diagram of the VAZ 2106 is a detailed "plan" on the basis of which the entire system of electrical connections of the car works. It consists of:
1 - front lights; 2 - side direction indicators; 3 - battery; 4 - relay from the battery charge indicator lamp; 5 - a relay with which the dipped headlights are switched on; 6 - relay for high beam headlights; 7 - automobile starter; 8 - generator; 9 - high beam lighting devices (headlights); 10 - low beam devices; 11 - a sensor with which the fan motor is switched on; 12 - electric motor of the SOD fan (engine cooling system); 13 - horn (sound signal); 14 - ignition coil;15 - ignition distributor; 16 - spark plugs; 17 - carburetor solenoid valve; 18 - a sensor that shows the temperature of the coolant; 19 - engine compartment lamp; 20 - car light switch reverse; 21 - a sensor showing the oil pressure level; 22 - oil pressure sensor; 23 - sensor from the control lamp indicating the level brake fluid; 24 - the electric motor used by the cleaner windscreen; 25 - switch (to be completed if a contactless ignition system is used); 26 - electric motor from the windshield washer; 27 - fan motor relay; 28 - machine voltage regulator; 29 - special relay-breaker of the windshield wiper; 30 - special additional fuse box; 31 - main fuse box; 32 - relay-breaker automobile alarm and corresponding direction indicators; 33 - relay with which the heater is turned on rear window; 34 - brake light switch; 35 - a special socket for a personal transport lamp (not installed since 2000); 36 - special additional resistor of the car electric motor of the heater; 37 - electric motor, without which the heater cannot work; 38 - mandatory heater electric motor switch; 39 - machine clock; 40 - a lamp that illuminates the glove box; 41 - car cigarette lighter; 42 - alarm switch; 43 - special dimmer transport devices; 44 - control lamp, which symbolizes insufficient brake fluid level; 45 - light switch of headlights, sound signals and direction indicators; 46 - car ignition switch; 47 - switch machine rear window heater; 48 - rear switch fog lamp car; 49 - switch for external lighting VAZ 2106; 50 - switches for door lamps (front pillars); 51 - electric motor of the power window (some of the manufactured vehicles are equipped with it); 52 - switches for door lamps (rear pillars); 53 - switch of a warning lamp of an automobile parking brake; 54 - plafonds producing interior lighting; 55 - fuel level indicator in the car, which has a reserve warning lamp; 56 - indicator of the temperature state of the coolant; 57 - oil pressure gauge equipped with a pressure failure indicator lamp; 58 - car tachometer; 59 - control lamp (CL) of the parking brake; 60 - CL battery charge; 61 - KL carburetor air damper; 62 - CL side light; 63 - CL of turn indicators; 64 - KL high beam headlights; 65 - autospeedometer; 66 - switch KL carburetor air damper; 67 - "left-hand" switch of the electric motor of the power window; 68 - automotive power window relay; 69 - "true" power window motor switch; 70 - rear transport lights; 71 - lanterns that illuminate license plates; 72 - sensor showing fuel level and reserve; 73 - rear window heater; 74 - a lamp with which the trunk is illuminated; 75 - rear transport fog lamp.
Fuse diagram VAZ 2106
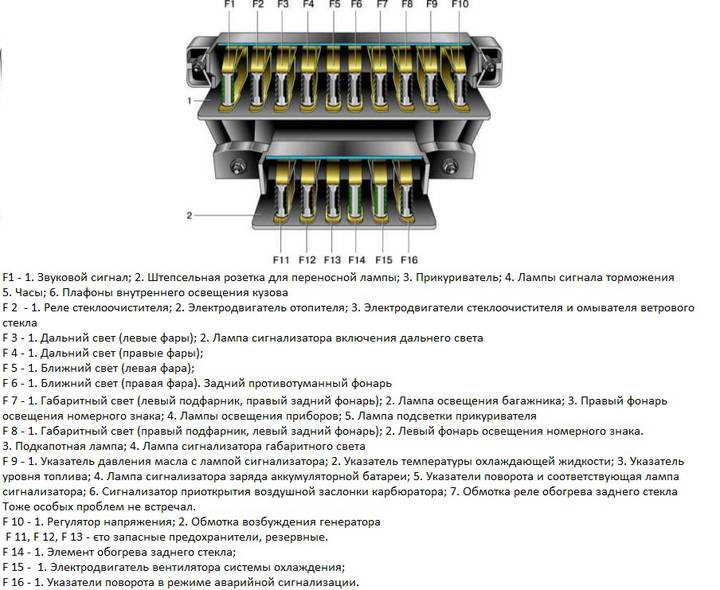
The fuse diagram of the VAZ 2106 is one of the simplest. She presents two lines with car fuses... This structure is attached to the machine body with two nuts. If you need to remove the fuse bar, you will have to disconnect the battery. The disadvantages of this are in its inconvenient lids.
The main disadvantage is that contact sometimes disappears due to the unbending legs. And in some cases, as a result of poor contact, the fuse heats up and, as a result, the plastic ruler melts. This drawback can be easily corrected by replacing the fork-shaped fuse box. It will take 10 minutes, but in the future, thanks to this "", you will get rid of various hassles that are associated with electricity.
A classic electric ignition system is mainly installed on a VAZ-2106 car.
On the modified model VAZ 21065, contactless systems were installed. In the classical form, B117A coils are used, in a contactless system - 27 3705, the main difference of which is in some details and winding data. The history of the release of the famous VAZ "six" VAZ 2106 dates back to 1976. From the very beginning of its release, the classic of the domestic auto industry, equipped with an 80 hp engine. forces, has become the most popular and demanded model among motorists.
The car is equipped with an engine start lock, characteristic of the entire line of VAZ cars, consisting of three main parts: a contact part, anti-theft device and the castle itself.
When the anti-theft lock device comes out, the device changes into complete set... The contact part, which is fixed in the ignition housing by means of a circlip, can be replaced separately. The car starting device is installed under the instrument panel on the left side of the driver on the steering shaft bracket.
The flawless operation of any car depends on the trouble-free and well-coordinated work of all its mechanisms. Not the last place in this series is occupied by the correct installation of the ignition system. After the car leaves the conveyor, the correct clearance is established by the factory specialists. With prolonged operation of the car, its failure may occur, which can lead, as one of the reasons, to excessive fuel consumption, or as one of the main ones - the car will stop starting. In this case, it will be necessary to install the ignition of the VAZ 2106 according to the factory technical parameters... You can do this yourself, having done all the necessary work with your own hands, or contact a professional who is familiar with all the nuances correct installation ignition systems.
Electronic ignition VAZ 2106
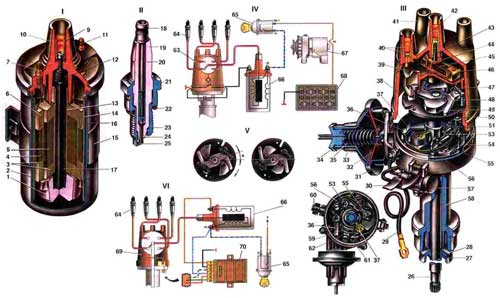
Ignition system. 1. Insulator; 2. Ignition coil housing; 3. Insulating paper windings; 4. Primary winding; 5. Secondary winding; 6. Insulating tube of the primary winding; 7. Terminal of output of the end of the primary winding; 8. Contact screw; 9. High voltage terminal; 10. Cover; 11. Terminal "+ E" of the output of the beginning of the primary and the end of the secondary windings; 12. Spring of the central terminal; 13. Frame of the secondary winding; 14. External insulation of the primary winding; 15. Mounting bracket; 16. Outside magnetic circuit; 17. Core; 18. Contact nut; 19. Plug insulator; 20. Stem; 21. Candle body; 22. O-ring; 23. Heat dissipating washer; 24. Central electrode; 25. Side electrode of the candle; 26. Distributor roller; 27. Oil baffle roller; 28. Washer; 29. Current supply wire and distributor; 30. Cover spring; 31. Housing of the vacuum regulator; 32. Aperture; 33. Cover of the vacuum regulator; 34. Nut; 35. Spring of the vacuum regulator; 36. Draft of the vacuum regulator; 37. Cam lubrication wick; 38. Support plate of the ignition timing regulator; 39. Distributor rotor; 40. Side electrode with a terminal; 41. Distributor cover; 42. Central electrode with a terminal; 43. Coal of the central electrode; 44. Central contact of the rotor; 45. Resistor 5-6 kohm for suppression of radio interference; 46. \u200b\u200bOuter rotor contact; 47. Spring of the ignition timing regulator; 48. Plate of the centrifugal regulator; 49. Ignition timing regulator weight; 50. Insulating sleeve; 51. Breaker cam; 52. Lever insulating block; 53. Lever of the breaker; 54. Rack with breaker contacts; 55. Breaker contacts; 56. Movable breaker plate; 57. Capacitor 0.20-0.25 uF; 58. Engine start distributor housing; 59. Bearing of the moving plate of the breaker; 60. Oiler body; 61. Terminal screw; 62. Bearing lock plate; 63. Distributor; 64. Candles; 65. Ignition switch; 66. Ignition coil; 67. Generator; 68. Accumulator battery; 69. Sensor-distributor; 70. Switch; 71. Ignition timing; 72. To power supplies; 73. I. Ignition coil; 74. II. Spark plug; 75. III. Ignition distributor; 76. IV. Scheme of the classical system; 77. V. Scheme of operation of the centrifugal ignition timing regulator; 78. VI.Scheme contactless system.
Installation of ignition VAZ-2106
Before installing the ignition system, it is necessary to check the gap between the breaker contacts, which should be within 0.35 ± 0.05 mm. If the size of the gap does not correspond to these parameters, then it will be necessary to install it using a twelve-sided wrench with a size of 39mm. The control lamp helps to correctly set the ignition on the VAZ 2106.
If the control lamp is not available, then it is possible to install on a spark by connecting a spare candle for this, which will help prevent system failure during work. Correctly exposed ignition is considered when the spark on the I or IV cylinder slips between the first and second exhaust marks. It should be added that in the event of oxidation of the breaker contacts, the control lamp will be on constantly, regardless of the position of the distributor body.
The most common cases of malfunction of the electronic start of the VAZ 2106 engine include: failure of the ball bearing 900706U in distributors, especially in recent years of production, which are equipped with a vacuum corrector diaphragm, breakage of the distributor cover, slider and resistor in the slider.
The destruction of the ball bearing leads to uneven operation of the car engine on idling and it stops working on full power, while the tachometer needle can “walk” along its entire scale, regardless of the engine speed. This situation can be corrected by performing a few simple steps:
- disconnect the vacuum hose from the distributor;
- having tied a strong knot at its end, remove it further so that it does not dangle;
- press the rod of the vacuum corrector using the bar in accordance with Figure 24a, if the bar does not fit between the bend of the rod and the body, then its end is made a little narrower, as shown in Figure 27b;
- re-adjust the gap in the breaker contacts, as described above;
- set the ignition angle + 7 ° 30 '
Now you can drive like with the ignition distributor of the first releases, but it is worth considering that in this case, fuel consumption will increase by about a third and the exhaust toxicity will increase.
In many ways, correct work the starting system of the engine depends on the spark plugs installed on it. With only one visual inspection of the spark plugs, it is possible to determine the malfunction of the piston group, ignition and power systems. A spark plug with an oily working surface cannot be repaired.
You can try to restore the spark plug by installing it on the second or third cylinders of a well-heated engine, or sandblasting the working part. It is recommended to replace the spark plugs after every 30,000 km. mileage.
A classic electric ignition system is mainly installed on a VAZ-2106 car.
On the modified model VAZ 21065, contactless systems were installed. In the classical form, B117A coils are used, in a contactless system - 27 3705, the main difference of which is in some details and winding data. The history of the release of the famous VAZ "six" VAZ 2106 dates back to 1976. From the very beginning of its release, the classic of the domestic auto industry, equipped with an 80 hp engine. forces, has become the most popular and demanded model among motorists.
Contactless
Benefits
The main advantages of such a complex as a contactless ignition system are as follows:
Increased spark power due to the increased voltage potential difference in the secondary current circuit with a value of 22-24 kV (in the contact system - 16-18 kV.
Increased combustion of the fuel-air mixture and a decrease in the concentration of carbon monoxide in the exhaust gases vehicle.
Improved start power plant at negative temperature values.
Significantly improved vehicle dynamics
A noticeable increase in reliability during the operation of a vehicle and the absence of the need for control over the functionality of the operation of such a complex.
Installation
To install a contactless ignition, you will need a set of locksmith tools and new parts in case of replacement. You can directly watch the installation of contactless ignition on the video on the Internet. Replacement and installation of contactless ignition is carried out already on the serviceable fuel equipment of the vehicle.
Routine adjustment of contactless ignition is carried out after 30-40 thousand km. mileage. Correct setting of the non-contact ignition of a car assumes that the engine operates in an optimal mode while observing the required voltage and current values.
Contact
The main malfunctions of the VAZ-2106 contact ignition system are as follows:
burning / oxidation of contacts of the ignition distributor (distributor)
burning or even partial destruction of the ignition distributor cover
burning of the end of the runner (its wear)
exit from the resistance side of the slider
exit from the side of the capacitor or decrease in its capacity
all of the above malfunctions, as a rule, greatly worsen the operation of the engine - the engine does not start well (especially cold), throttle response disappears, fuel consumption increases sharply up to 18-20 l / 100 km, engine power decreases, maximum speed decreases.
If a malfunction occurs on the way, it is recommended to clean the contacts with any abrasive at hand, if not, you can try to scrape off the carbon with a screwdriver (but it is extremely stable). Unfortunately, when the contacts are burnt, their wear occurs - the metal is transferred from one contact to the other - a protrusion is formed on one, and a hole on the other, this makes it difficult to clean and set the recommended gap (0.37-0.43 mm). Therefore, as soon as possible, the distributor contacts should be replaced.
If burning of contacts occurs too often, you should check the gap in the spark plugs (which is 0.5 mm for Lada with a contact ignition system). In new spark plugs, the gap is often set in the region of 0.8-1 mm, which is the norm for a contactless ignition system with a hall sensor.
The next reason for the frequent and rapid burning of the contacts can be severe wear of the ignition cover, as well as wear and tear of the runner. These parts must be replaced with new ones if they are visibly worn out (their price is an order of magnitude lower than the excess fuel that will burn out from malfunctions that later arise). When choosing a slider, you need to ask for multiple copies different manufacturers and buy the one from which the "tongue" is longer and in general there are different in quality. It is best to get a new slider made in the USSR (but unfortunately it is difficult to find them). The same applies to other parts of the ignition system - Soviet spare parts - contacts were made using silver plating and their service life is much higher than new-made crafts.
Another reason for burned out contacts is a malfunction of the interference suppression and spark-suppressing capacitor of the ignition distributor (distributor) - remember that its capacity should be in the range of 0.2-0.25 μF. You can measure the capacitance of a capacitor using a multimeter (see search engines as). As a rule, if the capacitor does not reach the capacity, the arc is not extinguished properly and the burning of the contacts increases significantly.
You should also monitor the wear of the mechanical part of the distributor - when the shaft dangles, then it is impossible to talk about any ignition quality - all the gaps float and, accordingly, even if the car is driving, it drives like a padded tank.
Scheme
The ignition system of a VAZ 2106 car consists of an ignition distributor 3 (Fig.9.10), an ignition coil 6, spark plugs 5, an ignition lock 2, high and low voltage wires.
Figure: 9.10. VAZ 2106 ignition system diagram: 1 - generator; 2 - ignition lock; 3 - ignition distributor; 4 - breaker cam; 5 - spark plugs; 6 - ignition coil; 7 - storage battery
Electronic
Main advantages electronic ignition VAZ 2106
After bSZ installations, at the very first start of a cold engine, it started literally with half a turn, but most importantly, the engine was idling even without pulling the choke, which was previously impossible. Also, when driving on a cold engine, there were no jerks, the engine worked smoothly and without interruptions. And with a sharp press on the gas pedal, there were no failures!
Stability idle speed increased, the engine began to run smoother, and the machine now rides better than before! Now you can forget about permanent replacement or cleaning the distributor contacts, which used to be very annoying. The only thing I would recommend is to buy a hall sensor and carry it with you in stock, just in case, so to speak! If, due to its breakdown, you become on the track, then you can immediately replace it and go on!
The price of a new set of electronic contactless ignition for the VAZ 2106 and all classic models is about 2000 rubles, but believe me, this kit is worth buying!
Malfunctions
Malfunctions in the ignition system of a VAZ 2106 car.
The capacitor of the VAZ 2106 ignition distributor is broken.
The gap between the electrodes of the spark plugs is broken, filled with fuel, oily or completely defective.
The ignition moment was lost as a result of loosening the fastening of the distributor or a malfunction of its individual parts. It is also quite possible that current leaks through cracks or burnout in the ignition distributor cover. A resistor in the distributor rotor burned out.
Damage to high voltage wires, lugs oxidized, as a result of which voltage is not supplied to the spark plugs.
The gap of the contacts of the breakers is violated, the contacts are sticking or their complete failure.
Defective ignition coil. It can be an open or short to ground in the secondary winding or an open in the primary winding. Can't be repaired, replacement is required.
Despite the fact that the "classic" VAZ 2106 has long been discontinued, a considerable number of these machines are used in the Russian open spaces. Since their design is outdated, the desire of the owners of the sixth Zhiguli model to improve it by any means is quite understandable. One of effective options - put instead standard system contactless ignition (abbreviated as BSZ), where the electronics are in charge of sparking. The replacement procedure is quite simple and available to anyone who wishes to improve the performance of the engine of his "six".
What is BSZ and how does it work?
To successfully install and configure contactless ignition, it is desirable to understand the principle of operation of the system, consisting of the following elements:
- Main ignition distributor (otherwise - distributor). Inside it is a photoelectric Hall sensor, a vacuum drive for adjusting the lead angle and the so-called slider with a moving contact.
- A coil that produces a high voltage pulse. It has 2 windings: primary, consisting of a small number of turns of a thick wire, and a secondary, wound with a thin wire with a large number of turns.
- Electronic unit - switch equipped with aluminum radiator cooling. The latter plays the role of a fastening element.
- Spark plugs connected by high-voltage wires to a distributor.
- Wires for connecting elements to each other.
It looks like the ignition system of the classic Zhiguli
For reference. In the standard obsolete VAZ 2106 systems, there was a contact group instead of a Hall sensor inside the distributor, and there was no switch at all.
Scheme of BSZ operation
The first contact of the coil is connected through the ignition switch relay to the generator, and the second to the control unit. Also from it to the distributor there is a high-voltage wire of large cross-section. There are 2 bundles of wires coming out of the distributor, connecting it to the switch and spark plugs. The system operates according to the following algorithm:
- After turning on the ignition by turning the key in the lock, a voltage of 12 V is applied to the primary winding of the coil, which causes an electromagnetic field.
- When the rotation occurs crankshaft and one of the pistons goes to the top dead center (TDC), the photoelectric sensor sends a signal to the switch, which briefly breaks the connection between the coil and the voltage source - a generator or a battery.
- When the circuit is broken, a pulse with a voltage of 20 to 24 kV is generated in the secondary winding of the coil, which is transmitted through a wire of large cross-section to the slider of the distributor.
- The sliding contact of the slider directs the impulse to the spark plug where the piston left at TDC. A powerful spark jumps between its contacts, igniting a mixture of fuel and air in the combustion chamber.
- The distributor shaft is driven by a gear train associated with crankshaft... When the next piston moves to TDC, the shaft turns and the moving contact is connected to another spark plug, and the Hall sensor sends the next signal and the sparking cycle repeats.
Reference. In older systems, the circuit was broken mechanically using a cam on the distributor shaft, pressing on the contact group.
Advantages of contactless systems
For an uninformed car enthusiast, the main argument in favor of BSZ is the fact that at the moment no manufacturer produces cars with a contact-cam sparking system. Foreign brands abandoned it in the distant 80s of the last century, and in Russian Federation mechanical ignition lasted until the 90s. The reasons for the refusal are quite clear:
- a spark constantly slipped on the contacts, which made them burn and required frequent cleaning;
- the contact group wore out quickly enough, on average it was enough for 15-20 thousand km of run, after which the element had to be changed;
- the wear of the bearing, on which the contacts were located, made itself felt, which caused unstable work power unit;
- the springs of weights - balancers were stretched.
Contactless ignition gives a powerful spark, which makes fuel burn better
All of the above malfunctions manifested themselves in turn, haunting the owner of the "classic" Zhiguli. Due to the imperfect design, the spark power on the spark plugs constantly decreased, the engine performance deteriorated, and the fuel consumption increased. New BSZ systems are devoid of such disadvantages, they are distinguished by their durability and stable sparking. The spark power also increased, since the voltage of the output pulse increased from 16-18 kV to 24 kV, which contributes to better fuel ignition.
Note. At first time weak point of domestic contactless systems was considered a switch that quickly fails and cannot be repaired. But later it was improved and the reliability of the BSZ increased.
Electronic ignition kit selection
Since the "six" were equipped with three types of engines (volume 1.3, 1.5 and 1.6 liters), then the BSZ kits for them differ in the design of the distributor. In a 1.3 liter engine. (model VAZ 21063) there is a distributor with a shortened shaft, and in engines of 1.5 and 1.6 liters. (VAZ 21061 and 2106 respectively) this shaft is equally long. The composition of the electronic ignition kit is as follows:
- distributor with catalog number 38.3706-01 for a 1.3 liter power unit. or 38.37061 - for engines of 1.5 and 1.6 liters;
- high voltage coil with marking 27.3705;
- the electronic unit control, marking - 36.3734 or 3620.3734;
- connecting wires.
Attention! When buying a contactless kit for the "classic" Zhiguli, do not confuse it with the products intended for the VAZ 2121 Niva, the distributors are very similar in appearance. But the "Nivovskaya" detail differs in technical specifications and is marked like this: 3810.3706, 38.3706-10 or 038.3706-10. Putting it on the "six" is strongly discouraged.
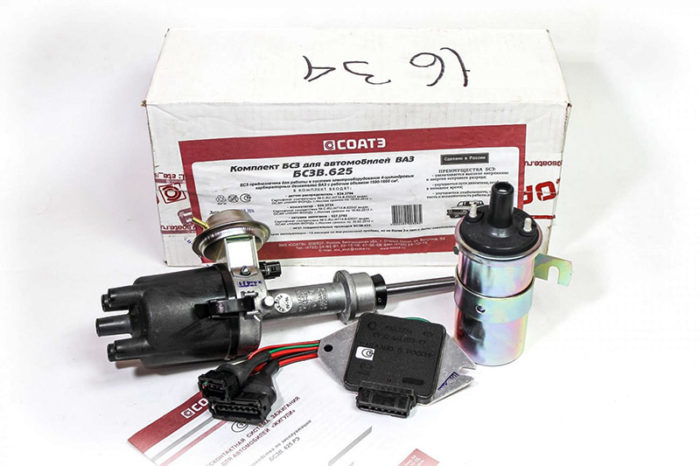
Installation kit for contactless ignition
Of the manufacturers selling their ignition kits in the Russian Federation, the most popular among motorists are spare parts from SOATE from Stary Oskol. It should be noted that the new candles of the A-17DVR brand, installed on classic vases with electronics, are not included in the delivery set, they will have to be purchased separately. In order to experience the full results of the replacement, it is also recommended to install new high-voltage wires if you have not changed them in the recent past.
Preparation for replacing BSZ
The work of removing the old ignition and installing a new one does not require any special tools, fixtures or appliances. There is no need for a viewing ditch, and the entire operation can be carried out outdoors in good daylight. It is enough to have such tools:
- open-ended spanner 13 mm for unscrewing the distributor mounting nut;
- using keys 10 and 8 mm, the coil is removed;
- flat and cross-head screwdriver;
- pliers;
- electric or manual drill with a drill for the diameters of the switch mounting screws.
Council. For the convenience of performing work, rent or from a friend you know a long-handled spanner wrench that fits over the ratchet nut and is used to rotate the crankshaft manually.
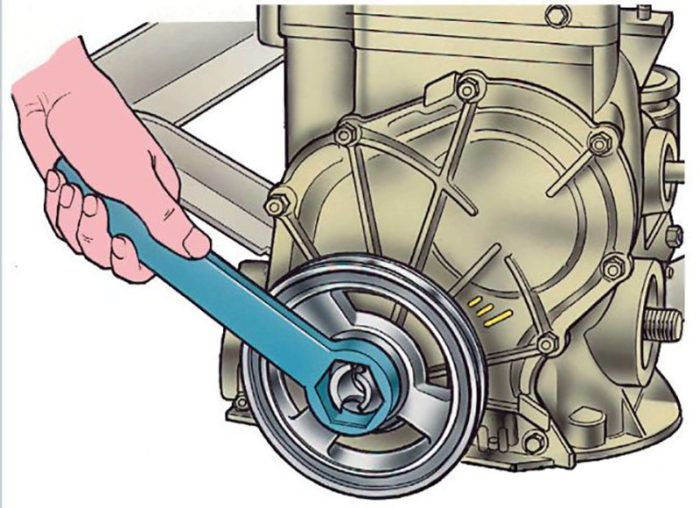
It is much more convenient to turn the crankshaft with such a key.
To get started, complete several stages of preliminary disassembly:
- Open the hood and disconnect the negative terminal of the battery.
- Remove the high-voltage wires from the spark plugs and the distributor cover.
- Unscrew the candles.
- Lower the screwdriver into the spark plug hole of cylinder 1 and turn the crankshaft until the piston in it reaches TDC. In this case, the mark on the shaft pulley will stand opposite the longest mark on the cylinder block.
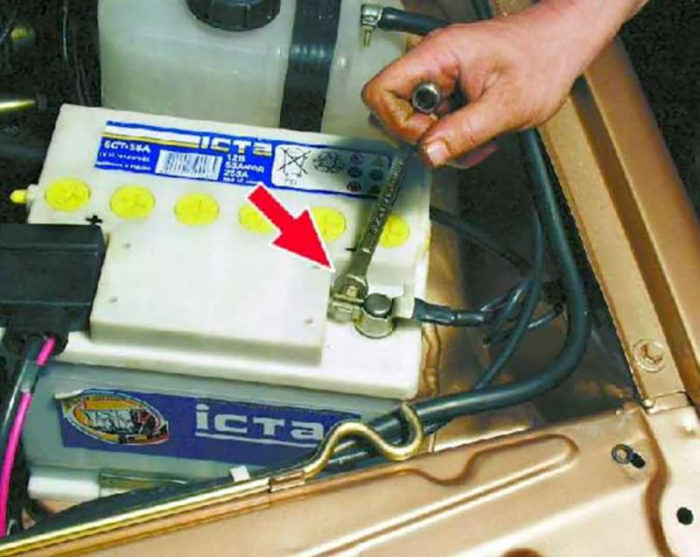
The first step is to disconnect the battery
Council. If you did not find a key for the ratchet nut, the crankshaft can be turned by rotating the posted rear wheel car. Do not forget to secure the machine with anti-rollback means, remove from hand brake and turn on 4th or 5th gear.
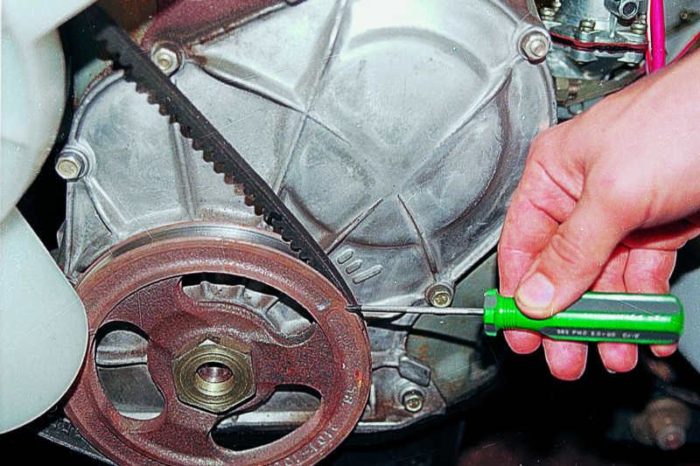
When the 1st piston is at TDC, the marks on the pulley and the block must match
Having compared the marks and having prepared new parts, you can proceed to the main stage of work.
Installation procedure for electronic ignition
The first step is to dismantle the old system, performing operations in the following sequence:
- Disconnect the high-voltage wire from the coil, remove the distributor cover and note the position of the slider. For convenience, the direction can be marked with chalk on valve cover engine.
- Disconnect the wires and vacuum tube from the carburetor from the distributor. Unscrew the fastening nut with a 13 mm wrench and remove the element from the cylinder block.
- Unscrew the nuts of the contacts of the high-voltage coil and remove the wires, remembering where the wires from the ignition switch and tachometer were connected.
- Dismantle the coil and set it aside.
Council. Between the distributor and seat there is a gasket on the cylinder block, do not lose it when removing the part from the car.
Connection diagram of electronic ignition elements
After disassembling, proceed with the installation of BSZ, observing next order actions:
- Move the gasket from the old distributor to the new one and remove the cover from it. Turning the slider in the desired direction, which you marked with chalk, insert the distributor shaft into the socket and fix its position with a nut. It is not worth tightening it too much, since you still have to adjust the ignition and release the nut again.
- Screw in the spark plugs, pre-setting the gap between the electrodes 0.8-0.9 mm. Put the distributor cover back in place and connect the high-voltage wires observing the cylinder numbers (punched out on the top of the cover).
- Replace the old coil with a new one. If the contacts on it are opposite, then first loosen the fastening clamp, turn the case 180 ° and install the part on the car.
- Attach a switch not far from the coil. After removing the washer reservoir, pre-drill 2 holes in the side member of the body and screw the block with self-tapping screws. Please note: the electronic element should not stand below the tank so that it does not flood with water in case of a leak.
- Take the connecting wires and connect the electronic unit, the distributor and the coil according to the diagram (attached to the BSZ kit). It is not difficult to understand it: the connector from the switch is connected to the distributor block, and the wires - to the contacts "B" and "K" of the high-voltage coil. Do not forget about the wires that were previously connected to the old coil (including from the tachometer), they must be connected to the new element in the same way.
- Put the vacuum tube from the carburetor onto the fitting of the distributor diaphragm assembly. This completes the installation of the contactless system.
Reference. In VAZ 2106 models latest issues Holes have already been made for mounting the switch. Look carefully at the side member on the left side (in the direction of travel of the car).
With a key for 8 and 10, you need to unscrew the wires from the distributor. The high-voltage wire is removed from the coil and the wires leading to the ignition lock and tachometer are unscrewed.Thus, the distributor is removed from the cylinder block. Wires to the new coil are connected in the same way as to the old The switch is placed in an empty space above the tank washer Do not mix up the wires when connecting a new distributorVideo about the installation of an electronic system on the "classic"
Starting the engine and setting the ignition
If, in the process of replacing the elements, you did not move the labels, and the wiring was connected correctly, then the "six" will start immediately. Let it warm up for a minute or two, manipulating the accelerator pedal, and then proceed to setting the ignition. It is performed in two ways:
- the most common technique is “by ear”;
- using a special device - a stroboscope.
Council. If the car engine does not start and does not show signs of life when the starter rotates, then you should check the correct connection of the high-voltage wires. Reason two: during installation, you turned the distributor cover 180 °, which is why the slider began to transmit an impulse to the 4th cylinder instead of the first and vice versa.
The ignition is adjusted "by ear" as follows:
- With the engine running, loosen the distributor nut.
- Turn it slowly for and counterclockwise to achieve the most stable operation of the power unit. The swing angle must not exceed 15 °.
- Having caught the position of a clear engine operation, finally tighten the distributor nut.
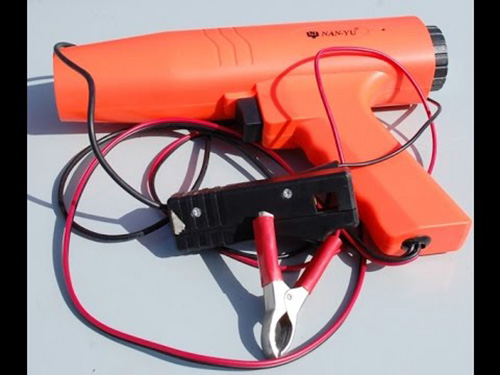
With the help of a stroboscope, the ignition timing is set in a different way. If you managed to get this device or take it somewhere for a while, then connect it to the battery terminals and the high-voltage wire of the first cylinder. Start the engine and carefully bring the blinking lamp to the marks on the block. The stroboscope will help to see the position of the marks knocked out on the pulley when the engine is running. Now you can loosen the distributor nut and turn the body to align this mark with the last, shortest mark.
It looks like a stroboscope to adjust the lead angle
After adjusting, warm up the car to operating temperature and try to drive it in different modes. If, with a sharp press on the gas pedal, the knock of the piston fingers is heard, then you are dealing with a detonation caused by too early ignition. Loosen the distributor and turn it clockwise by 1-2 °, no more. The knock should disappear.
Council. After installing BSZ, it often happens that the engine idle speed increases due to better spark formation. The speed is reduced to a value of 850-900 rpm with the fuel quantity screw. In Ozone carburetors, this is a large propeller located on the right (in the direction of travel) at the bottom of the unit. In Solex carburetors, this is a plastic handle protruding from the rear and resting on the damper axis. It is not allowed to touch the “quality” screw without knowledge of the matter!
Video about setting up contactless ignition
If you removed the distributor and high-voltage wires with a cover without aligning the marks, then the presented video will help you correctly set the ignition on a new one:
Vehicle operation with electronic system is strikingly different from driving on an old ignition. The engine runs much smoother and more stable, and the cleaning contact group is a thing of the past. But the owner of the VAZ 2106 does not hurt to carry a Hall sensor in stock in case of a breakdown of the standard one. This part cannot be repaired, although it rarely breaks down.
Heading
The contactless ignition system is considered a continuation of the wire type design. Proximity sensor replaces the standard contact breaker of this system. The presented system is quite common on some models. domestic production cars. Thanks to this system, it becomes possible to reduce fuel costs, increase engine power, reduce harmful emissions, with the help of a high voltage discharge of thirty thousand volts, as well as an increase in the quality of combustion of the air-fuel mixture.
Today we will talk in detail about the contactless ignition system of the VAZ 2106 car.
So, the article presented by us contains answers to such fairly common questions:
- What is BSZ?
- The design of the contactless ignition system VAZ 2106;
- What are the main features of the electronic ignition of a VAZ 2106 car?
- How to properly install a contactless ignition system on a VAZ 2106 car?
- How is the regulation of the contactless ignition system on a VAZ 2106 car correctly carried out?
Basic information about the contactless ignition system
A contactless ignition system, or as it is also abbreviated as BSZ, is considered to be a constructive continuation of the transistor-contact ignition system. Typically, the presented system is used on models of domestic-made machines or is independently installed instead of the contact one.
The BSZ design includes a whole list of various elements, which include:
- Signal sensor;
- Source of power;
- Distributor;
- Coil;
- Transistor switch;
- High voltage wiring;
- Switch;
- Main advance regulator;
- Candles;
- Vacuum advance regulator.

The distributor is connected to the spark plugs and the ignition coil using high voltage wires. In general, the design of the system is similar to the contact type, except that the signal sensor and transistor switch are excluded.
What are the main features of electronic ignition?
The installation of BSZ VAZ 2106 is accompanied by many advantages, and here are the main advantages:
- Simple establishment process;
- Ease of regulation;
- Reliable and accurate performance;
- Improving cold start of the car engine.
When using the presented system, your vehicle will start from the first revolutions, and the biggest advantage is the operation of the engine in the cold season without the need to tighten the choke, and with the contact system it was simply necessary. When moving the vehicle during the cold season, there will be no jerks, and the engine will function stably and without any interruptions. Moreover, even if hard pressing there will be no dips on the gas pedal.
The level of stability at idle speed of the engine will significantly increase, and the engine will function much more smoothly. With BSZ, you will forget what regular replacement and cleaning of distributor contacts is, and before that it was a common procedure.
Self-installation of a contactless ignition system
We will carry out the installation of the BSZ VAZ 2106 step by step, following this algorithm:
- Using a 38 wrench, unscrew the ratchet nut until the marks of the crankshaft pulleys and the front engine cover of the machine are connected;
- Remember how the distributor and slider are located, since this is where the new distributor will be located;
- Find the b + mark on the coil and remember the wiring connected to it;
- Unscrew and remove the coil;
- Using a 13 key, unscrew the distributor lock nut;
- Remove the distributor, just do not lose the gasket;
- Secure the switch and screw the black wires to ground;
- Install and secure the coil to the body;
- Connect the required wiring to the terminals;
- Install the distributor, but do not tighten the lock nut all the way;
- Connect the switch wiring to the distributor;
- Check the location of the slider and distributor;
- Put on the cover and connect the wiring in the following sequence 1-3-4-2;
- The establishment process is complete, now it remains to carry out the regulation.
Regulation of the contactless system
Please note that ignition affects not only normal engine starting, but also fuel costs, car dynamics, and overall vehicle life.
That is why it is very important to correctly adjust the ignition system. The entire regulation process is carried out in stages and there are 3 stages in total:
- Set the angle of the value of the closed state of the contacts, and it directly depends on the value of the clearance of the distributor of your car. The size of the gap is indicated in the instructions for use.
- Set the lead angle.
- Adjust and tune the ignition. Ideal option will carry out regulation taking into account the problematic moments.
We described the process of regulating a contactless system using the example of a VAZ 2106 car, but such a step-by-step adjustment is also suitable for a contact system. Just before using this regulation algorithm on cars of other brands, it is best to refer to the instructions for use of your particular car. In the instructions for use of your particular model, you will find the exact regulation value.